背景
raft算法
在Raft中,每个结点会处于follower、candidate、leader三种状态中的一种:
follower
所有结点都以follower的状态开始。如果没收到leader消息则会变成candidate状态
candidate
会向其他结点“拉选票”,如果得到大部分的票则成为leader。这个过程就叫做Leader选举(Leader Election)
leader
所有对系统的修改都会先经过leader。每个修改都会写一条日志(log entry)。leader收到修改请求后的过程如下,这个过程叫做日志复制(Log Replication):
- 复制日志到所有follower结点(replicate entry)。
- 大部分结点响应时才提交日志。
- 通知所有follower结点日志已提交。
- 所有follower也提交日志。
- 现在整个系统处于一致的状态。
leader选举
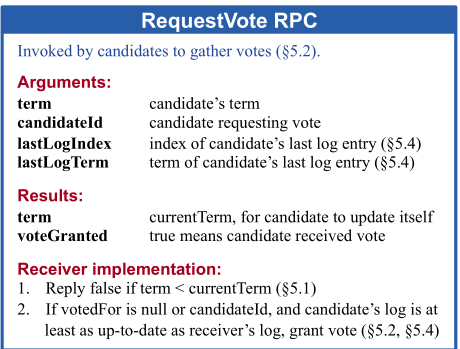
votedFor是server保存的投票对象,一个server在一个term内只能投一次票。如果此时已经投过票了,即votedFor就不为空,那么此时就可以直接拒绝当前的投票(当然还要检查votedFor是不是就是请求的candidate)。
如果没有投过票:则对比candidate的log和当前server的log哪个更新,比较方式为谁的lastLog的term越大谁越新,如果term相同,谁的lastLog的index越大谁越新。
candidate统计投票信息,如果过半同意了则认为自己当选了leader,转变成leader状态,如果没有过半,则等待是否有新的leader产生,如果有的话,则转变成follower状态,如果没有然后超时的话,则开启下一次的选举。
Raft对选举流程加了一些限制,只有最新的Server才能被选举为Leader,因此,这种机制保证了Leader拥有所有在上一个任期内达成一致的日志,Leader不需要从全局达成一致的日志中去学习那些它自身没有的日志。因此当一个Server成为Leader后,它可以立即对外服务,比如向其他Server发起一致性提案。
Raft对比不同Server中最后一条log记录的Index和Term来决定是否拥有最新的决议。如果两条log的Term不相同,则Term较大者胜出。如果两条log的Term相同,则Index较大者胜出。
扫描二维码关注公众号,回复: 1645729 查看本文章
Paxos允许任何Server被选举为Leader. 在Paxos中当一个Server成为Leader后,它需要先向其它Server学习自己所没有的已达成一致的日志,然后才能对外提供服务,paxos协议的这种灵活性带来了额外的复杂度。
log复制
client请求到达leader
leader首先将该请求转化成entry,然后添加到自己的log中,得到该entry的index信息,entry中就包含了当前leader的term信息和在log中的index信息。
leader复制上述entry到所有follower
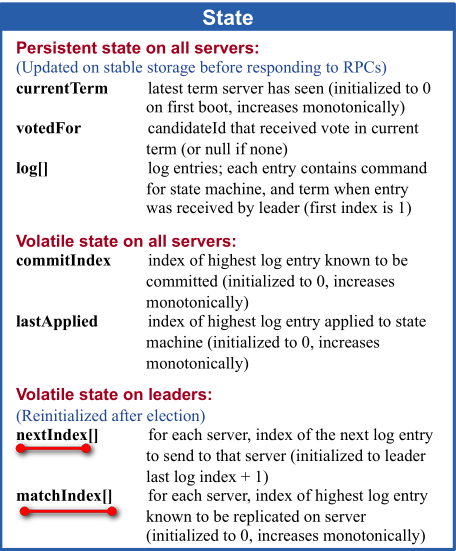
一个leader在刚开始的时候会初始化:
nextIndex=leader的log的最大index+1
matchIndex=0
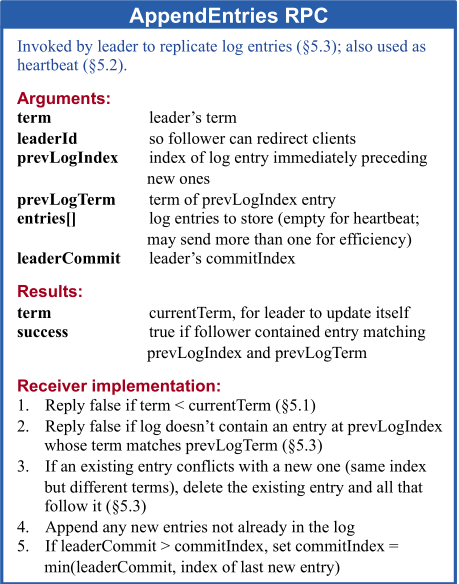
然后开始准备AppendEntries RPC请求的参数:
prevLogIndex=nextIndex-1
prevLogTerm=从log中得到上述prevLogIndex对应的term
然后开始准备entries数组信息,从leader的log的prevLogIndex+1开始到lastLog,此时是空的,
然后把leader的commitIndex作为参数传给leaderCommit:
leaderCommit=commitIndex
至此,所有参数准备完毕,发送RPC请求到所有的follower,follower再接收到这样的请求之后,处理如下:
- 重置HeartbeatTimeout
- 检查传过来的请求term和当前follower的term
- Reply false if term < currentTerm
检查prevLogIndex和prevLogTerm和当前follower的对应index的log是否一致。- Reply false if log doesn’t contain an entry at prevLogIndex whose term matches prevLogTerm
这里可能就是不一致的,因为初始prevLogIndex和prevLogTerm是leader上log的lastLog,不一致的话返回false,同时将该follower上log的lastIndex传送给leader。- leader接收到上述false之后,会记录该follower的上述lastIndex:
macthIndex=上述lastIndex
nextIndex=上述lastIndex+1
然后leader会从新按照上述规则,发送新的prevLogIndex、prevLogTerm、和entries数组- follower检查prevLogIndex和prevLogTerm和对应index的log是否一致(目前一致了),然后follower就开始将entries中的数据全部覆盖到本地对应的index上,如果没有则算是添加如果有则算是更新,也就是说和leader的保持一致。
- 最后follower将最后复制的index发给leader,同时返回ok,leader会像上述一样来更新follower的macthIndex。
leader统计过半复制的entries
leader一旦发现有些entries已经被过半的follower复制了,则就将该entry提交,将commitIndex提升至该entry的index。(这里是按照entry的index先后顺序提交的),具体的实现可以通过follower发送过来macthIndex来判定是否过半了。
一旦可以提交了,leader就将该entry应用到状态机中,然后给客户端回复OK
然后在下一次heartBeat心跳中,将commitIndex就传给了所有的follower,对应的follower就可以将commitIndex以及之前的entry应用到各自的状态机中了。
安全性
选举约束
被选举出来的leader必须要包含所有已经比提交的entries,只要当前server的log比半数server的log都新就可以被选举为leader,这里的新就是上述说的:
谁的lastLog的term越大谁越新,如果term相同,谁的lastLog的index越大谁越新
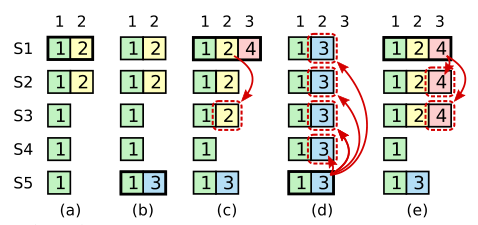
当前term的leader不能“直接”提交之前term的entries
当前term的leader不能“直接”提交之前term的entries,必须要等到当前term有entry过半了,才顺便一起将之前term的entries进行提交。
系统初始化
通过宏定义MONGO_INITIALIZER_WITH_PREREQUISITES注册系统初始化函数
MONGO_INITIALIZER_WITH_PREREQUISITES(CreateReplicationManager,
                                     ("SetGlobalEnvironment", "SSLManager"))
(InitializerContext* context) {
    ... ...
}
#define MONGO_INITIALIZER_WITH_PREREQUISITES(NAME, PREREQUISITES) \
MONGO_INITIALIZER_GENERAL(NAME, PREREQUISITES, MONGO_NO_DEPENDENTS)
#define _MONGO_INITIALIZER_FUNCTION_NAME(NAME) _mongoInitializerFunction_##NAME
#define MONGO_INITIALIZER_GENERAL(NAME, PREREQUISITES, DEPENDENTS) \
::mongo::Status _MONGO_INITIALIZER_FUNCTION_NAME(NAME)(::mongo::InitializerContext*); \
namespace { \
::mongo::GlobalInitializerRegisterer _mongoInitializerRegisterer_##NAME( \
#NAME, \
_MONGO_INITIALIZER_FUNCTION_NAME(NAME), \
MONGO_MAKE_STRING_VECTOR PREREQUISITES, \
MONGO_MAKE_STRING_VECTOR DEPENDENTS); \
} \
::mongo::Status _MONGO_INITIALIZER_FUNCTION_NAME(NAME)GlobalInitializerRegisterer::GlobalInitializerRegisterer(
const std::string& name, const InitializerFunction& fn,
const std::vector<std::string>& prerequisites,
const std::vector<std::string>& dependents) {
Status status = getGlobalInitializer().getInitializerDependencyGraph().addInitializer(
name, fn, prerequisites, dependents);
if (Status::OK() != status) {
::abort();
}
}调用注册的初始化函数
static int mongoDbMain(int argc, char* argv[], char** envp) {
     ... ...
     Status status = mongo::runGlobalInitializers(argc, argv, envp);
     ... ...
}
Status runGlobalInitializers(const InitializerContext::ArgumentVector& args,
const InitializerContext::EnvironmentMap& env) {
return getGlobalInitializer().execute(args, env);
}
Status runGlobalInitializers(int argc, const char* const* argv, const char* const* envp) {
... ...
return runGlobalInitializers(args, env);
}Status Initializer::execute(const InitializerContext::ArgumentVector& args,
const InitializerContext::EnvironmentMap& env) const {
std::vector<std::string> sortedNodes;
Status status = _graph.topSort(&sortedNodes); //InitializerDependencyGraph _graph;
InitializerContext context(args, env);
for (size_t i = 0; i < sortedNodes.size(); ++i) {
InitializerFunction fn = _graph.getInitializerFunction(sortedNodes[i]);
... ...
status = fn(&context);
... ...
}
... ...
}Sharding
cammands
db.runCommand({ addshard:”replset_xxx/HostAndPort”, name:”shard_xxx”, maxsize: 20480})
执行addshard命令时,会调动ForwardingCatalogManager::addShard(),最终调用会调用makeCatalogManager()函数创建的CatalogManagerReplicaSet对象继承的CatalogManagerCommon::addShard()方法,addShard()方法将分片相关信息插入到configserver。
const std::string ShardType::ConfigNS = "config.shards";
Status result = insertConfigDocument(txn, ShardType::ConfigNS, shardType.toBSON());
primaryShard的设置
1) 对于addshard前已经存在的database,addshard添加HostAndPort到一个shard后,会将该节点上所有已有的database对应的primaryShard都设置为该shard。如果有已经启用了sharding的database存在,则addshard命令会失败。
2) 对于addshard后新创建的database,则需要先调用如下命令为该database启动sharding。db.runCommand({"enablesharding":"database"})enablesharding命令会调用selectShardForNewDatabase()函数为该database选择一个当前totalSize最小的shard作为primaryShard,然后将相关信息写入到configserver的config.databases中。
const std::string DatabaseType::ConfigNS = "config.databases";
db.runCommand({“shardcollection”:”database.collection”, “key”: {“xxx” : “hashed”}})
shardcollection会为启动分片的collection按key范围进行切分,然后通过ChunkManager::createFirstChunks()函数将切分后的相关分片信息插入到configserver的config.chunk中。
const std::string ChunkType::ConfigNS = "config.chunks";... ... long long intervalSize = (std::numeric_limits<long long>::max() / numChunks) * 2; long long current = 0; if (numChunks % 2 == 0) { allSplits.push_back(BSON(proposedKey.firstElementFieldName() << current)); current += intervalSize; } else { current += intervalSize / 2; } for (int i = 0; i < (numChunks - 1) / 2; i++) { allSplits.push_back(BSON(proposedKey.firstElementFieldName() << current)); allSplits.push_back(BSON(proposedKey.firstElementFieldName() << -current)); current += intervalSize; } sort(allSplits.begin(), allSplits.end)Status CatalogManagerReplicaSet::shardCollection(... ...){ ... ... Status createFirstChunksStatus = manager->createFirstChunks(txn, dbPrimaryShardId, &initPoints, &initShardIds); ... ... }Status ChunkManager::createFirstChunks(... ...){ ... ... for (unsigned i = 0; i <= splitPoints.size(); i++) { BSONObj min = i == 0 ? _keyPattern.getKeyPattern().globalMin() : splitPoints[i - 1]; BSONObj max = i < splitPoints.size() ? splitPoints[i] : _keyPattern.getKeyPattern().globalMax(); ChunkType chunk; ... ... Status status = grid.catalogManager(txn) ->insertConfigDocument(txn, ChunkType::ConfigNS, chunk.toBSON()); } ... ... }
sh.enableBalancing(coll)
mongos> use config
mongos> db.collections.find()
mongos> sh.setBalancerState(true)
mongos> db.settings.find()
{ "_id" : "chunksize", "value" : NumberLong(2) }
{ "_id" : "balancer", "stopped" : false }
configserver中setting初始化是在runMongosServer() -> balancer.go() -> Balancer::run()中的如下处理:
auto balSettingsResult = grid.catalogManager(txn.get())->getGlobalSettings(
                txn.get(), SettingsType::BalancerDocKey);
db.runCommand({“listDatabases” : 1})
mongos> use admin
mongos> db.runCommand({"listDatabases" : 1})
{
        "databases" : [
                {
                        "name" : "test",
                        "sizeOnDisk" : 69632,
                        "empty" : false,
                        "shards" : {
                                "shard_27010" : 45056,
                                "shard_27011" : 12288,
                                "shard_27012" : 12288
                        }
                },
                {
                        "name" : "config",
                        "sizeOnDisk" : 868352,
                        "empty" : false
                }
        ],
        "totalSize" : 69632,
        "totalSizeMb" : 0,
        "ok" : 1
}

//mongs上执行listDatabases命令时会给所有shard对应副本集的primary节点发送listDatabases命令。
Othres
mongos> use config
mongos> db.getCollectionNames()
[
        "actionlog",
        "changelog",
        "chunks",
        "collections",
        "databases",
        "lockpings",
        "locks",
        "mongos",
        "settings",
        "shards",
        "tags",
        "version"
]

mongos> use admin
mongos> db.runCommand( { moveChunk : "test.111" , find : {"idx" : NumberLong("-3074457345618258601")}, to: "shard_27012"} )
{ "millis" : 199, "ok" : 1 }
mongos> db.runCommand( { moveChunk : "test.111" , "bounds" : [ { "idx" : NumberLong("-6148914691236517204") } ,
{ "idx" : NumberLong("-3074457345618258602") } ], to: "shard_27012"} )
mongos> db.getLogComponents()
mongos> db.setLogLevel(1)
mongos> db.setLogLevel(5, "command")chunk split
触发时机
1、mongos写入数据时,当达到一定条件时(参考ChunkManager::getCurrentDesiredChunkSize()函数),会触发 chunk 的自动分裂。
ClusterWriter::write() -> splitIfNeeded() -> Chunk::splitIfShould() -> Chunk::split() ->
Chunk::determineSplitPoints() -> ChunkManager::getCurrentDesiredChunkSize()
2、sh.splitFind()、sh.splitAt()手动发送split命令给mongos,mongos调用SplitCollectionCmd::run()实现chunk split。
chunk split处理流程
1、mongos给chunk对应shard的primary节点发送splitVector命令,获取splitPoints。
2、mongos获取splitPoints后,在multiSplit()函数中给对应shard的primary节点发送splitChunk命令。
rebalance
副本集
heartbeat机制
- mongod进程启动时,会调用_initAndListen函数初始化服务,_initAndListen函数中调用startReplication函数初始化副本集,startReplication函数中又会调用_startLoadLocalConfig函数加载本地配置信息(local.system.replset中保存了本地的配置信息),同时,_startLoadLocalConfig函数会将ReplicationCoordinatorImpl::_finishLoadLocalConfig的回调函数设置item,然后会将item加入到ReplicationExecutor::_readyQueue队列中。
- startReplication函数中会调用ReplicationExecutor对象的startup函数,startup函数会启动一个线程执行ReplicationExecutor::run函数,run函数中会从_readyQueue队列中获取item,执行item中的callback函数。
- ReplicationExecutor::run()函数中获取队列item时,执行item中的_finishLoadLocalConfig回调函数,_finishLoadLocalConfig 中又会调用_setCurrentRSConfig_inlock函数,_setCurrentRSConfig_inlock中调用_startHeartbeats_inlock函数启动心跳流程。
- _startHeartbeats_inlock函数会调用_scheduleHeartbeatToTarget函数,_scheduleHeartbeatToTarget函数会将要执行的时间点和ReplicationCoordinatorImpl::_doMemberHeartbeat回调函数保存在item中,然后将item加入ReplicationExecutor::_sleepersQueue队列中。
- ReplicationExecutor::run函数中会调用getWork函数获取_readyQueue队列中的item,然后执行item中的回调函数,其中,getWork函数会将_sleepersQueue队列中满足执行条件的item加入_readyQueue队列中。
- ReplicationCoordinatorImpl::_doMemberHeartbeat函数在满足执行条件后,会在ReplicationExecutor::run函数中被取出相应的item执行,_doMemberHeartbeat函数执行时会将心跳请求通过ReplicationExecutor::scheduleRemoteCommand发送到target副本,在收到响应后,会调用ReplicationExecutor::_finishRemoteCommand函数,而_finishRemoteCommand函数又会将ReplicationCoordinatorImpl::_handleHeartbeatResponse回调函数保存到item,然后加入ReplicationExecutor::_readyQueue队列中。最终,_handleHeartbeatResponse函数会在ReplicationExecutor::run函数中执行。
1) mongod的本地配置保存在local.system.replset的collection中。
2) 默认配置下,复制集的节点每隔2s会向其他成员发送一次心跳请求,心跳消息主要包含replSetName、本机的节点地址、复制集版本等。
3) 复制集成员收到心跳请求后,就开始处理请求,并将处理的结果回复给请求的节点。如果自身不是复制集模式、或复制集名称不匹配,则返回错误应答。
如果源节点的复制集配置(rs.conf()的内容)版本比自己低,则将自身的配置加入到心跳应答消息里。
将节点自身的oplog及其他状态信息等加入到心跳应答消息,如lastOpApplied、lastOpDurable等。
如果自身是未初始化状态,则立即向源节点发送心跳请求,以更新复制集配置。4) 节点收到心跳应答后,会调用_handleHeartbeatResponse函数,根据应答消息来更新对端节点的状态,并根据最终的状态确定是否需要进行重新选举。
收到心跳应答时,如果是错误应答,则:
- 如果当前重试次数 <= kMaxHeartbeatRetries(默认为2),并且上一次发送心跳在kDefaultHeartbeatTimeoutPeriod(默认为10)时间内,则立即发送下一次心跳。
- 当失败次数超过kMaxHeartbeatRetries,或者上一次心跳时间到现在超过kDefaultHeartbeatTimeoutPeriod,则认为节点down。
心跳消息超时未应答相当于收到了错误应答
void _validateAndRun(AsyncOp* op, std::error_code ec, Handler&& handler) {
   if (op->canceled())
      return _completeOperation(op,
            Status(ErrorCodes::CallbackCanceled, "Callback canceled"));
   if (op->timedOut())
      return _completeOperation(op,
           Status(ErrorCodes::ExceededTimeLimit, "Operation timed out"));
   if (ec) return _networkErrorCallback(op, ec);

   handler();
}
5) 如果对端的复制集版本比自己高,则通过makeReconfigAction创建action,然后更新自己的配置并持久化到local数据库中,同时,根据应答消息更新对端的状态信息。
6) v1版本的心跳协议中,先扫描副本集成员,找到最新的primary副本,如果发现自身的term跟primary副本的term相等,且自身的优先级高于primary副本的优先级,则通过makePriorityTakeoverAction调用_startElectSelfIfEligibleV1函数启动选举,选举过程送发送replSetRequestVotes进行投票。
- 在该优先级高的节点通过_startElectSelfIfEligibleV1选举成功时,在第二阶段发送提交消息时(dryRun为false),由于增加的term值,因此,无论是其他primary节点还是secondary节点,都会在processReplSetRequestVotes函数中调用updateTerm函数更新自己的term值。如果是master节点,还会触发stepdown操作。
- 在_handleHeartbeatResponse函数中处理心跳响应时,如果响应消息正常,则会调用_updateTerm_incallback尝试更新term值,如果本身是primarfy节点,则会触发stepdown操作。
leader选举
选举触发条件
初始化一个副本集
rs.initiate(调用的replSetInitiate)命令实现初始化副本集的功能,命令会调用CmdReplSetInitiate::run()函数,CmdReplSetInitiate函数初始化副本集时,会将配置文件写入本地local.oplog.rs集合中,然后调用_finishReplSetInitiate函数,在_setCurrentRSConfig_inlock函数中调用_startHeartbeats_inlock初始化心跳流程,刚开始每个节点都不是leader,_setCurrentRSConfig_inlock函数中设置的定时选举函数不会被不断重设(_handleHeartbeatResponse函数中检测primary节点有心跳响应才会不断重设),因此,等待一段时间后(本地electionTimeoutMillis配置默认值10s+随机值),就会开始启动选举流程,选举出一个leader并通知副本集其他节点。
主节点挂掉或断开连接
在心跳响应处理函数_handleHeartbeatResponse中,如果是leader节点,并且响应是正常的,那么slave节点会调用cancelAndRescheduleElectionTimeout函数重设定时选举回调函数_startElectSelfIfEligibleV1,因此,主节点挂掉或主节点断开连接,定时选举函数不会被不断重设,等待一段时间后(本地electionTimeoutMillis配置默认值10s+随机值),就会开始启动选举流程,选举出一个leader并通知副本集其他节点,slave节点挂掉或断开连接,则不会触发选举。
存在优先级更高的节点
_handleHeartbeatResponse函数中处理收到心跳响应,在processHeartbeatResponse函数中会调用_updatePrimaryFromHBDataV1函数update leader,如果发现本节点与最新的leader中term值相等,同时,优先级更高,则会做PriorityTakeover操作,从而启动选举流程。
if (_hbdata[primaryIndex].getTerm() == _term && updatedConfigIndex == primaryIndex &&
rsConfig.getMemberAt(primaryIndex).getPriority() < rsConfig.getMemberAt(_selfIndex).getPriority()) {
      LOG(4) << "I can take over the primary due to higher priority."
              << " Current primary index: " << primaryIndex << " in term "
              << _hbdata[primaryIndex].getTerm();

       return HeartbeatResponseAction::makePriorityTakeoverAction();
   }
选举流程
leader选举流程图
secondary选举流程图
mongodb选举基于raft协议实现(redis cluster的leader选举也是基于raft实现),选举过程中的判断条件如下代码所示:
   if (args.getTerm() < _term) {
        response->setVoteGranted(false);
        response->setReason("candidate's term is lower than mine");
    } else if (args.getConfigVersion() != _rsConfig.getConfigVersion()) {
        response->setVoteGranted(false);
        response->setReason("candidate's config version differs from mine");
    } else if (args.getSetName() != _rsConfig.getReplSetName()) {
        response->setVoteGranted(false);
        response->setReason("candidate's set name differs from mine");
    } else if (args.getLastCommittedOp() < lastAppliedOpTime) {
        response->setVoteGranted(false);
        response->setReason("candidate's data is staler than mine");
    } else if (!args.isADryRun() && _lastVote.getTerm() == args.getTerm()) {
        response->setVoteGranted(false);
        response->setReason("already voted for another candidate this term");
    } else {
        if (!args.isADryRun()) {
            _lastVote.setTerm(args.getTerm());
            _lastVote.setCandidateIndex(args.getCandidateIndex());
        }
        response->setVoteGranted(true);
    }
如上所示,leader选举过程中,会基于term、configversion、replsetname、lastAppliedOpTime等条件判断,主要是选择term最大、term相同下lastAppliedOpTime的节点作为leader。
数据同步
同步场景
- 副本集初始化
初始化选出Primary后,此时Secondary上无有效数据,oplog是空的,会先进行initial sync,然后不断的应用新的oplog。
新成员加入
因新成员上无有效数据,oplog是空的,会先进行initial sync,然后不断的应用新的oplog。
有数据的节点加入
有数据的节点加入有如下情况:
- 该节点与副本集其他节点断开连接,一段时间后恢复。
- 该节点从副本集移除(处于REMOVED)状态,通过replSetReconfig命令将其重新加入。
该场景下,如果该节点最新的oplog时间戳,比所有节点最旧的oplog时间戳还要小,该节点将找不到同步源,会一直处于RECOVERING而不能服务;反之,如果能找到同步源,则直接进入replication阶段,不断的应用新的oplog。
设置合理的oplog大小非常重要,如果因为oplog太旧而处于RECOVERING的节点目前无法自动恢复,需人工介入处理,最简单的方式是发送resync命令,让该节点重新进行initial sync。
initial sync
Secondary节点启动后,判断如果满足如下条件,即会进行initial sync。
1) Secondary上oplog为空,比如新加入的空节点
2) 本地local.replset.minvalid集合里doingInitialSync标记被设置为true。
当initial sync开始时,同步线程会调用setInitialSyncFlag函数设置该标记为true,当initial sync结束时会调用clearInitialSyncFlag函数清除该标记,如果initial sync过程中出现失败的情况,那么节点重启后发现该标记被设置为true,就会重新进行initial sync操作。
3) BackgroundSync::_initialSyncRequestedFlag被设置。
当向节点发送resync命令时,该标记会被设置,此时会强制进行initial sync操作。
initial sync时序图
如上图所示,intial sync主要包括如下流程:
1. 调用setInitialSyncFlag函数,设置minValid集合中doingInitialSync标记。
2. 获取同步源当前最新的oplog时间戳lastOptime 0。
3. 调用_initialSyncClone函数从同步源Clone所有的集合数据。
4. 获取同步源最新的oplog时间戳lastOptime 1。
5. 调用_initialSyncApplyOplog函数同步lastOptime 0 ~ lastOptime 1的所有的oplog。
6. 获取同步源最新的oplog时间戳lastOptime 2。
7. 调用_initialSyncApplyOplog函数同步lastOptime 1 ~ lastOptime 2所有的oplog。
8. 调用_initialSyncClone函数从同步源读取index信息,并建立索引。
9. 获取同步源最新的oplog时间戳lastOptime 3。
10. 调用_initialSyncApplyOplog函数同步lastOptime 2~ lastOptime 3所有的oplog。
11. 调用BackgroundSync::get()->setInitialSyncRequestedFlag函数清除_initialSyncRequestedFlag标记,调用clearInitialSyncFlag函数清除doingInitialSync标记。
sync oplog
当Secondary节点initial sync操作完成后,就进入sync oplog的状态,Secondary节点存在后台线程持续不断的从复制源同拉取新oplog,并在Secondary节点进行重放。

producer thread
这个线程不断的从同步源上拉取oplog,并加入到一个BlockQueue的队列里保存着。
OpQueueBatcher thread
这个线程在OpQueueBatcher对象初始化的时候启动,负责逐个从producer thread的BlockQueue队列里取出oplog,并放到自己维护的队列里。
writerPool
writerPool线程池中默认启动16个线程,sync线程将OpQueueBatcher thread的队列中的oplog分发到writerPool线程池中默认的16个writerThread线程进行处理,由writerthread来最终重放每条oplog。
writeOpsToOplog
默认会将sync的oplog写入到本地的local.oplog.rs集合中。
该过程中可能出现的两种问题:
1) 复制源数据写入速度过快(或者相对的,本地数据写入速度过慢),复制源的oplog覆盖了本地用于同步源oplog而维持在源的游标。
这个问题一般可以通过检查拉取回来的oplog的optime是否对应来判断,出现这种问题,节点本身会通过更换同步源的方式来尝试解决,如果更换同步源的方式也无法解决,则通过resync命令启动initial sync来解决。
2) 本节点在宕机之前是Primary,在重启后本地oplog有和当前Primary不一致的Oplog。
这个问题一般可以通过检查oplog的hash值是否相等来判断,如果不相同,则说明oplog出现冲突了,对应位置上的oplog不一致。
Write Concern
内部实现
实现流程
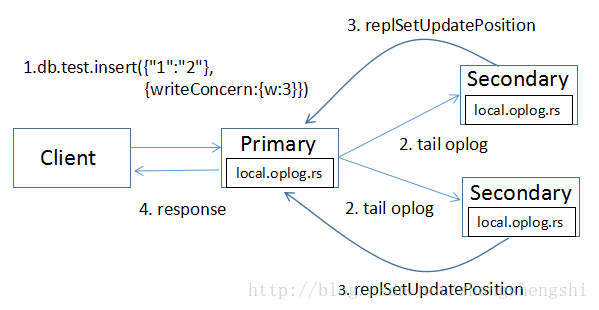
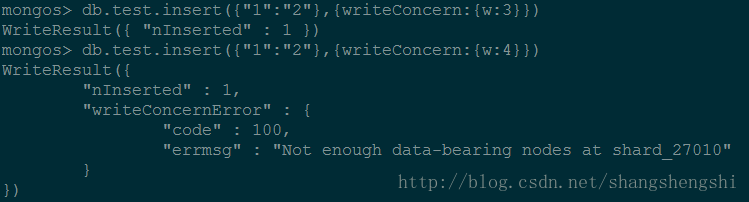
- Client向Primary发起请求,指定writeConcern为{w: 3},Primary收到请求,本地写入并记录写请求到oplog,然后等待另外2个Secondary节点都同步了这条oplog(Secondary应用完oplog会通过replSetUpdatePosition命令向Primary报告最新进度)。
Secondary拉取到Primary上新写入的oplog,本地重放并记录oplog。find命令支持一个awaitData的选项,当find没有任何符合条件的文档时,并不立即返回,而是等待最多maxTimeMS(默认为2s)时间看是否有新的符合条件的数据,如果有就返回;所以当新写入oplog时,Secondary能在第一时间内拉取到主上的oplog。
BSONObjBuilder cmdBob;
cmdBob.append("find", nsToCollectionSubstring(rsOplogName));
cmdBob.append("filter", BSON("ts" << BSON("$gte" << lastOpTimeFetched.getTimestamp())));
cmdBob.append("tailable", true);
cmdBob.append("oplogReplay", true);
cmdBob.append("awaitData", true);
cmdBob.append("maxTimeMS", durationCount<Milliseconds>(Minutes(1)));  // 1 min initial find.
... ...
Secondary上有单独的SyncSourceFeedback线程,当oplog的最新时间戳发生更新时,就会向Primary发送replSetUpdatePosition命令更新自己的oplog时间戳。当Primary发现满足writeConcern条件的的Secondary已经同步了该条oplog,就会向客户端发送response。
应答机制
mongodb应答机制主要分为2种:
应答式写入(缺省情形,安全写入,适用于数据强一致性场景)
非应答式写入(非安全写入,适用于数据弱一致性场景)
应答机制实现方式:
通过Write Concern来实现,客户端驱动调用db.getLastError()方法,错误返回给客户端。
如果捕获到错误,则可以通过客户端定义的逻辑尝试再次写入或记录到特定日志等。
Write Concern用法
writeConcern:{ { w: value, j: boolean, wtimeout: number } }
w : 该选项要求确认操作已经传播到指定数量的mongod实例或指定标签的mongod实例,w可选的值如下:
number
w:1(应答式写入):要求确认操作已经传播到指定的单个mongod实例或副本集主实例(缺省为1)
w:0(非应答式写入):不返回任何响应,所以无法知道写入是否成功,但是对于尝试向已关闭的套接字写入或者网络故障会返回异常信息。
w:>1(用于副本集环境):该值用于设定写入节点的数目,包括主节点。“majority”(大多数)
适用于集群架构,要求写入操作已经传递到绝大多数投票节点以及主节点后进行应答。
tag set
要求写入操作已经传递到指定tag标记副本集中的成员后进行应答。
j : 该选项要求确认写操作已经写入journal日志之后应答客户端(需要开启journal功能)
在意外重启,宕机等情形下可以通过journal来进行数据恢复。
写入journal操作必须等待直到下次提交日志时完成写入。
为降低延迟,MongoDB可以通过增加commit journal的频率来加快journal写入。wtimeout:该选项指定一个时间限制,以防止写操作无限制被阻塞导致无法应答给客户端。
wtimeout的单位为ms,当w值大于1时生效,该参数即仅适用于集群环境。
当某个节点写入时超出指定wtimeout之后,mongod将返回一个错误。
在捕获到超时之前,mongod并不会撤销其他节点已成功完成的写入。
wtimeout值为0时等同于没有配置wtimeout选项,容易导致由于某个节点挂起而无法应答。
Write Concern使用实例
其他
mongo-cxx-driver编译
cd build &&
cmake -DCMAKE_BUILD_TYPE=Release -DCMAKE_INSTALL_PREFIX=.. -DCMAKE_CXX_FLAGS=”-static-libgcc -static-libstdc++” -DPKG_CONFIG_PATH=/usr/local/lib/pkgconfig -DLIBBSON_DIR=/root/data1/projs/deps/mongo-c-driver/mongodb_c_bin/ -DLIBMONGOC_DIR=/root/data1/projs/deps/mongo-c-driver/mongodb_c_bin/ ..
参考文档
Raft 实现日志复制同步
Raft 一致性算法论文译文
mongodb副本集
MongoDB Wiredtiger存储引擎实现原理
MongoDB WiredTiger 存储引擎(1) cache_pool设计
MongoDB集群均衡
MongoDB sharding迁移那些事
MongoDB 3.2.9 请求 hang 分析及 wiredtiger 调优
MongoDB sharding chunk 分裂与迁移详解