vue实现多窗口主题样式切换以及跟随系统切换
自我记录
一.知识点链接:https://developer.mozilla.org/zh-CN/docs/Web/CSS/@media/prefers-color-scheme
一.知识点链接:https://www.runoob.com/jsref/met-win-matchmedia.html
二.监听 storage 变动 (跨页签通信)
三.watchEffect 侦听器
一.js+css 去匹配系统主题颜色
// 使用matchMedia API 去匹配css的媒体查询的 系统的主题是否为案(dark)颜色 (也可以去匹配屏幕的宽度高度等)
const match = matchMedia('(prefers-color-scheme:dark)')
console.log(match,'match');

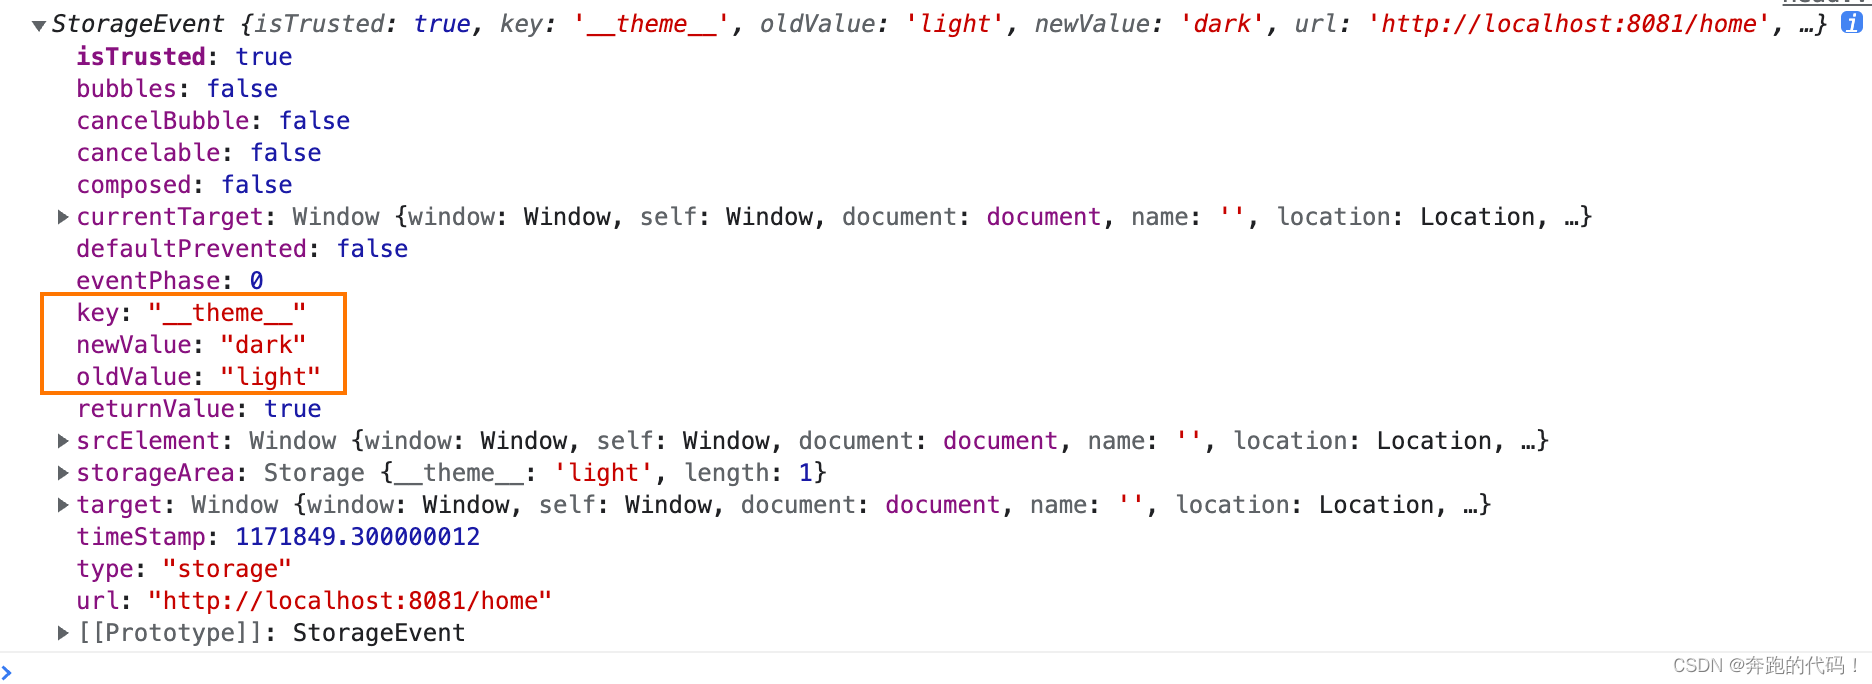
二. 跨标签通信
window.addEventListener('storage', (event) => {


      console.log(event.newValue)
    })
A页面存储发生变化时B页面可以监听到
三.监听本地存储的变化并赋值
watchEffect(() => {


 localStorage.setItem(LOCAL_KEY, theme.value)
 document.documentElement.className = theme.value
})
四.全部代码
<template>
  <a-layout-header class="head-box" :style="{ position: 'fixed', zIndex: 1, width: '100%' }">
    <a-row :gutter="{ xs: 24, sm: 24, md: 24, lg: 24 }">
      <a-col :xs="7" :sm="7" :md="7" :lg="7">奔跑的代码!</a-col>
      <a-col :xs="6" :sm="6" :md="6" :lg="6">奔跑的代码!</a-col>
      <a-col :xs="6" :sm="6" :md="6" :lg="6">奔跑的代码!</a-col>
      <a-col :xs="5" :sm="5" :md="5" :lg="5">
        <!-- 开关切换主题 -->
        <a-switch v-model:checked="checked" checked-children="经典" un-checked-children="深夜" @change="onChange" />
      </a-col>
    </a-row>
  </a-layout-header>
</template>
<script setup>
import {

     ref, watchEffect } from 'vue'

const checked = ref(false)
// 切换主题样式
// 'light' | 'dark'
const LOCAL_KEY = '__theme__'
const theme = ref(localStorage.getItem(LOCAL_KEY) || 'light')
// 使用matchMedia API 去匹配css的媒体查询的 系统的主题是否为案(dark)颜色 (也可以去匹配屏幕的宽度高度等)
const match = matchMedia('(prefers-color-scheme:dark)')
console.log(match,'match');
// 跟随系统
const followOs = () => {


  // 如果当前系统时暗色
  if (match.matches) {


  	// 本地存储重新赋值
    localStorage.setItem(LOCAL_KEY, 'dark')
    // html 的class 重新赋值
    document.documentElement.className = 'dark'
    // 优化了 页面滑块按钮的赋值
    checked.value = true
  } else {


    localStorage.setItem(LOCAL_KEY, 'light')
    document.documentElement.className = 'light'
    checked.value = false
  }
}
// matchMedia 的API 当 matchMedia('(prefers-color-scheme:dark)') 查询结果有变化时
// 监听主题的变化
match.addEventListener('change', followOs)

watchEffect(() => {


  // 仅需要多个标签页联动 用这俩
  // localStorage.setItem(LOCAL_KEY, theme.value)
  // document.documentElement.className = theme.value
  // 使用跟随系统功能 用这个函数
  followOs()
})
// 这个是antd滑块的事件
const onChange = (value) => {


  const temp = value ? 'dark' : 'light'
  if (value) {


    theme.value = temp
    localStorage.setItem(LOCAL_KEY, temp)
    document.documentElement.className = temp
  } else {


    theme.value = temp
    localStorage.setItem(LOCAL_KEY, temp)
    document.documentElement.className = temp
  }


};
// 监听本地存储的变化 为了实现多个标签页联动
addEventListener('storage', event => {


  console.log(event, 'ev');
  document.documentElement.className = event.newValue
  checked.value = event.newValue === 'light' ? false : true
})

</script>
<style lang="less" scoped>
.head-box {


  width: 100%;
  height: 64px;
  background: @bgc-head-color;
  padding: 0 20px;
}
</style>
element Plus主题切换
最终展示效果
实现功能所用的代码API都在上面 大家也可以根据自己的喜好实现 想要的功能
起初只实现了一个主题切换功能 昨天有个朋友突然跟我说她的神仙产品经理要一个跟element Plus一样的多个标签页联动主题切换功能
接下来就有了上面的代码 如果帮到你了 请点赞收藏多多支持!扫描二维码关注公众号,回复: 16524482 查看本文章
下面是我记录一下 简单配置vite+vue3+antd的主题切换
vite.config.js
import {
defineConfig} from 'vite'
import vue from '@vitejs/plugin-vue' //是vite 对vue 对支持插件
import Components from 'unplugin-vue-components/vite'
import path from 'path'
import themePreprocessorPlugin from "@zougt/vite-plugin-theme-preprocessor";
import VueSetupExtend from 'vite-plugin-vue-setup-extend'
import {
AntDesignVueResolver } from 'unplugin-vue-components/resolvers'
// https://vitejs.dev/config/
export default defineConfig(({
mode }) => {
return {
plugins: [
vue(),
VueSetupExtend(),
Components({
resolvers: [
AntDesignVueResolver({
importStyle: 'less', // 一定要开启这个配置项
}),
],
}),
themePreprocessorPlugin({
less: {
// 各个主题文件的位置
multipleScopeVars: [
{
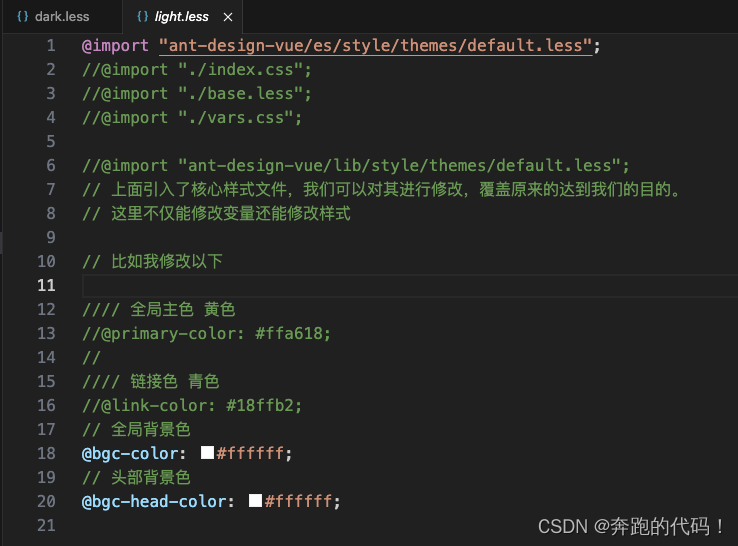
scopeName: "light",
path: path.resolve("src/assets/style/light.less"),
},
{
scopeName: "dark",
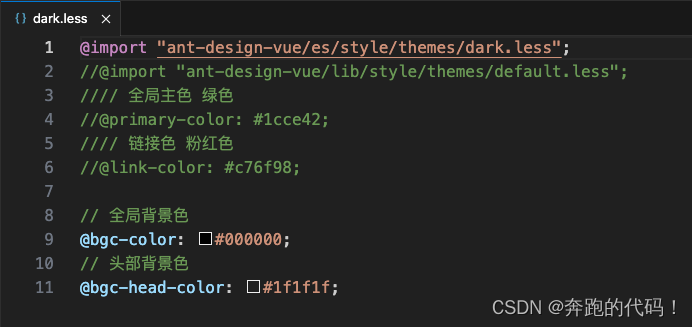
path: path.resolve("src/assets/style/dark.less"),
},
],
},
}),
],
base: "./",//公共基础路径 打包路径
resolve: {
alias: {
'@': path.resolve(__dirname, './src')//别名设置
},
extensions: ['.js', '.ts', '.jsx', '.tsx', '.json', '.vue']
},
server: {
// host: 'localhost',
port: 8081,//启动端口
// https: true, // 开启https
open: true, // 自动开启窗口
proxy: {
// 代理配置
'/api': {
target: 'xxx',//后端服务地址
changeOrigin: true,
rewrite: (path) => path.replace(/^\/api/, '') // 重写路径
}
},
},
css: {
preprocessorOptions: {
less: {
// modifyVars:
// {
// 'primary-color': '#1DA57A',
// 'link-color': '#1DA57A',
// 'border-radius-base': '2px',
// },
additionalData: `@import './src/assets/style/index.less';`,
javascriptEnabled: true,
},
stylus: {
/*vite 根据官档 @import 引入stylus不生效 需要通过绝对路径导入 */
// imports: [path.resolve(__dirname, 'src/stylus/...styl')] //配置全局变量
}
},
},
}
})
总结不易,希望对各位有所帮助.希望可以共同学习与进步.