参考链接
特点
Canvas 是通过 JavaScript 来绘制 2D 图形,是 HTML 5 中新增的元素。
绘制的是位图,图像放大后会失真。能够以 .png 或 .jpg 格式保存图像,比较适合游戏应用。不支持事件处理器
<canvas>
图形的容器(矩形),必须使用js定义图表或其他图像。
必须设置height和width属性,不能用style设置宽高,无效操作。返回的还是默认高宽 150* 300。
<canvas id="cvs" height="150" width="300"></canvas>getContext()
getContext() 返回一个对象,提供绘图方法和属性。
getContext("2d") 取得2d上下文对象。
var cvs = document.getElementById('cvs');
var ctx = cvs.getContext('2d');
样式
描边 strokeStyle、填充 fillStyle
同时具有的属性为纯色color、渐变、重复
纯色

ctx.fillStyle="#FF0000";
ctx.fillRect(20,20,150,100); //x的坐标,y的坐标,矩形宽度,矩形高度
渐变
线性渐变 createLinearGradient

var grd=ctx.createLinearGradient(170,0,0,0);
grd.addColorStop(0,"black");
grd.addColorStop(1,"white");
ctx.fillStyle=grd;
ctx.fillRect(20,20,150,100);
径向渐变 createRadialGradient

var grd=ctx.createRadialGradient(100,50,5,90,60,100);
grd.addColorStop(0,"red");
grd.addColorStop(1,"white");
ctx.fillStyle=grd;
ctx.fillRect(20,20,150,100);
重复 createPattern()
指定的方向内重复指定的元素。

var img=document.getElementById("img")
var pat=ctx.createPattern(img,"repeat"); // repeat、repeat-x、repeat-y、no-repeat
ctx.rect(0,0,220,128);
ctx.fillStyle=pat;
ctx.fill();
矩形
创建 rect

ctx.rect(20,20,150,100);
ctx.stroke(); 
ctx.rect(20,20,50,50);
ctx.fill();
描边 strokeRect
ctx.strokeStyle="#FF0000";
ctx.strokeRect(20,20,150,100);
填充 fillRect
默认是黑色
ctx.fillStyle="#FF0000";
ctx.fillRect(20,20,150,100); //x的坐标,y的坐标,矩形宽度,矩形高度
清空 clearRect
给定的矩形内清除指定的像素。

ctx.fillStyle="red";
ctx.fillRect(0,0,300,150);
ctx.clearRect(20,20,100,50);
线条
线条结束点

ctx.beginPath();
ctx.lineWidth=10;
ctx.lineCap="butt";
ctx.moveTo(20,20);
ctx.lineTo(200,20);
ctx.stroke();

ctx.beginPath();
ctx.lineCap="round";
ctx.moveTo(20,40);
ctx.lineTo(200,40);
ctx.stroke();

ctx.beginPath();
ctx.lineCap="square";
ctx.moveTo(20,60);
ctx.lineTo(200,60);
ctx.stroke();
相交拐点

ctx.beginPath();
ctx.lineWidth=10;
ctx.lineJoin="round";
ctx.moveTo(20,20);
ctx.lineTo(100,50);
ctx.lineTo(20,100);
ctx.stroke();

ctx.beginPath();
ctx.lineWidth=10;
ctx.lineJoin="bevel";
ctx.moveTo(80,20);
ctx.lineTo(160,50);
ctx.lineTo(80,100);
ctx.stroke();

ctx.beginPath();
ctx.lineWidth=10;
ctx.lineJoin="miter";
ctx.moveTo(140,20);
ctx.lineTo(200,50);
ctx.lineTo(140,100);
ctx.stroke();
斜接角度


ctx.lineWidth=10;
ctx.lineJoin="miter";
ctx.miterLimit=5;
ctx.moveTo(20,20);
ctx.lineTo(50,27);
ctx.lineTo(20,34);
ctx.stroke();
路径
线条

ctx.beginPath();  // 开始
ctx.lineWidth="5"; // 宽度
ctx.strokeStyle="green";
ctx.moveTo(30,25); //开始点
ctx.lineTo(150,35); // 到这个点绘制线条
ctx.lineTo(150,75);
ctx.closePath(); // 从当前点回到起始点
ctx.stroke();  // 画
二次贝塞尔曲线
ctx.beginPath();
ctx.moveTo(20,20);
ctx.quadraticCurveTo(20,100,200,20);
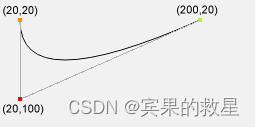
ctx.stroke();三次贝塞尔曲线

ctx.beginPath();
ctx.moveTo(20,20);
ctx.bezierCurveTo(20,100,200,100,200,20);
ctx.stroke();
剪裁 clip
从原始画布剪切任意形状和尺寸的区域。

ctx.rect(50,20,200,120);
ctx.stroke();

ctx.fillStyle="red";
ctx.fillRect(0,0,150,100);
ctx.rect(50,20,200,120);
ctx.stroke();
ctx.clip();
ctx.fillStyle="red";
ctx.fillRect(0,0,150,100);圆或者部分圆
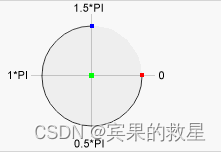
//x坐标,y坐标,半径,开始位置,整圆:2*Math.PI,true逆时针,false是顺时针
ctx.beginPath();
ctx.arc(100,75,50,0,2*Math.PI);
ctx.stroke();
两线之间的弧度

ctx.beginPath();
ctx.moveTo(20,20);
ctx.lineTo(100,20);
ctx.arcTo(150,20,150,70,50);
ctx.lineTo(150,120);
ctx.stroke();
测试某个点是否在路径中
ctx.rect(20,20,150,100);
ctx.stroke();
if (ctx.isPointInPath(20,80)) {
	console.log("在区域内")
}else {
	console.log("不在区域内")
}
转换
scale 放大

ctx.strokeRect(5,5,25,15);
ctx.scale(2,2);
ctx.strokeRect(5,5,25,15);
rorate 旋转

ctx.rotate(20*Math.PI/180);
ctx.fillRect(50,20,100,50);
translate 平移
ctx.fillRect(10,10,100,50);
ctx.translate(70,70);
ctx.fillRect(10,10,100,50);
transform
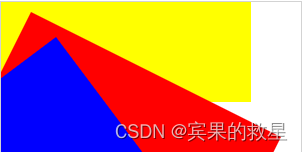
ctx.fillStyle="yellow";
ctx.fillRect(0,0,250,100)

ctx.transform(1,0.5,-0.5,1,30,10);
ctx.fillStyle="red";
ctx.fillRect(0,0,250,100);

ctx.transform(1,0.5,-0.5,1,30,10);
ctx.fillStyle="blue";
ctx.fillRect(0,0,250,100);
setTransform
不以上一个为基础的变化。所以蓝色会覆盖掉上一个红色的。
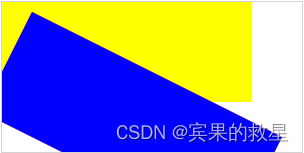
ctx.fillStyle="yellow";
ctx.fillRect(0,0,250,100)

ctx.setTransform(1,0.5,-0.5,1,30,10);
ctx.fillStyle="red";
ctx.fillRect(0,0,250,100);

ctx.setTransform(1,0.5,-0.5,1,30,10);
ctx.fillStyle="blue";
ctx.fillRect(0,0,250,100);
阴影 shadow

ctx.shadowBlur=20;
ctx.shadowColor="black";
ctx.fillStyle="red";
ctx.fillRect(10,10,50,50);


ctx.shadowBlur=20;
ctx.shadowOffsetX=20;
ctx.shadowColor="black";
ctx.fillStyle="red";
ctx.fillRect(70,10,50,50);


ctx.shadowBlur=20;
ctx.shadowOffsetY=20;
ctx.shadowColor="black";
ctx.fillStyle="red";
ctx.fillRect(150,10,50,50);
透明度
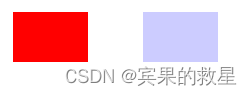
ctx.fillStyle="red";
ctx.fillRect(20,20,75,50);

ctx.globalAlpha=0.2;
ctx.fillStyle="blue";
ctx.fillRect(150,20,75,50);
合成
红色矩形是目标图像,蓝色矩形是源图像:

ctx.fillStyle="red";
ctx.fillRect(20,20,75,50);
ctx.fillStyle="blue";
ctx.globalCompositeOperation="source-over";
ctx.fillRect(50,50,75,50);


ctx.fillStyle="red";
ctx.fillRect(150,20,75,50);
ctx.fillStyle="blue";
ctx.globalCompositeOperation="destination-over";
ctx.fillRect(180,50,75,50); 
文本
文字

ctx.font="italic small-caps bold 32px aria";
ctx.fillText("Hello World",10,50);
水平对齐
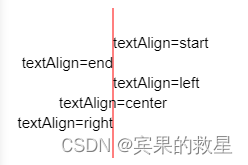
ctx.strokeStyle="red";
ctx.moveTo(150,20);
ctx.lineTo(150,170);
ctx.stroke();

ctx.font="15px Arial";


ctx.textAlign="start";
ctx.fillText("textAlign=start",150,60);

ctx.textAlign="end";
ctx.fillText("textAlign=end",150,80);

ctx.textAlign="left";
ctx.fillText("textAlign=left",150,100);

ctx.textAlign="center";
ctx.fillText("textAlign=center",150,120);

ctx.textAlign="right";
ctx.fillText("textAlign=right",150,140);
垂直对齐

//在Y = 100画一条红线
ctx.strokeStyle="red";
ctx.moveTo(5,100);
ctx.lineTo(395,100);
ctx.stroke();

ctx.font="20px Arial"

ctx.textBaseline="top";
ctx.fillText("Top",5,100);

ctx.textBaseline="bottom";
ctx.fillText("Bottom",50,100);

ctx.textBaseline="middle";
ctx.fillText("Middle",120,100);

ctx.textBaseline="alphabetic";
ctx.fillText("Alphabetic",190,100);

ctx.textBaseline="hanging";
ctx.fillText("Hanging",290,100);
实心字

ctx.font="30px Arial";
ctx.textAlign ="center";
ctx.textBaseline = "bottom";

ctx.fillText("fillText",80,50);
空心字

// 渐变
var grd = ctx.createLinearGradient(0,0,300,0);
grd.addColorStop("0","magenta");
grd.addColorStop("0.5","blue");
grd.addColorStop("1.0","red");

// 文字
ctx.font="30px Verdana";
ctx.strokeStyle=grd;
ctx.strokeText("Big smile!",10,50);
文本宽度

let wd = ctx.measureText("Hello World").width
ctx.font="30px Arial";
ctx.fillText(wd,10,50);
图像
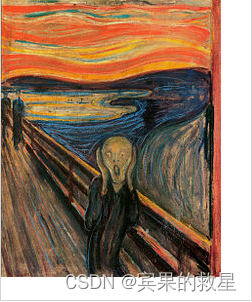
var img=document.getElementById("scream");
img.onload = function() {
	ctx.drawImage(img,0,0);
}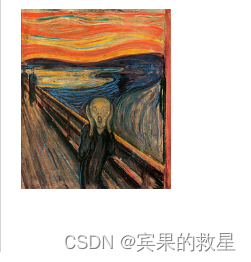
img.onload = function() {
    ctx.drawImage(img,20,10,150,180);
} 
var img=document.getElementById("scream");
img.onload = function(){
    // 图片,x坐标,y坐标,被剪切的宽度,被剪切的高度,放置图像的x坐标,放置图像的y坐标,宽度,高度
    ctx.drawImage(img,90,130,50,60,10,10,50,60)
}
图像数据 imageData

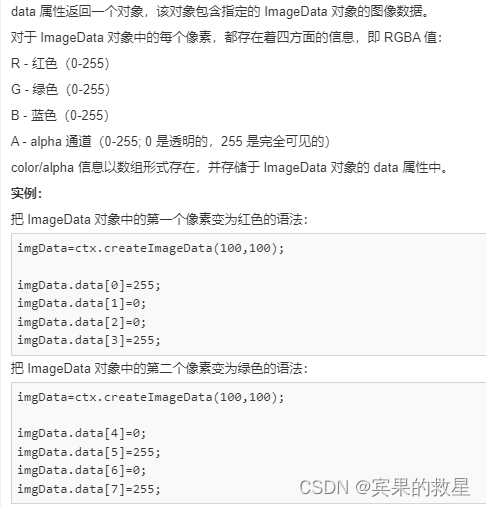
var imgData=ctx.createImageData(100,50);
console.log("imgdata的宽度是: " + imgData.width);
console.log("imgdata的高度是: " + imgData.height);
console.log("imgdata的长度: " + imgData.data.length);

for (var i=0;i<imgData.data.length;i+=4)
{
	// rgba
	imgData.data[i+0]=255; // r
	imgData.data[i+1]=0; // g
	imgData.data[i+2]=0; // b
	imgData.data[i+3]=155; // a
}
ctx.putImageData(imgData,10,10);
console.log("imgdata: " + JSON.stringify(imgData));

// 获取数据复制一份
var imgData2=ctx.getImageData(10,10,50,50);
ctx.putImageData(imgData2,10,70);
Canvas 高清屏模糊问题
原文链接:canvas生成图片模糊的解决方案 - 简书canvas生成图片模糊的解决方案 - 简书
在高清屏的设备下,出现模糊的问题可以通过 hidpi-canvas-polyfill 解决。
- 首先去 GitHub 下载 hidpi-canvas.js 文件:传送门;
- 在项目中引入 hidpi-canvas.js 文件;
- 调用 getPixelRatio( ) 函数,得到 ratio 值;
- 在 drawImage( ) 中,将 width 和 height 乘以 ratio;
在部分 iOS 设备中,可能会存在 image.onload 失效的问题,会导致无法将图片画到 canvas 中。引起该现象的原因可能是:
1、iOS中存在 image.onload 失效的问题(注意:image.onload 执行的前提是图片正常加载完成,如果稍微出错,就会执行 image.onerror 而不是 image.onload);
2、如果 image.src 是 base64 格式文件,不要设置 image.crossOrigin = "anonymous",可能会出现 image.onload 无法执行的问题,从而无法正常画图。
关于 onload 失效的问题,看 Stack Overflow 这个解答,可能收获挺多的:IPhone img onload fails。
// html
<div onclick="makeCanvasToPhoto()" style="width: 100px; padding: 10px 30px;background: #eee;text-align: center">生成图片</div>
<canvas id="canvasBox" style="margin: 50px auto"></canvas>
<!-- 引入js -->
<script type="text/javascript" src="canvas.js"></script>
<script type="text/javascript" src="hidpi-canvas.min.js"></script>

// canvas.js 文件
function makeCanvasToPhoto() {
    var that = this;
    var canvas = document.getElementById("canvasBox");
    var context = canvas.getContext('2d');
    var ratio = getPixelRatio(context);  // 关键代码
    canvas.width = 300 * ratio; // 画布宽度
    canvas.height = 300 * ratio; // 画布高度
    var divWidth = 300 * ratio; // 用于内容居中
    var divHeight = 300 * ratio; // 用于内容居中

    // 画矩形
    context.beginPath();
    context.fillStyle = "#abcdef";
    context.fillRect(0, 0, divWidth, divHeight);
    context.closePath();

    // 图片
    context.beginPath();
    var imgObj = new Image();
    imgObj.crossOrigin = "anonymous";  // 在iOS 9设备中,如果src是base64格式,设置了crossOrigin 属性,会导致无法执行image.onload 而执行image.onerror 函数
    imgObj.src = 'http://img0.imgtn.bdimg.com/it/u=458129248,1588126214&fm=26&gp=0.jpg';
    imgObj.onload = function () {
        var imgWidth = '150';
        var imgHeight = '150';
        context.drawImage(this, 50, 50, imgWidth * ratio, imgHeight * ratio)
    };
    context.closePath();

    // 文本
    context.beginPath();
    context.font = '32px bold';
    context.fillStyle = '#1a1a1a';
    context.textAlign = 'center';
    context.textBaseline = 'middle';
    context.fillText('文本', 50, 240);
    context.closePath();

    context.drawImage(canvas, 0, 0, divWidth, divHeight);
    var base64Obj = canvas.toDataURL('image/png', 1);
    console.log(base64Obj);
}

function getPixelRatio(context) {
    var backingStore = context.backingStorePixelRatio ||
        context.webkitBackingStorePixelRatio ||
        context.mozBackingStorePixelRatio ||
        context.msBackingStorePixelRatio ||
        context.oBackingStorePixelRatio ||
        context.backingStorePixelRatio || 1;
    return (window.devicePixelRatio || 1) / backingStore;
};
Canvas 图片裁剪成圆形
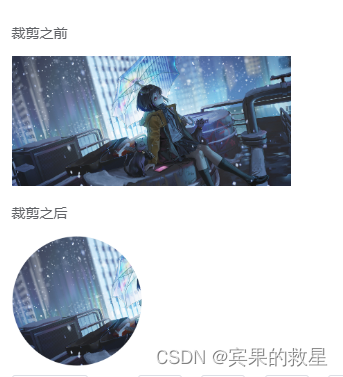
<p>裁剪之前</p>
<img :src="options.img" />
<p>裁剪之后</p>
<img :src="options.canvasImg">
this.options.img = store.getters.avatar;
console.log('img',this.options.img)
this.imageToCircle(this.options.img).then((res) => {
this.options.canvasImg = res
console.log('canvasImg',this.options.canvasImg)
})imageToCircle(picUrl) {
// 通过图片地址换出圆形的图片
let radius, diameter, canvas, ctx;
let img = new Image();
img.setAttribute("crossOrigin", "anonymous"); // 解决图片跨域访问失败
img.src = picUrl;
return new Promise((reslove) => {
img.addEventListener(
"load",
() => {
let { width, height } = img;
if (img.width > img.height) {
radius = height / 2;
} else {
radius = width / 2;
}
diameter = radius * 2;
canvas = document.createElement("canvas");
if (!canvas.getContext) {
// 判断浏览器是否支持canvas,如果不支持在此处做相应的提示
console.log("您的浏览器版本过低,暂不支持。");
return false;
}
canvas.width = diameter;
canvas.height = diameter;
ctx = canvas.getContext("2d");
ctx.clearRect(0, 0, diameter, diameter);
// 描边
ctx.save(); //save和restore可以保证样式属性只运用于该段canvas元素
ctx.strokeStyle = "#eee"; //设置边线的颜色
ctx.lineWidth = 2;
ctx.beginPath(); //开始路径
ctx.arc(radius, radius, radius - 5, 0, Math.PI * 2); //画一个整圆.
ctx.stroke(); //绘制边线
// 截圆形图
ctx.save();
ctx.beginPath();
ctx.arc(radius, radius, radius - 5, 0, Math.PI * 2);
ctx.clip();
let x = 0,
y = 0,
swidth = diameter,
sheight = diameter;
ctx.drawImage(img, x, y, swidth, sheight, 0, 0, diameter, diameter);
ctx.restore();
// toDataURL()是canvas对象的一种方法,用于将canvas对象转换为base64位编码
let dataURL = canvas.toDataURL("image/png");
reslove(dataURL);
},
false
);
});
}