一、开发环境
1、Windows7 32位操作系统
2、Web服务器:Apache2.2 32位(Apache-2.2.17-win32-x86-openssl-0.9.8o.msi)
3、PHP:PHP5.3 Win32(php-5.3.27-Win32-VC9-x86.zip)
4、MySql数据库:MySql5.1(mysql-essential-5.1.73-win32.msi)
5、ThinkPHP:ThinkPHP3.2.3(thinkphp_3.2.3_full.zip)
二、基本安装配置
1、安装配置Apache服务器为8080端口(Listen8080)。
修改httpd.conf文件
2、配置PHP服务
在httpd.conf文件中添加:
LoadModule php5_moduleD:/php-5/php5apache2_2.dll
PHPIniDir "D:/php-5"
AddType application/x-httpd-php .php .phtml
3、PHP配置中开启php_mysql、php_mysqli和php_mbstring扩展服务
修改PHP文件夹下php.ini文件
4、建立Web虚拟文件夹ThinkPHP
在Apache配置文件httpd.conf中修改:
<IfModule dir_module>
#设置缺省载入页面
DirectoryIndex index.html index.php
#设置站点别名
Alias /ThinkPHP "G:/fxp/PHP/php_project"
<Directory G:/fxp/PHP/php_project>
#设置访问权限
Order Allow,Deny
Allow from all
</Directory>
</IfModule>
三、项目需求分析
1、基本功能需求:用户注册、用户登录、用户留言、浏览留言。
① 用户使用系统必须是注册用户,并且经过登录验证才能使用系统;
② 用户进入系统后能够留言(带附件)和分页浏览所有用户的留言信息。
2、数据需求:系统记录用户注册信息、留言信息以及留言附带文件信息。用户注册信息和留言信息记录在MySql数据库中,留言附带文件上传到服务器中。
在MySql中创建'message'数据库,在'message'数据库中创建tm_user和tm_message表,表结构如下:
tm_user表
字段名 |
类型 |
能否为空 |
默认值 |
备注 |
id |
int |
否 |
用户ID,自动增加 |
|
username |
varchar(20) |
否 |
用户名 |
|
userpass |
varchar(40) |
否 |
密码,MD5加密 |
|
usersex |
tinyint |
否 |
0 |
性别,0-男,1-女 |
tm_message表
字段名 |
类型 |
能否为空 |
默认值 |
备注 |
id |
int |
否 |
留言ID,自动增加 |
|
title |
varchar(20) |
否 |
留言标题 |
|
content |
text |
否 |
留言内容 |
|
attachment |
varchar(40) |
是 |
附件文件名 |
|
mtime |
int |
否 |
留言时间-时间戳 |
|
uid |
int |
否 |
留言用户的id |
四、创建数据库与表
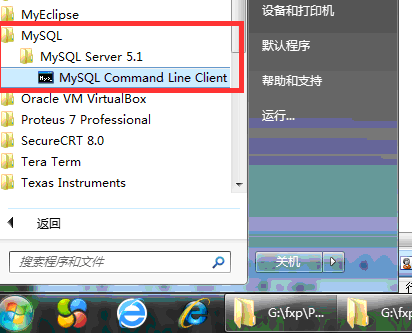
1、在开始菜单中选择”MySQL”->”MySQL Server 5.1”->”MySQL Command Client”
打开MySQL命令行操作窗口:
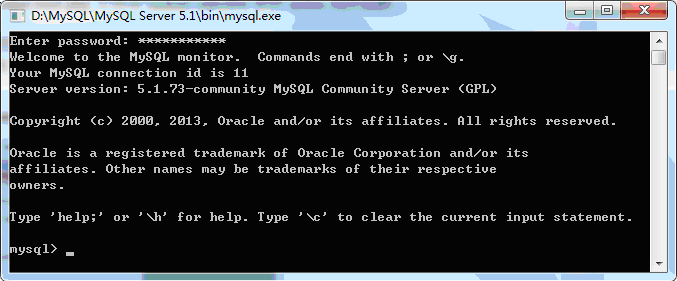
输入root用户密码后进入MySQL的命令行操作模式。
2、创建数据库'message'
create database message;
3、创建数据表
use message;
create table tm_user(id int (10)AUTO_INCREMENT primary key,
username varchar(20),userpass varchar(40),usersextinyint default 0);
create table tm_message(id int (10)AUTO_INCREMENT primary key,
title varchar(20),content text, attachment varchar(40),mtime int, uid int);
五、项目基本设置
1、在G:/fxp/PHP/php_project文件夹下建立项目文件夹:pMessage;
2、复制thinkphp_3.2.3_full.zip 中的ThinkPHP文件夹到pMessage文件夹下;
3、在pMessage文件夹下创建index.php文件,在该文件中确定应用名称、应用路径、模块名称和控制名称内容为:
<?php
define('APP_NAME','Message'); //1.确定应用名称
define('APP_PATH','./'); //2.确定应用路径
define('BIND_MODULE','MessageBlock'); //3. 定义模块名为'MessageBlock'
//4. 自动为'MessageBlock'模块创建三个控制类
define('BUILD_CONTROLLER_LIST','Index, User, Login');
//5.自动为'MessageBlock'模块创建二个模型类
define('BUILD_MODEL_LIST','User,Message');
define('APP_DEBUG',true); //6. 先设置为调试模式
require'./ThinkPHP/ThinkPHP.php'; //7. 应用核心文件
?>
该文件指定应用程序名称为'Message',应用程序路径为'./',表示该Web应用程序的文件均会生成在G:/fxp/PHP/php_project/pMessage/文件夹下(与index.php为同一个文件夹)。然后指定应用程序下有'MessageBlock'模块,该模块下自动生成'Index,User, Login'三个控制类和'User,Message'两个模型类的相应文件。
4、启动浏览器,在地址栏中输入:
http://localhost:8080/ThinkPHP/pMessage,浏览器显示欢迎页面。
初次运行G:/fxp/PHP/php_project/pMessage/ ThinkPHP/ThinkPHP.php程序,这时框架会在G:/fxp/PHP/php_project/ pMessage /文件夹下自动生成'MessageBlock'、'Common'、'Runtime'等文件夹;
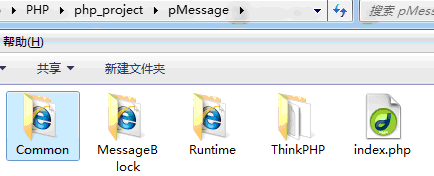
'MessageBlock'文件夹下又有Commom、Conf、Controller、Model、View等文件夹,各文件夹下又有相应的文件和子文件夹等。
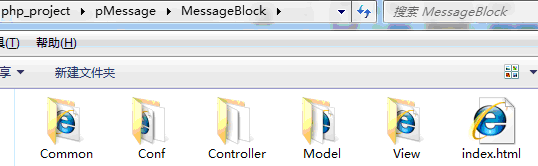
Common文件夹为'MessageBlock'模块的公共文件夹,一般存放配置信息和共有函数信息;Conf为配置信息文件夹,内有config.php文件,用来配置模块信息;Controller文件夹下有IndexController.class.php、LoginController.class.php和UserController.class.php三个控制类的文件,分别对应Index、Login和User三个控制器类;Model文件夹下有MessageModule.class.php和UserModule.class.php两个模型类的文件;View文件夹存放视图文件(网页模板文件),初始状态没有视图文件。
六、功能模块实现
1、模块配置
项目中使用数据库,在pMessage\Common\Conf文件夹下的config.php文件中设置相关信息。
<?php return array( //'配置项'=>'配置值' 'DB_TYPE' => 'mysql', // 数据库类型 'DB_HOST' => 'localhost', // 服务器地址 'DB_NAME' => 'message', // 数据库名 'DB_USER' => 'root', // 用户名 'DB_PWD' => '123456', // 密码 'DB_PORT' => '3306', // 端口 'DB_PREFIX' => 'tm_', // 数据库表前缀 'SHOW_PAGE_TRACE' => true, //设置页面调试,项目完成后设为false ); |
2、用户注册
① 打开pMessage\MessageBlock\Controller文件夹下的LoginController.class.php文件(Login控制类文件),将其中的index函数修改为:
namespace MessageBlock\Controller; use Think\Controller; class LoginController extends Controller { public function index(){ $this->display(); } } |
② 在pMessage\MessageBlock\View文件夹下创建'Login'文件夹,该文件夹为'Login'控制类的视图模板文件夹,在该文件夹中建立index.html网页文件。
设计界面如下:
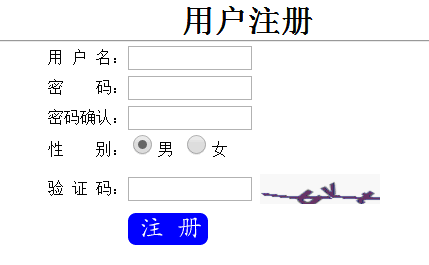
设计界面时需要用到CSS样式、“注册”图片、验证码和jQuery-JavaScript脚本编程。
③ 准备样式文件:在pMessage文件夹下新建Public文件夹,在Public文件夹下新建Css文件夹和Js文件夹,分别用来存放样式文件和Js文件。针对用户注册和登录的样式,在Css文件夹下新建home文件夹,在home文件夹下新建login.css样式文件,内容如下:
form{ width:400px; margin:0 auto; } form input{ width:120px; height:20px; margin-top:3px; } form .radio{ width:30px; } form img{ position:relative; top:10px; } form #dologin,#register{ cursor:pointer; margin-left:80px; } #main{ margin:0 auto; width:600px; line-height:30px; } |
该样式分别为网页中的表单(form标记)、表单内的文本框、单选按钮、'注册'、'登录'图片和主div设计样式。
④ 准备'注册'和'登录'图片
⑤ 使用验证码。
在ThinkPHP3.2.3中使用验证码通过框架提供的Verify类实现,该类的定义在\ThinkPHP\Library\Think文件夹下。为了方便使用,这里在控制类文件夹下新建一个Public控制类实现code和check_code两个方法,分别为获取验证码和验证。网页中通过<img src="__APP__/Public/code"/>就可以获得验证码的图片,在ThinkPHP生成验证码图片的同时,在服务端创建了验证码的SESSION值,该code方法还可以传参调用,如需要宽度90,高度30的验证码图片,可以用:<img src="__APP__/Public/code"height="30" width="120"/>,还可以在img标记中加上js脚本实现点击图片刷新验证码,<imgsrc="__APP__/Public/code" height="30" width="120"onClick="this.src=this.src+'?'+Math.random"/>
代码如下:
<?php namespace MessageBlock\Controller; use Think\Controller; class PublicController extends Controller { public function code(){ $Verify = new \Think\Verify(); $Verify->length = 3; $Verify->imageW = isset($_GET['w'])?$_GET['w']:90; $Verify->imageH = isset($_GET['h'])?$_GET['h']:30; $Verify->fontSize = $Verify->imageH/2; $Verify->useNoise = false; $Verify->entry(); } public function check_code($code, $id = ''){ $verify = new \Think\Verify(); return $verify->check($code, $id); } } |
⑥ 页面代码:
<!DOCTYPE html PUBLIC "-//W3C//DTD XHTML 1.0 Transitional//EN" "http://www.w3.org/TR/xhtml1/DTD/xhtml1-transitional.dtd"> <html> <head> <meta http-equiv="Content-Type" content="text/html; charset=utf-8"/> <title>用户注册</title> <load href="__PUBLIC__/Css/home/login.css"/> <load href="__PUBLIC__/Js/jquery-1.7.2.min.js"/> <script> $(function(){ $('img#register').click(function(){ var s=''; var n_error=0; if($('input[name="username"]').val()==''){ n_error=n_error+1; s=s+'用户名不能为空!\n'; } if($('input[name="userpass"]').val()==''){ n_error=n_error+1; s=s+'密码不能为空!\n'; } if($('input[name="reuserpass"]').val()==''){ n_error=n_error+1; s=s+'确认密码不能为空!\n'; } if($('input[name="reuserpass"]').val()!=$('input[name="userpass"]').val()){ n_error=n_error+1; s=s+'密码不一致!\n'; } if($('input[name="checkcode"]').val()==''){ n_error=n_error+1; s=s+'验证码不能为空!\n'; } if(n_error>0){ alert(s); }else{ $("#rform").submit(); } }); }); </script> </head> <body> <h1 align="center">用户注册</h1> <hr/> <div id="main"> <form action="__URL__/do_register" method="post" name="rform" id="rform"> <div>用 户 名:<input type="text" name="username"/></div> <div>密 码:<input type="password" name="userpass"/></div> <div>密码确认:<input type="password" name="reuserpass"/></div> <div>性 别:<input type="radio" name="usersex" value="0" class="radio" checked="checked"/>男 <input type="radio" name="usersex" value="1" class="radio"/>女</div> <div>验 证 码:<input type="text" name="checkcode"/> <img src="__APP__/Public/code" height="30" width="120" onClick= "this.src=this.src+'?'+Math.random"/></div> <div><img src="__PUBLIC__/images/zc.gif" id="register"/></div> </form> </div> </body> </html> |
⑦ 从网上下载jquery-1.7.2.min.js文件存放于pMessage\Public\Js 文件夹下,通过Load标记引入网页(或引用官网地址)。
⑧ 在Login控制类(LoginController.class.php文件)中设计do_register方法,用来处理注册页面提交的注册信息。代码如下:
public function do_register(){ //检查验证码 $p = A('Public'); //创建公共控制器对象 if(!$p->check_code($_POST['checkcode'])){ $this->error('验证码错误'); } $user = M('user'); //创建用户表模板对象 $_POST['userpass'] = md5($_POST['userpass']); //将页面提交的密码md5加密 $user->create(); //在$user对象中根据$_POST内容生成数据 $n = $user->add(); //将数据插入到数据库中 if($n>0){ $this->success('注册成功','login'); }else{ $this->error('注册失败'); } } |
3、用户登录
用户登录功能需要在Login控制类中设计进入登录页面的方法login和处理用户提交登录信息的方法doLogin以及用户登录信息的模板视图页面login.html。
① 在Login控制类(LoginController.class.php文件)中设计login方法,如下:
public function login(){ $this->display(); } |
② 设计登录视图页面login.html。
在pMessage\MessageBlock\View\Login文件夹下新建网页文件login.html,加入如下代码:
<!DOCTYPE html PUBLIC "-//W3C//DTD XHTML 1.0 Transitional//EN" "http://www.w3.org/TR/xhtml1/DTD/xhtml1-transitional.dtd"> <html> <head> <meta http-equiv="Content-Type" content="text/html; charset=utf-8"/> <title>用户登录</title> <load href="__PUBLIC__/Css/home/login.css"/> <load href="__PUBLIC__/Js/jquery-1.7.2.min.js"/> <script> $(function(){ $('img#dologin').click(function(){ var s=''; var n_error=0; if($('input[name="username"]').val()==''){ n_error=n_error+1; s=s+'\n'+'用户名不能为空!'; } if($('input[name="userpass"]').val()==''){ n_error=n_error+1; s=s+'\n'+'密码不能为空!'; } if($('input[name="checkcode"]').val()==''){ n_error=n_error+1; s=s+'\n'+'验证码不能为空!'; } if(n_error>0){ alert(s); }else{ $("#lform").submit(); } }); $('img#register').click(function(){ $(location).attr('href', '__URL__/index'); }); }); </script> </head> <body> <h1 align="center">用户登录</h1> <hr/> <div id="main"> <form action="__URL__/doLogin" method="post" name="lform" id="lform"> <div>用 户 名:<input type="text" name="username"/></div> <div>密 码:<input type="password" name="userpass"/></div> <div>验 证 码:<input type="text" name="checkcode"/> <img src="__APP__/Public/code" onClick= "this.src=this.src+'?'+Math.random"/></div> <div><img src="__PUBLIC__/images/dl.gif" id="dologin"/> <img src="__PUBLIC__/images/zc.gif" id="register"/></div> </form> </div> </body> </html> |
实际界面如下:

③ 验证登录信息。
在Login控制类(LoginController.class.php文件)中设计doLogin方法,如下:
public function doLogin(){ $username = $_POST['username']; $userpass = $_POST['userpass']; $code = $_POST['checkcode']; $p = A('Public'); if(!$p->check_code($code)){ $this->error('验证码错误'); }
$user=M('user'); $where['username']=$username; $where['userpass']=md5($userpass); $rset=$user->field('id')->where($where)->find(); if($rset){ $_SESSION['username']=$username; $_SESSION['id']=$rset['id']; $this->success('用户登录成功', U('Index/index')); }else{ $this->error('登录失败'); } } |
4、使用自定义标签
在登录页面和注册页面中都用到了验证码,通过ThinkPHP的自定义标签可以自由扩展标签,简化页面内容。
① 标签定义在标签库类中,在ThinkPHP\Library\Think\Template\TagLib目录下就定义了Cx.class.php和Html.class.php两个标签库。自定义的标签库文件可以放在ThinkPHP\Library\Think\Template\TagLib目录下,也可以放在自己项目的其他目录下,区别在于放在ThinkPHP\Library\Think\Template\TagLib目录下地标签库在引用标签的页面前面指定标签库名是不需要指定库文件路径,而在其他目录下的要明确指明路径。这里选择后者。
② 在pMessage\MessageBlock目录下新建TagLib目录(pMessage为项目主目录,MessageBlock为模块目录),在TagLib目录下新建Message.class.php文件,标签库名为'Message',文件内容如下:
<?php namespace MessageBlock\TagLib; use Think\Template\TagLib; class Message extends TagLib{ //定义标签'code' //有width和height两个属性,不闭合 protected $tags = array( 'code'=>array('attr'=>'width,height','close'=>0), ); public function _code($attr,$content){ $width = $attr['width']; //获得width属性值 $height = $attr['height']; $str = "<img src='__APP__/Public/code?w={$width}&h={$height}' onclick= 'this.src=this.src+\"?\"+Math.random()'/>"; return $str; } } |
在这个标签库中只定义了一个'code'标签,在标签中定义了'width,height'两个属性,分别表示验证码图片的宽度和高度。
③ 使用标签。
在登录页面login.html和注册页面index.html(是Login控制中login方法和index方法对应的两个视图模板)中使用验证码的位置加上:<Message:code width="90" height="30"/>,在页面的第一行加上:<taglibname='MessageBlock\TagLib\Message'/>就可以直接使用。
5、留言主页面
留言主页面有头部、左、右三部分构成,布局如下:
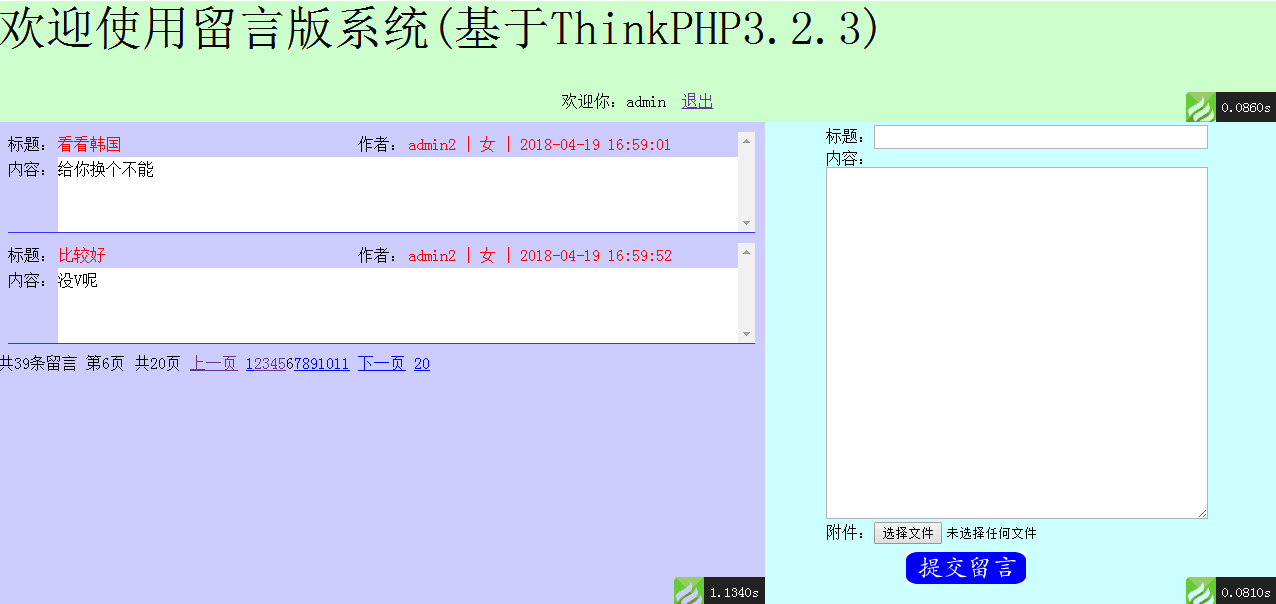
使用了框架页面的方法(HTML5不再使用页面框架),实际由4个页面文件组成,分别是index.html(框架页面)、top.html、left.html和right.html,这4个页面模板分别对应Index控制类中的index、top、left和right4个方法。
① 主框架页面和index方法。
index.html
<!DOCTYPE html PUBLIC "-//W3C//DTD XHTML 1.0 Transitional//EN" "http://www.w3.org/TR/xhtml1/DTD/xhtml1-transitional.dtd"> <html xmlns="http://www.w3.org/1999/xhtml"> <head> <meta http-equiv="Content-Type" content="text/html; charset=utf-8" /> <title>留言板</title> </head> <frameset rows="20%,*" border="0"> <frame src="__URL__/top" name="top"/> <frameset cols="60%,40%"> <frame src="__URL__/left" name="left" /> <frame src="__URL__/right" name="right" /> </frameset> </frameset><noframes></noframes> </html> |
index方法(pMessage\MessageBlock\Controller文件夹下IndexController.class.php文件)
public function index(){ if(isset($_SESSION['username']) && $_SESSION['username'] != ''){ $this->display(); }else{ $this->redirect('Login/login'); } } |
该方法检查用户有无登录,如果未登录,直接转到登录页面。如果已经登录则进入主页面。
② top.html、top方法和logout方法。
top.html主要显示系统标题、登录用户和“退出”链接,代码如下:
<!DOCTYPE html PUBLIC "-//W3C//DTD XHTML 1.0 Transitional//EN" "http://www.w3.org/TR/xhtml1/DTD/xhtml1-transitional.dtd"> <html xmlns="http://www.w3.org/1999/xhtml"> <head> <meta http-equiv="Content-Type" content="text/html; charset=utf-8" /> <title></title> <load href="__PUBLIC__/Css/home/mess.css"/> <load href="__PUBLIC__/Js/jquery-1.7.2.min.js"/> </head> <body style="background-color:#CCFFCC;"> <p id="t1">欢迎使用留言版系统(基于ThinkPHP3.2.3)</p><br /><br /> <p align="center">欢迎你:{$_SESSION['username']} <a href="__APP__/Login/logout" target="_top">退出</a></p> </body> </html> |
top方法为top页面的入口,代码如下:
public function top(){ $this->display(); } |
logout方法为Login控制类中的方法,实现清SESSION等功能,代码如下:
public function logout(){ $_SESSION = array(); if(isset($_COOKIE[session_name()])){ setcookie(session_name(),'',time()-1,'/'); } session_destroy(); $this->redirect('Index/index'); } |
③ right方法、right.html和saveMessage方法
right方法是right页面的入口,right页面主要是一个留言表单,表单信息提交给Message控制类中的saveMessage方法处理。
right方法(Index控制类中),代码如下:
public function right(){ $this->display(); } |
right.html页面代码如下:
<!DOCTYPE html PUBLIC "-//W3C//DTD XHTML 1.0 Transitional//EN" "http://www.w3.org/TR/xhtml1/DTD/xhtml1-transitional.dtd"> <html xmlns="http://www.w3.org/1999/xhtml"> <head> <meta http-equiv="Content-Type" content="text/html; charset=utf-8" /> <title></title> <load href="__PUBLIC__/Css/home/mess.css"/> <load href="__PUBLIC__/Js/jquery-1.7.2.min.js"/> <script> $(function(){ var s=""; $('img').click(function(){ if($('input[name="title"]').val()==''){ s = s+"请填写留言标题\n"; } if($("textarea").val()==''){ s = s+"请填写留言内容\n"; } if(s==""){ $("#messform").submit(); }else{ alert(s); } }); }); </script> </head> <body style="background-color:#CCFFFF;"> <div id="liuyan"> <form action="__APP__/Message/savemessage" method="post" id="messform" enctype="multipart/form-data"> <p>标题:<input type="text" name="title" id="bt"/></p> <p>内容:<br /><textarea name="content"></textarea></p> <p>附件:<input type="file" name="attachment"/></p> <p><img src="__PUBLIC__/images/ly.gif" id="savemess" /></p> </form> </div> </body> </html> |
saveMessage方法(Message控制类中)用于将right.html页面提交的留言信息存入tm_message表中,代码如下:
public function saveMessage(){ //$attachment = $_POST['attachment']; $filename = ''; if($_FILES['attachment']['size']>0){ //处理文件上传 $upload = new \Think\Upload(); //实例化上传类 $upload->maxSize = 3145728; //设置附件上传大小 $upload->exts = array('jpg','gif','png','jpeg');//设置上传文件类型 $upload->rootPath = './Public/Uploads/'; //设置上传根目录 $upload->savePath = ''; //设置上传子目录 $upload->autoSub = false; $info = $upload->upload(); if(!$info){ $this->error($upload->getError());//上传错误提示信息 }else{ $filename = $info['attachment']['savename']; } } $message = D('message');//使用自定义Model类 //M('message'); $message->create(); $message->attachment = $filename; //$message->mtime = time(); //$message->uid = $_SESSION['id']; $last = $message->add(); if($last){ echo '<script> window.parent["left"].location.reload(); </script>'; $this->success('OK'); }else{ $this->error('ERROR'); } } |
在处理数据保存时,为了对留言时间(mtime)和uid两个字段数据的自动处理,定义了Message模型类(在pMessage\MessageBlock\Model目录下MessageModel.class.php文件),代码如下:
<?php namespace MessageBlock\Model; use Think\Model\RelationModel; //引用RelationModel class MessageModel extends RelationModel { //有关联的要继承RelationModel //自动创建字段内容 protected $_auto = array( array('mtime','time',1,'function'), //在insert操作时调用time函数,值给mtime字段 array('uid','getId',1,'callback'), //在insert操作时调用getId函数,获得登录用户的id );
//建立关联模型 protected $_link = array( 'User'=>array('mapping_type'=>self::BELONGS_TO, //关联类型 'class_name'=>'user', //关联的表名 'foreign_key'=>'uid', //外键 'mapping_name'=>'user', //映射名称 'mapping_fields'=>'username,usersex', //取哪些字段数据 'as_fields'=>'username,usersex', //直接作为本模型的字段名 ), ); protected function getId(){ return $_SESSION['id']; } } |
在该数据模型类中通过$_auto属性定义对mtime和uid两个字段的数据自动生成,其中mtime字段内容通过调用系统函数time得到,uid字段内容通过自定义方法函数getId从SESSION中得到。
这个数据模型类还定义了与用户表的关联模型,用于left页面显示留言信息的查询。
④ left方法、left.html页面
left方法首先实现D方法实例化Message数据模型,然后实例化一个Page类实现留言信息分页显示,在数据查询中采用关联模型将tm_message表的数据与tm_user表的数据通过tm_message表中的uid与tm_user表中的主键id关联起来,最后查询数据,向模板页面left.html传递查询数据信息和分页代码信息,代码如下:
public function left(){ $message = D('message'); $count = $message->count(); $page = new \Think\Page($count,2); $page->setConfig('header','共%TOTAL_ROW%条留言 第%NOW_PAGE%页 共%TOTAL_PAGE%页 '); $page->setConfig('first','首页'); $page->setConfig('last','共%TOTAL_PAGE%页'); $page->setConfig('prev','上一页'); $page->setConfig('next','下一页'); $page->setConfig('theme','%HEADER% %FIRST% %UP_PAGE% %LINK_PAGE% %DOWN_PAGE% %END%'); $show = $page->show(); $rec = $message->relation(true)->limit($page->firstRow.','.$page->listRows)->select(); $this->assign('data',$rec); $this->assign('page',$show); $this->display(); } |
left.html模板页面代码如下:
<!DOCTYPE html PUBLIC "-//W3C//DTD XHTML 1.0 Transitional//EN" "http://www.w3.org/TR/xhtml1/DTD/xhtml1-transitional.dtd"> <html xmlns="http://www.w3.org/1999/xhtml"> <head> <meta http-equiv="Content-Type" content="text/html; charset=utf-8" /> <load href="__PUBLIC__/Css/home/mess.css"/> <load href="__PUBLIC__/Js/jquery-1.7.2.min.js"/> <title></title> </head> <body style="background-color:#CCCCFF;"> <volist name='data' id='v'> <div class="messitem"> <div class="ctitle">标题:</div> <div class="messtitle">{$v['title']}</div> <div class="ctitle">作者:</div> <div class="messtitle">{$v['username']} | {$v['usersex']?'女':'男'} | {$v.mtime|date='Y-m-d H:i:s',###} <if condition='$v["attachment"] neq ""'> <a href="__PUBLIC__/uploads/{$v['attachment']}" target="_blank"><img src="__PUBLIC__/images/pic.gif" /></a> </if> </div> <div style="clear:both;"></div> <div class="ctitle">内容:</div><div class="content">{$v['content']} </div> <div style="clear:both;"></div> </div> </volist> <div>{$page}</div> </body> </html> |
其中top.html、left.html和right.html页面用到的样式文件为mess.css,内容为:
*{margin:0px; padding:0px; } #t1{font-size:48px; font-family:"华文新魏", "楷体", "宋体"; } #liuyan{width:400px; margin:0 auto; } form{ width:390px; margin:0 auto; } form input{ width:330px; height:20px; margin-top:3px; } form textarea{ width:380px; height:350px;} form img{ position:relative; top:10px; } form #savemess{ cursor:pointer; margin-left:80px; } .messitem{margin:10px; height:100px; line-height:25px;font-size:16px; position:relative;overflow-x:hidden; overflow-y:scroll;border-bottom:#0033FF thin solid; } .itemt{width:100px; background-color:#FFFFFF;} .content{ float:left; width:calc(100% - 50px); height:calc(100% - 25px); background-color:#FFFFFF;} .messtitle{color:red; float:left; width:300px;} .ctitle{float:left; width:50px;} |