0.前言
DCC-DIF是2022CVPR的文章,全称是Learning Deep Implicit Functions for 3D Shapes with Dynamic Code Clouds[Paper] 。
深层隐式函数(DIF)已成为有效的3D形状表示方法。为了捕获几何细节信息,当前方法通常使用局部潜在代码(latent code)学习DIF,该代码将空间离散和规则的3D网格(或八叉树),并将本地代码存储在网格点(或八叉树节点)中。给定查询点,通过将其相邻的局部代码与其位置插值来计算局部特征。但是,本地代码在离散和规则位置(例如网格点)上受到限制,这使得很难优化代码位置并限制其表示能力。为了解决此问题,论文作者建议使用Dynamic Code Cloud学习DIF,名为DCC-DIF。论文作者的方法将本地代码与可学习的位置向量相关联,并且位置向量是连续的,并且可以动态优化,从而提高表示能力。此外,论文作者提出了一种新颖的代码位置损失,以优化代码位置,启发式地指导更多的局部潜在代码分布在几何细节复杂的区域。与以前的方法相反,DCC-DIF用少量局部代码更有效地表示3D形状,并提高了重建质量。实验表明,DCC-DIF比以前的方法实现更好的性能
1.代码和数据集下载
1.1.论文作者提供的
- 数据处理(预处理代码、推理代码、数据demo) :[Data] (需要翻墙)
- DCC-DIF主程序(训练、验证代码):[Pytorch Code]
1.2.其他来源
-
Occupancy Network 用来提取mesh的几何信息,并转化为watertight mesh
-
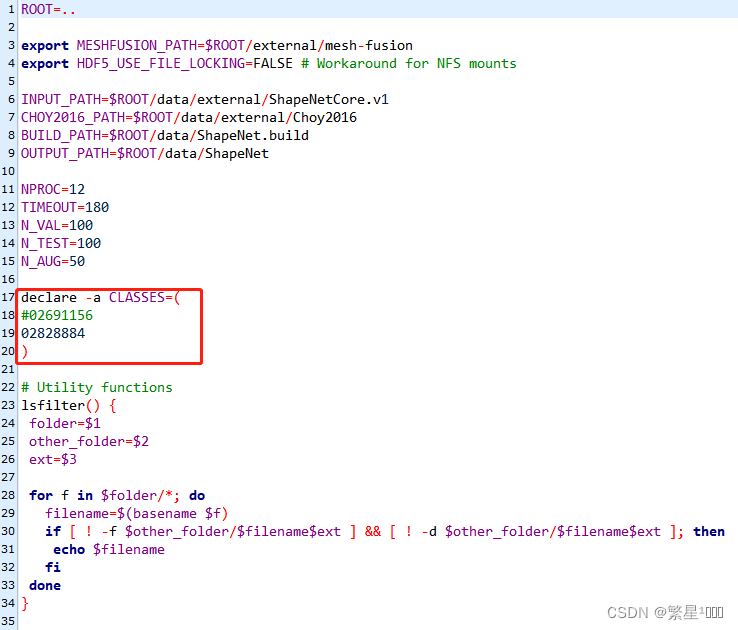
文章使用的是ShapeNetCore.v1,需要注册ShapeNet账号下载。完整数据集30.3GB,也可以下载其中的子集,文章使用的类别如下:
‘04256520’: ‘sofa’
‘02691156’: ‘plane’
‘03636649’: ‘lamp’
‘04401088’: ‘phone’
‘04530566’: ‘watercraft’
‘03691459’: ‘speaker’
‘03001627’: ‘chair’
‘02933112’: ‘cabinet’
‘04379243’: ‘table’
‘03211117’: ‘display’
‘02958343’: ‘car’
‘02828884’: ‘bench’
‘04090263’: ‘rifle’
参考资料: 【3维视觉】ShapeNet数据集介绍
2.环境配置
2.1 数据预处理
2.1.1 Occupancy Networks
a. 首先根据environment.yaml建立基本的环境
conda env create -f environment.yaml
conda activate mesh_funcspace
b. 编译extension module
cd occupancy_networks
python setup.py build_ext --inplace
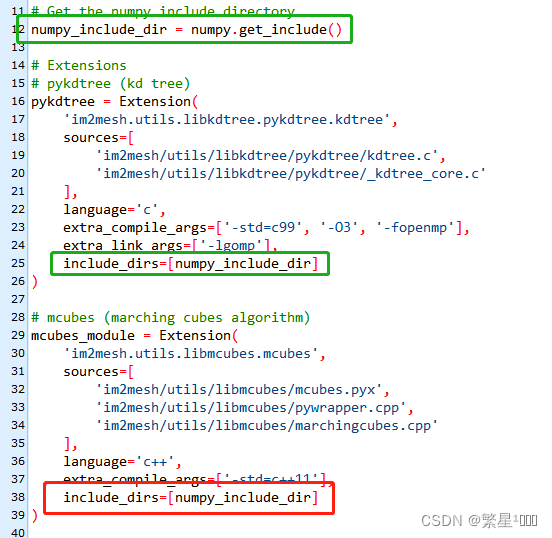
如果报找不到numpy的错误,则对setup.py中的extension都添加numpy路径(有的不需要也没事,多个路径不碍事),原来的只在pykdtree那有numpy的路径。
pykdtree,
mcubes_module,
triangle_hash_module,
mise_module,
simplify_mesh_module,
voxelize_module,
dmc_pred2mesh_module,
dmc_cuda_module,
c.编译mesh_fusion中的模块
这里的模块编译好后,调用来对mesh进行scale,fusion,simplify
用下方的命令来编译,如果编译报错:
fatal error: GL/glut.h
fatal error: GL/glu.h
缺失这种openGL的库,那么直接apt来安装,参考ubuntu openGL 安装
cd external/mesh-fusion
# build libfusiongpu
cd libfusiongpu
mkdir build
cd build
cmake ..
make
cd ..
python setup.py build_ext --inplace

#如果没有gpu,那就build libfusioncpu
cd libfusioncpu
mkdir build
cd build
cmake ..
make
cd ..
python setup.py build_ext --inplace

cd ..
# build pyrender
cd librender
python setup.py build_ext --inplace

cd ..
# build PyMCubes
cd libmcubes
python setup.py build_ext --inplace
d. 安装meshlabserver
meshlabserver是meshlab的开发的一个可执行程序,但是从从2020.12版本开始就不提供meshlabserver了,参考文章【ubuntu】安装meshlabserver。我们直接apt安装就行
sudo apt install meshlab
e. 安装parallel
GNU Parallel 是一个shell工具,可以在一台或多台计算机上并行执行计算任务。
安装
wget https://ftp.gnu.org/gnu/parallel/parallel-20190122.tar.bz2
tar jxvf parallel-20190122.tar.bz2
cd parallel-20190122
./configure
make -j 4
make install
2.1.2 sample_SDF_points
a.新建环境dccdif
conda env create -n dccdif
conda activate dccdif
- requirments.txt文件如下,但不能直接pip install -r requirments.txt。因为这样安装的torch不能用,可能会报错:libtorch_cuda_cu.so: cannot open shared object file: No such file or directory,因为这样安装的torch不完整。
numpy1.19.2
setuptools57.4.0
tinyobjloader2.0.0rc6
torch1.7.1
所以需要把requirments中的torch给去掉,用pytorch官网的命令安装。根据自己的系统和cuda版本选择命令。
- 此外,我这里安装的不是1.7.1而是1.8.0,是因为我的GPU算力是86,而torch1.7.1最高支持算力70。而1.8.0支持算力86。因此要根据机器GPU算力来选择。
这个问题参考博客:解决CUDA error: no kernel image is available for execution on the device
pip install torch==1.8.0+cu111 torchvision==0.9.0+cu111 torchaudio==0.8.0
# 把requirments中的torch给去掉
pip install -r requirments.txt
如果下载很慢,则换源,例如更换清华pip源
NOTE:这里还使用到了mesh2sdf库,是mesh2sdf的cuda版本,不能直接pip install mesh2sdf,因为pypi仓库中的mesh2sdf是普通版本,运行时会报错:module ‘mesh2sdf’ has no attribute ‘mesh2sdf_gpu’。
b.编译安装extensions
cd sample_SDF_points/extensions/
chmod +x build_ext.sh && ./build_ext.sh
完成后就安装好了带有mesh2sdf_gpu属性的mesh2sdf了
2.2 DCC-DIF主程序
DCC-DIF主程序和sample_SDF_points 可以共用一个环境。
conda activate dccdif
pip install -r requirements.txt
这里同样要把requirments中的torch给去掉,用pytorch官网的命令安装。根据自己的系统和cuda版本,GPU算力选择对应版本的安装命令。我们这边之前已经安装过了,所以可以直接去掉。
2.3 usage_demo(推理demo程序)
可以与DCC-DIF主程序和sample_SDF_points 可以共用一个环境。
3.跑代码
3.1 数据预处理
3.1.1运行Occupancy Networks程序
将原始mesh转化成watertight mesh,并且对watertight mesh进行normalize(其实就是平移和缩放,使其落在一个单位1立方体上(a unit cube),且模型中心在立方体的中心。)
Building the dataset
Alternatively, you can also preprocess the dataset yourself.
To this end, you have to follow the following steps:
- download the ShapeNet dataset v1 and put into
data/external/ShapeNet. (下载好来,放到对应目录) - download the renderings and voxelizations from Choy et al. 2016 and unpack them in
data/external/Choy2016(这个可以不需要) - build our modified version of mesh-fusion by following the instructions in the
external/mesh-fusionfolder(前面做过了)
编辑scripts/config.sh,修改成你自己想要处理的类别,可以放多个类别
建立数据集
conda activate mesh_funcspace
cd scripts
bash dataset_shapenet/build.sh
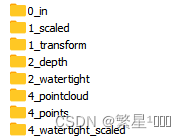
跑完会为每个类别生成5个文件夹
3.1.2 运行sample_SDF_points 程序
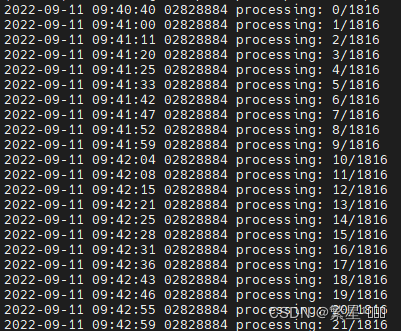
对normalized的wattertight的mesh进行采样,每个采样点记录了(x, y, z)坐标和 ground truth signed distance。
- 修改main.py中的参数

- 跑代码
conda activate dccdif
cd sample_SDF_points
python main.py
输出文件夹output,组织结构:
output
├── 02691156
│ ├── 10155655850468db78d106ce0a280f87.npy
│ ├── …
│ └── fff513f407e00e85a9ced22d91ad7027.npy
│
├── …
│
└── 04530566
├── 10212c1a94915e146fc883a34ed13b89.npy
├── …
└── ffffe224db39febe288b05b36358465d.npy
3.2 DCC-DIF主程序
3.2.1 首先修改configs/bench.py.中的参数
需要修改data路径和split文件路径。
split文件[Data] 论文作者给出了,下载好后可以将里面的文件提取到output文件夹里。
- 训练数据config[‘train_dataset’][‘data_root’] = 数据预处理后output文件夹的地址
- 测试数据 config[‘recon_dataset’][‘data_root’] = 数据预处理后output文件夹的地址
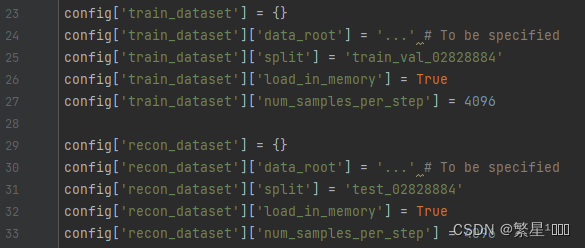
- split_file:注意里要给出包含split文件名的完整路径
- gt_mesh_dir: 数据预处理中有occupancy network生成的normalized watertight meshes的地址

3.2.2 训练
python train.py configs.bench
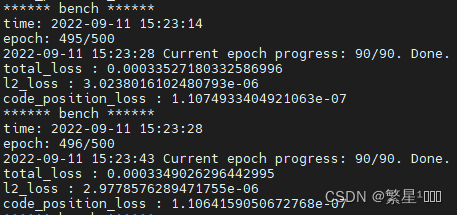
训练时每100个epoch保存decoder和latent code参数,完成后输出文件夹experiments,其组织结构:
experiments
├── bench
│ ├── ckpt
│ │ ├──epoch0-decoder.pth
│ │ ├──epoch0-decoder_lr_scheduler.pth
│ │ ├──epoch0-decoder_optimizer.pth
│ │ ├──epoch0-latent_codes.pth
│ │ ├──epoch0-latent_codes_lr_scheduler.pth
│ │ ├──epoch0-latent_codes_optimizer.pth
│ │ ├── …
│ │ └── epoch500-latent_codes_optimizer.pth
│ │
│ ├── log
│ │ ├──events.out.tfevents.1662873831.amax.3793721.0
│ │ ├── …
│ ├── src
│ │ ├──dataset.py
│ │ ├── …
│ │ ├──train.py
│ ├── config.json
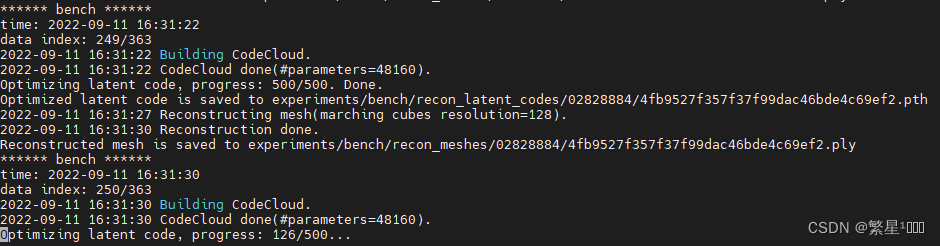
3.2.3 重建
python reconstruct.py configs.bench
3.2.4 验证
python evaluate.py configs.bench

3.3 usage_demo
用预训练好的latent code和decoder解码重建出mesh模型
python main.py
完成得到mesh 模型