引言:
- 一般情况下,如果
单表数据量超过2000w的样子查询速度会很慢,因为内存无法存储其索引,使得之后的 SQL 查询会产生磁盘 IO,从而导致性能下降。- 解决方案:
mysql 分区、分表处理
分库分表:
- 原因: 当数据量级达到一定规模,当并发过高,数据库连接数不够用时
- 目的:将一个表拆成N个表,控制每张表的数据范围,保证SQL性能,建议数据量不超过
500W
概念:
- 库垂直拆分:按业务拆分库,不同业务不同数据库
- 表锤子拆分:大表拆小表
- 水平拆分:按维度标准,将数据分撒到各个表,离散存储; 或者分区,一个表按维度存储分割在不同的磁盘文件中,表还是一个。
- 读写分离:数据的查询与数据的入库,单独分离开来
- 这个需要
mysql主从复制与 类似sharding-spere插件整合实现
Mysql 分区实现:
- 版本大于
mysql 5.1.3,分区后,表面上还是一张表,但数据散列到多个位置了。- 分区类型:
RANGE分区,基于一个给定连续区间的列值,如日期、数值大小LIST分区,类型给定一个list数组,值包含 在改list 范围,则属于该分区HASH分区,指定分区数,对表的一个或多个列的Hash(Key),key对应列值为整数进行计算,然后分配到不同分区。KEY分区,与hash分区类似,可以指定除BLOB和Text外其他类型的列作为分区键- 注意事项:
- 做分区时,要么不定义主键,要么把分区字段加入到主键中
- 分区字段不能为NULL
分区常用SQL :
-- 查询表分区
SELECT table_schema,table_name,partition_name,partition_ordinal_position,partition_method,partition_expression
 from information_schema.PARTITIONS
where table_schema = schema()
and table_name = '表名称'

-- 清除表分区,不清除数据
alter table dymc_from_input_info remove partitioning;

-- 定义 表 list 分区 ,表:dymc_from_input_info,字段:template_id
-- 这个业务是,当前表存储数据量很大,数据以模板id导入,可以按模板id分区,所有一个模板id一个分区
ALTER TABLE `dymc_from_input_info` PARTITION BY
LIST(template_id)(
    PARTITION p_1613559290235248642 VALUES IN (1613559290235248642),
    PARTITION p_1613910831752355842 VALUES IN (1613910831752355842),
    PARTITION p_1613910831752355843 VALUES IN (1613910831752355843)
);

-- 添加表list分区,在以有分区再添加list分区
alter table dymc_from_input_info add partition
(
PARTITION p_1 VALUES IN (1)
);

-- 添加 key分区,PARTITIONS 5, 是指定分区数为5
ALTER TABLE `dymc_from_input_info` PARTITION BY KEY(template_id) PARTITIONS 5;

-- 添加 hash分区
ALTER TABLE `dymc_from_input_info` PARTITION BY HASH(template_id) PARTITIONS 3;

-- 查询是否命中分区
EXPLAIN
select * from dymc_from_input_info where template_id=1613559290235248642
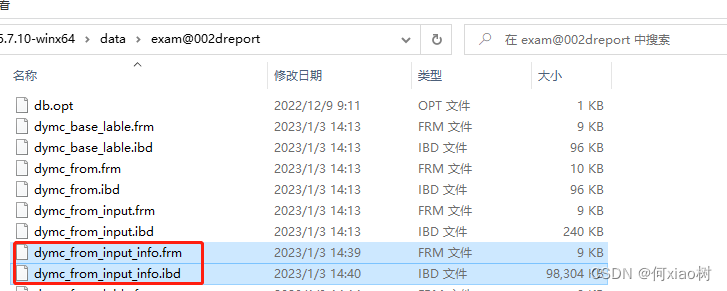
分区文件存储:
- 如果存储引擎是InnoDB,
.frm–表结构的文件,.ibd表数据和索引的文件
分区前:
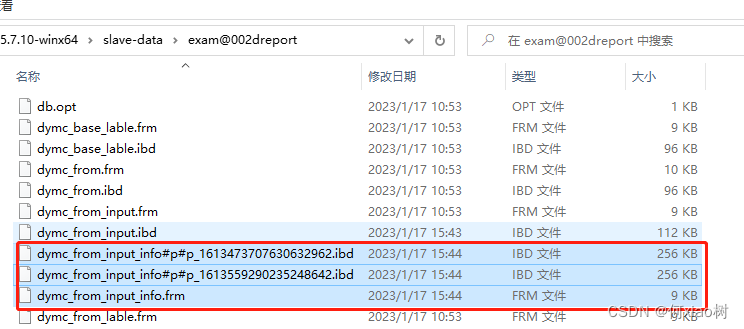
分区后:.ibd 文件,分两个分区;生成了2个
#p#分区名.ibd文件,几个分区几个文件;分开存储

代码整合
@ApiModel(value = "mysql表分区Vo")
@Data
public class MysqlPartitionVo implements Serializable {


    private static final long serialVersionUID = -4548301443478563468L;

    @ApiModelProperty(value = "库名称")
    private String tableSchema;

    @ApiModelProperty(value = "表名称")
    private String tableName;

    @ApiModelProperty(value = "分区名称")
    private String partitionName;

    @ApiModelProperty(value = "分区位置")
    private String partitionOrdinalPosition;

    @ApiModelProperty(value = "分区类型")
    private String partitionMethod;

    @ApiModelProperty(value = "分区字段")
    private String partitionExpression;

}
public interface PartitionMapper {


    /**
     * 查询mysql 对应表-分区列表
     * @param tableName 表名称
     * @return List<MysqlPartitionVo>
     */
    List<MysqlPartitionVo> getPartitionByTable(@Param("tableName") String tableName);

    /**
     * 删除对应表分区,保留分区
     * @param tableName 表名称
     * @return Boolean
     */
    void removePartitionByTable(@Param("tableName") String tableName);

}
<?xml version="1.0" encoding="UTF-8" ?>
<!DOCTYPE mapper PUBLIC "-//mybatis.org//DTD Mapper 3.0//EN" "http://mybatis.org/dtd/mybatis-3-mapper.dtd" >

<mapper namespace="com.mapper.PartitionMapper">

    <update id="removePartitionByTable">
        alter table ${

    tableName} remove partitioning;
    </update>


    <select id="getPartitionByTable" resultType="com.vo.mysql.MysqlPartitionVo">
        SELECT table_schema,table_name,partition_name,partition_ordinal_position,partition_method,partition_expression
        from information_schema.PARTITIONS
        where table_schema = schema()
        and table_name = #{

    tableName}
    </select>

</mapper>
/**
 * @author xiaoshu
 * @description mysql 分区处理
 * @date 2023年01月15日 18:53
 */
public interface PartitionService {


    /**
     *  初始化分区 表:dymc_from_input_info
     */
    void checkPartition();

    /**
     * 查询该模板是否存在分区,没有则创建
     * @param templateId 模板id
     * @return Boolean
     */
    Boolean checkExistTemplateId(Long templateId);
}
import cn.hutool.core.collection.CollectionUtil;
import cn.hutool.core.util.StrUtil;
import com.constant.CommonConstants;
import com.mapper.DymcFromInputInfoMapper;
import com.mapper.PartitionMapper;
import com.service.PartitionService;
import com.vo.mysql.MysqlPartitionVo;
import lombok.extern.slf4j.Slf4j;
import org.redisson.Redisson;
import org.redisson.api.RLock;
import org.springframework.beans.factory.annotation.Value;
import org.springframework.stereotype.Service;
import javax.annotation.Resource;
import java.sql.Connection;
import java.sql.DriverManager;
import java.sql.SQLException;
import java.sql.Statement;
import java.util.*;
import java.util.stream.Collectors;

/**
 * @author xiaoshu
 * @description
 * @date 2023年01月15日 18:54
 */
@Slf4j
@Service
public class PartitionServiceImpl implements PartitionService {


    @Value("${spring.datasource.url}")
    private String url;
    @Value("${spring.datasource.username}")
    private String username;
    @Value("${spring.datasource.password}")
    private String password;

    @Resource
    private Redisson redisson;

    @Resource
    private PartitionMapper partitionMapper;

    @Resource
    private DymcFromInputInfoMapper dymcFromInputInfoMapper;

    private static final String tableName="dymc_from_input_info";

    //初始化定义分区sql
    private static final String sql =" ALTER TABLE `%s` PARTITION BY\n" +
            "LIST(%s)(\n" +
            " %s "+
            "); ";

    //添加分区sql
    private static final String add_sql =" ALTER TABLE `%s` add partition( %s )";

    private static final String partitionSql="PARTITION %s VALUES IN (%s)";

    @Override
    public void checkPartition() {


        RLock redissonLock = redisson.getLock(CommonConstants.REDIS_LOCK+"partitionTash");
        try {


            redissonLock.lock();
            List<Long> templateIds = dymcFromInputInfoMapper.getTemplateIds();
            if (CollectionUtil.isEmpty(templateIds)){


                log.info("表单列详情没有数据,不建立分区");
            }else {


                int requiredSize = templateIds.size();
                log.info("需要分区数量:"+ requiredSize);
                //分区列表
                List<MysqlPartitionVo> partitionByTable = partitionMapper.getPartitionByTable(tableName);
                if (CollectionUtil.isNotEmpty(partitionByTable)){


                    //查询表对应分区数量
                    List<MysqlPartitionVo> partitionVos = partitionByTable.stream().filter(e -> StrUtil.isNotEmpty(e.getPartitionName())).collect(Collectors.toList());
                    int actualSize = partitionVos.size();
                    log.info("实际分区数量:"+ actualSize);
                    //分区为空
                    if (CollectionUtil.isEmpty(partitionVos)){


                        //需要分区数量 > 实际分区数量
                        log.info("初始化分区");
                        //拼接分区sql
                        StringBuilder partitionSql = getPartitionSql(templateIds);
                        initPartition(partitionSql);
                    }else {


                        //分区不为空
                        if (requiredSize>actualSize){


                            //添加分区
                            Map<String, String> templateMap = partitionByTable.stream().collect(Collectors.toMap(MysqlPartitionVo::getPartitionName, MysqlPartitionVo::getPartitionOrdinalPosition));
                            templateIds.forEach(e->{


                                String partitionName="p_" + e;
                                String existFlag = templateMap.get(partitionName);
                                //不存在分区,模板id
                                List<Long> unPartitionTemplate = new LinkedList<>();
                                if (StrUtil.isEmpty(existFlag)){


                                    unPartitionTemplate.add(e);
                                }
                                if (CollectionUtil.isNotEmpty(unPartitionTemplate)){


                                    log.info("添加分区数量:"+unPartitionTemplate.size());
                                    //拼接分区sql
                                    StringBuilder partitionSql = getPartitionSql(unPartitionTemplate);
                                    addPartition(partitionSql);
                                }
                            });
                        }
                    }
                }
                //清空表分区
                //partitionMapper.removePartitionByTable(tableName);
            }
        }catch (Exception e){


            e.printStackTrace();
        }finally {


            redissonLock.unlock();
        }
    }

    @Override
    public Boolean checkExistTemplateId(Long templateId) {


        //分区列表
        try {


            List<MysqlPartitionVo> partitionByTable = partitionMapper.getPartitionByTable(tableName);
            if (CollectionUtil.isNotEmpty(partitionByTable)){


                //查询表对应分区数量
                List<MysqlPartitionVo> partitionVos = partitionByTable.stream().filter(e -> StrUtil.isNotEmpty(e.getPartitionName())).collect(Collectors.toList());
                //分区不为空
                if (CollectionUtil.isNotEmpty(partitionVos)){


                    log.info("当前分区数量:"+partitionVos.size());
                    //已有分区map
                    Map<String, String> templatePartitionMap = partitionByTable.stream().collect(Collectors.toMap(MysqlPartitionVo::getPartitionName, MysqlPartitionVo::getPartitionOrdinalPosition));
                    String partitionName = templatePartitionMap.get(String.valueOf(templateId));
                    //如果不存在分区
                    if (StrUtil.isEmpty(partitionName)){


                        partitionName="p_"+templateId;
                        log.info("该分区不存在:"+partitionName);
                        StringBuilder partitionSql = getPartitionSql(Collections.singletonList(templateId));
                        //添加分区
                        addPartition(partitionSql);
                    }
                }else {


                    //分区为空
                    String partitionName = "p_"+templateId;
                    log.info("该分区不存在:"+partitionName);
                    StringBuilder partitionSql = getPartitionSql(Collections.singletonList(templateId));
                    //初始化分区
                    initPartition(partitionSql);
                }
                return Boolean.TRUE;
            }
        }catch (Exception e){


            return Boolean.FALSE;
        }
        return Boolean.FALSE;
    }


    /**
     * 拼接分区sql
     * @param templateIds 待添加分区模板id列表
     * @return partitionSql
     */
    private synchronized StringBuilder getPartitionSql(List<Long> templateIds) {


        List<String> partitionSqls = new LinkedList<>();
        //拼接分区sql
        for (Long templateId : templateIds) {


            String partitionName = String.format(partitionSql, "p_" + templateId, templateId);
            partitionSqls.add(partitionName);
        }
        StringBuilder partitionSql= new StringBuilder();
        for (int i = 0; i < partitionSqls.size(); i++) {


            if (i!=partitionSqls.size()-1){


                partitionSql.append(partitionSqls.get(i)).append(",");
            }else {


                partitionSql.append(partitionSqls.get(i));
            }
        }
        return partitionSql;
    }

    /**
     * 定义表分区
     * @param partitionSql 分区sql
     */
    private synchronized void initPartition(StringBuilder partitionSql) {


        Connection connection;
        Statement statement;
        String executeSql = String.format(sql, tableName, "template_id", partitionSql);
        try {


            connection = DriverManager.getConnection(url, username, password);
            statement = connection.createStatement();
            statement.execute(executeSql);
            log.info("分区添加成功");
        } catch (SQLException e) {


            e.printStackTrace();
        }
    }
    /**
     * 添加表分区
     * @param partitionSql 分区sql
     */
    private synchronized void addPartition(StringBuilder partitionSql) {


        Connection connection;
        Statement statement;
        String executeSql = String.format(add_sql, tableName,partitionSql);
        try {


            connection = DriverManager.getConnection(url, username, password);
            statement = connection.createStatement();
            statement.execute(executeSql);
            log.info("分区添加成功");
        } catch (SQLException e) {


            e.printStackTrace();
        }
    }

}
sharding-sphere 概念
Apache ShardingSphere设计哲学为 Database Plus,旨在构建异构数据库上层的标准和生态ShardingSphere-JDBC定位为轻量级 Java 框架,在 Java 的 JDBC 层提供的额外服务ShardingSphere-Proxy定位为透明化的数据库代理端,通过实现数据库二进制协议,对异构语言提供支持- 官网: https://shardingsphere.incubator.apache.org/index_zh.html
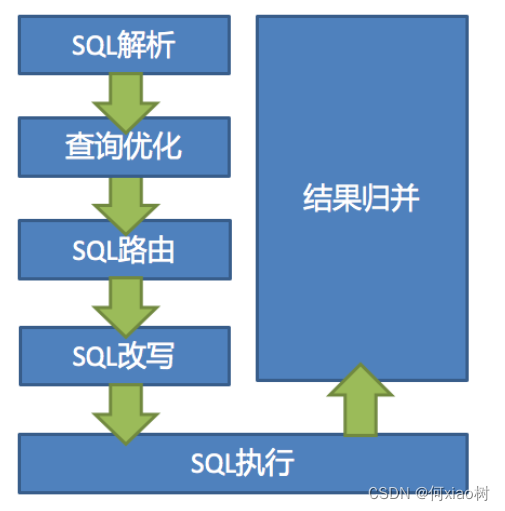
流程图:
sharding-shpere 实现读写分离:
- 实现读写分离,先需要配置
mysql的 主从复制,再通过 sharding-shpere 实现读写分离
mysql主从复制配置:
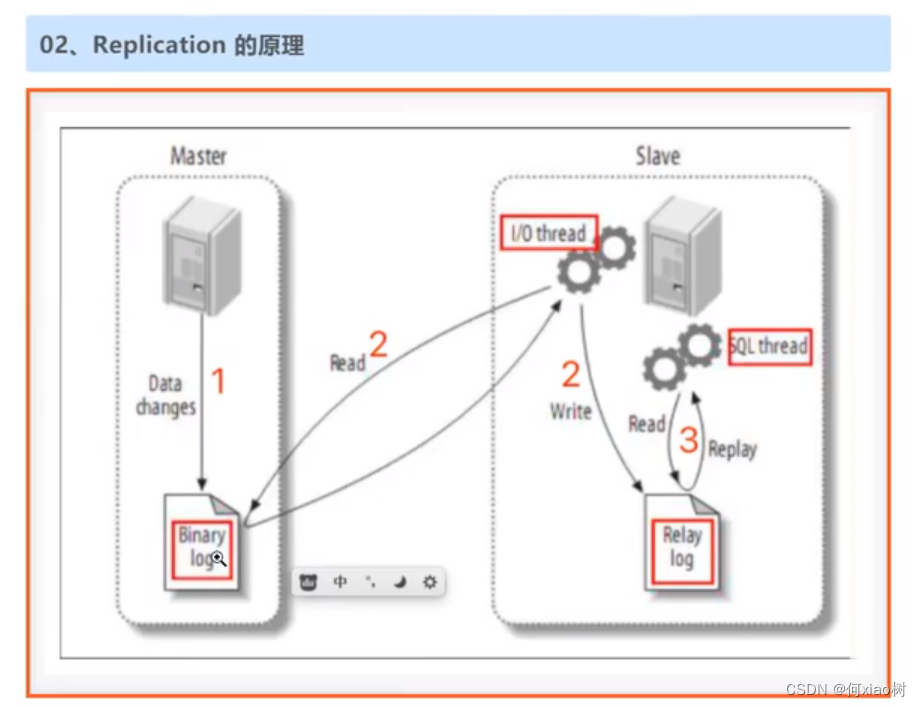
- 主从复制(也称 AB 复制)允许将来自一个MySQL数据库服务器(主服务器)的数据复制到一个或多个MySQL数据库服务器(从服务器)。
流程概念:开启数据库二进制日志功能,数据操作记录( data changes ) -》 会存入 binary log 二进制文件中,通过TCP连接,上报到从库的 中继日志文件中 (Relay log),重新执行sql语句,实现数据同步。
mysql 主从配置 以5.7.10为例:
- 修改主数据库配置文件,/etc/my.cnf ; 开启二进制日志功能,然后重启服务器
[mysqld]
#
# Remove leading # and set to the amount of RAM for the most important data
# cache in MySQL. Start at 70% of total RAM for dedicated server, else 10%.
# innodb_buffer_pool_size = 128M
#
# Remove leading # to turn on a very important data integrity option: logging
# changes to the binary log between backups.
# log_bin
#
# Remove leading # to set options mainly useful for reporting servers.
# The server defaults are faster for transactions and fast SELECTs.
# Adjust sizes as needed, experiment to find the optimal values.
# join_buffer_size = 128M
# sort_buffer_size = 2M
# read_rnd_buffer_size = 2M

## 同一局域网内注意要唯一
server-id=100
## 开启二进制日志功能,可以随便取(关键)
log-bin=mysql-bin
## 复制过滤:不需要备份的数据库,不输出(mysql库一般不同步)
binlog-ignore-db=mysql
## 为每个session 分配的内存,在事务过程中用来存储二进制日志的缓存
binlog_cache_size=1M
## 主从复制的格式(mixed,statement,row,默认格式是statement)
binlog_format=mixed

validate_password_policy=0
validate_password_length=0

datadir=/var/lib/mysql
socket=/var/lib/mysql/mysql.sock

# Disabling symbolic-links is recommended to prevent assorted security risks
symbolic-links=0

log-error=/var/log/mysqld.log
pid-file=/var/run/mysqld/mysqld.pid
- 确定主从服务之间ping通,防火墙以放开
- 确保远程可访问
mysql -uroot -p,登录到数据库;show master status;- 查看二进制文件状态

-- 修改远程访问 ,'%' 可为从服务器ip
use mysql;
update user set host = '%' where user = 'root';
FLUSH PRIVILEGES;
- 从mysql同意修改数据配置,确保
server-id 不一致- 从服务器执行sql 绑定,主服务器。
master_log_file、master_log_pos再show master status;命令查看
change master to master_host='master服务器ip', master_user='root',
master_password='master密码', master_port=3306, master_log_file='mysql-bin.000002',master_log_pos=2079;
- 查询同步状态
show slave status\G;
问题处理:

--建议处理:
stop slave;
--删除多余库
set global sql_slave_skip_counter=1;
start slave;
show slave status\G ;
代码整合:
<!-- <sharding-sphere.version>4.0.0-RC1</sharding-sphere.version> -->

		<!--依赖sharding-->
        <dependency>
            <groupId>org.apache.shardingsphere</groupId>
            <artifactId>sharding-jdbc-spring-boot-starter</artifactId>
            <version>${sharding-sphere.version}</version>
        </dependency>
        <dependency>
            <groupId>org.apache.shardingsphere</groupId>
            <artifactId>sharding-core-common</artifactId>
            <version>${sharding-sphere.version}</version>
        </dependency>
读写分离配置:
spring:
  #读写分离配置
  shardingsphere:
    # 参数配置,显示sql
    props:
      sql:
        show: true
    # 配置数据源
    datasource:
      # 给每个数据源取别名,下面的ds1,ds2,ds3任意取名字
      names: master,slave
      # 给master-ds1每个数据源配置数据库连接信息
      master:
        # 配置druid数据源
        type: com.alibaba.druid.pool.DruidDataSource
        driver-class-name: com.mysql.cj.jdbc.Driver
        url: jdbc:mysql://192.168.1.21:3306/sharding-test?useUnicode=true&characterEncoding=utf8&tinyInt1isBit=false&useSSL=false&serverTimezone=GMT
        username: root
        password: 123456
        maxPoolSize: 100
        minPoolSize: 5
      # 配置slave
      slave:
        type: com.alibaba.druid.pool.DruidDataSource
        driver-class-name: com.mysql.cj.jdbc.Driver
        url: jdbc:mysql://127.0.0.1:3306/sharding-test?useUnicode=true&characterEncoding=utf8&tinyInt1isBit=false&useSSL=false&serverTimezone=GMT
        username: root
        password: 730730
        maxPoolSize: 100
        minPoolSize: 5
    # 配置默认数据源ds1
    sharding:
      # 默认数据源,主要用于写,注意一定要配置读写分离 ,注意:如果不配置,那么就会把三个节点都当做从slave节点,新增,修改和删除会出错。
      default-data-source-name: master
    # 配置数据源的读写分离,但是数据库一定要做主从复制
    masterslave:
      # 配置主从名称,可以任意取名字
      name: ms
      # 配置主库master,负责数据的写入
      master-data-source-name: master
      # 配置从库slave节点
      slave-data-source-names: slave
      # 配置slave节点的负载均衡均衡策略,采用轮询机制
      load-balance-algorithm-type: round_robin
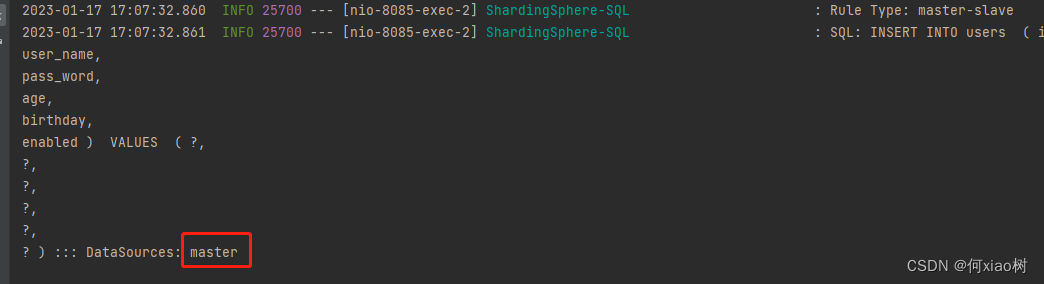
整合成功:

查询走从库

写入走主库
配置数据分片:
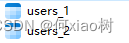
- 分表概念:如对
users进行分表处理,则users为逻辑表,实际不存在;
- 按照yml 配置的规则,最后命中 users_1、或者users_2表
yml配置
- 表达式说明:
ds$->{0..1},ds 代码上面命名的数据库别名,分片表达式的值命中,则对应$->{0..N}范围的值
spring:
  #数据分片配置
  shardingsphere:
    # 参数配置,显示sql
    props:
      sql:
        show: true
    # 配置数据源
    datasource:
      # 给每个数据源取别名,下面的ds1,ds2,ds3任意取名字
      names: ds0,ds1
      # 给master-ds1每个数据源配置数据库连接信息
      ds0:
        # 配置druid数据源
        type: com.alibaba.druid.pool.DruidDataSource
        driver-class-name: com.mysql.cj.jdbc.Driver
        url: jdbc:mysql://192.168.1.21:3306/sharding-test?useUnicode=true&characterEncoding=utf8&tinyInt1isBit=false&useSSL=false&serverTimezone=GMT
        username: root
        password: 123456
        maxPoolSize: 100
        minPoolSize: 5
      # 配置ds2-slave
      ds1:
        type: com.alibaba.druid.pool.DruidDataSource
        driver-class-name: com.mysql.cj.jdbc.Driver
        url: jdbc:mysql://127.0.0.1:3306/sharding-test?useUnicode=true&characterEncoding=utf8&tinyInt1isBit=false&useSSL=false&serverTimezone=GMT
        username: root
        password: 730730
        maxPoolSize: 100
        minPoolSize: 5
    # 配置默认数据源ds1
    sharding:
      # 默认数据源,主要用于写,注意一定要配置读写分离 ,注意:如果不配置,那么就会把三个节点都当做从slave节点,新增,修改和删除会出错。
      default-data-source-name: ds0
      # 配置分表的规则
      tables:
        # users 逻辑表名
        users:
          # 数据节点:数据源$->{0..N}.逻辑表名$->{0..N}
          actual-data-nodes: ds$->{

    0..1}.users$->{

    0..1}
          # 拆分库策略,也就是什么样子的数据放入放到哪个数据库中。
          database-strategy:
            inline:
              sharding-column: age    # 分片字段(分片键)
              algorithm-expression: ds$->{

    age % 2} # 分片算法表达式
          # 拆分表策略,也就是什么样子的数据放入放到哪个数据表中。
          table-strategy:
            inline:
              sharding-column: age    # 分片字段(分片键)
              algorithm-expression: users$->{

    age % 2} # 分片算法表达式
提交数据 age=20时,命中 ds0
提交数据 age=21时,命中 ds1


标准分片,如按日期分;则需要
implements PreciseShardingAlgorithm;
spring:
  #读写分离配置
  shardingsphere:
    # 参数配置,显示sql
    props:
      sql:
        show: true
    # 配置数据源
    datasource:
      # 给每个数据源取别名,下面的ds1,ds2,ds3任意取名字
      names: ds0,ds1
      # 给master-ds1每个数据源配置数据库连接信息
      ds0:
        # 配置druid数据源
        type: com.alibaba.druid.pool.DruidDataSource
        driver-class-name: com.mysql.cj.jdbc.Driver
        url: jdbc:mysql://192.168.1.21:3306/sharding-test?useUnicode=true&characterEncoding=utf8&tinyInt1isBit=false&useSSL=false&serverTimezone=GMT
        username: root
        password: 123456
        maxPoolSize: 100
        minPoolSize: 5
      # 配置ds2-slave
      ds1:
        type: com.alibaba.druid.pool.DruidDataSource
        driver-class-name: com.mysql.cj.jdbc.Driver
        url: jdbc:mysql://127.0.0.1:3306/sharding-test?useUnicode=true&characterEncoding=utf8&tinyInt1isBit=false&useSSL=false&serverTimezone=GMT
        username: root
        password: 730730
        maxPoolSize: 100
        minPoolSize: 5
    # 配置默认数据源ds1
    sharding:
      # 默认数据源,主要用于写,注意一定要配置读写分离 ,注意:如果不配置,那么就会把三个节点都当做从slave节点,新增,修改和删除会出错。
      default-data-source-name: ds0
      # 配置分表的规则
      tables:
        # users 逻辑表名
        users:
          # 数据节点:数据源$->{0..N}.逻辑表名$->{0..N}
          actual-data-nodes: ds$->{

    0..1}.users$->{

    0..1}
          # 拆分库策略,也就是什么样子的数据放入放到哪个数据库中。
          database-strategy:
            standard:
              sharding-column: birthday    # 分片字段(分片键)
              preciseAlgorithmClassName: com.config.BirthdayAlgorithm
          # 拆分表策略,也就是什么样子的数据放入放到哪个数据表中。
          table-strategy:
            inline:
              sharding-column: age    # 分片字段(分片键)
              algorithm-expression: users$->{

    age % 2} # 分片算法表达式
编写具体规则:
