动态配置多模板
-
按照这个模板创建项目
-
安装
glob,获取目录下的文件名称 -
封装方法
utilsConfig,动态生产 page// pages 多入口配置 const path = require("path"); // glob 是 webpack 安装时依赖的一个第三方模块,该模块允许你使用 * 等符号, // 例如 lib/*.js 就是获取 lib 文件夹下的所有 js 后缀名的文件 const glob = require("glob"); // 取得相应的页面路径,因为之前的配置,所以是 src 文件夹下的 pages 文件夹 const PAGE_PATH = path.resolve(__dirname, "./src/pages"); exports.setPages = (value = "") => { let entryFiles = glob.sync(PAGE_PATH.replace(/\\/g, "/") + "/*/*.js"); let map = { }; entryFiles.forEach((filePathValue) => { const filePath = filePathValue.replace(/\\/g, "/"); let filename = filePath.substring( filePath.lastIndexOf("/") + 1, filePath.lastIndexOf(".") ); if (value == "" || value == filename) { let tmp = filePath.substring(0, filePath.lastIndexOf("/")) + `/${ filename}`; let conf = { // page 的入口 entry: filePath, title: "项目名称_" + filename, // 模板来源 // template: "./public/index.html", template: tmp + ".html", // 在 dist/index.html 的输出 filename: (value && value != "" ? "index" : filename) + ".html", // 页面模板需要加对应的js脚本,如果不加这行则每个页面都会引入所有的js脚本 chunks: ["manifest", "vendor", filename], id: filename, inject: true, }; map[filename] = conf; } }); return map; }; -
配置
vue.config.jsconst { defineConfig } = require("@vue/cli-service"); const utils = require("./utilsConfig"); const path = require("path"); const pagesList = utils.setPages(appid); module.exports = defineConfig({ // 通过appid进行设置对应的pages,传入''则是设置所有的入口和模板全部 pages: pagesList, }); -
在
./router/index.js,配置多项目的功能页面import { createRouter, createWebHistory } from "vue-router"; import store from "@/store"; // 公共页面 const routesList = [ { path: "/", redirect: "/index", }, { path: "index", name: "index", component: () => import("@/views/index.vue"), }, { path: "home", name: "home", component: () => import("@/views/home.vue"), }, ]; const router = createRouter({ history: createWebHistory(process.env.BASE_URL), routes: [], }); // 重写push const originalPush = router.push; router.push = function push(valueData) { const routerList = router.getRoutes(); let routeUrl = router.resolve(valueData); if (routerList.findIndex((n) => n.path == routeUrl.path) != -1) { return originalPush.call(this, valueData).catch((err) => err); } else { if ( routeUrl.href.includes("https://") || routeUrl.href.includes("http://") ) { let hrefUrl = routeUrl.href; const index1 = routeUrl.href.indexOf("https://"); if (index1 != -1) { hrefUrl = hrefUrl.substring(index1); } const index2 = routeUrl.href.indexOf("http://"); if (index2 != -1) { hrefUrl = hrefUrl.substring(index2); } window.location.href = hrefUrl; } else { window.location.href = routeUrl.href; } } }; // 重写replace const originalReplace = router.replace; router.replace = function replace(valueData) { let routeUrl = router.resolve(valueData); const routerList = router.getRoutes(); if (routerList.findIndex((n) => n.path == routeUrl.path) != -1) { return originalReplace.call(this, valueData).catch((err) => err); } else { if ( routeUrl.href.includes("https://") || routeUrl.href.includes("http://") ) { let hrefUrl = routeUrl.href; const index1 = routeUrl.href.indexOf("https://"); if (index1 != -1) { hrefUrl = hrefUrl.substring(index1); } const index2 = routeUrl.href.indexOf("http://"); if (index2 != -1) { hrefUrl = hrefUrl.substring(index2); } window.location.replace(hrefUrl); } else { window.location.replace(routeUrl.href); } } }; router.beforeEach((to, from, next) => { // 判断是否缓存 console.log(to, from); const keepAlive = to.meta.keepAlive; const name = to.name; if (keepAlive && !store.state.aliveList.includes(name)) { store.dispatch("setAliveList", name); } next(); }); export default { router, routesList }; -
在
./pages/index1/router/index.js和./pages/index2/router/index.js,配置对应多项目的对应路由// 单个页面 const routesList = [ { path: "about", name: "about", component: () => import("../views/about.vue"), meta: { keepAlive: true, }, }, { path: "index", name: "index", component: () => import("../views/index.vue"), }, ]; export default routesList; -
在
./pages/index1/index1.js和./pages/index2/index2.js,合并路由import { createApp } from "vue"; import store from "@/store"; const pageInit = require("@/utils/pageInit"); pageInit.setInit("index1").then((res) => { createApp(res.index).use(store).use(res.router).mount("#app"); }); -
合并时需要调用封装的方法
pageInit/* eslint-disable */ exports.setInit = async (value) => { const indexVue = (await import(`@/pages/${ value}/${ value}.vue`)).default; const routerPageList = (await import(`@/pages/${ value}/router`)).default; const routerObject = (await import(`@/router`)).default; routerObject.router.addRoute({ path: `/${ value}`, name: `${ value}`, component: indexVue, }); routerObject.routesList.forEach((item) => { routerObject.router.addRoute(`${ value}`, { ...item, meta: { fromList: "common", ...(item.meta || { }) }, }); }); routerPageList.forEach((item) => { routerObject.router.addRoute(`${ value}`, { ...item, meta: { fromList: `${ value}`, ...(item.meta || { }) }, }); }); return Promise.resolve({ index: indexVue, router: routerObject.router }); }; /* eslint-disable */此时配置成功后,公共页面路由是这样的
/index,对应项目的路由是这样的/index1/about、/index2/about
last. 具体文档
动态配置 cdn
-
安装依赖
script-ext-html-webpack-pluginnpm install script-ext-html-webpack-plugin --save--dev -
vue.config.js配置const { defineConfig } = require("@vue/cli-service"); const utils = require("./utilsConfig"); const path = require("path"); const pagesList = utils.setPages(appid); // externals const externals = { vue: "Vue", "vue-router": "VueRouter", vuex: "Vuex", axios: "axios", }; // CDN外链,会插入到对应的.html中 const cdn = { css: [], js: [ "https://unpkg.com/[email protected]/dist/vue.global.js", "https://unpkg.com/[email protected]/dist/vue-router.global.js", "https://unpkg.com/axios/dist/axios.min.js", "https://unpkg.com/[email protected]/dist/vuex.global.js", ], }; module.exports = defineConfig({ configureWebpack: (config) => { config.name = "xxx"; config.externals = externals; }, chainWebpack: (config) => { config.plugins.delete("preload"); // TODO: need test config.plugins.delete("prefetch"); // TODO: need test // 别名 alias config.resolve.alias .set("@", resolve("src")) .set("assets", resolve("src/assets")) .set("api", resolve("src/api")) .set("views", resolve("src/views")) .set("components", resolve("src/components")); // 多入口的 Object.keys(pagesList).forEach((key) => { config.plugin("html-" + key).tap((args) => { if (args.length > 0) { args[0].title = "项目名称" + key; args[0].cdn = cdn; } return args; }); }); // 单一的 // config // .plugin("html-index") // .tap((args) => { // args[0].title = "项目名称"; // args[0].cdn = cdn; // return args; // }) }, });-
我们可以通过
vue inspect,查看当前项目 webpack 配置,进而知道注入 cdn 模块的名称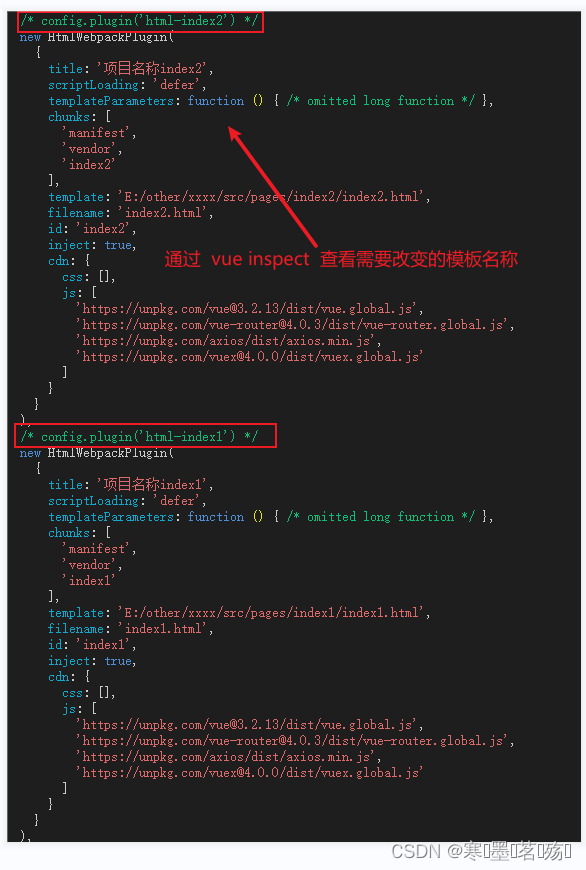
-
-
模板对应的
html<!DOCTYPE html> <html lang=""> <head> <meta charset="utf-8" /> <meta http-equiv="X-UA-Compatible" content="IE=edge" /> <meta name="viewport" content="width=device-width,initial-scale=1.0" /> <link rel="icon" href="<%= BASE_URL %>favicon.ico" /> <title><%= htmlWebpackPlugin.options.title %></title> <% for (var i in htmlWebpackPlugin.options.cdn&&htmlWebpackPlugin.options.cdn.css) { %> <link href="<%= htmlWebpackPlugin.options.cdn.css[i] %>" rel="preload" as="style" /> <% } %> </head> <body> <noscript> <strong >We're sorry but <%= htmlWebpackPlugin.options.title %> doesn't work properly without JavaScript enabled. Please enable it to continue.</strong > </noscript> <div id="app"></div> <% for (var i in htmlWebpackPlugin.options.cdn&&htmlWebpackPlugin.options.cdn.js) { %> <script src="<%= htmlWebpackPlugin.options.cdn.js[i] %>"></script> <% } %> <!-- built files will be auto injected --> </body> </html>- 主要是对
htmlWebpackPlugin.options.cdn&&htmlWebpackPlugin.options.cdn.css和htmlWebpackPlugin.options.cdn&&htmlWebpackPlugin.options.cdn.js进行循环
- 主要是对
通过命令打包不同的文件
-
修改
package.json,添加命令"scripts": { "serve-index1": "vue-cli-service serve --Key=index1 --port 8081", "serve-index2": "vue-cli-service serve --Key=index2 --port 8082", "build-index1": "vue-cli-service build --Key=index1 ", "build-index2": "vue-cli-service build --Key=index2", ... }, -
修改
vue.config.jsconst { defineConfig } = require("@vue/cli-service"); // 获取命令的参数 const argvData = process.argv; // 获取appid let appid = ""; argvData.forEach((item) => { if (item.includes("--Key=")) { appid = item.split("=")[1]; } }); // 获取outputDir的路径 const getOutputDir = (value) => { if (value == "") { return "dist/"; } else { return `dist/${ value}`; } }; module.exports = defineConfig({ outputDir: getOutputDir(appid), }); -
运行
npm run build-index1和npm run build-index2