新建一个项目目录比如叫root,下面新建一个rollup的配置文件: rollup.config.ts 因为rollup良好支持ts和esmodule 所以用ts配置文件
Setup
生成一个package.json文件,这里用pnpm生成:
pnpm init
安装rollup和Typescript:
pnpm add rollup
pnpm add typescript
配置package.json的pnpm build命令:
{


  "scripts": {


    "build": "rollup --c --configPlugin typescript2 --bundleConfigAsCjs",
    "build:dev": "cross-env NODE_ENV=development pnpm build",
    "build:prod": "cross-env NODE_ENV=production pnpm build"
  },
  "type": "module"
}
rollup是跑在node环境的,node的模块化是commonjs不支持esmodule的 所以要在package.json的运行脚本里配置一个rollup命令–bundleConfigAsCjs将esmodule代码解析成commonjs让nodejs能够认识 然后package.json还要加上type:module支持esmodule
build命令解释:
- –c是指定rollup读取项目根目录下的rollup.config配置文件进行构建
- –configPlugin是指定rollup构建时要使用的插件 包括对rollup配置文件的处理 这里指定用typescript2这个插件来处理ts的配置文件 防止rollup配置文件读取报错
- –bundleConfigAsCjs是rollup的一个命令用来将esmodule转换成commonjs便于node环境中使用
- cross-env是一个插件用来抹平不同操作系统中设置环境变量的方式,不同操作系统环境变量设置方式是不一样的 我们不能一个个去弄 所以用来实现跨平台的设置环境变量
- build:dev和build:prod用来根据获取环境变量注入的值process.env.NODE_ENV来做不同的操作
- type:module也是配置支持esmodule的一步 要加上
rollup.config.ts配置文件
文件要求导出一个RollupOptions对象/RollupOptions[]对象数组 一个对象就是一个文件的打包配置 要打包多少就多少个配置对象 这里我就指定一个入口文件对外暴露三个接口就行 rollup会根据入口文件的导入引用去查找文件进行构建
rollup配置文件配置:
import nodeResolve from '@rollup/plugin-node-resolve'
import typescript2 from 'rollup-plugin-typescript2'
// @ts-ignore
import babel from 'rollup-plugin-babel'
import commonjs from '@rollup/plugin-commonjs'
import {

     join, resolve } from 'path'
import {

     readdir } from 'fs/promises'
import {

     RollupOptions, defineConfig } from 'rollup'
import {

     IOptions } from 'rollup-plugin-typescript2/dist/ioptions'
import {

     existsSync } from 'fs'
import {

     unlink, rmdir, lstat } from 'fs/promises'
const commonPlugins = [
  nodeResolve({


    extensions: ['.ts', '.tsx'], // 告诉node要解析的文件扩展名
  }),
  typescript2({


    tsConfig: resolve(__dirname, 'tsconfig.json'), // 指定ts配置文件位置
    // useTsconfigDeclarationDir: true, // 使用配置文件里的DeclarationDir 不开启默认强制生成在和文件同级目录同名文件
  } as Partial<IOptions>),
  babel({


    babelrc: true, // 使用.babelrc配置文件
  }),
  commonjs(), // 这个插件比如加 用来转换成commonjs 然后注入react17新的jsx组件转换函数_JSX react17+不再用createElement 不用这个插件只用babel处理会报错
]
/**
 * @description 根据路径删除目录
 * @param dirs 删除的目录路径
 */
const removeDir = async (...dirs: string[]) => {


  for (const dir of dirs) {


    const absolutePath = resolve(__dirname, dir)
    if (existsSync(absolutePath)) {


      const dirStack = [absolutePath]
      while (dirStack.length > 0) {


        const initPath = dirStack[dirStack.length - 1]
        const fileStat = await lstat(initPath)
        if (fileStat.isDirectory()) {


          const files = await readdir(initPath)
          if (files.length > 0) {


            dirStack.push(...files.map((e) => join(initPath, e)))
          } else {


            await rmdir(initPath)
            dirStack.pop()
          }
        } else if (fileStat.isFile()) {


          await unlink(initPath)
          dirStack.pop()
        }
      }
    }
  }
}
const resolveRollupOptions = async () => {


  const results: RollupOptions[] = []
  const dirStack = [resolve(__dirname, 'src')]
  while (dirStack.length > 0) {


    const initPath = dirStack.shift()!
    const fileStat = await lstat(initPath)
    if (fileStat.isDirectory()) {


      const files = await readdir(initPath)
      if (files.length > 0) {


        dirStack.push(...files.map((e) => join(initPath, e)))
      }
    } else if (fileStat.isFile()) {


      const rollupOption: RollupOptions =
        process.env.NODE_ENV === 'development'
          ? {


              input: initPath,
              treeshake: false,
              external: ['react', 'react-dom'],
              output: {


                file: initPath
                  .replace(/src/, 'lib')
                  .replace(/\.(tsx|ts)/, '.js'),
                format: 'esm',
                sourcemap: true,
              },
              plugins: commonPlugins,
            }
          : {


              input: initPath,
              treeshake: true,
              external: ['react', 'react-dom'],
              output: {


                file: initPath
                  .replace(/src/, 'lib')
                  .replace(/\.(tsx|ts)/, '.min.js'),
                format: 'esm',
                sourcemap: false,
              },
              plugins: [...commonPlugins],
            }
      results.push(rollupOption)
    }
  }
  return results
}
export default defineConfig(async (/* commandLineArgs */) => {


  // 每次构建前先删除上一次的产物
  await removeDir('es', 'lib')
  // 生成两个产物 一个esmodule模块 一个umd通用模块
  return [
    {


      input: resolve(__dirname, 'src/index.ts'), // 指定入口文件
      treeshake: true, // 开启treeshaking
      external: ['react', 'react-dom'], // 第三方库使用外部依赖
      output: {


        name: 'ReactAlive', // 这个name用于打包成umd/iife模块时模块挂到全局对象上的key
        file: resolve(__dirname, 'es/index.js'), // 构建的产物输出位置和文件名
        format: 'esm', // 构建产物的模块化类型
        sourcemap: false, // 关闭sourcemap
        // 指定被排除掉的外部依赖在全局对象上的key
        globals: {


          react: 'React',
          'react-dom': 'ReactDOM',
        },
      },
      plugins: commonPlugins,
    },
    {


      input: resolve(__dirname, 'src/index.ts'),
      treeshake: true,
      external: ['react', 'react-dom'],
      output: {


        name: 'ReactAlive',
        file: resolve(__dirname, 'lib/index.js'),
        format: 'umd',
        sourcemap: false,
        globals: {


          react: 'React',
          'react-dom': 'ReactDOM',
        },
      },
      plugins: commonPlugins,
    },
  ] as RollupOptions[]
})
root/src/index.ts:入口文件声明好这个库要对外暴露的接口:
import KeepAliveScope from './components/keepalive-scope'
import KeepAliveItem, {

     useCacheDestroy } from './components/keepalive-item'
export {

     KeepAliveItem, KeepAliveScope, useCacheDestroy }
root/global.d.ts:为process.env.NODE_ENV提供类型声明 这样就有代码提示了:
declare namespace NodeJS {


  interface ProcessEnv {


    NODE_ENV: 'development' | 'production'
  }
}
root/tsconfig.json:
{


  "compilerOptions": {


    "target": "ESNext",
    "lib": ["DOM", "DOM.Iterable", "ESNext"],
    "allowJs": false,
    "skipLibCheck": true, // 跳过第三方库类型声明文件的检查
    "esModuleInterop": true, // 开启将esm代码编译成cjs
    "allowSyntheticDefaultImports": true, // 启用默认导出 .default访问默认导出的module.exports内容
    "strict": true,
    "forceConsistentCasingInFileNames": true,
    "module": "ESNext",
    "sourceMap": true,
    "moduleResolution": "node",
    "resolveJsonModule": true,
    "isolatedModules": true,
    "noEmit": true,
    "types": ["node"],
    "experimentalDecorators": true, // 开启装饰器语法
    "jsx": "react-jsx", // react17+这里可以改成react-jsx 17+后会自动引入一个编译jsx函数 配置babel的automatic
    "baseUrl": ".",
    // "paths": {


    //   "@/*": ["src/*"]
    // },
    "declaration": true // 是否生成类型声明文件
    // "declarationDir": "lib/types" // 类型声明文件默认生成在对应ts文件同级目录 指定一个目录统一生成
  },
  "exclude": ["node_modules"],
  "include": ["src"]
}
root/.babelrc:给babel插件提供配置:
{


  "presets": [
    "@babel/preset-env",
    [
      "@babel/preset-react",
      {


        "runtime": "automatic"
      }
    ]
  ],
  "extensions": [".ts", ".tsx"],
  "include": ["src"],
  "exclude": ["node_modules"]
}
.babelrc文件解释:
- @babel/preset-env:babel根据我们环境的不同来调整babel的自身配置的预设
- @babel/preset-react:babel用于在react项目环境中调整自己的配置的预设 用来转换jsx propstype检查之类的 预设里的配置项runtime:automatic是指运行时自动在react组件里注入jsx的转换函数 react17之前我们需要在组件开头导入React才能用React对象上的createElement创建组件 v17之后的新特性允许我们不用导入React就能自动注入jsx的转换函数 这件事最终是由@babel/plugin-transform-react-jsx来做的
- extensions:告诉babel要处理的文件的文件后缀 我的组件就只有tsx和ts文件
.npmignore文件: 告诉npm publish时哪些文件忽略不用发布到npm包里
这是我的项目要忽略的checklist:
node_modules
src
.babelrc
.gitignore
.npmignore
.prettierrc
rollup.config.ts
test
pnpm-lock.yaml
global.d.ts
tsconfig.json
.DS_Store
test-project
除了.npmignore里的文件都会被上传到npm
发布npm包
首先注册一个npm账号 然后去首页搜索包的头部会有个提示让你绑定2FA安全校验策略 根据提示走完流程就行 大概就是要绑定一个otp(one-time-password)一次性密码 这个下载一个google authentication的app就能生成 扫网页上的码绑定账号然后跟着提示走就行 这个一次性密码在第一次npm login和npm publish的时候会让你输入otp 后面就直接让你去浏览器验证就行
每次发布前要先修改一下package.json的version版本号 不能发布相同的版本 会报错
发布前最好去搜搜包名(package.json的name就是npm包的包名)是否已经存在了 不然取存在的名字会报没有权限更新别人的包 最好就是用@自己的名字/包名这个格式 加个用户名称前缀相当于一个namespace 重复的几率就会小很多
root/package.json完整代码示例:
{


  "name": "@williamyi74/react-keepalive",
  "version": "1.1.2",
  "description": "基于react18+的缓存组件,拥有类似vue的KeepAlive组件功能效果",
  "main": "index.js",
  "scripts": {


    "build": "rollup --c --configPlugin typescript2 --bundleConfigAsCjs",
    "build:dev": "cross-env NODE_ENV=development pnpm build",
    "build:prod": "cross-env NODE_ENV=production pnpm build"
  },
  "keywords": [
    "alive",
    "keep alive",
    "react",
    "react keep alive",
    "react keep alive item",
    "react keep alive scope",
    "react keep scope",
    "react hooks keep alive"
  ],
  "author": "williamyi",
  "license": "ISC",
  "peerDependencies": {


    "react": ">=18.2.0",
    "react-dom": ">=18.2.0",
    "typescript": ">=5.0.4"
  },
  "devDependencies": {


    "@babel/core": "^7.21.4",
    "@babel/preset-env": "^7.21.4",
    "@babel/preset-react": "^7.18.6",
    "@rollup/plugin-commonjs": "^24.1.0",
    "@rollup/plugin-node-resolve": "^15.0.2",
    "@types/react": "^18.2.0",
    "@types/react-dom": "^18.2.1",
    "cross-env": "^7.0.3",
    "react": "^18.2.0",
    "react-dom": "^18.2.0",
    "rollup": "^3.21.0",
    "rollup-plugin-babel": "^4.4.0",
    "rollup-plugin-typescript2": "^0.34.1",
    "typescript": "^5.0.4"
  },
  "type": "module"
}
root/package.json解释:
- keywords: 搜索你的包时的关键词
- description: 搜索包时略缩图下的简述
- license: 项目的协议,ISC是MIT的一个简化版本 这个说明就是别人能自由的修改和用你的项目
- peerDependencies: 项目里用到的外部依赖要求 告诉使用这个包的项目这些依赖版本要符合这个要求 否则会报错 用这个包的项目下载依赖时会下载peerDep 而不是我们项目里去下载 external里的包都写到这
首先执行npm login前先切换到npm源不要在淘宝源 否则会报错 输入信息跟着走完
登录成功后执行npm publish --access public发布
–access public是告诉npm发布公开的包 因为默认是不能发布私有包的 忘了私有包是要收费还是啥 指定了这个命令参数就不会报权限错误了
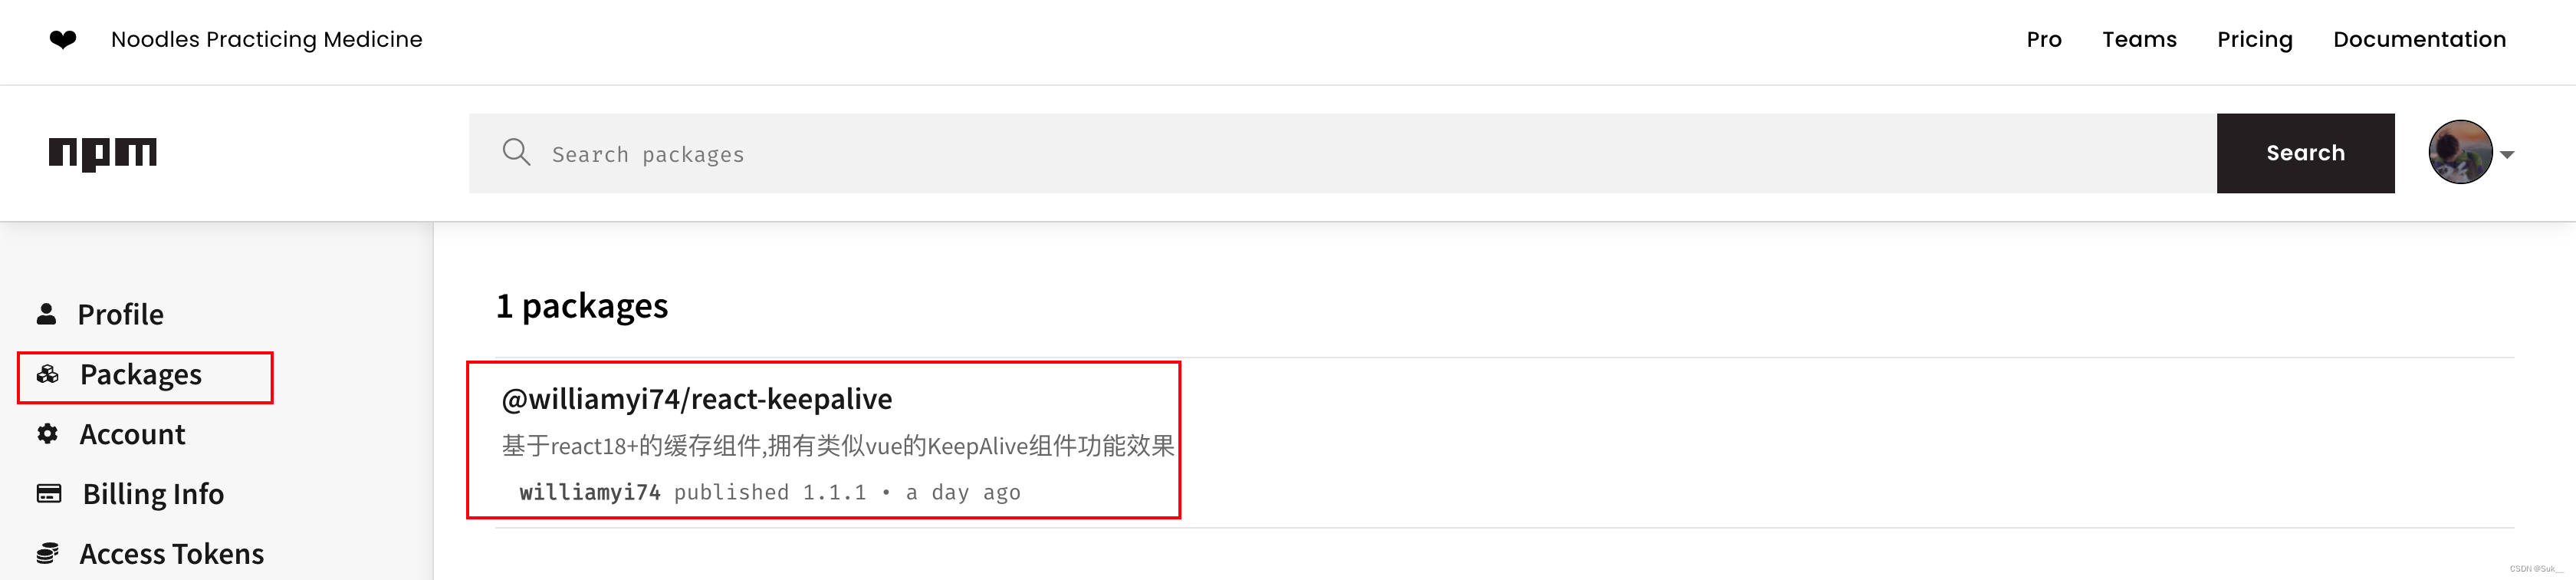
一路没报错后去看npm的package就能看到自己发布上去的包了:
文档
使用文档就是根目录下的README.md文件 完善这个文件就可以了