文章目录
前置 Express安装
- 方式一 : express提供的脚手架,直接创建一个应用的骨架
- 安装脚手架npm install -g express-generator
- 创建项目 express express-demo
- 安装依赖npm install
- 启动项目 node bin/www
- 方式二 : 从零搭建自己的express应用结构;
- 初始化项目 npm init
- 安装express npm i express
1. 基本使用
- 导入–>创建–>监听
- 使用参考文档
const express = require('express');
//  * 创建express服务器
const app=express()
//  * 启动服务器 ,监听端口

app.listen(8000,()=>{


	console.log('启动express 服务器')
})

// 请求
app.post('/login',(req,res)=>{


     res.end('登录成功')
})

app.get('/home',(req,res)=>{


    res.end('home 列表模块')
})
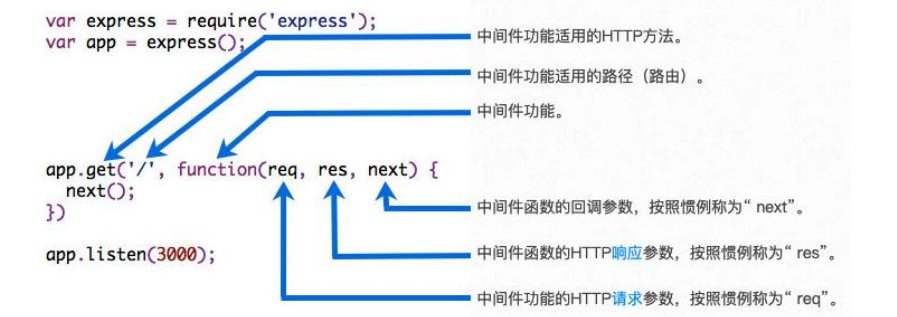
2. 中间件
- 中间件的本质是传递给express的一个回调函数;
- 这个回调函数接受三个参数:
- 请求对象(request对象);
- 响应对象(response对象);
- next函数(在express中定义的用于执行下一个中间件的函数);
重要:中间件的执行过程,只会执行第一次匹配的中间件,关于后面是否执行看next
app.post('/login', (req, res, next) => {


    // 中间件中的req与res可以进行修改
    res.aaa = '添加aaa并修改res'
    // 2. JSON结束
    // res.json({message:'登录成功',code:200})
    // res.end('登录成功')
    // 3. next 匹配执行下一个中间件
    next()
})
注意点: 如果当前中间件功能没有结束请求-响应周期,则必须调用next()这将控制权传递给下一个中间件功能,否则,请求将被挂起
const express = require('express');
//  * 创建express服务器
const app = express()
//  * 启动服务器 ,监听端口

app.listen(8000, () => {


    console.log('启动express 服务器')
})

// 请求
app.post('/login', (req, res, next) => {


    // 中间件中的req与res可以进行修改
    res.aaa = '添加aaa并修改res'
    // 2. JSON结束
    // res.json({message:'登录成功',code:200})
    // res.end('登录成功')
    // 3. next 匹配执行下一个中间件
    next()
})

app.use((req,res,next)=>{


    console.log('执行下一个中间件next');
})

app.get('/home', (req, res) => {


    res.end('home 列表模块')
})
2.1 中间件应用
- express主要提供了两种方式:
- app/router.use;
- app/router.methods;
app.use
app.use((req,res,next)=>{


    console.log('执行下一个中间件next');
})
app.methods
app.get('/home', (req, res) => {


    res.end('home 列表模块')
})
3. 中间件的注册方式
3.1 普通中间件的注册
use注册的中间件不管什么路径或者请求都可以匹配的上- 同时在匹配的过程中如何不
next(), 只会执行第一个中间件
// 1. use注册的中间件不管什么路径或者请求都可以匹配的上
// 2. 同时在匹配的过程中如何不 next(), 只会执行第一个中间件
app.use((req,res,next)=>{


    console.log('执行下一个中间件next');
    next()
})

app.use(()=>{


    console.log('执行第二个中间件')
})
3.2 path匹配中间件
-路径匹配中间件只是对路径做限制并没有对请求方式做显示
// 这里的路径匹配中间件只是对路径做限制并没有请求方式做显示
// 不管method如何都可以匹配
app.use('/home',(req,res,next)=>{


	console.log('路径匹配中间件')
})
3.3 method与路径匹配
- 语法:
app.method(path,middleware) - 匹配中间件只会匹配第一个符合要求的中间件 , 关于下一个中间件是否执行看有没有调用next
// app.method(path,middleware)
app.get('/home',(req,res,next)=>{


	console.log('路径以及方法匹配');
	res.end('匹配成功')
})

// 注册多个中间件
app.get('/home', (req, res, next) => {


	console.log('路径以及方法匹配');
	res.end('匹配成功')
	// 中间的匹配只会匹配第一个符合要求的中间件 , 关于下一个中间件是否执行看有没有调用next
}, (req, res, next)=>{


   console.log('关于这个中间件的执行需要看上一个中间件是否有next');
})
3.4 案列中间件匹配与执行方法
- 普通直接写法
app.post('/login', (req, res, next) => {


	req.on('data', data => {


		let userInfo = data.toString()
		const user = JSON.parse(userInfo)
		if (user.username === 'admin' && user.password===123456) {


			res.end('登录成功')
		}else{


			res.end('账号或者密码错误')
		}
	})

})

//  注册信息
app.post('/register', (req, res, next) => {


	// res.end('注册成功')
	// 注册要查询数据库,看是否存在用户名
   if (true) {


		 req.on('data', data => {


			 let userInfo = data.toString()
			 const user = JSON.parse(userInfo)
			 if (user.username === 'admin' && user.password === 123456) {


				 res.end('注册成功')
			 } else {


				 res.end('账号或者密码错误')
			 }
		 })
	 }

})
- ** 优化
JSON解析,放到body后next()**
// 1. JSON解析,放到body
app.use((req, res, next) => {


	if (req.headers['content-type'] === 'application/json') {


		req.on('data', data => {


			const jsonInfo = JSON.parse(data.toString())
			req.body = jsonInfo
		})
		req.on('end', () => {


			next()
		})
	}
})

// 账号密码
app.post('/login', (req, res, next) => {


  console.log(req.body);
	res.end('登录成功')
})
//  注册信息
app.post('/register', (req, res, next) => {


	console.log(req.body);
})
4. 中间件request数据解析
express有内置一些帮助我们完成对request解析的中间件;
4.1 解析request body中间件
app.use((req, res, next) => {


	if (req.headers['content-type'] === 'application/json') {


		req.on('data', data => {


			const jsonInfo = JSON.parse(data.toString())
			req.body = jsonInfo
		})
		req.on('end', () => {


			next()
		})
	}
	next()
})
// 账号密码
app.post('/login', (req, res, next) => {


  console.log(req.body);
	res.end('登录成功')
})
- 上面代码中利用
JSON.parse对data数据进行解析,但是express中提供了 json可以直接进行解析
app.use(express.json())
// 账号密码
app.post('/login', (req, res, next) => {


  console.log(req.body);
	res.end('登录成功')
})
4.2 urlencoded解析
- 解析客户端利用
urlencoded传参 , 这时就需要用express.urlencoded()
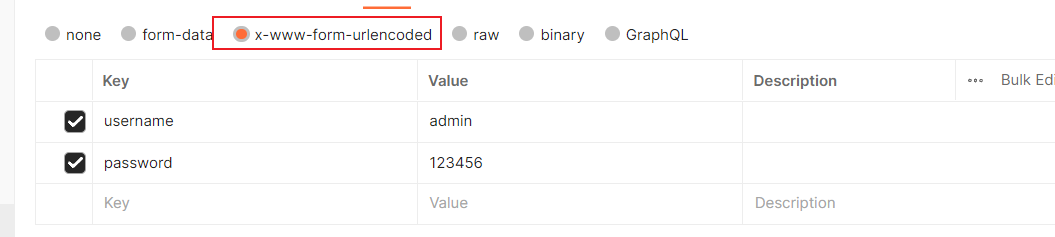
app.use(express.urlencoded())  // 解析客户端利用urlencoded传参
// 解决 body - parser deprecated undefined extended: provide extended option 05urlencoded警告
app.use(express.urlencoded({

     extended: true }))
app.post('/login', (req, res, next) => {


	console.log(req.body);
	res.end('登录成功')
})
5. 第三方中间件
5.1 morgan 日志记录
const express = require('express');
const morgan = require('morgan');
const fs = require('fs');
const app = express()
// cnpm i morgan  安装
// 第三方中间件 合并日志
const writerLog=fs.createWriteStream('./log.txt')
// 日志写入
app.use(morgan('combined', {

     stream: writerLog }))
app.post('/login', (req, res, next) => {


	console.log(req.body);
	res.end('登录成功')
})
5.2 multer 文件上传
- 安装
npm i multer --save Multer只处理任何multipart/form-data类型的表单数据。Multer会在express 的 request 对象里添加一个 body 对象(包含表单的文本域信息)以及file或files对象 (单文件通过req.file获取,多文件通过req.files获取,file 或 files 对象包含对象表单上传的文件信息)。注意点upload.single的值,对应前端name中的值,同时也要保住form-data中key的值相同。
const multer = require('multer');
// 对上传的文件名字重起
const upload = multer({


	storage: multer.diskStorage({


		//  文件名称,
		// destination 是用来确定上传的文件应该存储在哪个文件夹中
		// destination 是一个函数,必须创建这个文件夹
		destination(require, file, callback) {


			callback(null, 'uploads/')
		},
		filename(require, file, callback) {


			// originalname是文件上传时的名字,可以根据它获取后缀
			callback(null, Date.now() + '_' + file.originalname)
		}
	})
})
app.post('/upload', upload.single("file"), (req, res, next) => {


	console.log(req.file);  // 文件信息
	res.end('文件上传成功')
})
- 多文件上传 ,接受的是一个数组
- 同时在
multer实例.array(fielname[,maxCount])——接收一个以fielname命名的文件数组;maxCount——限制上传的最大数量,这些文件的信息保存在req.files里面
app.post('/upload', upload.array("file"), (req, res, next) => {


	console.log(req.files);  // 文件信息
	res.end('文件上传成功')
})
参考解析
解析form-data中的普通数据
const formData=  multer()
app.post('/login',formData.any(), (req, res, next) => {


	console.log(req.body);
	res.end('登录成功')
})
6. 参数解析 params和query
- query 主要用于分页
app.post('/list', (req, res, next) => {


	// http://localhost:8000/list?offset=10&page=20解析
	console.log(req.query);   // { offset: '10', page: '20' }
	res.end('登录成功')
})
- params 主要用于id的传递
app.post('/user/:id', (req, res, next) => {


	// http://localhost:8000/user/1100

	const id = req.params.id
	res.end(`获取用户${

      id}`)
})
7. 响应数据
end方式: 类似于http中的response.end方法,用法是一致的json方法: json方法中可以传入很多的类型:object、array、string、boolean、number、null等,它们会被转换成json格式返回status方法: 用于设置状态码;注意是函数- 其他响应内容参考
app.get('/login', (req, res, next) => {


	// 1. 方法一 end
	// res.end(`响应数据---登录成功`)
	//  2. JSON数据响应
	// res.json({


	// 	code: 0, message: '欢迎回来', data: [{


	// 		name: "admin",
	// 		avator:'www.http.ccc.jpg'
	// 	}]
	// })

	//  3. status 方法,设置http状态码
	res.status(201)
	res.json(
		{


			code: 0, message: '欢迎回来', data: [{


				name: "admin",
				avator: 'www.http.ccc.jpg'
			}]
		}
	)
})
8. 路由
express.Router来创建一个路由处理程序
useRouter.js
const express = require('express');
const userRouter = express.Router()
userRouter.get('/', (req, res, next) => {


	res.json(
		{


			code: 0, message: 'success', data: [{


				name: "admin",
				password:'123456'
			}, {


					name: "admin",
					password: '123456'
				}]
		}
	)
})
userRouter.get('/:id',(req, res, next) => {


	const id=req.params.id
	res.end(id)
})
userRouter.post('/', (req, res, next) => {


})
userRouter.delete('/:id', (req, res, next) => {


})
userRouter.patch('/:id', (req, res, next) => {


})

module.exports=userRouter
index.js
const userRouter = require('./router/userRouters.js');
app.use('/users', userRouter)
参考文章 :路由在项目中的具体使用
9. 静态资源
express 内置static() 静态资源,直接将文件夹做一个静态资源
app.use(express.static('./uploads'))
10 错误处理
- 普通的错误处理,需要利用前端的数据进行if判断处理
- 但是每一个接口写一个判断或者返回的错误信息以及状态码相同,这就会造成代码的甬余
app.post('/login', (req, res, next) => {


	const {

     username, password } = req.body
	if (username !== 'admin' || password !== 123456) {


		res.json({


			code: 1002,
			message: '账号密码错误'
		})
	} else {


		console.log('xx')
		res.json({


			code: 200,
			message: '登录成功'
		})
	}
})
- 简单封装统一处理
// 中间件处理错误信息
app.post('/login', (req, res, next) => {


	if (username !== 'admin' || password !== 123456) {


		next(1002)
	}
	else {


		next()
	}
})
app.use((errCode, req, res, next) => {


	const code = errCode
	let message = ''
	switch (code) {


		case 1001:
			message = '未知的错误'
			break
		case 1002:
			message = '账号或密码错误'
		default:
			message = '登录成功'
	}
	res.json({


		code: errCode,
		message,
	})
})