SpringBoot介绍
做为后端开发的你,是否也曾像我一样,因为框架中无穷无尽的配置而加班至深夜,浸没在xml的海洋里,绝望在心中蔓延。忽然,天边出现了一丝曙光,SpringBoot这轮太阳冉冉升起,将永夜的黑暗一扫而光。使用了SpringBoot之后,编码、配置、部署及监控都将变得简单,让我们一起沐浴在SpringBoot的海洋中吧!
很多初入坑的小伙伴有这样的疑惑:SpringBoot和SpringMVC之间是什么关系?其实两者之间没有必然的关系,SpringBoot是SpringMVC的升级版。可以直接学习SpringBoot,学习过SpringMVC的同学转到SpringBoot之后,一定会被SpringBoot的超爽快感所征服。
SpringBoot的特点
- 化繁为简,简化配置:抛掉繁琐的xml的配置
- 备受关注,下一代框架:SpringBoot今年来的搜索量直线上升
- 微服务的入门级微框架:微服务是当下非常流行的一种服务,学习SpringCloud的前提是先学会SpringBoot
我们本篇博客将引导大家搭建第一个简单的SpringBoot项目,并结合MyBatis实现数据库的交互及简单的增删改查,一起来看吧!
搭建第一个SpringBoot项目
首先来看看我们所使用的各版本信息:SpringBoot: 2.0.2
MyBatis: 1.3.2
IDEA: 2017.3.4(Ultimate Edition)
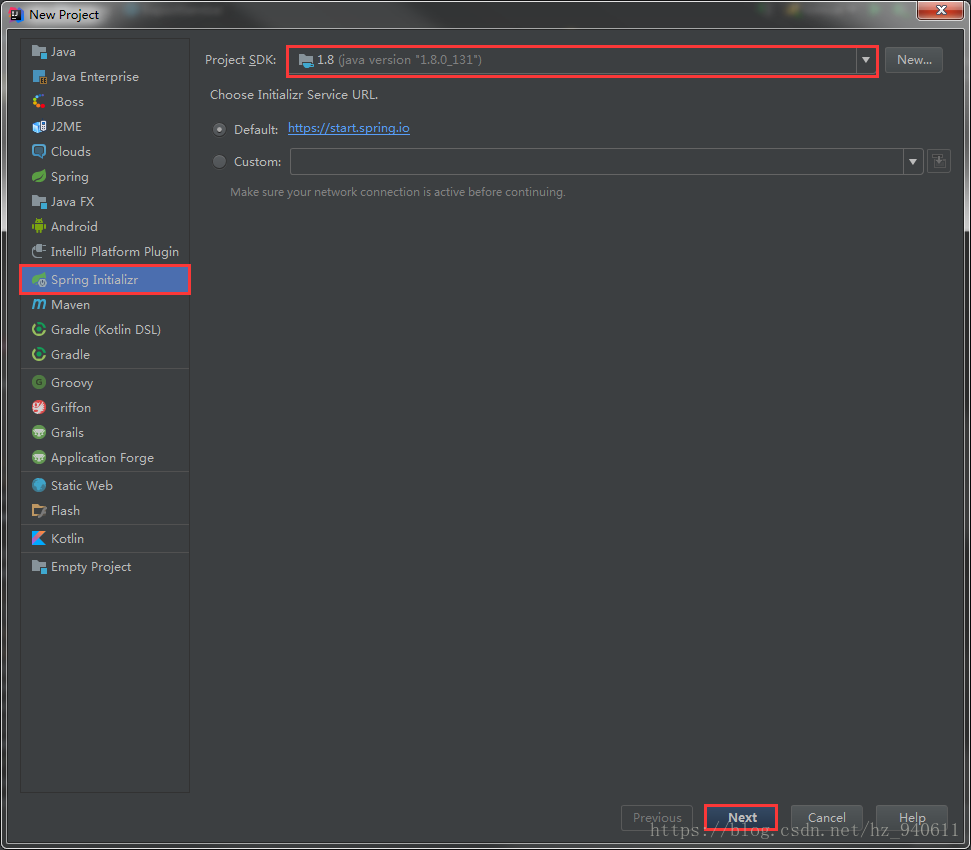
打开IDEA,选择new -> projrct 看到如下所示窗口,选择Spring Initializr,并选择Project SDK为当前使用的java版本,然后点击next
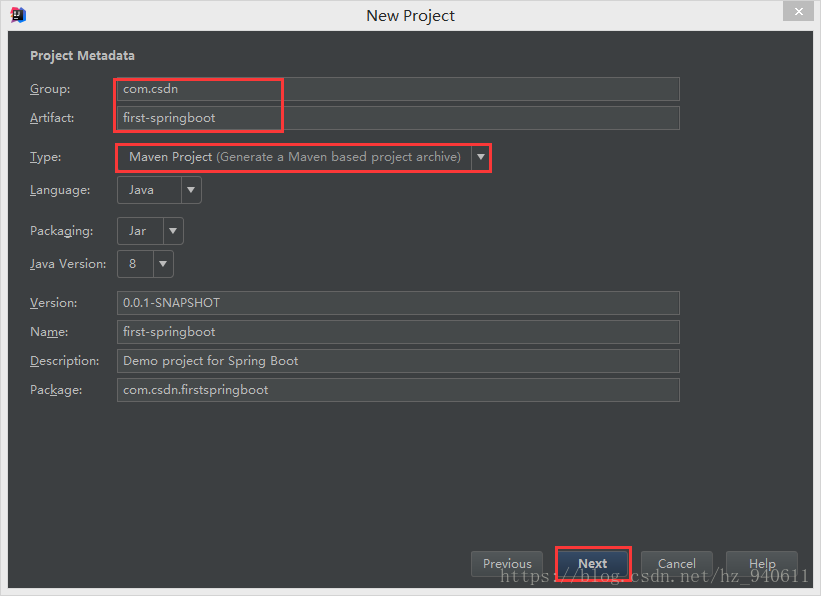
接下来,选择项目所在的包名及Artifact名称,并且选择Type为Maven Project,其余选项默认即可,next
接下来需要SpringBoot版本,这里我们选择比较新的2.0.2的版本,并且选择项目的基础依赖jar包,分别选择Web、MySQL、JDBC及MyBatis,next指定project和location点击finish

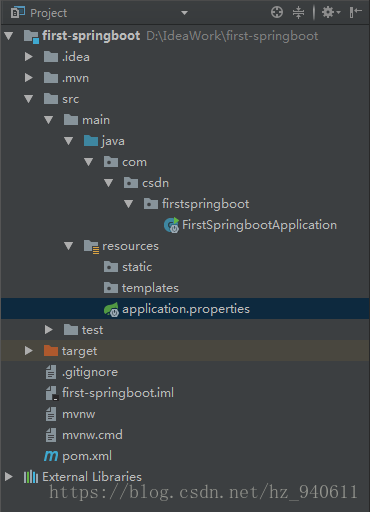
至此,SpringBoot项目的搭建已经基本完成。
我们来看一下项目的基本结构
点击查看FirstSpringbootApplication类
package com.csdn.firstspringboot;

import org.springframework.boot.SpringApplication;
import org.springframework.boot.autoconfigure.SpringBootApplication;

@SpringBootApplication
public class FirstSpringbootApplication {

	public static void main(String[] args) {
		SpringApplication.run(FirstSpringbootApplication.class, args);
	}
}
这个类是SpringBoot项目的启动类,它的头部必须有@SpringBootApplication的标注,通过其中的main方法启动SpringBoot项目。
我们再来看一下熟悉的老朋友——pom.xml:
<?xml version="1.0" encoding="UTF-8"?>
<project xmlns="http://maven.apache.org/POM/4.0.0" xmlns:xsi="http://www.w3.org/2001/XMLSchema-instance"
	xsi:schemaLocation="http://maven.apache.org/POM/4.0.0 http://maven.apache.org/xsd/maven-4.0.0.xsd">
	<modelVersion>4.0.0</modelVersion>

	<groupId>com.csdn</groupId>
	<artifactId>first-springboot</artifactId>
	<version>0.0.1-SNAPSHOT</version>
	<packaging>jar</packaging>

	<name>first-springboot</name>
	<description>Demo project for Spring Boot</description>

	<parent>
		<groupId>org.springframework.boot</groupId>
		<artifactId>spring-boot-starter-parent</artifactId>
		<version>2.0.2.RELEASE</version>
		<relativePath/> <!-- lookup parent from repository -->
	</parent>

	<properties>
		<project.build.sourceEncoding>UTF-8</project.build.sourceEncoding>
		<project.reporting.outputEncoding>UTF-8</project.reporting.outputEncoding>
		<java.version>1.8</java.version>
	</properties>

	<dependencies>
		<dependency>
			<groupId>org.springframework.boot</groupId>
			<artifactId>spring-boot-starter-jdbc</artifactId>
		</dependency>
		<dependency>
			<groupId>org.springframework.boot</groupId>
			<artifactId>spring-boot-starter-web</artifactId>
		</dependency>
		<dependency>
			<groupId>org.mybatis.spring.boot</groupId>
			<artifactId>mybatis-spring-boot-starter</artifactId>
			<version>1.3.2</version>
		</dependency>

		<dependency>
			<groupId>mysql</groupId>
			<artifactId>mysql-connector-java</artifactId>
			<scope>runtime</scope>
		</dependency>
		<dependency>
			<groupId>org.springframework.boot</groupId>
			<artifactId>spring-boot-starter-test</artifactId>
			<scope>test</scope>
		</dependency>

		<!-- alibaba的druid数据库连接池 -->
		<dependency>
			<groupId>com.alibaba</groupId>
			<artifactId>druid-spring-boot-starter</artifactId>
			<version>1.1.9</version>
		</dependency>
	</dependencies>

	<build>
		<plugins>
			<plugin>
				<groupId>org.springframework.boot</groupId>
				<artifactId>spring-boot-maven-plugin</artifactId>
			</plugin>
		</plugins>
	</build>
</project>
这里我们使用时下比较流行的数据库连接池——阿里爸爸的druid,所以需要手动在pom.xml中加入其jar
我们将application.properties文件删掉,使用更为方便的application.yml文件做配置:
server:
  port: 8082

spring:
    datasource:
        druid:
          filters: stat
          driver-class-name: com.mysql.jdbc.Driver
          url: jdbc:mysql://127.0.0.1:3306/firstspringboot?useUnicode=true&characterEncoding=UTF-8&allowMultiQueries=true
          username: root
          password: root
          initial-size: 1
          min-idle: 1
          max-active: 20
          max-wait: 60000
          time-between-eviction-runs-millis: 60000
          min-evictable-idle-time-millis: 300000
          validation-query: SELECT 'x'
          test-while-idle: true
          test-on-borrow: false
          test-on-return: false
          pool-prepared-statements: false
          max-pool-prepared-statement-per-connection-size: 20

mybatis:
  mapper-locations: classpath:mapper/*.xml
  type-aliases-package: com.csdn.firstspringboot.entity
我们这里指定项目的端口号为8082,并且指定数据库地址及MyBatis的xml文件位置和映射实体类包路径
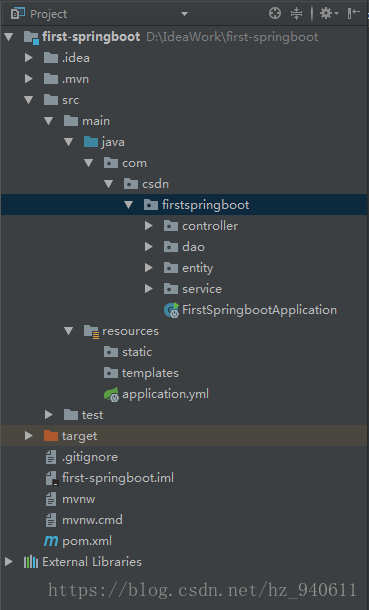
接下来分别创建entity,dao,service,controller包(注意:这些包需要和SpringBoot的启动类在同级目录下):
我们在entity包下创建People实体类:
package com.csdn.firstspringboot.entity;

/**
 * @Auther: haozz
 * @Date: 2018/6/2 01:06
 * @Description:
 */
public class People {

    private Integer id;

    private String name;

    private String password;

    private String email;

    /* Getter and Setter */
}
创建数据库firstspringboot及表t_people:
CREATE DATABASE firstspringboot;

CREATE TABLE t_people(
  id INT NOT NULL PRIMARY KEY AUTO_INCREMENT,
  name VARCHAR(255) NOT NULL ,
  password VARCHAR(255) NOT NULL ,
  email VARCHAR(255) NOT NULL
) ENGINE=INNODB AUTO_INCREMENT=1 DEFAULT CHARSET=utf8;
在dao包中创建PeopleMapper接口,我们这里不做过多处理,只写增和查:
package com.csdn.firstspringboot.dao;

import com.csdn.firstspringboot.entity.People;

import java.util.List;

/**
 * @Auther: haozz
 * @Date: 2018/6/2 00:09
 * @Description: people ORM
 */
public interface PeopleMapper {

    int insertPeople(People people);

    List<People> findPeopleList();
}
在dao包下创建PeopleMapper.xml
<?xml version="1.0" encoding="UTF-8" ?>
<!DOCTYPE mapper PUBLIC "-//mybatis.org//DTD Mapper 3.0//EN" "http://mybatis.org/dtd/mybatis-3-mapper.dtd" >
<mapper namespace="com.csdn.firstspringboot.dao.PeopleMapper" >

    <insert id="insertPeople" parameterType="com.csdn.firstspringboot.entity.People">
        insert into
        t_people
        (name,password,email)
        values
        (#{name},#{password},#{email})
    </insert>

    <select id="findPeopleList" resultType="com.csdn.firstspringboot.entity.People">
        select * from t_people
    </select>

</mapper>
创建PeopleService.java:
package com.csdn.firstspringboot.service;

import com.csdn.firstspringboot.dao.PeopleMapper;
import com.csdn.firstspringboot.entity.People;
import org.springframework.beans.factory.annotation.Autowired;
import org.springframework.stereotype.Service;

import java.util.List;

/**
 * @Auther: haozz
 * @Date: 2018/6/2 00:17
 * @Description: PeopleService
 */
@Service
public class PeopleService {

    @Autowired
    private PeopleMapper peopleMapper;

    public int addPeople(People people){
        return peopleMapper.insertPeople(people);
    }

    public List<People> findAllPeople(){
        return peopleMapper.findPeopleList();
    }
}
创建PeopleController.java:
package com.csdn.firstspringboot.controller;

import com.csdn.firstspringboot.entity.People;
import com.csdn.firstspringboot.service.PeopleService;
import org.springframework.beans.factory.annotation.Autowired;
import org.springframework.web.bind.annotation.RequestMapping;
import org.springframework.web.bind.annotation.RequestMethod;
import org.springframework.web.bind.annotation.RestController;

import java.util.HashMap;
import java.util.List;
import java.util.Map;

/**
 * @Auther: haozz
 * @Date: 2018/6/2 00:24
 * @Description: PeopleController
 */
@RestController
@RequestMapping("people")
public class PeopleController {

    @Autowired
    private PeopleService peopleService;

    @RequestMapping(value = "/addpeople",method = RequestMethod.POST)
    public int addPeople(People people){
        return peopleService.addPeople(people);
    }

    @RequestMapping(value = "/findallpeople",method = RequestMethod.GET)
    public Map<String,Object> findAllPeople(){
        Map<String,Object> result = new HashMap<>();
        List<People> list = peopleService.findAllPeople();
        result.put("data",list);
        return result;
    }

    @RequestMapping(value = "",method = RequestMethod.GET)
    public String hello(){
        return "hello to my SpringBoot";
    }
}
至此,我们的SpringBoot+MyBatis项目就已经搭建完毕了,我使用神器Postman进行测试,出现了几处bug,主要是由于粗心大意引起的,在这里和大家分享一下:
- 项目启动成功之后,浏览器输入url提示404,这是因为我之前创建包的时候没有将controller、service等等包路径和SpringBoot启动类放在同级目录下引起的,调整之后就可以了;
- 启动报错:提示PeopleMapper找不到,这时需要在SpringBoot启动类头部加上@MapperScan("com.scdn.firstspringboot.dao")注解,即将dao包路径引入到SpringBoot对mapper的扫描中;
- 启动成功,但是在进行到新增或者查询操作之后返回500,控制台输出"invalid bound statement (not found)...",这是因为我习惯性的将PeopleMapper.xml和PeopleMapper.java放在同一个包下,而...Mapper.xml的MyBatis文件是需要映射到resourcers下的,所以需要我们手动在pom.xml的<build>下加入resource的配置:
<resources>
    <resource>
	<directory>src/main/java</directory>
	<includes>
		<include>**/*.yml</include>
		<include>**/*.xml</include>
	</includes>
	<filtering>false</filtering>
    </resource>
   <resource>
	<directory>src/main/resources</directory>
	<includes>
		<include>**/*.yml</include>
		<include>**/*.xml</include>
	</includes>
	<filtering>false</filtering>
   </resource>
</resources>
即将所有的.yml和.xml都映射到resources目录下
最后,我们Postman一把:
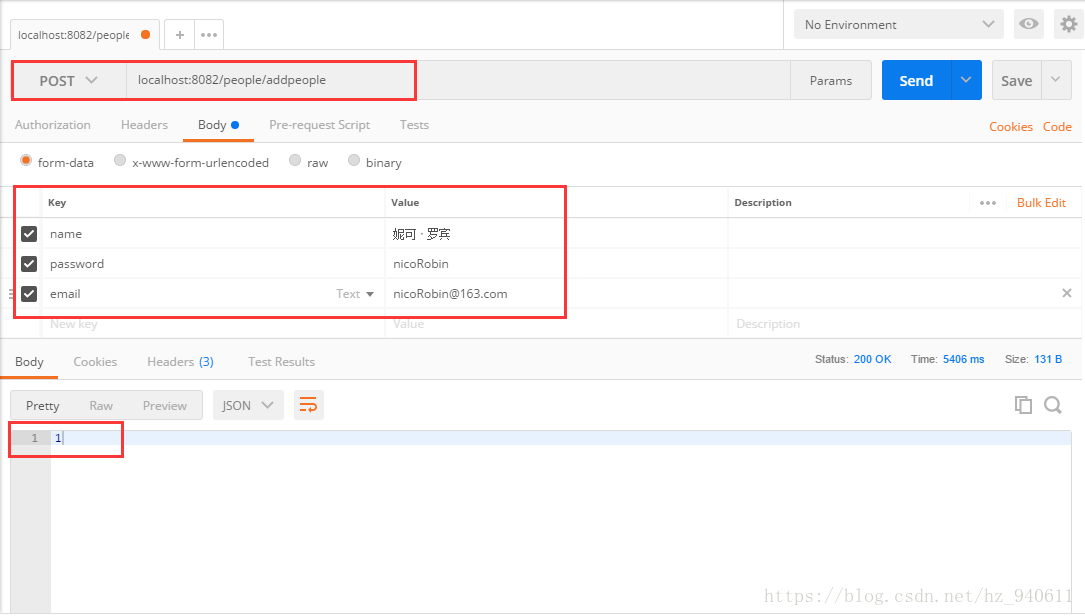
可以看到返回结果为1,说明数据添加成功
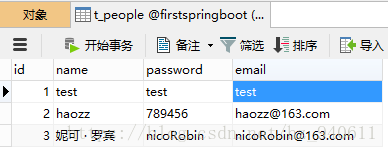
并且数据库中也出现了我们刚才新增的数据
再来测试一下查询:

同样获得了想要的结果。
至此,我们的SpringBoot+MyBatis项目的搭建才是大功告成了,各位小伙伴可以参考此文搭建自己的项目,如果出现了错误,希望大家仔细检查各种配置以及使用的各个模块的版本,尤其需要注意上面提到的几处bug。当然,这只是一个很小的项目,其中不足的地方也希望大家批评指正,主要是为了向大家演示这两者之间的结合,后期我们还将结合更多的技术,比如redis、mongo等等。
另外,项目中如果需要返回MedelAndView的话还需要在pom中加入这些配置:
<!-- jstl JSP标准标签库  -->
<dependency>
	<groupId>javax.servlet</groupId>
	<artifactId>jstl</artifactId>
	<version>1.2</version>
</dependency>
<!-- 返回jsp页面还需要这个依赖 -->
<dependency>
	<groupId>org.apache.tomcat.embed</groupId>
	<artifactId>tomcat-embed-jasper</artifactId>
	<!--<scope>provided</scope>-->
</dependency>