Chapter 2 比较硬的基础部分
Section 1 委托
什么是委托?
- 委托 Delegate 是函数指针的升级版
- Delegate 的意思是,这有一件事情,我不亲自去做,而是交给别人去做,也就是间接地去做;
#include <studio.h>

int Add(int a, int b)
{


	int result = a + b;
	return result
}

int Sub(int a, int b)
{


	int result = a - b;
	return result
}

int main()
{


	int x = 100;
	int y = 200;
	int z = 0;

	z = Add(x, y);
	printf("%d+%d=%d", x, y, z);

	z = Sub(x, y);
	printf("%d-%d=%d", x, y, z);

	system("pause");
	return 0;
}
我们可以看到输出结果如下:
>> 100+200=300
>> 100-200=-100
>> Press any key to continue ...
在这个例子里,是通过函数的名字,来调用,是直接调用
#include <studio.h>
typedef int (* Calc)(int a, int b); // 函数指针,并且定义为一种类型
int Add(int a, int b)
{
int result = a + b;
return result
}
int Sub(int a, int b)
{
int result = a - b;
return result
}
int main()
{
int x = 100;
int y = 200;
int z = 0;
Calc funcPoint1 = &Add;
Calc funcPoint2 = ⋐
z = funcPoint1(x, y);
printf("%d+%d=%d", x, y, z);
z = funcPoint2(x, y);
printf("%d-%d=%d", x, y, z);
system("pause");
return 0;
}
我们可以看到输出结果如下:
>> 100+200=300
>> 100-200=-100
>> Press any key to continue ...
可以看到输出结果是一样的,这就说明了间接调用和直接调用的效果是一样的,这就是C语言中的函数指针;
- 一切皆地址
-
- 变量(数据)是以某个地址为起点的一段内存中所存储的值;
-
- 函数(算法)是以某个地址为起点的一段内存中所存储的一组机器语言指令;
- 直接调用与间接调用
-
- 直接调用:通过函数名来调用函数,处理器通过函数名直接获得函数所在的地址并开始执行 -> 返回;
-
- 间接调用:通过函数指针来调用函数,处理器通过读取函数指针存储的值获得函数所在地址并开始执行 -> 返回;
- Java 中没有委托相对应的功能实体;
- 委托的简单实用
-
- Action 委托;Void类型用
-
- Func 委托;有参数的用
Part 1 Action 与 func 委托的示例
namespace ConsoleHelloWorld
{


    class Program
    {


        static void Main(string[] args)
        {


            Calculator calculator = new Calculator();
            Action action = new Action(calculator.Report); // 注意这里没有圆括号,这里只需要方法名,而不是调用方法
            calculator.Report(); // 直接调用
            action.Invoke(); // 间接调用,模仿函数指针的写法
            action(); // 间接调用,简洁的写法

            // 参数,参数,返回类型
            Func<int, int, int> func = new Func<int, int, int>(calculator.Add);
            Func<int, int, int> func2 = new Func<int, int, int> (calculator.Sub);

            int x = 100;
            int y = 200;
            int z = 0;

            // 间接调用,函数指针式的写法
            z = func.Invoke(x, y);
            Console.WriteLine(z);

            z = func2.Invoke(x, y);
            Console.WriteLine(z);

            // 间接调用,简洁的写法
            z = func(x, y);
            Console.WriteLine(z);

            z = func2(x, y);
            Console.WriteLine(z);
        }
    }

    class Calculator
    {


        public void Report()
        {


            Console.WriteLine("I have 3 methods");
        }

        public int Add(int a, int b)
        {


            int result = a + b;
            return result;
        }

        public int Sub(int a, int b)
        {


            int result = a - b;
            return result;
        }
    }
}
运行上面的程序可以获得如下的输出:
I have 3 methods
I have 3 methods
I have 3 methods
300
-100
300
-100
Part 2 自定义委托
- 由于委托是一种类 class,类是一种数据类型,且是引用类型的数据类型,委托可以声明变量和声明实例;
- 委托的声明方式与一般的类的声明方式并不相同,更像是 C/C++ 中函数指针的声明方式;
下面这个例子是自定义委托的声明与使用;
namespace ConsoleHelloWorld
{


    public delegate double Calc(double x, double y);
    // delegate 是类,需要声明在名称空间体里面;
    // public 是访问范围,delegate 是告诉编译器要声明一个委托
    // 第一个 double 是目标方法的返回值类型
    // 然后 Calc 是委托的名字
    // 后面的圆括号里面是目标方法的参数列表
    // 到此自定义委托类型声明完成

    class Program
    {


        static void Main(string[] args)
        {


            Calculator calculator = new Calculator();
            // 传递的方法的参数列表必须和声明时一样,返回类型也必须一致
            Calc calc1 = new Calc(calculator.Add);
            Calc calc2 = new Calc(calculator.Sub);
            Calc calc3 = new Calc(calculator.Mul);
            Calc calc4 = new Calc(calculator.Div);

            double a = 100;
            double b = 200;
            double c = 0;

            c = calc1.Invoke(a, b);
            Console.WriteLine(c);

            c = calc2.Invoke(a, b);
            Console.WriteLine(c);

            c = calc3.Invoke(a, b);
            Console.WriteLine(c);

            c = calc4.Invoke(a, b);
            Console.WriteLine(c);
        }
    }

    class Calculator
    {


        // 有四个方法,除了名字不同,返回值类型和参数列表都是一样的
        public double Add(double x, double y)
        {


            return x + y;
        }

        public double Sub(double x, double y)
        {


            return x - y;
        }

        public double Mul(double x, double y)
        {


            return x * y;
        }

        public double Div(double x, double y)
        {


            return x / y;
        }
    }
}
运行上面的代码,可以获得以下的输出:

当我们自定义委托的时候,需要注意几点:
- 委托与所封装的方法必须保持“类型兼容”
- 声明委托的时候不要放错位置,委托是类,需要声明在名称空间体里面,放错了可能导致运行不了或成为嵌套类;
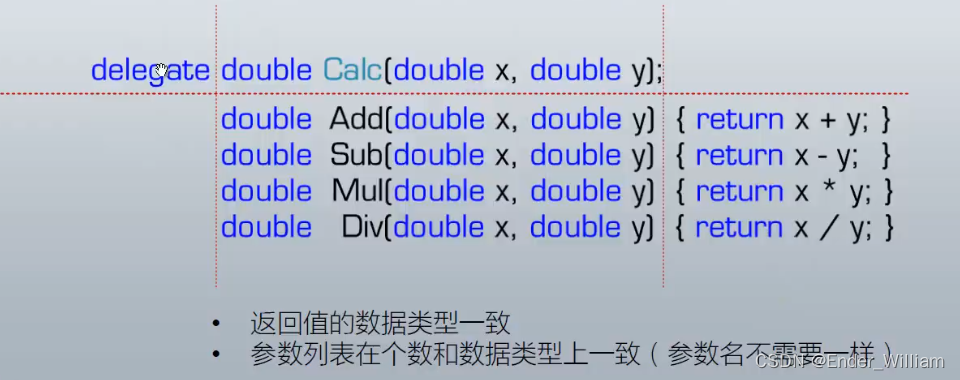
上图可以看到,第一行是委托的声明,下面四行是与之兼容的方法;
Part 3 委托的一般使用
在工作中,一般是把委托当做参数传到另一个方法里去,这样做的好处可以间接调用委托所封装的方法,形成一个动态调用方法的结构;
- 模版方法,写了一个方法,通过传进来的委托参数,借用指定的外部方法来产生结果;
-
- 相当于 填空题
-
- 常位于代码中部
-
- 委托有返回值
-
- 相当于写了一个方法,是模版,这个模版里有一处是不确定的,其他地方是确定好的,这个不确定的部分就靠传进来的委托类型的参数所包含的方法来填补;
- 回调方法 callback,调用制定的外部方法;
-
- 相当于流水线
-
- 常位于代码末尾
-
- 委托没有返回值,通常用来处理一些末尾的工作;
下面展示的使模板方法的使用:
namespace ConsoleHelloWorld
{


    class Program
    {


        static void Main(string[] args)
        {


            ProductFactory productFactory = new ProductFactory();
            WrapFactory wrapFactory = new WrapFactory();

            Func<Product> func1 = new Func<Product>(productFactory.MakePizza);
            Func<Product> func2 = new Func<Product>(productFactory.MakeToyCar);

            Box box1 = wrapFactory.WrapProduct(func1);
            Box box2 = wrapFactory.WrapProduct(func2);

            Console.WriteLine(box1.Product.Name);
            Console.WriteLine(box2.Product.Name);
        }
    }

    class Product
    {


        public string Name {

     get; set; }
    }

    class Box
    {


        public Product Product {

     get; set; }
    }

    class WrapFactory
    {


        public Box WrapProduct ( Func<Product> getProduct )
        {


            // 模板方法
            Box box = new Box();
            // 执行传进来的委托所封装的方法,这就是间接调用
            Product product = getProduct.Invoke(); // 获取产品,将产品装入 Box
            box.Product = product;
            return box;
            // 写成模版方法的好处是,Product类,Box类还有WrapFactory类都不需要在修改,
            // 只需要扩展产品工厂,让其产出更多的产品,不管生产哪种产品的方法,
            // 只需要将该方法封装在委托类型的对象里,传给模版方法,这个模版方法一定可以将
            // 产品包装成箱子返回回来,极大地实现代码的重复使用
        }
    }

    class ProductFactory
    {


        public Product MakePizza()
        {


            Product product = new Product();
            product.Name = "Pizza";
            return product;
        }

        public Product MakeToyCar()
        {


            Product product = new Product();
            product.Name = "Toy Cat";
            return product;
        }
    }
}
下面展示的是回调方法的使用:
namespace ConsoleHelloWorld
{


    class Program
    {


        static void Main(string[] args)
        {


            ProductFactory productFactory = new ProductFactory();
            WrapFactory wrapFactory = new WrapFactory();

            Func<Product> func1 = new Func<Product>(productFactory.MakePizza);
            Func<Product> func2 = new Func<Product>(productFactory.MakeToyCar);

            Logger logger = new Logger();
            Action<Product> log = new Action<Product>(logger.Log);

            Box box1 = wrapFactory.WrapProduct(func1, log);
            Box box2 = wrapFactory.WrapProduct(func2, log);

            Console.WriteLine(box1.Product.Name);
            Console.WriteLine(box2.Product.Name);
        }
    }

    class Logger
    {


        public void Log(Product product)
        {


            // Log 以回调的形式传进模版的方法里
            Console.WriteLine("Product '{0}' created at {1}. Price is {2}.", product.Name, DateTime.UtcNow, product.Price);
        }
    }

    class Product
    {


        public string Name {

     get; set; }
        public double Price {

     get; set; }
    }

    class Box
    {


        public Product Product {

     get; set; }
    }

    class WrapFactory
    {


        public Box WrapProduct ( Func<Product> getProduct, Action<Product> logCallback)
        {


            // 模板方法
            Box box = new Box();
            // 执行传进来的委托所封装的方法,这就是间接调用
            Product product = getProduct.Invoke(); // 获取产品,将产品装入 Box
            if (product.Price >= 50)
            {


                logCallback(product);
            }

            box.Product = product;
            return box;
            // 写成模版方法的好处是,Product类,Box类还有WrapFactory类都不需要在修改,
            // 只需要扩展产品工厂,让其产出更多的产品,不管生产哪种产品的方法,
            // 只需要将该方法封装在委托类型的对象里,传给模版方法,这个模版方法一定可以将
            // 产品包装成箱子返回回来,极大地实现代码的重复使用
        }
    }

    class ProductFactory
    {


        public Product MakePizza()
        {


            Product product = new Product();
            product.Name = "Pizza";
            product.Price = 20;
            return product;
        }

        public Product MakeToyCar()
        {


            Product product = new Product();
            product.Name = "Toy Cat";
            product.Price = 120;
            return product;
        }
    }
}
无论是模版方法还是回调方法,都使用委托类型的参数封装一个外部的方法,然后把这个方法传进方法的内部进行间接调用, 这个就是委托的常规用法。
委托如果被滥用的后果非常危险;
- 这时一种方法级别的紧耦合,现实工作中要慎之又慎;
- 使可读性下降、debug难度增加;
- 把委托回调、异步调用和多线程纠缠在一起,会让代码难以维护和阅读,是灾难级的;
- 委托的使用不当有可能造成内存泄漏和程序性能下降;
Part 4 委托的高级使用
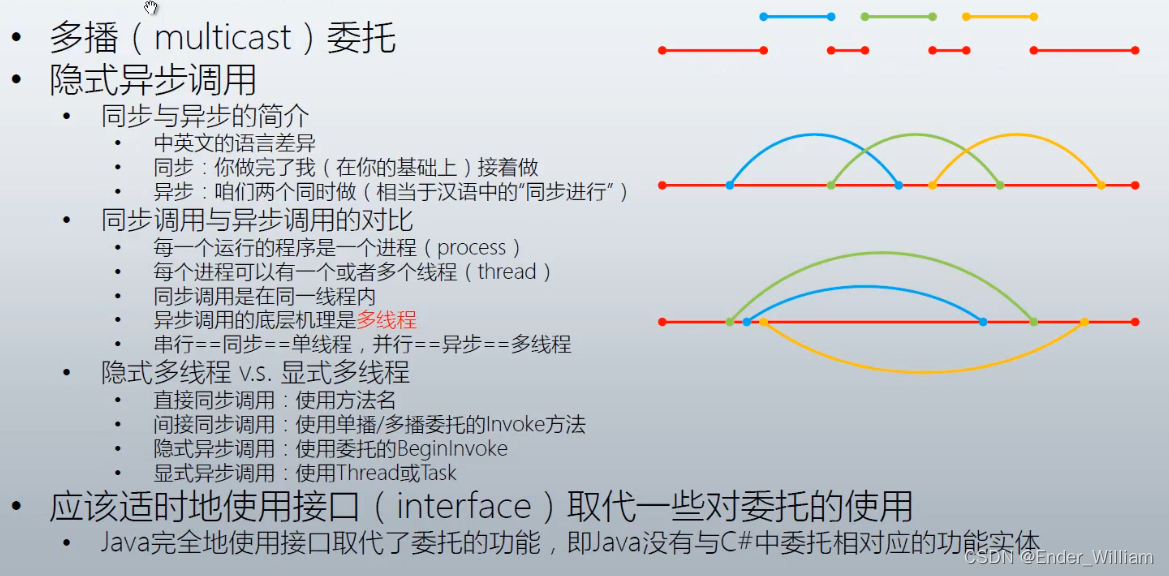
多播委托指的是一个委托内部封装了不止一个方法,下面是例子:
namespace ConsoleHelloWorld
{


    class Program
    {


        static void Main(string[] args)
        {


            Student student1 = new Student() {

     Id = 1, PenColor = ConsoleColor.Yellow };
            Student student2 = new Student() {

     Id = 2, PenColor = ConsoleColor.Green };
            Student student3 = new Student() {

     Id = 3, PenColor = ConsoleColor.Red };

            Action action1 = new Action(student1.DoHomework);
            Action action2 = new Action(student2.DoHomework);
            Action action3 = new Action(student3.DoHomework);

            // 多播委托的写法:
            action1 += action2; // 将 aciton2 合并到 action1
            action1 += action3;

            action1.Invoke();
            // 多播委托的执行顺序是按照你封装方法的顺序执行的
        }
    }

    class Student
    {


        public int Id {

     get; set; }
        public ConsoleColor PenColor {

     get; set; }

        public void DoHomework()
        {


            for (int i = 0; i < 5; i++)
            {


                Console.ForegroundColor = this.PenColor;
                Console.WriteLine("Student {0} doing homework {1} hours.", this.Id, i);
                Thread.Sleep(1000); // 线程暂停一秒钟
            }
        }
    }
}

隐式异步调用
- 异步调用:与同步调用是相对的,
-
- 同步:你做完了,我在你的基础上接着做;
-
- 异步:咱们两个同时做,也就是各做各的;
- 同步调用与异步调用的对比
-
- 每一个运行的程序是一个进程 process
-
- 每一个进程可以有一个或者多个线程 thread,第一个线程叫做主线程,之外的是分支线程
-
- 同一个线程内调用方法的时候,是前一个执行完,后一个才能执行,叫做同步调用;
-
- 异步调用的底层机理是多线程;
-
- 同步调用是单线程串行调用,异步调用是多线程并行调用;
下面是同步调用的异步调用的例子
namespace ConsoleHelloWorld
{


    class Program
    {


        static void Main(string[] args)
        {


            Student student1 = new Student() {

     Id = 1, PenColor = ConsoleColor.Yellow };
            Student student2 = new Student() {

     Id = 2, PenColor = ConsoleColor.Green };
            Student student3 = new Student() {

     Id = 3, PenColor = ConsoleColor.Red };

            // 直接同步调用
            student1.DoHomework();
            student2.DoHomework();
            student3.DoHomework();

            Console.WriteLine("=============================================");

            Action action1 = new Action(student1.DoHomework);
            Action action2 = new Action(student2.DoHomework);
            Action action3 = new Action(student3.DoHomework);

            // 使用委托的隐式异步调用
            action1.BeginInvoke(null, null);
            action2.BeginInvoke(null, null);
            action3.BeginInvoke(null, null);

            Console.WriteLine("=============================================");

            // 使用委托的显式异步调用
            Task task1 = new Task(new Action(student1.DoHomework));
            Task task2 = new Task(new Action(student2.DoHomework));
            Task task3 = new Task(new Action(student3.DoHomework));

            task1.Start();
            task2.Start();
            task3.Start();

            Console.WriteLine("=============================================");

            // 单播委托的间接同步调用
            action1.Invoke();
            action2.Invoke();
            action3.Invoke();

            Console.WriteLine("=============================================");

            // 多播委托的间接同步调用
            action1 += action2;
            action2 += action3;
            action1();

            Console.WriteLine("=============================================");
        }
    }

    class Student
    {


        public int Id {

     get; set; }
        public ConsoleColor PenColor {

     get; set; }

        public void DoHomework()
        {


            for (int i = 0; i < 5; i++)
            {


                Console.ForegroundColor = this.PenColor;
                Console.WriteLine("Student {0} doing homework {1} hours.", this.Id, i);
                Thread.Sleep(1000); // 线程暂停一秒钟
            }
        }
    }
}
Part 5 适时地使用接口 Interface 取代一些对委托的使用
委托使用不当回提高代码的维护难度,使用接口可以避免这些不必要的麻烦还可以获得相同的功能;
namespace ConsoleHelloWorld
{


    class Program
    {


        static void Main(string[] args)
        {


            IProductFactory pizzaFactory = new PizzaFactory();
            IProductFactory toycarFactory = new ToyFactory();
            WrapFactory wrapFactory = new WrapFactory();

            Logger logger = new Logger();
            Action<Product> log = new Action<Product>(logger.Log);

            Box box1 = wrapFactory.WrapProduct(pizzaFactory, log);
            Box box2 = wrapFactory.WrapProduct(toycarFactory, log);

            Console.WriteLine(box1.Product.Name);
            Console.WriteLine(box2.Product.Name);
        }
    }

    interface IProductFactory
    {


        Product Make();
    }

    class PizzaFactory : IProductFactory // 这个类实现了IProductFactory的接口
    {


        public Product Make()
        {


            // 重构是指基本不改变原来的代码,只是把代码放到更合适的地方去
            Product product = new Product();
            product.Name = "Pizza";
            product.Price = 20;
            return product;
        }
    }

    class ToyFactory : IProductFactory
    {


        public Product Make()
        {


            Product product = new Product();
            product.Name = "Toy Cat";
            product.Price = 120;
            return product;
        }
    }

    class Logger
    {


        public void Log(Product product)
        {


            // Log 以回调的形式传进模版的方法里
            Console.WriteLine("Product '{0}' created at {1}. Price is {2}.", product.Name, DateTime.UtcNow, product.Price);
        }
    }

    class Product
    {


        public string Name {

     get; set; }
        public double Price {

     get; set; }
    }

    class Box
    {


        public Product Product {

     get; set; }
    }

    class WrapFactory
    {


        public Box WrapProduct(IProductFactory productFactory, Action<Product> logCallback)
        {


            // 模板方法
            Box box = new Box();
            Product product = productFactory.Make();
            if (product.Price >= 50)
            {


                logCallback(product);
            }
            box.Product = product;
            return box;
        }
    }
}
可以看到,重构之后,使用接口之后,程序没有委托的身影,也就没有方法级别的耦合;
这个例子说明可以使用接口取代委托;
Section 2 事件
Part 1 初步了解事件
- 定义:Event,译为“事件”
-
- 能够发生的东西,特别是一些比较重要的;
-
- a thing that happens, especially something important.
-
- 通顺的解释就是“能够发生的什么事情”,叫做事件;
- 角色:使对象或类具备通知能力的成员
-
- 在 C# 语言中,事件是一种类型的成员,是一种使对象或类能够提供通知的成员
-
- An event is a member that enables an object or class to provide notifications.
-
- 对象 A 拥有一个时间 B的意思是:当B发生的时候,A有能力通知别的对象;
-
- 经由事件发送出来的,与事件本身相关的消息,称为 事件参数 EventArgs
-
- 根据同时和事件参数来采取行动的行为,称为响应时间或处理事件,处理事件时所做的事情就叫做事件处理器 Event Handler.
- 使用:用于对象或类之间的动作协调与信息传递(消息推送)
-
- 事件的功能 = 通知别的对象或者类 + 可选的事件参数(即详细信息)
- 原理:事件模型(event model)(也叫做发生-响应模型)中的两个 “5”
-
- “发生 -> 响应”中的五个部分:闹钟响了你起床、孩子饿了你做饭…这里面隐含着“订阅”的关系;
-
- “发生 -> 响应”中的五个动作:
-
-
- (1)我有一个事件;
-
-
-
- (2)一个人或一群人关心我的这个事件;
-
-
-
- (3)我的这个事件发生了;
-
-
-
- (4)关心这个事件的人会被一次通知到;
-
-
-
- (5)被通知到的人根据拿到的事件信息(又称“时间数据”、“事件参数”、“通知”)对事件进行相应(又称“处理事件”);
-
- 需要规定一下相关的术语以便于交流和学习
-
- 事件的订阅者,与事件消息的接收者、时间的响应者、事件的处理者、被事件所通知的对象是一样的,便于交流,只用事件的订阅者;
-
- 事件参数,与事件信息、事件消息、事件数据是一样的,便于交流,只使用事件参数;
- 提示
-
- 事件多用于桌面、手机等开发的客户端编程,因为这些客户端程序经常是用户通过事件来“驱动”的;
-
- 事件模型是从现实世界抽象而来的,各种编程语言对这个机制的实现方法不尽相同;
-
- Java 语言里没有事件这种成员,也没有委托这种数据类型,Java的事件是使用接口来实现的;
-
- 事件模式是好东西,但是是有缺陷的,如果编写的时候没有约束,程序的逻辑容易混乱,经过长期的总结下来,总结出MVC,MVP,MVVM等架构模式,这些是事件模式更高级、更有效的用法;
-
- 日常开发的时候,使用已有事件的机会比较多,自己声明事件的机会比较少;
Part 2 事件的应用
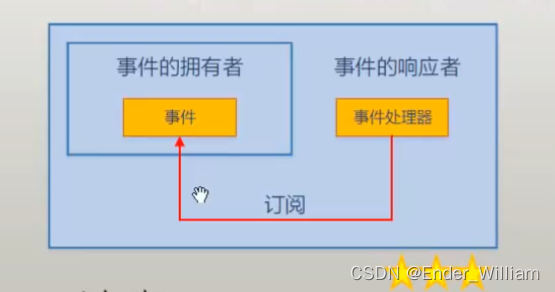
- 事件模型的五个组成部分
-
- 事件的拥有者 event source,对象,事件是被拥有者的内部触发的;
-
- 事件成员,也就是事件本身,event,成员
-
- 事件的响应者,也就是事件的订阅者 event subscriber,对象,当事件发生的时候,有哪些对象被通知到了,就是事件响应者;
-
- 事件的处理器 event handler,成员,本质上是一个回调方法
-
- 事件的订阅,把事件处理器与事件关联在一起,本质上是一种以委托类型为基础的“约定”
- 注意
-
- 事件处理器是方法成员
-
- 挂接事件处理器的时候,可以使用委托实例,也可以直接使用方法名,这是个语法糖;
-
- 事件处理器对事件的订阅不是随意地,匹配是否声明事件时所使用的委托类型来检测;
-
- 事件可以同步调用也可以异步调用;
下面是一个小例子
namespace ConsoleHelloWorld
{


    class Program
    {


        static void Main(string[] args)
        {


            System.Timers.Timer timer = new System.Timers.Timer(); // 事件拥有者 timer
            timer.Interval = 1000; // ms
            Boy boy = new Boy(); // 事件的响应者是 boy 对象
            Girl girl = new Girl();

            timer.Elapsed += boy.Action;// += 是订阅的写法,后面要跟上事件响应者的事件处理器
            timer.Elapsed += girl.Action;
            // 事件 Elapsed,事件订阅 +=
            timer.Start();
            Console.ReadLine();
        }
    }

    class Boy
    {


        // 事件的处理器
        internal void Action(object sender, ElapsedEventArgs e)
        {


            Console.WriteLine("Jump!");
        }
    }

    class Girl
    {


        internal void Action(object sender, ElapsedEventArgs e)
        {


            Console.WriteLine("Sing!");
        }
    }
}
上面展示的是一个事件同时有两个事件处理器的时候的样子;
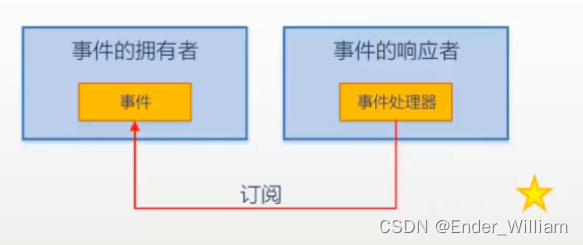
上图展示的是标准的事件机制模型,结构清晰,是MVC、MVP等设计模式的雏形;
下面的程序是对这个标准的事件机制模型的解释
namespace WindowsFormsApp1
{


    internal static class Program
    {


        /// <summary>
        /// The main entry point for the application.
        /// </summary>
        [STAThread]
        static void Main()
        {


            Form form = new Form(); // 事件的拥有者 form
            Controller controller = new Controller(form); // 事件的响应者 controller
            form.ShowDialog();
        }
    }

    class Controller
    {


        private Form form;
        public Controller(Form form)
        {


            if (form != null)
            {


                this.form = form;
                this.form.Click += this.FormClicked; // 事件是 form 的 click,+=实现事件订阅
            }
        }

        // 事件处理器
        private void FormClicked(object sender, EventArgs e)
        {


            this.form.Text = DateTime.Now.ToString();
        }
    }
}
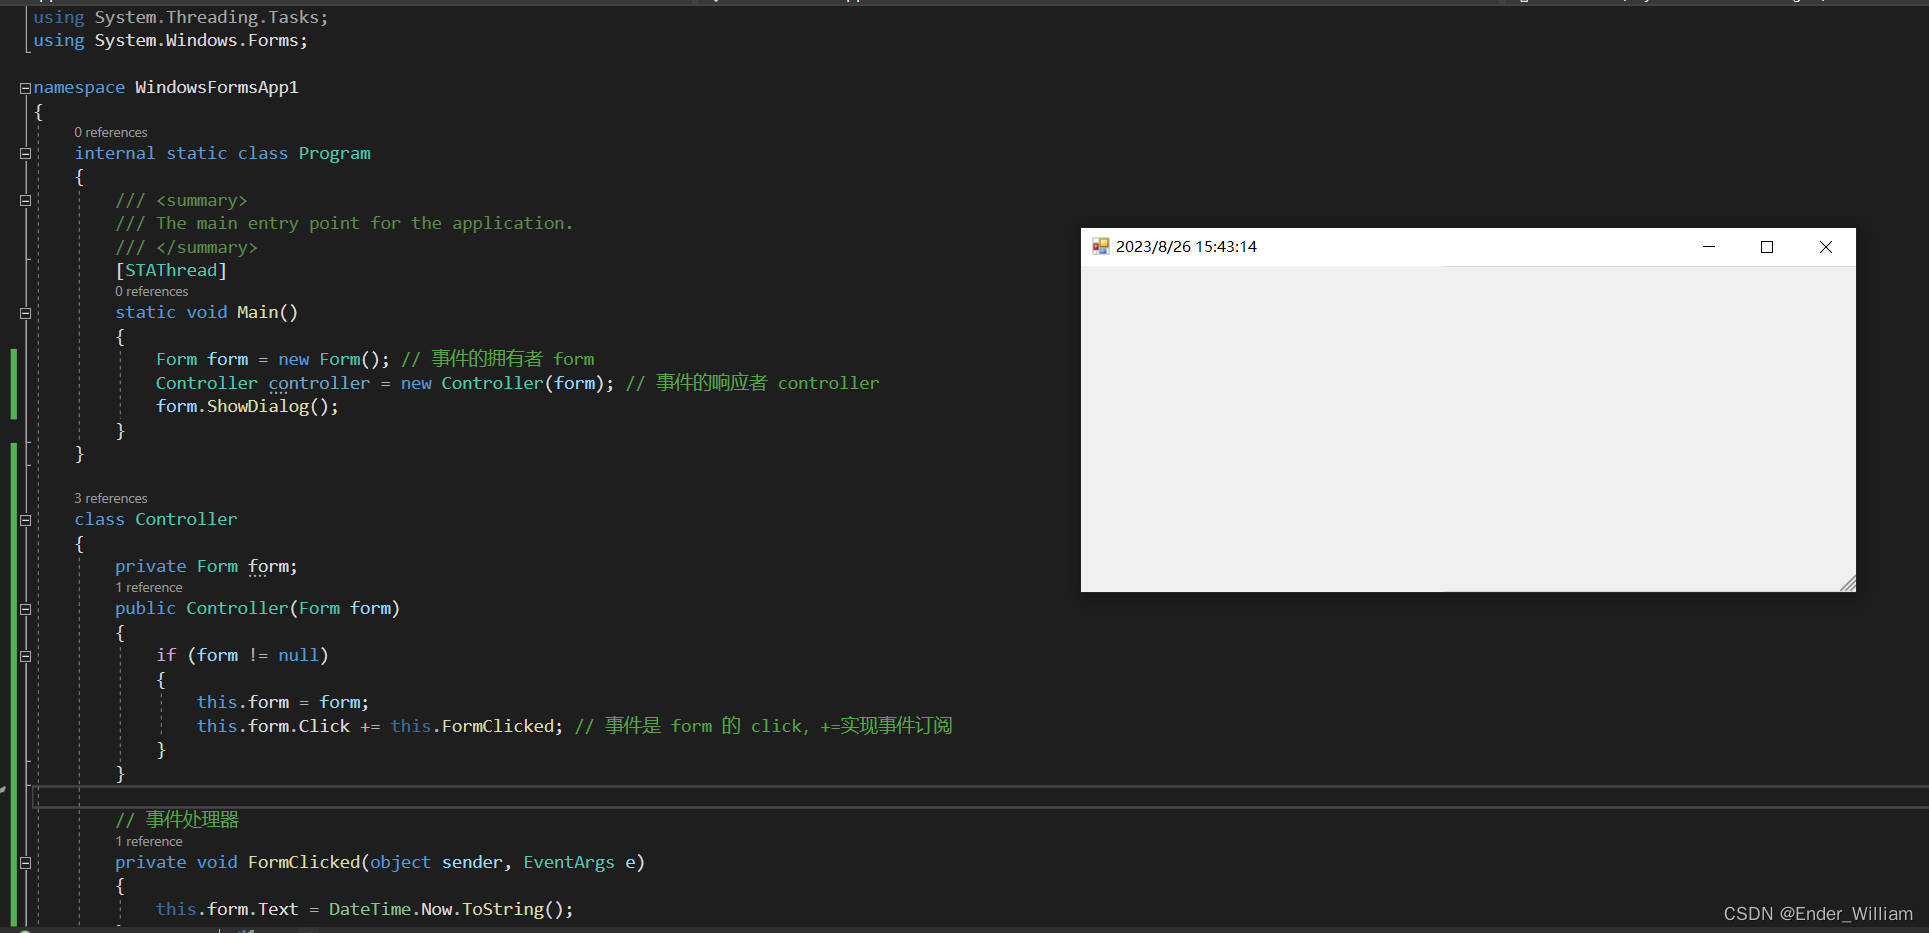

上图展示的是对象用自己的方法订阅、处理自己的事件;
下面的程序是对上图的解释,同时接触到了什么是派生
namespace WindowsFormsApp1
{


    internal static class Program
    {


        /// <summary>
        /// The main entry point for the application.
        /// </summary>
        [STAThread]
        static void Main()
        {


            MyForm form = new MyForm(); // 事件的拥有者 form,事件的响应者也是 from
            form.Click += form.FormClicked; // 事件是 Click,事件的订阅是 +=
            form.ShowDialog();
        }
    }

    class MyForm : Form // 派生,集成原有的方法之外还可以添加新的方法
    {


        // 事件处理器
        internal void FormClicked(object sender, EventArgs e)
        {


            this.Text = DateTime.Now.ToString();
        }
    }
}
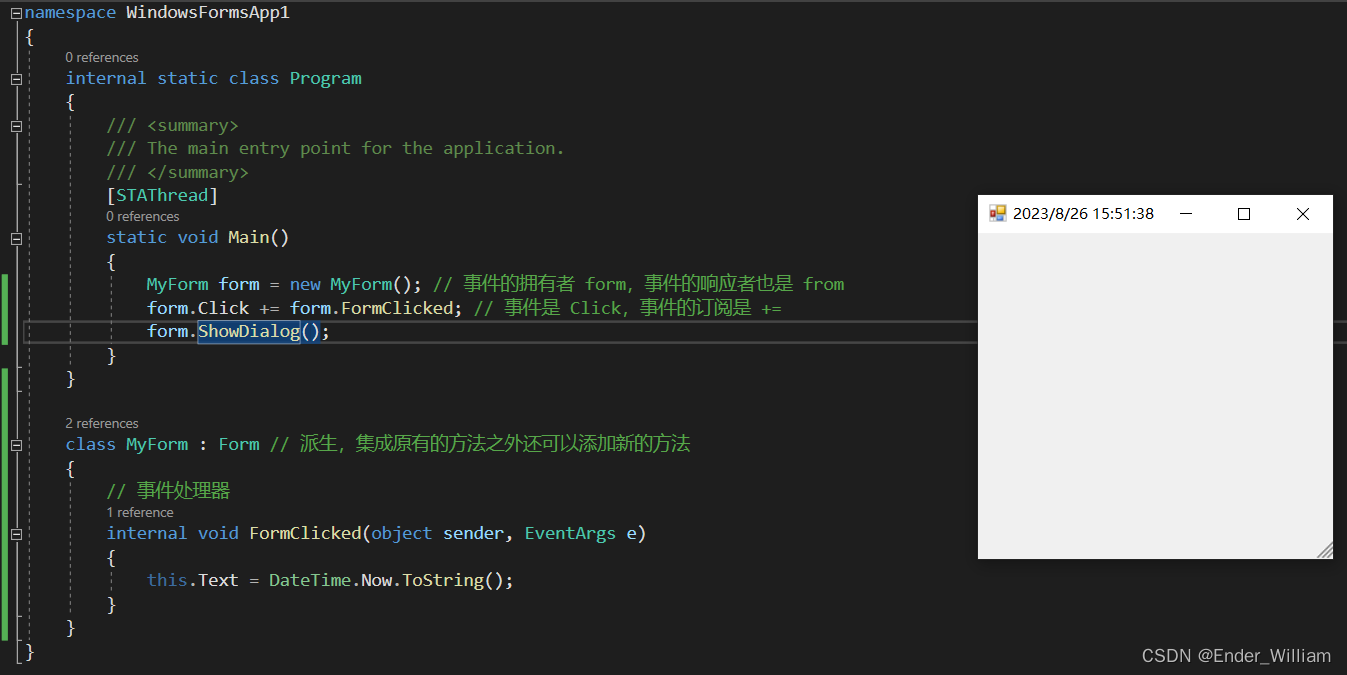
上图展示的是使用最多的,特点是,事件的拥有者是事件的响应者的字段成员,是Windows上默认的事件订阅和处理结构;
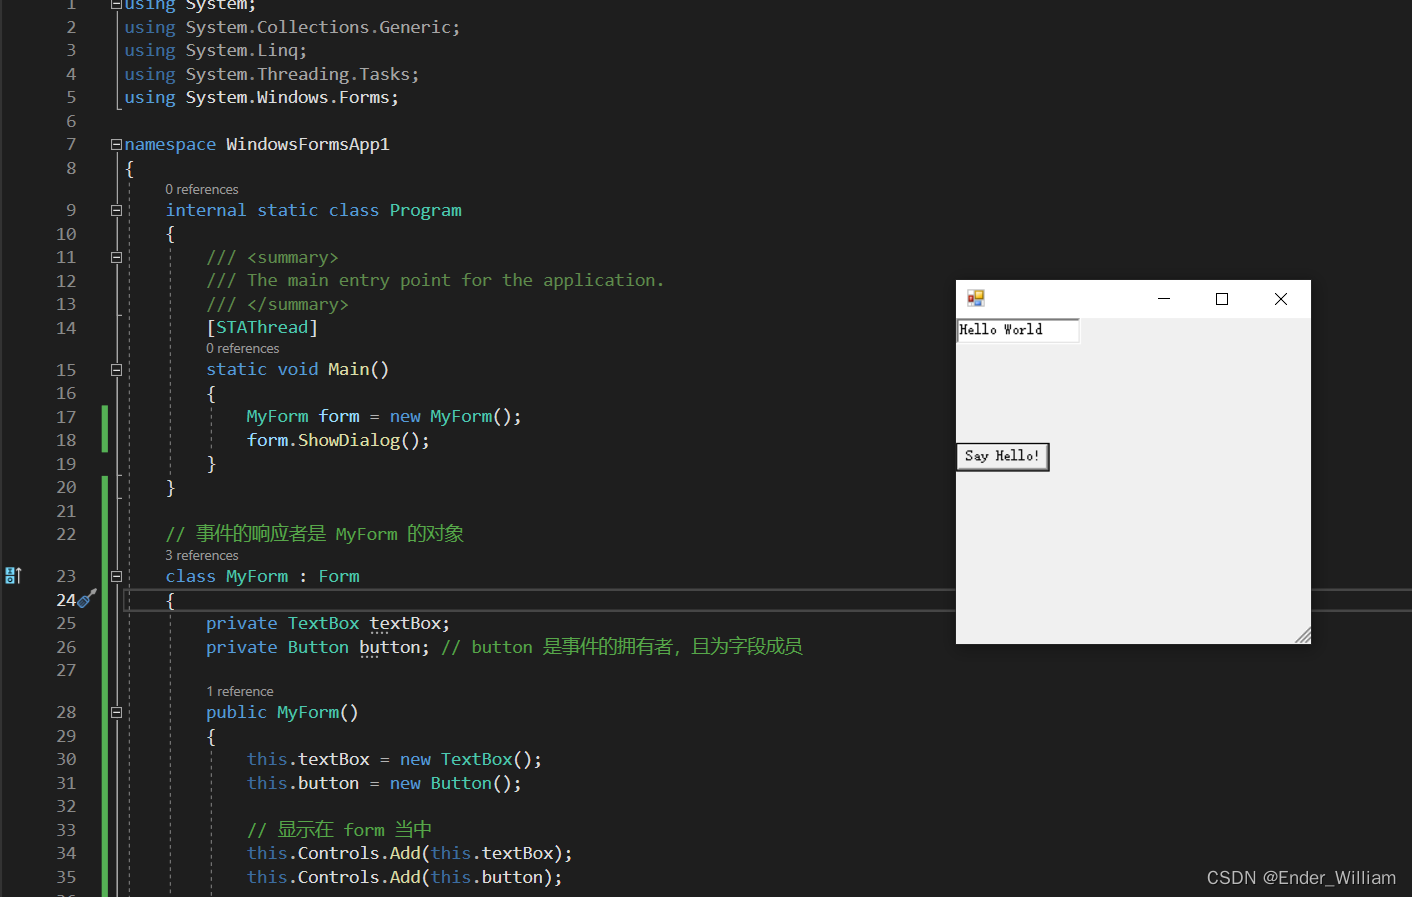
下面的程序是对上图示例的解释
namespace WindowsFormsApp1
{


    internal static class Program
    {


        /// <summary>
        /// The main entry point for the application.
        /// </summary>
        [STAThread]
        static void Main()
        {


            MyForm form = new MyForm();
            form.ShowDialog();
        }
    }

    // 事件的响应者是 MyForm 的对象
    class MyForm : Form
    {


        private TextBox textBox;
        private Button button; // button 是事件的拥有者,且为字段成员

        public MyForm()
        {


            this.textBox = new TextBox();
            this.button = new Button();

            // 显示在 form 当中
            this.Controls.Add(this.textBox);
            this.Controls.Add(this.button);

            this.button.Click += this.ButtonClicked; // 事件是 Click
            // += 是事件的订阅

            this.button.Text = "Say Hello!";
            this.button.Top = 100;
        }

        // 事件的处理器
        private void ButtonClicked(object sender, EventArgs e)
        {


            this.textBox.Text = "Hello World";
        }
    }
}
Part 3 事件的声明
完整的事件声明方式 示例
namespace ConsoleHelloWorld
{


    class Program
    {


        static void Main(string[] args)
        {


            Customer customer = new Customer(); // 事件的拥有者
            Waiter waiter = new Waiter(); // 事件的响应者
            customer.Order += waiter.Action; // 使用 Action 的方法作为 waiter 类型的事件处理器
            // Order 事件 += 事件的订阅

            customer.Action();

            customer.PayTheBill();
        }
    }

    public class OrderEventArgs : EventArgs
    {


        public string DishName {

     get; set; }
        public string Size {

     get; set; }
    }

    public delegate void OrderEventHandler(Customer customer, OrderEventArgs e);


    public class Customer // 需要保证访问级别是一致的
    {


        private OrderEventHandler orderEventHandler;

        // 事件 Order
        public event OrderEventHandler Order
        {


            add
            {


                this.orderEventHandler += value;
            }

            remove
            {


                this.orderEventHandler -= value;
            }
        }

        public double Bill {

     get; set; }
        public void PayTheBill()
        {


            Console.WriteLine("I will pay ${0}", this.Bill);
        }

        public void WalkIn()
        {


            Console.WriteLine("Walk into the restaurant.");
        }

        public void SitDown()
        {


            Console.WriteLine("Sit Dowm.");
        }

        public void Think()
        {


            for (int i = 0; i < 5; i++)
            {


                Console.WriteLine("Let me think.......");
                Thread.Sleep(1000);
            }

            if (this.orderEventHandler != null)
            {


                OrderEventArgs e = new OrderEventArgs();
                e.DishName = "Kongpao Chicken";
                e.Size = "large";
                this.orderEventHandler.Invoke(this, e);
            }
        }

        public void Action()
        {


            Console.ReadLine();
            this.WalkIn(); ;
            this.SitDown();
            this.Think();
        }
    }

    // 事件的响应者
    public class Waiter
    {


        internal void Action(Customer customer, OrderEventArgs e)
        {


            Console.WriteLine("I will serve you the dish - {0}", e.DishName);
            double price = 10;

            switch (e.Size)
            {


                case "small":
                    price = price * 0.5;
                    break;
                case "large":
                    price = price * 1.5;
                    break;
                default:
                    break;
            }
            customer.Bill += price;
        }
    }
}
简略的事件声明方式 示例
namespace ConsoleHelloWorld
{


    class Program
    {


        static void Main(string[] args)
        {


            Customer customer = new Customer(); // 事件的拥有者
            Waiter waiter = new Waiter(); // 事件的响应者
            customer.Order += waiter.Action; // 使用 Action 的方法作为 waiter 类型的事件处理器
            // Order 事件 += 事件的订阅

            customer.Action();

            customer.PayTheBill();
        }
    }

    public class OrderEventArgs : EventArgs
    {


        public string DishName {

     get; set; }
        public string Size {

     get; set; }
    }

    public delegate void OrderEventHandler(Customer customer, OrderEventArgs e);


    public class Customer // 需要保证访问级别是一致的
    {


        public event OrderEventHandler Order;

        public double Bill {

     get; set; }
        public void PayTheBill()
        {


            Console.WriteLine("I will pay ${0}", this.Bill);
        }

        public void WalkIn()
        {


            Console.WriteLine("Walk into the restaurant.");
        }

        public void SitDown()
        {


            Console.WriteLine("Sit Dowm.");
        }

        public void Think()
        {


            for (int i = 0; i < 5; i++)
            {


                Console.WriteLine("Let me think.......");
                Thread.Sleep(1000);
            }

            if (this.Order != null)
            {


                OrderEventArgs e = new OrderEventArgs();
                e.DishName = "Kongpao Chicken";
                e.Size = "large";
                this.Order.Invoke(this, e);
            }
        }

        public void Action()
        {


            Console.ReadLine();
            this.WalkIn(); ;
            this.SitDown();
            this.Think();
        }
    }

    // 事件的响应者
    public class Waiter
    {


        internal void Action(Customer customer, OrderEventArgs e)
        {


            Console.WriteLine("I will serve you the dish - {0}", e.DishName);
            double price = 10;

            switch (e.Size)
            {


                case "small":
                    price = price * 0.5;
                    break;
                case "large":
                    price = price * 1.5;
                    break;
                default:
                    break;
            }

            customer.Bill += price;
        }
    }
}
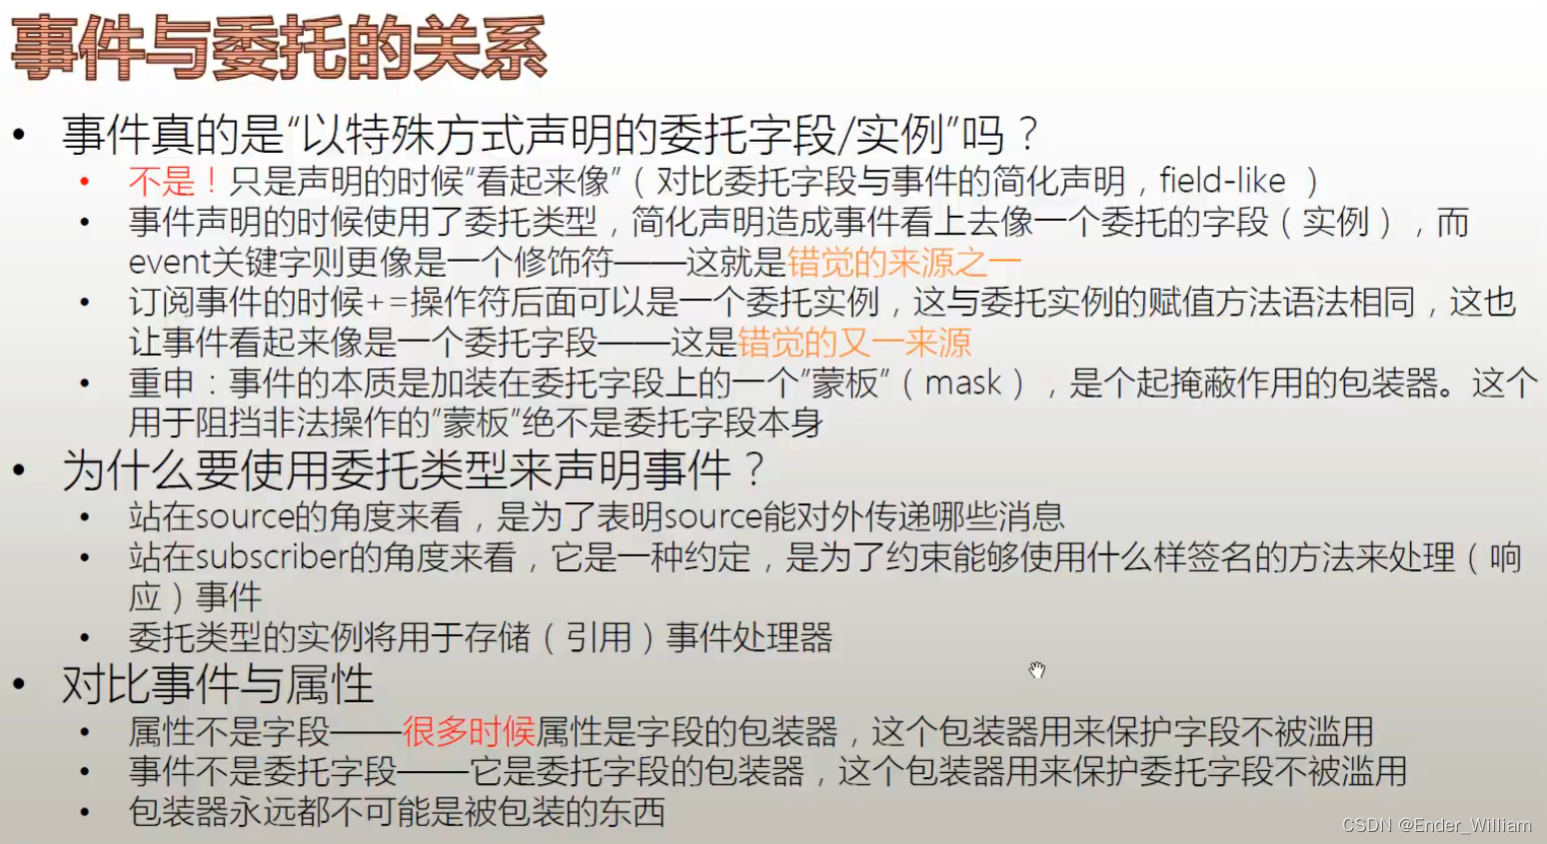
为什么有了委托类型的字段,还需要事件?
- 事件成员可以让程序的逻辑和对象之间的关系变得更加有道理、安全;
Part 4 澄清
Section 3 类
面向对象编程,有三个主要特征:封装、继承和多态;
什么是类
- 是一种数据结构 data structure
- 是一种数据类型
namespace ConsoleHelloWorld {


    class Program {


        static void Main(string[] args) {


            Student student = new Student(id: 1, name: "Tim"); // 创建实例
            student.Report();
        }
    }

    class Student {


        public Student(int id, string name) {


            this.ID = id; ;
            this.Name = name;
        }

        // 析构器,手动释放资源
        // 当程序关闭之前,变量 student 没人引用,系统会自动调用析构器
        ~ Student() {


            Console.WriteLine("Bye bye, Release the system resources");
        }
        public int ID {

     get; set; }
        public String Name {

     get; set; }
        public void Report() {


            Console.WriteLine($"I'm #{

      this.ID} student, my name is {

      this.Name}.");
        }
    }
}
Part 1 类的声明
- 类可以声明在以下三个位置:
-
- 名称空间之内(最常见的)
-
- 显式名称空间之外(实际上是声明在全局名称空间里面)
-
- 类体里面(成员类,或者叫做嵌套类,用得也比较多)
声明 Declaration,定义是 Definition,在 C#和Java中可以混用理解,但在 C++ 当中这二者不是一个东西。在 C++ 中类的声明与类的定义是分开的,C++ 如果要应用类是需要引用头文件,而在 C# 和 Java 当中是不需要的;
因此在 C# 语言中,声明即定义

类命名中的 class 类名 和 类体 是不可缺少的
-
类修饰符是可选的:
-
- new
-
- public
-
- protected
-
- internal
-
- private
-
- abstract
-
- sealed
-
- static
-
new 修饰符适用于嵌套类,它指定类隐藏同名的继承成员,如果在不是嵌套类声明的类声明中使用 new 修饰符,则会导致编译时的错误;
-
public、protected、internal 和 private 修饰符将控制类的可访问性,根据类声明所处的上下文,这其中的一些修饰符可能不允许使用;
-
abstract、sealed 和 static 是有关继承的;
-
public class 其他的项目是可以访问的,也就是其他的 Assembly 可以访问这个 Assembly 中的类;
-
internal class 是可以在同一个项目中自由访问的,也就是把访问级别限制在项目,也就是 Assembly 当中;
-
private class 仅当这个class是其他类的成员的时候,才能见到
Part 2 类的继承
对于面向对象编程非常重要,其最显著的特征是封装、继承和多态,而多态是基于继承的;
声明继承类的语法是比较简单的:
class + 类名 : 类基础 + 类体
一般来说,基类和派生类是一对,父类和子类是一对;
namespace ConsoleHelloWorld {


    class Program {


        static void Main(string[] args) {


            Type type = typeof(Car);
            Type baseType = type.BaseType;
            Console.WriteLine(baseType.FullName);
            // 可以看到输出 >> ConsoleHelloWorld.Vehicle
            // 说明 Car 的基类是 Vehicle
            // "是一个 is a" 概念:
            // 一个派生类的实例,也是基类的实例,但反过来不正确
            // 也就是 Car 的实例也是 Vehicle 的实例
            // 也就是:一个汽车,也是一个交通工具
            Car car = new Car(); // car 是实例,引用着 new 操作符创建的实例
            Console.WriteLine(car is Vehicle);
            // 可以看到输出 >> True
            Vehicle vehicle = new Vehicle();
            Console.WriteLine(vehicle is Car);
            // 可以看到输出 >> False

            // 从 "是一个 is a" 概念,引出 "可以用一个父类类型的变量,引用子类类型的实例"
            // 在多态中是非常有用的,下面是引出概念的示例:
            Vehicle vehicle1 = new Car();
            Object o1 = new Vehicle();
            Object o2 = new Car();
        }
    }

    // 作为基类
    // 如果声明一个类没有说基类是谁
    // 下面的例子编译器等效 class Vehicle : Object { }
    class Vehicle {


    }

    // 由 Vehicle 派生而来,Car 继承了 Vehicle
    class Car : Vehicle {


    }
}
需要注意:
如果使用 sealed 来修饰类,那么这个类就不能作为基类来使用
C# 中一个类最多只允许有一个基类,但可以有多个基接口
- 规范一下用语:
-
- 继承/派生自某个基类;
-
- 某个类实现了某个基接口;
子类的访问级别不能超过父类的访问级别
Part 3 成员的继承与访问
继承的本质:是派生类在基类已有的成员上,进行横向和纵向的扩展
- 派生类基于基类目前已有的成员:当继承发生的时候,子类对父类的成员是全盘获得的,父类里有什么成员,子类就全部获得;
- 派生与继承的过程当中,进行的是扩展:类成员只可能是越来越多,不可能是越来越少;
- 上述两点导致了:一个类成员,一旦被引入到继承链当中,就会一直向下传递,不可能被从继承链中移除掉;这个是静态语言的特点;
- 类成员在数量上的扩充就是横向扩展;
- 不增加类成员的个数,而是对某个类成员的版本进行扩充,就是纵向扩展,也就是重写 override;
例子1:继承链
namespace ConsoleHelloWorld {


    class Program {


        static void Main(string[] args) {


            RaceCar raceCar = new RaceCar();
            string owner = raceCar.Owner; // Owner 声明在 Vehicle 当中,在继承链中继承下来了,这个 Owner 是去不掉的
        }
    }

    // 基类
    class Vehicle {


        public string Owner {

     get; set; }
    }

    class Car : Vehicle {


    }

    class RaceCar : Car {


    }
}
例子2:什么是基类对象,以及如何通过基类对象对基类的类成员进行访问
namespace ConsoleHelloWorld {


    class Program {


        static void Main(string[] args) {


            Car car = new Car();
            // 继承链上的类,当我们创建实例的时候,
            // 先从基类的构造器开始,先构造基类对象,再一级一级构造
            // 最终构造创建的子类对象
            car.ShowOwner();
        }
    }

    // 基类
    class Vehicle {


        // 实例构造器
        public Vehicle(string owner)
        {


            this.Owner = owner;
        }
        public string Owner {

     get; set; }
    }

    class Car : Vehicle {


        public Car() : base("N/A") // 调用 Vehicle 构造器的时候传入一个值,或者和 Vehicle 构造器的参数列表一致
        {


            this.Owner = "Car Owner";
        }

        public void ShowOwner() {


            Console.WriteLine($"this class owner value: {

      this.Owner}"); // this. 子类对象上的值
            Console.WriteLine($"base class owner value: {

      base.Owner}"); // base. 基类对象上的值,base. 只能向上访问一层
            // 在这个例子中,二者的值是一样的,因为 Car 继承下来了父类的全部成员,
            // 所以 this.Owner 和 base.Owner 指向的使内存中同一个值
        }
    }

    class RaceCar : Car {


    }
}
类成员的访问级别,是以类的访问级别为上限
Part 4 面向对象的实现风格
Class-based 基于类的封装继承多态;
Prototype-based 基于原型的封装继承多态;
Part 5 重写与多态
子类在继承父类之后,并没有在成员的个数上的增加,而是重写了父类的成员的方法;
重写需要在父类的成员上标注 virtual,并在子类的成员上标注 override
如果父类不添加 virtual,子类不添加 override,叫做子类对父类成员的隐藏
类成员的隐藏这种用法不常见;
重写与隐藏的发生条件:函数成员,可见(需要对子类可见,也就是 public 或 protected 的时候才算是可见的),签名一致
public 是不仅对子类可见,且对其他类可见;
protected 是只对子类可见,对其他类不可见;
多态 Polymorphism:当我们用父类变量引用子类实例的时候,调用被重写的成员的时候,总是能够调用到继承类上最新的成员;当调用方法成员的时候,能调用到的,永远是跟实例类型相关的最新的版本;
多态是基于重写机制的(virtual -> override)
下面是有关重写与多态的一个例子:
using System;

namespace HelloRider
{


    class Program {


        static void Main(string[] args)
        {


            var car = new Car();
            car.Run();
            // 可以看到输出为 >> Car is running!
            var vehicle = new Vehicle();
            vehicle.Run();
            // 可以看到输出为 >> I'm running!

            var vehicle2 = new RaseCar();
            vehicle2.Run();
            // 可以看到输出为 >> RaceCar is running!

            // 涉及到多态
            Vehicle v = new Car();
            v.Run(); // 因为引用的是 Car 类型的实例
            // 可以看到输出为 >> Car is running!
            v.Walking();
            // 可以看到输出为 >> I'm walking!
            // 因为 Car 类型的 Walking 和 Vehicle 类型的 Walking 并没有重写关系
            // 可以视为这个 Walking 中有两个方法,一个属于 Vehicle 一个属于 Car
        }
    }

    class Vehicle
    {


        // 重写需要在父类的成员上标注 virtual,并在子类的成员上标注 override
        public virtual void Run()
        {


            Console.WriteLine("I'm running!");
        }

        public void Walking()
        {


            Console.WriteLine("I'm walking!");
        }
    }

    class Car : Vehicle
    {


        // 子类中的方法在父类中也有,并没有新增方法,只是更新了父类方法的版本
        // 子类对父类成员的重写,也叫做成员的纵向扩展
        public override void Run()
        {


            Console.WriteLine("Car is running!");
        }

        // 如果父类不添加 virtual,子类不添加 override,叫做子类对父类成员的隐藏
        public void Walking()
        {


            Console.WriteLine("Car is walking");
        }
    }

    class RaseCar : Car
    {


        // 继承链的重写
        public override void Run()
        {


            Console.WriteLine("RaceCar is running!");
        }
    }
}
下面这个例子是对属性进行的重写
using System;

namespace HelloRider
{


    class Program {


        static void Main(string[] args)
        {


            Vehicle vehicle = new Car();
            vehicle.Run();
            Console.WriteLine(vehicle.Speed);

        }
    }

    class Vehicle
    {


        private int _speed;

        public virtual int Speed
        {


            get {

     return _speed;}
            set {

     this._speed = value; }
        }

        // 重写需要在父类的成员上标注 virtual,并在子类的成员上标注 override
        public virtual void Run()
        {


            Console.WriteLine("I'm running!");
            this._speed = 100;
        }

        public void Walking()
        {


            Console.WriteLine("I'm walking!");
        }
    }

    class Car : Vehicle
    {


        private int _rpm;

        public override int Speed
        {


            get
            {


                return this._rpm / 100;
            }
            set
            {


                this._rpm = value / 100;
            }
        }

        // 子类中的方法在父类中也有,并没有新增方法,只是更新了父类方法的版本
        // 子类对父类成员的重写,也叫做成员的纵向扩展
        public override void Run()
        {


            Console.WriteLine("Car is running!");
            this._rpm = 5000;
        }

        // 如果父类不添加 virtual,子类不添加 override,叫做子类对父类成员的隐藏
        public void Walking()
        {


            Console.WriteLine("Car is walking");
        }
    }

    class RaseCar : Car
    {


        // 继承链的重写
        public override void Run()
        {


            Console.WriteLine("RaceCar is running!");
        }
    }
}
Section 4 类的扩展知识
接口与抽象类是面向对象设计中最重要的部分,是软件工业设计的两块基石;
SOLID 原则:单一职责原则、开放关闭原则、里氏替换原则、接口隔离原则和依赖倒置原则;
Part 1 抽象类
下面的代码解释了什么是抽象类以及开放关闭原则的简单释义
namespace HelloRider
{


    class Program {


        static void Main(string[] args)
        {


        }
    }

    // 抽象类:指的是函数成员没有被完全实现的类
    abstract class Student
    {


        abstract public void Study(); // 没有被实现的函数成员一定用 abstract 关键字修饰,且不能用 private
        // 被 abstract 修饰的方法,只有返回值,方法名和参数列表,没有方法体,是完全没有被实现的方法,是抽象方法
        // 一旦一个类里有抽象方法或其他抽象成员,这个类就变成了抽象类,抽象类前面必须加上 abstract

        // 因为抽象类含有未被实现的成员,因此编译器不允许实例化这个抽象类
        // 两个作用:
        // 1、作为基类,让别人从自己派生出去,在派生类实现没有实现的方法;
        // 2、作为基类,声明变量,用基类类型的变量去引用子类类型的实例;
    }

}

/*
 * 为做基类而生的“抽象类”与“开放/关闭原则”
 *
 * 开闭原则:我们应该封装一些不变的、稳定的、固定的和确定的成员,
 * 而把那些不确定的、有可能改变的成员声明为抽象成员,并留给子类去实现
 *
 * */
下面的例子是:为做基类而生的“抽象类”与“开放/关闭原则”:
using System;

namespace HelloRider
{


    class Program {


        static void Main(string[] args)
        {


            Vehicle v = new RaceCar();
            // 抽象类的唯一能做的事情就是给别的类当基类,并且引用一些已经完全实现抽象成员的子类实例
            v.Run();
        }
    }

    // 程序既有抽象类,也遵守开闭原则
    abstract class Vehicle
    {


        public void Stop()
        {


            Console.WriteLine("Stopped!");
        }

        public void Fill()
        {


            Console.WriteLine("Pay and fill......");
        }

        public abstract void Run();
    }

    class Car : Vehicle
    {


        public override void Run() // 实现抽象方法的时候也需要加上 override
        {


            Console.WriteLine("Car is running......");
        }
    }

    class Truck : Vehicle
    {


        public override void Run()
        {


            Console.WriteLine("Truck is running......");
        }
    }

    class RaceCar : Vehicle
    {


        public override void Run()
        {


            Console.WriteLine("Race Car is running......");
        }
    }
}
纯抽象类:
using System;

namespace HelloRider
{


    class Program {


        static void Main(string[] args)
        {


            Vehicle v = new RaceCar();
            // 抽象类的唯一能做的事情就是给别的类当基类,并且引用一些已经完全实现抽象成员的子类实例
            v.Run();
        }
    }

    // 纯抽象类,在 C# 中实际上就是接口
    abstract class VehicleBase
    {


        abstract public void Stop();
        abstract public void Fill();
        abstract public void Run();
    }

    // 程序既有抽象类,也遵守开闭原则
    abstract class Vehicle : VehicleBase
    {


        public override void Stop()
        {


            Console.WriteLine("Stopped!");
        }

        public override void Fill()
        {


            Console.WriteLine("Pay and fill......");
        }
    }

    class Car : Vehicle
    {


        public override void Run() // 实现抽象方法的时候也需要加上 override
        {


            Console.WriteLine("Car is running......");
        }
    }

    class Truck : Vehicle
    {


        public override void Run()
        {


            Console.WriteLine("Truck is running......");
        }
    }

    class RaceCar : Vehicle
    {


        public override void Run()
        {


            Console.WriteLine("Race Car is running......");
        }
    }
}
纯抽象类在 C# 中就是接口,下面是示例
using System;

namespace HelloRider
{


    class Program {


        static void Main(string[] args)
        {


            Vehicle v = new RaceCar();
            // 抽象类的唯一能做的事情就是给别的类当基类,并且引用一些已经完全实现抽象成员的子类实例
            v.Run();
        }
    }

    // 纯抽象类,在 C# 中实际上就是接口
    interface IVehicle
    {


         void Stop();
         void Fill();
         void Run();
    }

    // 类实现接口
    // 通过 抽象类作为不完全的实现,将其作为基类再创建具体类
    abstract class Vehicle : IVehicle
    {


        public  void Stop()
        {


            Console.WriteLine("Stopped!");
        }

        public  void Fill()
        {


            Console.WriteLine("Pay and fill......");
        }

        abstract public void Run();

    }

    class Car : Vehicle
    {


        public override void Run() // 实现抽象方法的时候也需要加上 override
        {


            Console.WriteLine("Car is running......");
        }
    }

    class Truck : Vehicle
    {


        public override void Run()
        {


            Console.WriteLine("Truck is running......");
        }
    }

    class RaceCar : Vehicle
    {


        public override void Run()
        {


            Console.WriteLine("Race Car is running......");
        }
    }
}
- 什么是接口和抽象类
-
- 接口和抽象类都是软件工程的产物,如果不遵循软件工程,将提高代码的维护难度;
-
- 具体类 -> 抽象类 -> 接口:越来越抽象,内部实现的东西越来越少;
-
- 抽象类是未完全实现逻辑的类(可以由字段和非public成员,它们代表了具体逻辑);
-
- 抽象类为复用而生:专门作为基类来使用,也具有解耦功能;
-
- 封装确定的,开放不确定的,推迟到合适的子类中去实现;
-
- 接口是完全未实现逻辑的类,纯虚类,只有函数成员,所有成员都是 public,也是隐式 public;
-
- 接口为解耦而生:高内聚,低耦合,方便单元测试;
-
- 接口是一个协约,早已为工业生产所熟知;
-
- 它们都不能实例化,只能用来声明变量、引用具体类(concrete class)的实例;
Part 2 接口
接口:由抽象类进化而来;接口中的成员方法必须是 public,因此写的时候,不需要明写public,默认的就是public;
接口的本质:服务的调用者与服务的提供者之间的契约,对双方必须是可见的,因此使用 public;

在抽象世界中,是类与类、对象与对象之间的分工与合作,这个合作叫做依赖,依赖的同时就出现了耦合,依赖越直接,耦合就越紧,下面就是解释依赖与耦合的例子:
namespace HelloRider
{


    class Program {


        static void Main(string[] args)
        {


            var engine = new Engine();
            var car = new Car(engine);
            car.Run(3);
            Console.WriteLine(car.Speed);
            // 可以看到输出结果为 >> 30
        }
    }

    class Engine
    {


        public int RPM {

     get; private set; }

        public void Work(int gas)
        {


            this.RPM = 1000 * gas;
        }
    }

    class Car
    {


        // 此时 Car 和 Engine 类型紧耦合在一起,Car 依赖在 Engine 上
        // 紧耦合的问题在于,基础的类如果出问题,会导致依赖这个类的类出现问题;
        // 紧耦合会导致调试难度升高,这就是紧耦合带来的弊端;
        private Engine _engine;

        public Car(Engine engine)
        {


            _engine = engine;
        }

        public int Speed {

     get; private set; }
        public void Run(int gas)
        {


            _engine.Work(gas);
            this.Speed = _engine.RPM / 100;
        }
    }
}
如何解决紧耦合的问题?那就是引入接口,下面是例子:
namespace HelloRider
{


    class Program {


        static void Main(string[] args)
        {


            var user = new PhoneUser(new EricssonPhone());
            // 只在这块换了类名,而 User class 还有其他的代码都没变动
            // 引入接口之后,耦合变得非常的松,松耦合
            user.UsePhone();
        }
    }

    class PhoneUser
    {


        private IPhone _phone;

        public PhoneUser(IPhone phone)
        {


            _phone = phone;
        }

        public void UsePhone()
        {


            _phone.Dail();
            _phone.PickUp();
            _phone.Send();
            _phone.Receive();
        }
    }

    interface IPhone
    {


        void Dail();
        void PickUp();
        void Send();
        void Receive();
    }

    class NokiaPhone : IPhone
    {


        public void Dail()
        {


            Console.WriteLine("Nokia calling ...");
        }

        public void PickUp()
        {


            Console.WriteLine("Hello! This is Tim!");
        }

        public void Send()
        {


            Console.WriteLine("Nokia message ring ...");
        }

        public void Receive()
        {


            Console.WriteLine("Hello!");
        }
    }

    class EricssonPhone : IPhone
    {


        public void Dail()
        {


            Console.WriteLine("Ericsson calling ...");
        }

        public void PickUp()
        {


            Console.WriteLine("Hello! This is Jack!");
        }

        public void Send()
        {


            Console.WriteLine("Ericsson ring ...");
        }

        public void Receive()
        {


            Console.WriteLine("Good morning!");
        }
    }
}
接口是为了松耦合而生、是为了解耦合而生
Part 3 单元测试与依赖倒置原则
单元测试是依赖倒置原则在开发中的直接应用;
依赖倒置原则:高层模块不应该依赖底层模块,二者都应依赖其抽象;抽象(接口)不应该依赖于细节(具体功能的实现),细节应依赖抽象(按接口格式写实现的程序);
也就是应针对接口编程,不应针对实现编程
namespace HelloRider
{


    class Program {


        static void Main(string[] args)
        {


            var fan = new DeskFan(new PowerSupply());
            Console.WriteLine(fan.Work());
        }
    }

    class PowerSupply
    {


        public int GetPower()
        {


            return 210;
        }
    }

    class DeskFan
    {


        private PowerSupply _powerSupply;
        public DeskFan(PowerSupply powerSupply)
        {


            _powerSupply = powerSupply;
        }

        public string Work()
        {


            int power = _powerSupply.GetPower();
            if (power <= 0)
            {


                return "Won't work.";
            }
            else if (power < 100)
            {


                return "Slow";
            }
            else if (power < 200)
            {


                return "Work fine";
            }
            else
            {


                return "Warning!";
            }
        }
    }
}
可以看到上面的例子是一个紧耦合的例子,当我们想要修改电压 power 的值的时候,需要修改 PowerSupply 里面的值。一个类设计好之后,是不能够再去直接动类的代码;为了解决这个紧耦合的问题,引入接口进行解耦,并使用单元测试来测试DeskFan;下面是修改之后的代码;
namespace HelloRider
{


    class Program {


        static void Main(string[] args)
        {


            var fan = new DeskFan(new PowerSupply());
            Console.WriteLine(fan.Work());
        }
    }

    public interface IPowerSupply
    {


        int GetPower();
    }
    public class PowerSupply : IPowerSupply
    {


        public int GetPower()
        {


            return 210;
        }
    }

    public class DeskFan
    {


        private IPowerSupply _powerSupply; // 所有的耦合类型都变成接口类型;
        public DeskFan(IPowerSupply powerSupply)
        {


            _powerSupply = powerSupply;
        }

        public string Work()
        {


            int power = _powerSupply.GetPower();
            if (power <= 0)
            {


                return "Won't work.";
            }
            else if (power < 100)
            {


                return "Slow";
            }
            else if (power < 200)
            {


                return "Work fine";
            }
            else
            {


                return "Explode!";
            }
        }
    }
}
下面是单元测试例子:也是接口在单元测试中的应用;
using NUnit.Framework;
using HelloRider;

namespace InterfaceExample.Tests
{


    public class DeskFanTests
    {


        [SetUp]
        public void Setup()
        {


        }

        [Test]
        public void PowerLowerThanZero_OK() // 测试电压为 0 时的测试结果是否符合预期
        {


            var fan = new DeskFan(new PowerSupplyLowerThanZero());
            var expected = "Won't work.";
            var actual = fan.Work();
            Assert.AreEqual(expected, actual);
        }

        [Test] // 测试例子必须加上 [Test]
        public void PowerHigherThan200_Warning() // 测试电压超过 200 时的测试结果是否符合预期
        {


            var fan = new DeskFan(new PowerSupplyHigherThan200());
            var expected = "Warning!";
            var actual = fan.Work();
            Assert.AreEqual(expected, actual);
        }
    }

    class PowerSupplyLowerThanZero : IPowerSupply
    {


        public int GetPower()
        {


            return 0;
        }
    }

    class PowerSupplyHigherThan200 : IPowerSupply
    {


        public int GetPower()
        {


            return 220;
        }
    }
}
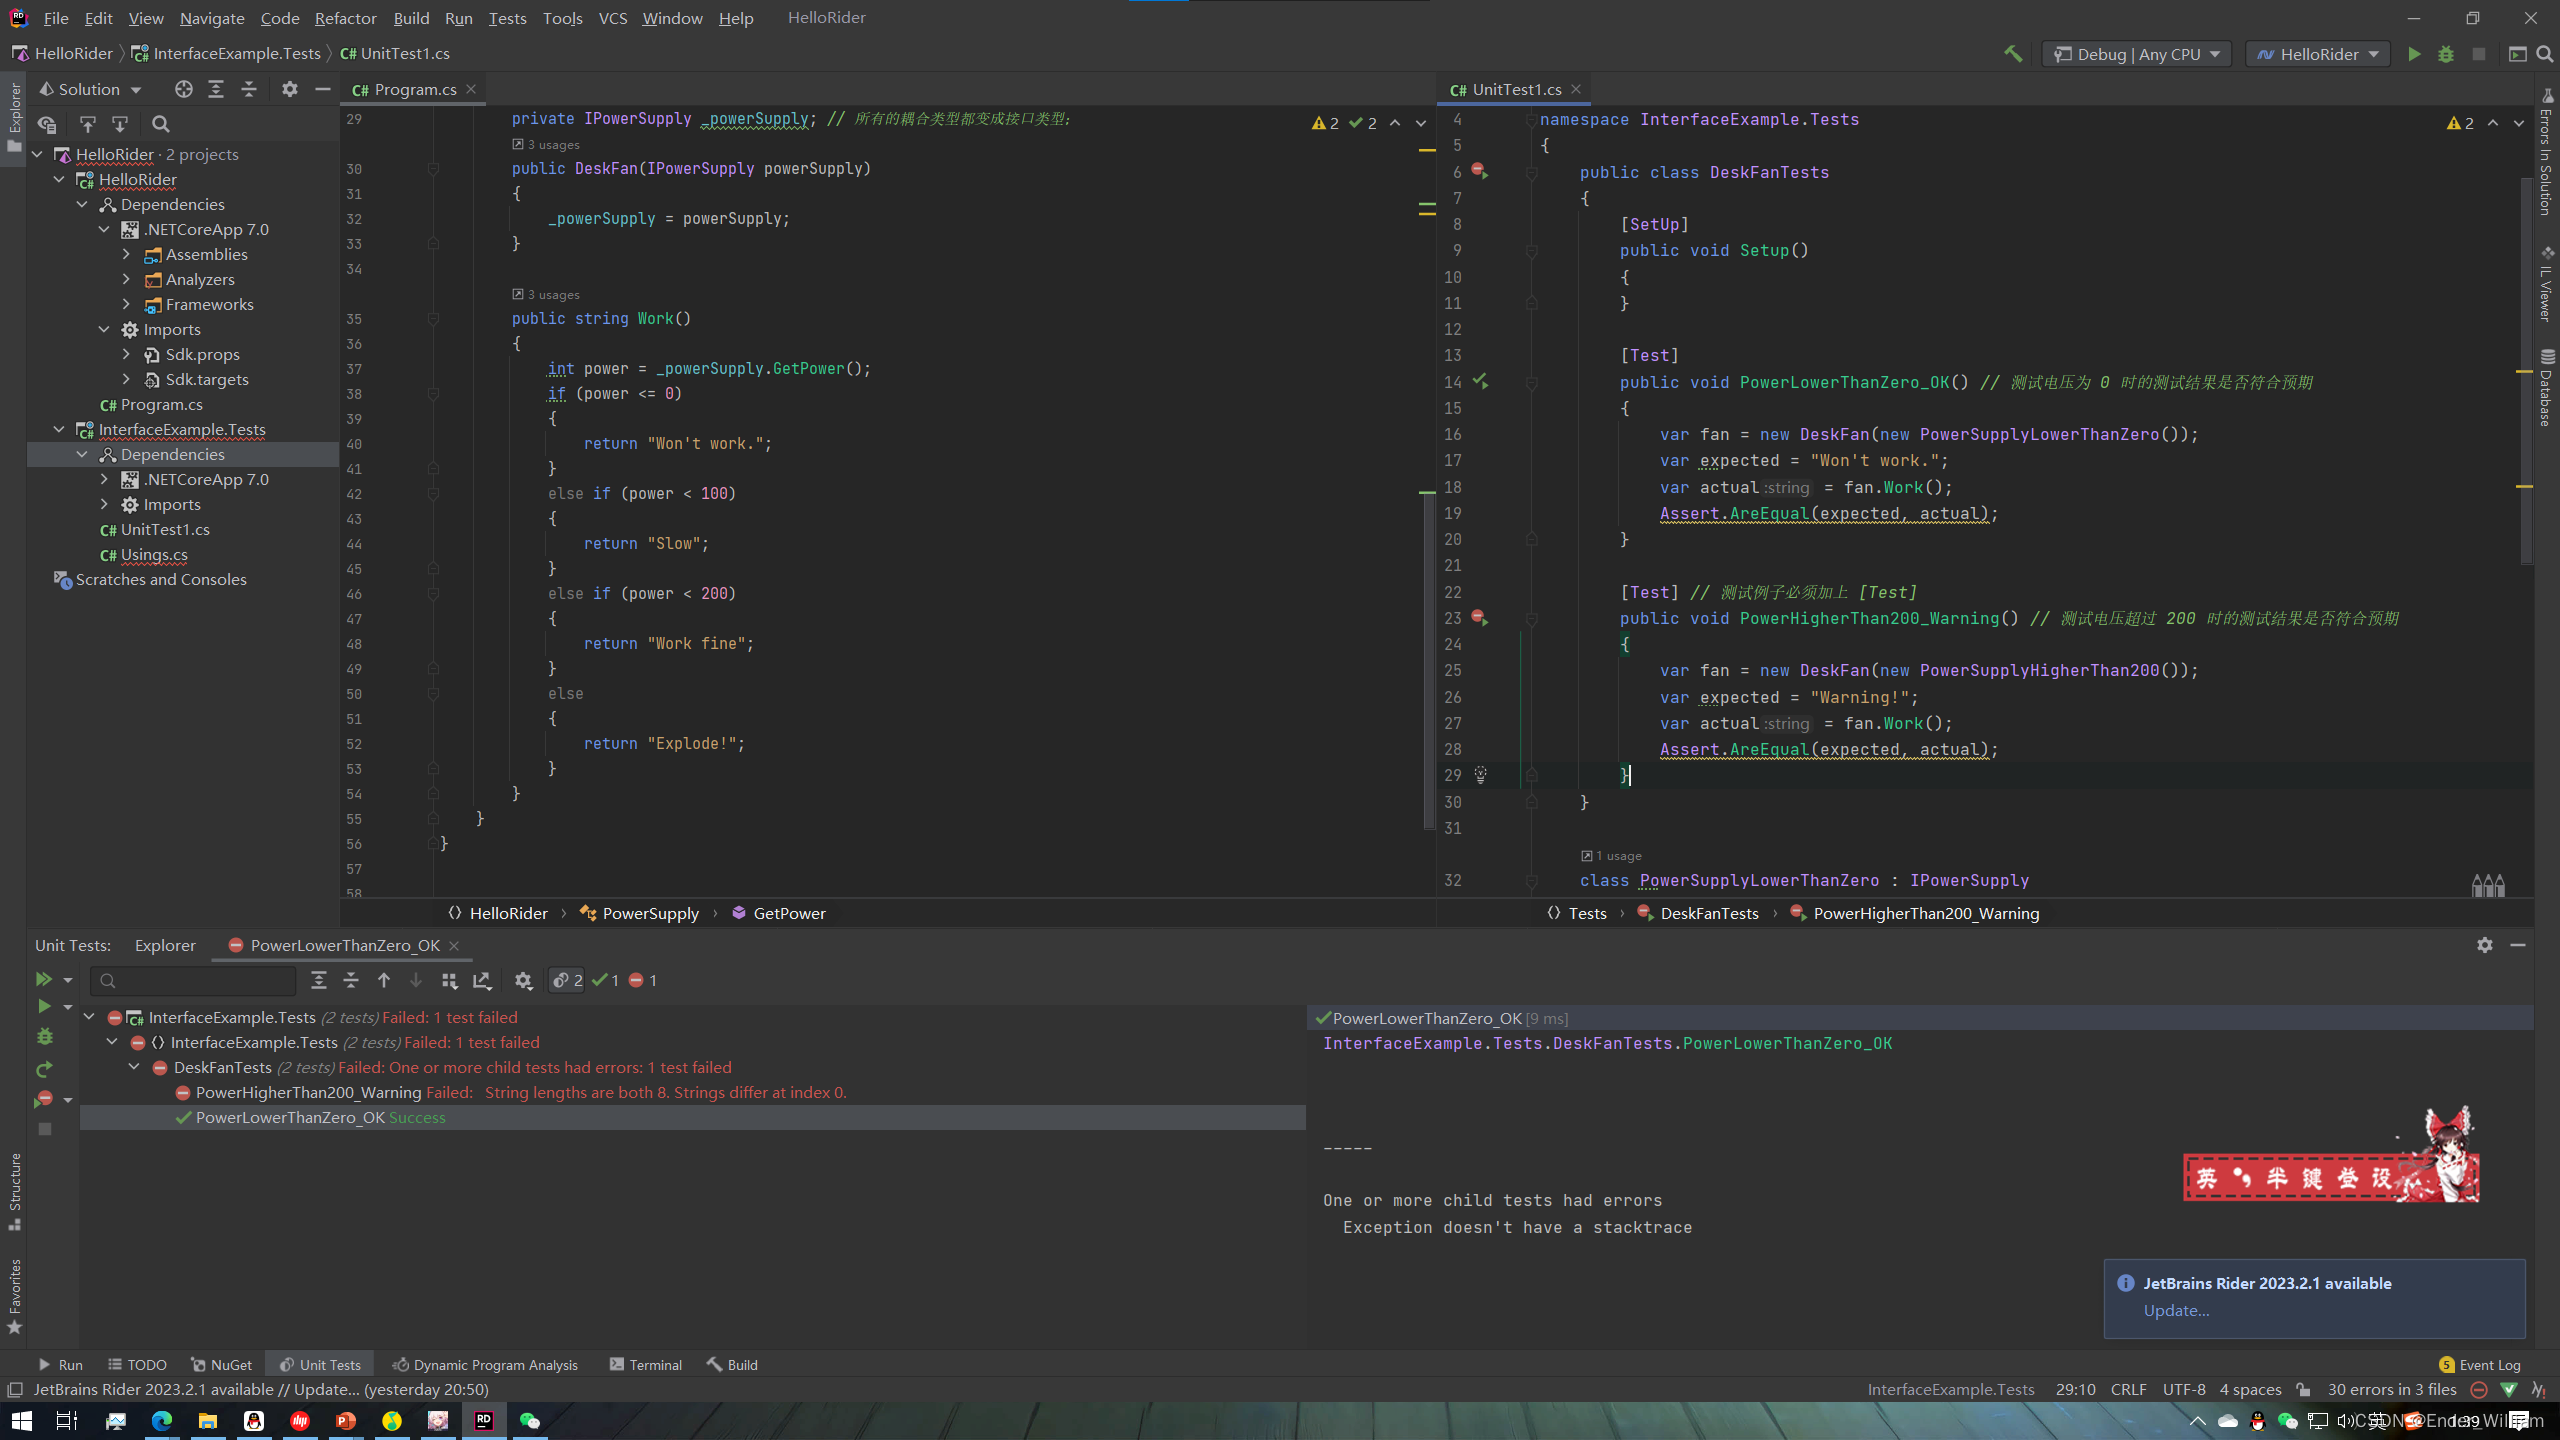
上图展示的是单元测试的运行结果,可以看到左下角部分,一个测试case通过一个测试case没有通过;因此可以在出现问题的测试样例部分打断点调试;
Part 4 接口隔离原则
违反接口隔离原则,带来的后果有两个
例子1:
namespace HelloRider
{


    class Program {


        static void Main(string[] args)
        {


            var driver = new Driver(new Car());
            driver.Drive();
        }
    }

    // 当把包含过多功能的接口类型,传给功能调用者的时候
    // 必然有一部分功能是用不到的,违反了接口隔离原则
    // 实现这个接口的类,同时违反了单一职责原则
    // 针对这个问题的解决方案,把接口拆分为多个小接口,
    // 本质就是把不同的功能分离开,封装成接口

    class Driver
    {


        private IVehicle _vehicle;

        public Driver(IVehicle vehicle)
        {


            _vehicle = vehicle;
        }

        public void Drive()
        {


            _vehicle.Run();
        }
    }

    interface IVehicle
    {


        void Run();
    }

    class Car : IVehicle
    {


        public void Run()
        {


            Console.WriteLine("Car is running");
        }
    }

    class Truck : IVehicle
    {


        public void Run()
        {


            Console.WriteLine("Truck is running");
        }
    }

    interface ITank
    {


        void Fire();
        void Run();
    }

    class LightTank : ITank
    {


        public void Fire()
        {


            Console.WriteLine("Boom!");
        }

        public void Run()
        {


            Console.WriteLine("Light Tank is running");
        }
    }

    class MediumTank : ITank
    {


        public void Fire()
        {


            Console.WriteLine("Boom!!!");
        }

        public void Run()
        {


            Console.WriteLine("Medium Tank is running");
        }
    }

    class HeavyTank : ITank
    {


        public void Fire()
        {


            Console.WriteLine("Boom!!!!!!");
        }

        public void Run()
        {


            Console.WriteLine("Heavy Tank is running");
        }
    }
}
如果此时想要传入 ITank 接口,需要修改 Driver 类的代码;这时问题出在把一个胖接口传了进去,有永远用不到的功能 Fire;现在这个设计违反了接口隔离原则,而胖接口是由两个本质不同的东西合并起来的时候,应该把胖接口分裂成两个接口,也就是 Fire 和 Run 分离开;Fire 属于武器类,Run 属于机动车类;下面是修改后的代码
namespace HelloRider
{


    class Program {


        static void Main(string[] args)
        {


            var driver = new Driver(new Car());
            var driver = new Driver(new Truck());
            var driver = new Driver(new HeavyTank());
            // 可以看到,这个 Driver 只要求能跑,修改完代码后,
            // 无论是 Car、Truck还是Tank,都可以跑
            // Driver 只调用 Run,不调用其他无关的,符合了接口隔离原则
            driver.Drive();
        }
    }

    // 当把包含过多功能的接口类型,传给功能调用者的时候
    // 必然有一部分功能是用不到的,违反了接口隔离原则
    // 实现这个接口的类,同时违反了单一职责原则
    // 针对这个问题的解决方案,把接口拆分为多个小接口,
    // 本质就是把不同的功能分离开,封装成接口

    class Driver
    {


        private IVehicle _vehicle;

        public Driver(IVehicle vehicle)
        {


            _vehicle = vehicle;
        }

        public void Drive()
        {


            _vehicle.Run();
        }
    }

    interface IVehicle
    {


        void Run();
    }

    interface IWeapon
    {


        void Fire();
    }

    class Car : IVehicle
    {


        public void Run()
        {


            Console.WriteLine("Car is running");
        }
    }

    class Truck : IVehicle
    {


        public void Run()
        {


            Console.WriteLine("Truck is running");
        }
    }

    interface ITank : IVehicle, IWeapon // 一个接口对多个接口的继承
    {


    }

    class LightTank : ITank
    {


        public void Fire()
        {


            Console.WriteLine("Boom!");
        }

        public void Run()
        {


            Console.WriteLine("Light Tank is running");
        }
    }

    class MediumTank : ITank
    {


        public void Fire()
        {


            Console.WriteLine("Boom!!!");
        }

        public void Run()
        {


            Console.WriteLine("Medium Tank is running");
        }
    }

    class HeavyTank : ITank
    {


        public void Fire()
        {


            Console.WriteLine("Boom!!!!!!");
        }

        public void Run()
        {


            Console.WriteLine("Heavy Tank is running");
        }
    }
}
过于追求接口隔离原则和单一职责原则的时候,会产生很多很细碎的、只有一个方法的接口和类,因此一定要掌握平衡,把接口和类的大小要维持平衡。
例子2:传给调用者的胖接口,本身是由两个原本设计很好的小接口合并而来,本来应该传进一个小接口,结果传进了合并了小接口的大接口进来;把原本合格的服务提供者挡在外面;下面是例子和修改建议
namespace HelloRider
{


    class Program {


        static void Main(string[] args)
        {


            int[] nums1 = {

    1, 2, 3, 4, 5};
            ArrayList nums2 = new ArrayList {

    1, 2, 3, 4, 5};
            Console.WriteLine(Sum(nums1));
            Console.WriteLine(Sum(nums2));
            var nums3 = new ReadOnlyCollection(nums1);
            foreach (var n in nums3)
            {


                Console.WriteLine(n);
            }
            Console.WriteLine(Sum(nums3)); // 此时 Sum 函数无法处理 nums3
            // 虽然现在只用得到迭代,但现在传入的使 ICollection
            // 把一些合格的 Service Provider 挡在外面
            // 只需要把 Sum 传入的 ICollection 改为 IEnumerable 即可
            // 这时符合接口隔离原则:调用者绝不多要用不着的功能
            // static int Sum(IEnumerable nums)
        }

        static int Sum(ICollection nums)
        {


            int sum = 0;
            foreach (var num in nums)
            {


                sum += (int) num;
            }
            return sum;
        }
    }

    // 只能用于迭代,不能添加也不能删除的集合
    class ReadOnlyCollection : IEnumerable
    {


        private int[] _array;

        public ReadOnlyCollection(int[] array)
        {


            _array = array;
        }

        public IEnumerator GetEnumerator()
        {


            return new Enumerator(this);
        }

        // 成员类
        public class Enumerator : IEnumerator
        {


            private ReadOnlyCollection _collection;
            private int _head;

            public Enumerator(ReadOnlyCollection collection)
            {


                _collection = collection;
                _head = -1;
            }
            public bool MoveNext()
            {


                if (++_head < _collection._array.Length)
                {


                    return true;
                }
                else
                {


                    return false;
                }
            }

            public void Reset()
            {


                _head = -1;
            }

            public object Current
            {


                get
                {


                    object o = _collection._array[_head];
                    return o;
                }
            }
        }
    }
}
例子3:专门展示 C# 中特有的:显式接口实现
namespace HelloRider
{


    class Program {


        static void Main(string[] args)
        {


            var wk = new WarmKiller();
            wk.Love();
            wk.Kill();
            // 此时,Love 和 Kill 方法都轻易能被调用

            var wk2 = new WarmKillerAAA();
            wk2.Love(); // 此时只能看到 Love 看不到 Killer
            IKiller killer = new WarmKillerAAA();
            killer.Kill(); // 此时才能看到 Killer
            // 如果此时要用 Love 方法
            var wk3 = killer as WarmKiller; // 强制类型转换
            wk3.Love(); // 就能看到 Love 方法了
        }
    }

    interface IGentleman
    {


        void Love();
    }

    interface IKiller
    {


        void Kill();
    }

    // 普通的接口隔离与普通的类与实现
    class WarmKiller : IGentleman, IKiller
    {


        public void Love()
        {


            Console.WriteLine("I will love you for ever ...");
        }

        public void Kill()
        {


            Console.WriteLine("Let me kill you ...");
        }
    }

    // 普通的接口隔离与普通的类与实现
    class WarmKillerAAA : IGentleman, IKiller
    {


        public void Love()
        {


            Console.WriteLine("I will love you for ever ...");
        }

        // 只有把这个类的实例,当做 IKiller 类型的实例的时候,这个方法才能被调用
        // 也就是 只有 Killer 类型的变量来引用 WarmKillerAAA 类,类型的时候,这个方法才能被调用
        void IKiller.Kill()
        {


            Console.WriteLine("Let me kill you ...");
        }
    }
}
Part 5 反射 (待补充)
反射不是 C# 语言的功能,而是 .Net 框架的功能。
下面的例子是反射的基本原理
    class Program {


        static void Main(string[] args)
        {


            ITank tank = new HeavyTank();
            // ==========================
            // 分割线以下不再使用静态类型
            // 完全是从内存中读取出动态的类型的描述,MetaData 和方法的表述
            // 这块展示的使反射的基本原理
            var t = tank.GetType();
            object o = Activator.CreateInstance(t);
            MethodInfo fireMi = t.GetMethod("Fire");
            MethodInfo runMi = t.GetMethod("Run");
            fireMi.Invoke(o, null);
            runMi.Invoke(o, null);
        }
    }

    class Driver
    {


        private IVehicle _vehicle;

        public Driver(IVehicle vehicle)
        {


            _vehicle = vehicle;
        }

        public void Drive()
        {


            _vehicle.Run();
        }
    }

    interface IVehicle
    {


        void Run();
    }

    interface IWeapon
    {


        void Fire();
    }

    class Car : IVehicle
    {


        public void Run()
        {


            Console.WriteLine("Car is running");
        }
    }

    class Truck : IVehicle
    {


        public void Run()
        {


            Console.WriteLine("Truck is running");
        }
    }

    interface ITank : IVehicle, IWeapon // 一个接口对多个接口的继承
    {


    }

    class LightTank : ITank
    {


        public void Fire()
        {


            Console.WriteLine("Boom!");
        }

        public void Run()
        {


            Console.WriteLine("Light Tank is running");
        }
    }

    class MediumTank : ITank
    {


        public void Fire()
        {


            Console.WriteLine("Boom!!!");
        }

        public void Run()
        {


            Console.WriteLine("Medium Tank is running");
        }
    }

    class HeavyTank : ITank
    {


        public void Fire()
        {


            Console.WriteLine("Boom!!!!!!");
        }

        public void Run()
        {


            Console.WriteLine("Heavy Tank is running");
        }
    }
在实际的工作中,大部分接触的都是封装好的反射。
封装好的反射最重要的功能之一是依赖注入 Dependencey Injection,DI;
Part 6 泛型 Generic (待补充)
泛型无处不在,是面向对象编程中与接口相当的位置;
为什么需要泛型?避免成员膨胀或者类型膨胀
正交性:泛型类型,泛型成员
泛型的东西,在编程的时候是不能直接拿来使用的,需要经过特化才能使用;
泛型类凡是经过特化之后,使用到类型参数的地方,都是强类型的
下面的例子是:泛型类既不产生类型膨胀,也不产生成员膨胀
namespace HelloRider
{


    class Program {


        static void Main(string[] args)
        {


            Apple apple = new Apple() {

    Color = "Red"};
            Box<Apple> box1 = new Box<Apple>() {

    Cargo = apple};
            Console.WriteLine(box1.Cargo.Color);
            // 可以看到输出为 >> Red

            Book book = new Book() {

    Name = "New Book"};
            Box<Book> box2 = new Box<Book>() {

    Cargo = book};
            Console.WriteLine(box2.Cargo.Name);
            // 可以看到输出为 >> New Book
        }
    }

    class Apple
    {


        public string Color {

     get; set; }
    }

    class Book
    {


        public string Name {

     get; set; }
    }

    class Box<TCargo> // 普通类改成泛型类就是在类名后加上尖括号,在尖括号内写上类型参数
    {


        public TCargo Cargo {

     get; set; }
    }
}
下面的例子是泛型接口的例子:
namespace HelloRider
{


    class Program {


        static void Main(string[] args)
        {


            Student<int> student = new Student<int>();
            student.ID = 101;
            student.Name = "Tim";

            Teacher teacher = new Teacher();
            teacher.ID = 1001;
            teacher.Name = "Cheems";

        }
    }

    interface IUnique<TId>
    {


        public TId ID {

     get; set; }
    }

    // 如果一个类实现的是泛型接口,那么这个类本身也是泛型的
    // 这个类是实现泛型接口,所以成了泛型类 {第一个方法}
    class Student<TId> : IUnique<TId>
    {


        public TId ID {

     get; set; }
        public string Name {

     get; set; }
    }

    // 在实现泛型接口的时候,是实现特化之后的泛型接口,那么这个类就不再是泛型类 {第二个方法}
    class Teacher : IUnique<ulong>
    {


        public ulong ID {

     get; set; }
        public string Name {

     get; set; }
    }
}
泛型之所以对编程的影响很广泛,在 C# 中几乎所有常用的数据结构都是泛型的;