ESP32低功耗蓝牙BLE通信
蓝牙分类
经典蓝牙Classic Bluetooth):用于数据量比较大的传输,如:图像、视频、音乐等。
低功耗蓝牙(Bluetooth Low Energy):用于实时性要求比较高但数据速率比较低的产品,如智能穿戴设备、遥控类的,鼠标,键盘,还有传感设备的数据发送,如心跳带,血压计,温湿度传感器等。
还支持广播模式(一对多)和组网。
蓝牙分为单模和双模蓝牙。
单模蓝牙:只支持经典蓝牙(EDR/BDR基本速率/增强数据速率);只支持低功耗蓝牙(BTLE);
双模蓝牙:支持经典蓝牙(EDR/BDR)+低功耗蓝牙(BTLE)。
蓝牙从4.0开始就集成了经典蓝牙和低功耗蓝牙两个标准,并不只是低功耗蓝牙。低功耗蓝牙设备和经典蓝牙设备两者之间是不能相互通信的,如果主设备是低功耗蓝牙设备,从设备也必须是低功耗蓝牙设备;同样,经典蓝牙的从设备也只能和经典蓝牙的主设备进行通信。

GATT协议
GATT (Generic Attribute Profile) 是蓝牙低功耗 (Bluetooth Low Energy, BLE) 协议栈中的一部分,它定义了 BLE 设备之间交换数据的格式和规范。
GATT 是基于属性 (attribute) 和服务 (service) 的概念,通过将数据封装在属性中,从而实现设备之间的通信。
在 GATT 中,一个服务表示一个特定的功能,一个服务可以包含多个属性。每个属性都有一个唯一的标识符 (UUID),可以用来识别它们。属性的性质(Properties)可以是只读的 (Read),也可以是可写的 (Write),通知(notify), 广播(broadcast), 指示(indicate)等。属性还可以包含一个描述符 (Descriptor),用于描述属性的特性和值。描述符是可选的,但是它们可以提供关于属性的额外信息,例如范围、单位或名称。
GATT 使用基于请求-响应模型的通信方式。当一个设备想要读取或写入属性时,它会发送一个请求给另一个设备,请求的格式包含要访问的属性的 UUID 和操作类型 (读或写)。接收方设备会根据请求返回响应消息,其中包含请求的数据,或者在写入操作时返回确认消息。GATT 还定义了一些通用的属性和服务,例如设备信息服务 (Device Information Service)、电池服务 (Battery Service) 等,这些服务可以让开发人员更容易地实现常见的功能。
下图举例展示了GATT各层概念之间的包含关系:

GATT角色
在 GATT 中,存在两种角色:GATT Server 和 GATT Client。
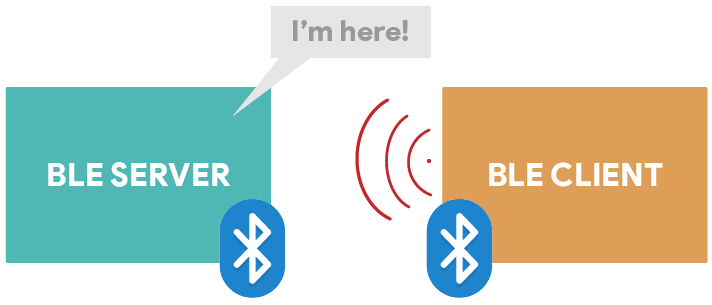
(1)GATT Server
是指具有 GATT 数据的设备,它可以被 GATT Client 连接并提供服务。GATT Server 存储着一个或多个服务,每个服务都包含一个或多个属性。当 GATT Client 连接到 GATT Server 时,它可以通过 GATT 协议来访问服务和属性。GATT Server 需要响应 GATT Client 的请求,例如读取和写入属性值。
(2)GATT Client
是指需要访问 GATT Server 的设备。GATT Client 可以扫描周围的 BLE 设备,找到包含 GATT 数据的设备,并连接到它们。一旦连接建立,GATT Client 可以通过 GATT 协议来读取和写入 GATT Server 上的服务和属性。例如,GATT Client 可以读取一个温度传感器的属性值,或者写入一个 LED 灯的属性值。
一个设备既可以作为 GATT Server,也可以作为 GATT Client。例如,一个智能手表可以作为 GATT Server,提供心率监测服务;同时,它也可以作为 GATT Client 连接到另一个设备,例如智能手机,以获取其他服务的数据,如来自手机的通知。
ESP32蓝牙简介

ESP32-WROOM-32模组集成了双模蓝牙包括传统蓝牙(BR/EDR)、低功耗蓝牙(BLE)和 Wi-Fi,具有广泛的用途:Wi-Fi 支持极大范围的通信连接,也支持通过路由器直接连接互联网;而蓝牙可以让用户连接手机或者广播 Bluetooth LE Beacon 以便于信号检测。
蓝牙特性:
• 支持标准 Class-1、Class-2 和 Class-3,且无需外部功率放大器
• 增强型功率控制 (Enhanced Power Control)
• 输出功率高达 +9 dBm
• NZIF 接收器具有–94 dBm 的 BLE 接收灵敏度
• 自适应跳频 (AFH)
• 基于 SDIO/SPI/UART 接口的标准 HCI
• 高速 UART HCI,最高可达 4 Mbps
• 支持蓝牙 4.2 BR/EDR 和 Bluetooth LE 双模 controller
• 同步面向连接/扩展同步面向连接 (SCO/eSCO)
• CVSD 和 SBC 音频编解码算法
• 蓝牙微微网 (Piconet) 和散射网 (Scatternet)
• 支持传统蓝牙和低功耗蓝牙的多设备连接
• 支持同时广播和扫描
开发板集成Type-C USB转TTL串口芯片CH343可以实现一键串口下载程序和串口打印。
ESP32开发板作为BLE服务设备或扫描设备
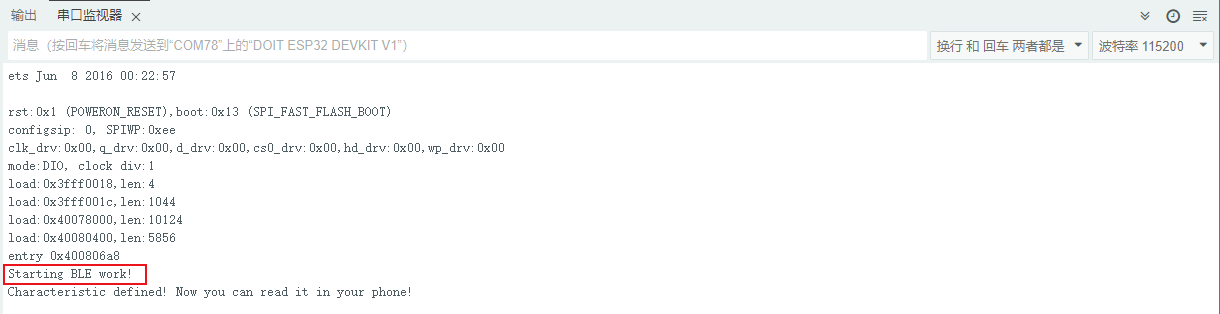
一个ESP32开发板作为BLE Server,Arduino IDE打开开发板的BLE_server示例程序,并上传至开发板。

/*
    Based on Neil Kolban example for IDF: https://github.com/nkolban/esp32-snippets/blob/master/cpp_utils/tests/BLE%20Tests/SampleServer.cpp
    Ported to Arduino ESP32 by Evandro Copercini
    updates by chegewara
*/

#include <BLEDevice.h>
#include <BLEUtils.h>
#include <BLEServer.h>

// See the following for generating UUIDs:
// https://www.uuidgenerator.net/

#define SERVICE_UUID        "4fafc201-1fb5-459e-8fcc-c5c9c331914b"
#define CHARACTERISTIC_UUID "beb5483e-36e1-4688-b7f5-ea07361b26a8"

void setup() {


  Serial.begin(115200);
  Serial.println("Starting BLE work!");

  BLEDevice::init("Long name works now");
  BLEServer *pServer = BLEDevice::createServer();
  BLEService *pService = pServer->createService(SERVICE_UUID);
  BLECharacteristic *pCharacteristic = pService->createCharacteristic(
                                         CHARACTERISTIC_UUID,
                                         BLECharacteristic::PROPERTY_READ |
                                         BLECharacteristic::PROPERTY_WRITE
                                       );

  pCharacteristic->setValue("Hello World says Neil");
  pService->start();
  // BLEAdvertising *pAdvertising = pServer->getAdvertising();  // this still is working for backward compatibility
  BLEAdvertising *pAdvertising = BLEDevice::getAdvertising();
  pAdvertising->addServiceUUID(SERVICE_UUID);
  pAdvertising->setScanResponse(true);
  pAdvertising->setMinPreferred(0x06);  // functions that help with iPhone connections issue
  pAdvertising->setMinPreferred(0x12);
  BLEDevice::startAdvertising();
  Serial.println("Characteristic defined! Now you can read it in your phone!");
}

void loop() {


  // put your main code here, to run repeatedly:
  delay(2000);
}
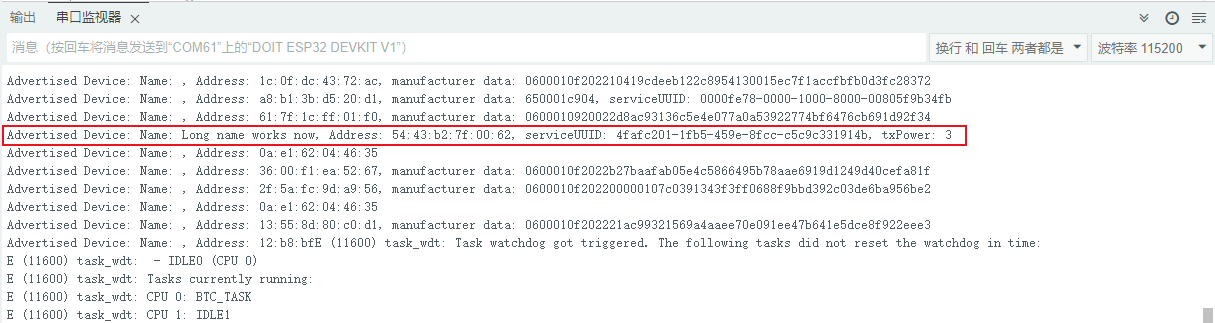
另一个ESP32开发板作为BLE Scanner,扫描周围环境存在的蓝牙设备,Arduino IDE打开开发板的BLE_scan示例程序,并上传至开发板。
/*
   Based on Neil Kolban example for IDF: https://github.com/nkolban/esp32-snippets/blob/master/cpp_utils/tests/BLE%20Tests/SampleScan.cpp
   Ported to Arduino ESP32 by Evandro Copercini
*/

#include <BLEDevice.h>
#include <BLEUtils.h>
#include <BLEScan.h>
#include <BLEAdvertisedDevice.h>

int scanTime = 5; //In seconds
BLEScan* pBLEScan;

class MyAdvertisedDeviceCallbacks: public BLEAdvertisedDeviceCallbacks {


    void onResult(BLEAdvertisedDevice advertisedDevice) {


      Serial.printf("Advertised Device: %s \n", advertisedDevice.toString().c_str());
    }
};

void setup() {


  Serial.begin(115200);
  Serial.println("Scanning...");

  BLEDevice::init("");
  pBLEScan = BLEDevice::getScan(); //create new scan
  pBLEScan->setAdvertisedDeviceCallbacks(new MyAdvertisedDeviceCallbacks());
  pBLEScan->setActiveScan(true); //active scan uses more power, but get results faster
  pBLEScan->setInterval(100);
  pBLEScan->setWindow(99);  // less or equal setInterval value
}

void loop() {


  // put your main code here, to run repeatedly:
  BLEScanResults foundDevices = pBLEScan->start(scanTime, false);
  Serial.print("Devices found: ");
  Serial.println(foundDevices.getCount());
  Serial.println("Scan done!");
  pBLEScan->clearResults();   // delete results fromBLEScan buffer to release memory
  delay(2000);
}
手机APP连接作为BLE Server的ESP32
手机浏览器搜索下载安装“nRF Connect for Mobile”软件APP,并和作为BLE Sever的ESP32开发板连接

总结
通过本实验我们了解了ESP32的BLE基础概念和简单的使用,在此基础上ESP32搭载一些传感器,可以通过BLE实现两个ESP32的数据传输或ESP32和手机进行人机信息交互。