目录
一、组网需求
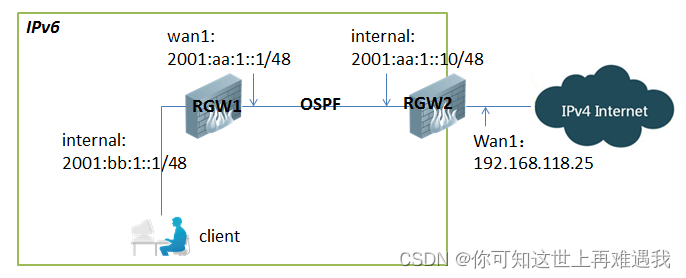
在IPv6网络内部使用OSPFv3
二、网络拓扑
三、配置要点
RGW1
(1)配置基本上网功能
(2)配置OSPFv3
RGW2
(1)配置NAT64上网工呢过
(2)配置OSPF
四、操作步骤
RGW1
(1)配置基本上网功能,参照IPv6--上网配置
config system interface
edit "internal"
config ipv6
set ip6-allowaccess ping https http
set ip6-address 2001:bb:1::1/48
next
edit "wan1"
config ipv6
set ip6-allowaccess ping https
set ip6-address 2001:aa:1::1/48
next
end
(2)配置OSPFv6
RG-WALL # show router ospf6
config router ospf6
set router-id 192.168.1.200 //指定路由ID
config area
edit 0.0.0.0 //配置area 0
next
end
config ospf6-interface
edit "wan1" // 名字,可自定义
set interface "wan1" //配置wan1口运行OSPFv6
next
end
config redistribute "connected" //充分发直连路由
set status enable
end
config redistribute "static"
end
RGW2
(1)配置NAT64上网功能----参照 IPv6----NAT64
config system interface
edit "internal"
config ipv6
set ip6-allowaccess ping https telnet
set ip6-address 2001:aa:1::10/48
next
edit "wan1"
set vdom "root"
set ip 192.168.118.25 255.255.255.0
set allowaccess ping https
set type physical
set description " "
set snmp-index 2
next
end
(2)配置OSPFv6
config router ospf6
set default-information-originate always //向OSPF邻居RGW1发布一条默认路由
set router-id 192.168.1.99 //配置路由ID
config area //配置区域 0.0.0.0
edit 0.0.0.0
next
end
config ospf6-interface //指定internal接口运行OSPF协议
edit "internal" // 名字,可自定义
set interface "internal"
next
end
end
五、验证效果
(1) 查看OSPF邻居
RG-WALL # get router info6 ospf neighbor
OSPFv3 Process (*null*)
Neighbor ID Pri State Dead Time Interface Instance ID
192.168.1.99 1 Full/Backup 00:00:34 wan1 0
(2)查看RGW1路由表:
RG-WALL # get router info6 routing-table
IPv6 Routing Table
Codes: K - kernel route, C - connected, S - static, R - RIP, O - OSPF,
IA - OSPF inter area
N1 - OSPF NSSA external type 1, N2 - OSPF NSSA external type 2
E1 - OSPF external type 1, E2 - OSPF external type 2
I - IS-IS, B - BGP
* - candidate default
Timers: Uptime
O*E2 ::/0 [110/1] via fe80::a5b:eff:fe6f:f7a6, wan1, 00:20:29 //学到的默认路由
C ::1/128 via ::, root, 02:21:41
C 2001:aa:1::/48 via ::, wan1, 02:13:38
C 2001:bb:1::/48 via ::, internal, 01:58:51
(3)RGW1用户可以通过RGW2访问IPv4互联网