文章目录
一、介绍
什么是窗口
窗口即是屏幕上的一块用于绘制各种UI元素并可以响应用户输入的一个矩形区域。从原理上讲,窗口的概念是独自占有一个Surface实例的显示区域(我们在屏幕上看到的图形都需要绘制在Surface上)。
Window是个抽象类其实现类为PhoneWindow。
可以先学习层级结构树相关内容,有助于本文的理解
Android T 窗口层级其一 —— 容器类
Android T 窗口层级其二 —— 层级结构树的构建
Android T 窗口层级其三 —— 层级结构树添加窗口
二、流程简述
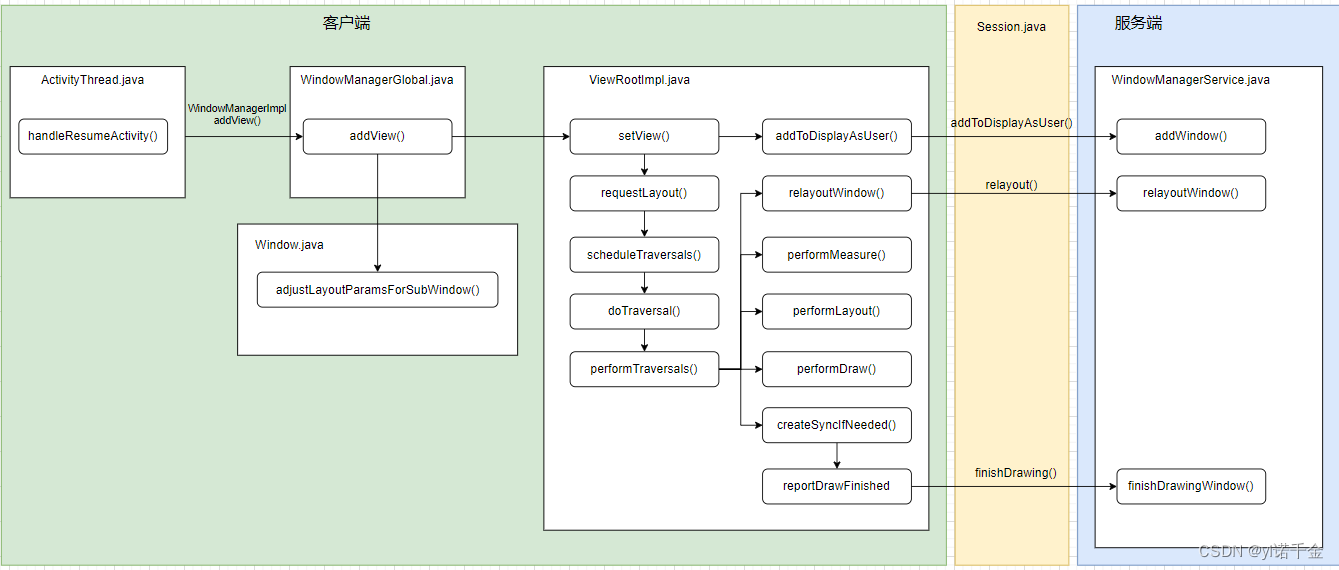
当Activity.onResume()被调用之后,客户端会与WMS进行通信将我们的布局显示在屏幕上。其中主要涉及以下几个过程:
客户端通知WMS创建一个窗口,并添加到WindowToken。即addToDisplayAsUser阶段。
客户端通知WMS创建Surface,并计算窗口尺寸大小。即relayoutWindow阶段。
客户端获取到WMS计算的窗口大小后,进一步测量该窗口下View的宽度和高度。即performMeasure阶段。
客户端确定该窗口下View的尺寸和位置。即performLayout阶段。
确定好View的尺寸大小位置之后,便对View进行绘制。即performDraw阶段。
通知WMS,客户端已经完成绘制。WMS进行系统窗口的状态刷新以及动画处理,并最终将Surface显示出来。即reportDrawFinished阶段。
这里以Activity.onResume()被调用之后为起点
1.客户端
WindowManager:是一个接口类,负责窗口的管理(增、删、改)。
WindowManagerImpl:WindowManager的实现类,但是他把对于窗口的具体管理操作交给WindowManagerGlobal来处理。
WindowManagerGlobal:是一个单例类,实现了窗口的添加、删除、更新的逻辑,但是
ViewRootImpl:通过IWindowSession与WMS进行通信。其内部类W实现了WMS与ViewRootImpl的通信。
ActivityThread.java
- handleResumeActivity
通过WindowManager接口添加view,即wm.addView(decor, l);,wm为ViewManager对象,即ViewManager wm = a.getWindowManager();
WindowManagerImpl.java
- addView
mGlobal.addView(view, params, mContext.getDisplayNoVerify(), mParentWindow,mContext.getUserId());mGlobal为WindowManagerGlobal对象。
WindowManagerGlobal.java
- addView
root.setView(view, wparams, panelParentView, userId);root为ViewRootImpl对象。
parentWindow.adjustLayoutParamsForSubWindow(wparams);parentWindow为Window(Window为抽象类,PhoneWindow继承于Window),即在Window中调用adjustLayoutParamsForSubWindow,用于赋值参数布局的token以及title
ViewRootImpl.java
- setView
1.addToDisplayAsUser
客户端通知WMS创建一个窗口,并添加到WindowToken
res = mWindowSession.addToDisplayAsUser(mWindow,mWindowAttributes,getHostVisibility(), mDisplay.getDisplayId(), userId,mInsetsController.getRequestedVisibilities(), inputChannel, mTempInsets,mTempControls);
2.requestLayout
在添加到窗口管理器之前安排第一个布局,以确保我们在从系统接收任何其他事件之前进行重新布局
scheduleTraversals->doTraversal->performTraversals
performTraversals中调用了五个关键方法:
relayoutWindow
客户端通知WMS创建Surface,并计算窗口尺寸大小
performMeasure
客户端获取到WMS计算的窗口大小后,进一步测量该窗口下View的宽度和高度
performLayout
客户端确定该窗口下View的尺寸和位置
performDraw
确定好View的尺寸大小位置之后,便对View进行绘制
createSyncIfNeeded->reportDrawFinished
通知WMS,客户端已经完成绘制。WMS进行系统窗口的状态刷新以及动画处理,并最终将Surface显示出来
2. 通信方式
Session表示一个客户端和服务端的交互会话。一般来说不同的应用通过不同的会话来和WindowManagerService交互,但是处于同一个进程的不同应用通过同一个Session来交互。
-
IWindowSession.aidl
ViewRootImpl中通过此接口调用服务端
1.addToDisplayAsUser
2.relayout
3.finishDrawing -
Session.java
IWindowSession的实现在这里,最终调用到WMS中
1.addToDisplayAsUser->addWindow
2.relayout->relayoutWindow
3.finishDrawing->finishDrawingWindow
3. 服务端
WindowManagerService:负责为Activity对应的窗口分配Surface,管理Surface的显示顺序以及位置尺寸,控制窗口动画,并且还是输入系统的一个重要中转站。
WindowState:和客户端窗口一一对应,在向WMS添加一个窗口时,WMS会为其创建一个WindowState,来表示窗口的所有属性,WindowState相当于属性窗口管理(比如对外提供操作接口,属于层级结构中最底部的容器),窗口画面相关都剥离给了WindowStateAnimator,WindowState也是WMS中事实上的窗口。
WindowStateAnimator:主要用于管理WindowState相关画面surface,通过mDrawState参数来描述Surface所处的状态。
WindowToken:保存了所有具有同一个token的WindowState,将属于同一个activity的窗口组织在一起,activity在需要更新窗口时,必须向WMS提供WindowToken以表名自己的身份,并且窗口的类型必须与所持有的的WindowToken类型一致。
补充:一个WindowToken可以对应多个WindowState。 WindowToken是一个用于表示窗口层次结构中的窗口的标识符。每个Window具有一个与之关联的WindowToken,它用于帮助系统管理窗口的显示和交互。
一个WindowToken可以有多个WindowState表示与之相关的窗口。这是因为在Android系统中,可能会存在一些特殊情况,例如PopupWindow、Dialog等,它们属于同一个WindowToken,但是显示在不同的窗口上。
因此,一个WindowToken可以与多个WindowState关联,这样可以实现多个窗口的操作和管理。
WindowSurfaceController:用来创建SurfaceControl。
DisplayContent:即代表的是单个屏幕。隶属于同一个DisplayContent的窗口将会被显示在同一个屏幕中。每个DisplayContent都对应着一个唯一的id,在添加窗口时可以通过指定这个ID决定将其显示在哪个屏幕中。
WindowSurfacePlacer:整个窗口层次结构刷新的入口。
RootWindowContainer:是窗口容器的顶层容器,其直接管理DisplayContent。
WindowManagerService.java
3.1.addWindow
1.根据客户端传来的token获取WindowToken或创建WindowToken,并将其挂载到对应的层级节点上
WindowToken token = displayContent.getWindowToken(hasParent ? parentWindow.mAttrs.token : attrs.token);
判断WindowToken是否有父亲,即parentWindow 是否不为空
final boolean hasParent = parentWindow != null;
注:前面代码有判断是否是子窗口,是则会给parentWindow 赋值;否则parentWindow仍为初始值,即为空
关于窗口类型,见 窗口常见参数汇总
Activity启动时会在ActivityRecord的构造方法中new Token()。
应用侧直接通过addView的方式添加窗口不会有ActivityRecord,因此不会在ActivityRecord的构造方法中new Token()。
系统侧直接添加的窗口(状态栏、导航栏等),是通过new WindowToken.Builder的方式添加
即主动使用ViewManager.addView来添加一个窗口则不会在ActivityRecord的构造方法中new Token(),否则通过new WindowToken.Builder的方式添加。
attrs.token这个参数一可以在应用端设置,应用没有设置token那么就为空,token为IBinder类型对象,默认值为空public IBinder token = null;
例如:
在应用侧可通过mLayoutParams.token的方式设置值
private WindowManager.LayoutParams mLayoutParams;
mLayoutParams.token = null;
后面会继续判断token是否为空,最终会到最后的else中创建token
2.创建WindowState
final WindowState win = new WindowState(this, session, client, token, parentWindow, appOp[0], attrs, viewVisibility, session.mUid, userId,session.mCanAddInternalSystemWindow);
3.验证当前窗口是否可以添加到WMS
res = displayPolicy.validateAddingWindowLw(attrs, callingPid, callingUid);
该方法会对窗口TYPE,FLAG等多方面判断。只有返回ADD_OKAY时表示允许当前窗口的添加,反之则不允许添加该窗口。假如想禁止某些应用做添加窗口操作时,可以在里面通过应用的包名过滤该应用,也可以直接在WindowManagerGlobal.java的addView()方法中直接对应用想要添加的窗口进行过滤。
注:ADD_OKAY在WindowManagerGlobal中定义,这个类里面还有一些其他的返回值,所有返回给res的常量最终会在ViewRootImpl的setView方法中判断
4.调用openInputChannel,初始化input相关通路(本文不做讨论)
final boolean openInputChannels = (outInputChannel != null && (attrs.inputFeatures & INPUT_FEATURE_NO_INPUT_CHANNEL) == 0);
if (openInputChannels) { win.openInputChannel(outInputChannel); }
5.将WindowState加入到WindowToken
win.mToken.addWindow(win);
WMS窗口添加之后,还没有创建Surface,此时mDrawState状态为NO_SURFACE
3.2 relayoutWindow
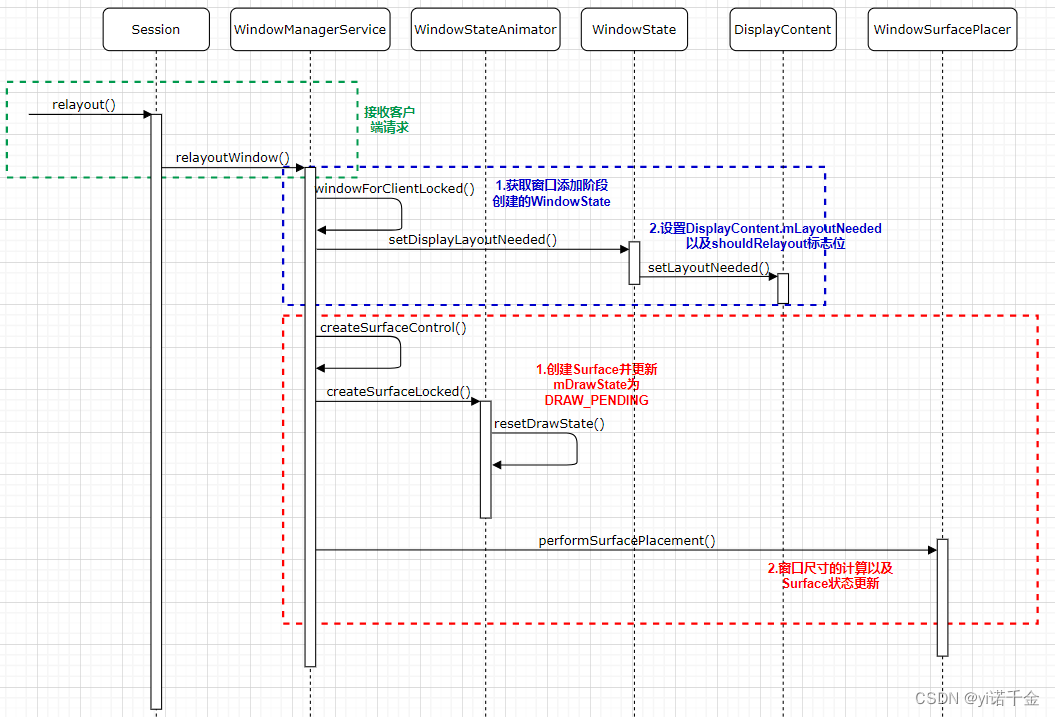
1.根据客户端传递过来的IWindow的mWindowMap获取窗口添加阶段创建的WindowState
final WindowState win = windowForClientLocked(session, client, false);
2.设置DisplayContent.mLayoutNeeded以及shouldRelayout标志位
win.setDisplayLayoutNeeded();win为WindowState对象,该方法实际操作在DisplayContent中
final boolean shouldRelayout = viewVisibility == View.VISIBLE &&(win.mActivityRecord == null || win.mAttrs.type == TYPE_APPLICATION_STARTING || win.mActivityRecord.isClientVisible());
3.创建SurfaceControl
在layoutWindow()调用了createSurfaceControl方法创建SurfaceControl
result = createSurfaceControl(outSurfaceControl, result, win, winAnimator);该方法的实现仍然在WMS中
这里以createSurfaceControl方法为起点
在createSurfaceControl()中调用WindowStateAnimator执行具体的SurfaceControl的创建 surfaceController = winAnimator.createSurfaceLocked();
创建Surface后,Surface还未进行绘制,此时mDrawState状态为DRAW_PENDING
将创建的SurfaceControl赋值给客户端的outSurfaceControl
surfaceController.getSurfaceControl(outSurfaceControl);
4.窗口尺寸的计算以及Surface状态更新
在layoutWindow()调用了performSurfacePlacement
mWindowPlacerLocked.performSurfacePlacement(true /* force */);mWindowPlacerLocked为WindowSurfacePlacer对象,因此这里以WindowSurfacePlacer的performSurfacePlacement()为起点

处理窗口布局循环
WindowSurfacePlacer.performSurfacePlacementLoop()
处理Surface的状态更变,以及调用LayoutWindowLw的流程
RootWindowContainer.performSurfacePlacementNoTrace()
计算窗口位置大小
DisplayPolicy.layoutWindowLw()
3.3 finishDrawingWindow
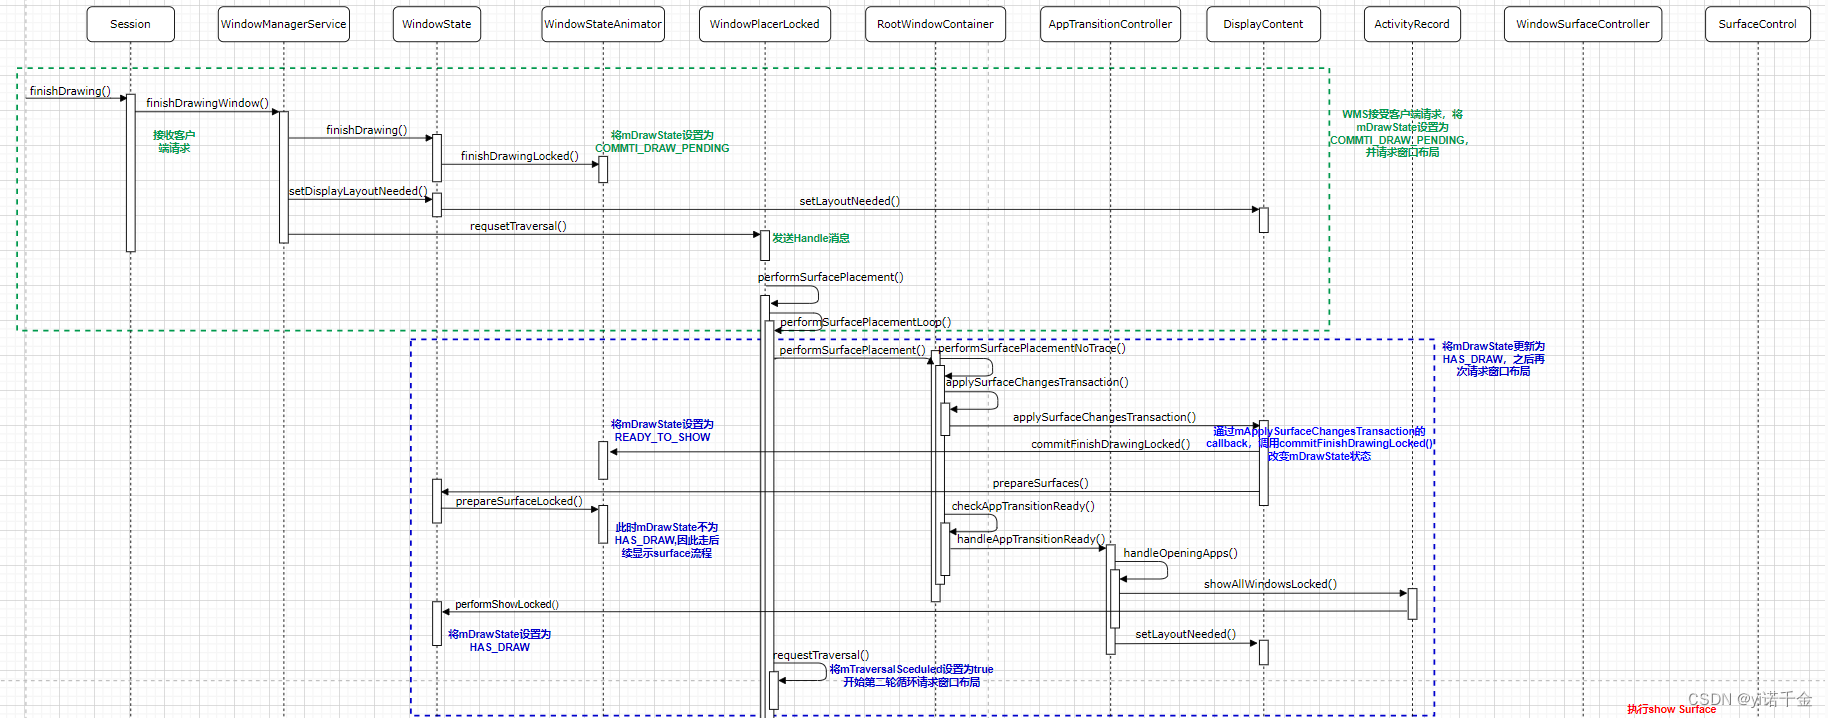

1.WMS接受客户端请求,将mDrawState更新为COMMIT_DRAW_PEDINGwin.finishDrawing(postDrawTransaction, seqId),并请求窗口布局mWindowPlacerLocked.requestTraversal();
2.通过mApplySurfaceChangesTransaction的callback,

调用commitFinishDrawingLocked()
改变mDrawState状态将mDrawState更新为READY_TO_SHOW,
最终mDrawState更新为HAS_DRAW后,再次请求窗口布局
3.执行show Surface
showSurfaceRobustlyLocked(t)
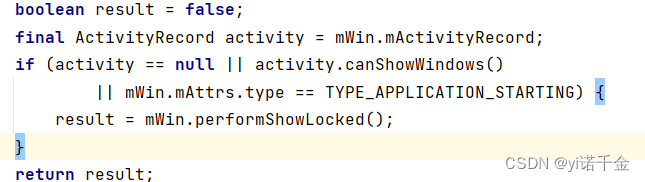
注:WindowStateAnimator的commitFinishDrawingLocked()方法中,如果是应用通过addView的方式创建窗口,则不会有ActivityRecord,或者该窗口类型为启动窗口,则直接调用result = mWin.performShowLocked();,即WindowState的performShowLocked()方法改变窗口状态为HAS_DRAW,否则会从RootWindowContainer的checkAppTransitionReady方法逐步调用到performShowLocked()
4.窗口状态变化总结
WMS为了管理窗口的显示进度,在WindowStateAnimator中定义了mDrawState来描述Surface所处的状态。主要有如下五种状态:
NO_SURFACE:WMS添加窗口,即调用addWindow之后,还没有创建Surface,mDrawState处于该状态。
DRAW_PENDING:app调用relayoutWindow创建Surface后,但是Surface还没有进行绘制,mDrawState处于该状态。
COMMIT_DRAW_PENDING:app完成Surface的绘制,调用finishDrawing,将mDrawState设置为该状态。
READY_TO_SHOW:在performSurfacePlacement过程中会将所有处于COMMIT_DRAW_PENDING状态的mDrawState变更为READY_TO_SHOW。
HAS_DRAW:若准备显示窗口,WMS执行performShowLocked,将mDrawState设置为该状态

| 窗口显示相关方法 | 工作内容解释 |
|---|---|
| addWindow | App向WMS请求添加窗口记录,会在WMS里新建WindowState(NO_SURFACE) |
| relayoutWindow | App向WMS申请surface用于绘制,执行后window拥有了surface(NO_SURFACE->DRAW_PENDING) |
| finishDrawingWindow | App在surface上完成绘制后,通知WMS(DRAW_PENDING->COMMIT_DRAW_PENDING) |
| commitFinishDrawingLocked | WMS遍历window,对于完成绘制的window(COMMIT_DRAW_PENDING->READY_TO_SHOW) |
| performShowLocked | 判断系统是否允许窗口显示isReadyForDisplay(READY_TO_SHOW->HAS_DRAWN) |
| showSurfaceRobustlyLocked | 对HAS_DRAWN状态的窗口,用SurfaceControl通知SurfaceFlinger显示出来 |
5.移除流程简述
窗口移除从App端发起,当Activity执行destroy(),即以handleDestroyActivity()为起点,执行wm.removeViewImmediate()开启;
通过WindowManagerGlobal–>ViewRootImpl–>Session–>WindowManagerService的removeWindow(),调用到WindowState的removeIfPossible()–>removeImmediately(),接着调用到WindowStateAnimator的destroySurfaceLocked()–>destroySurface(),逐步调用改变绘制状态为NO_SURFACE–>WindowSurfaceController的destroy()最终调用到SurfaceControl的remove()来通知SurfaceFlinger来移除layer;
三、代码流程详解
1.客户端
1.1 Activity走到onresume后
从ActivityThread.handleResumeActivity方法看起
1.调用performResumeActivity,执行onResume。
2.获取WindowManager的实现类WindowManagerImpl的实例。
3.调用WindowManagerImpl.addView传入DecorView和当前布局参数WindowManager.LayoutParams。
代码路径:framework/core/java/android/app/ActivityThread.java
@Override
    public void handleResumeActivity(ActivityClientRecord r, boolean finalStateRequest,
            boolean isForward, String reason) {


			......
        // TODO Push resumeArgs into the activity for consideration
        // skip below steps for double-resume and r.mFinish = true case.
        /*1.执行onResume*/
        if (!performResumeActivity(r, finalStateRequest, reason)) {


            return;
        }
		......
		//获取Activity实例
        final Activity a = r.activity;
		......
        // If the window hasn't yet been added to the window manager,
        // and this guy didn't finish itself or start another activity,
        // then go ahead and add the window.
        //mStartedActivity在performLaunchActivity和performResumeActivity方法中被置为false
        boolean willBeVisible = !a.mStartedActivity;
		......
        if (r.window == null && !a.mFinished && willBeVisible) {


        	//获取当前Activity的PhoneWindow
            r.window = r.activity.getWindow();
            //从PhoneWindow中获取DecorView
            View decor = r.window.getDecorView();
            //将view的可见性状态设置为INVISIBLE,view不可见但是仍然占用布局空间
            decor.setVisibility(View.INVISIBLE);
            /*2.获取WindowManager的实现类WindowManagerImpl的实例*/
            ViewManager wm = a.getWindowManager();
            //获取布局参数
            WindowManager.LayoutParams l = r.window.getAttributes();
            //将phoneWindow的DecorView赋值给mDecor
            a.mDecor = decor;
            //设置窗口类型为TYPE_BASE_APPLICATION
            l.type = WindowManager.LayoutParams.TYPE_BASE_APPLICATION;
            l.softInputMode |= forwardBit;
            if (r.mPreserveWindow) {


                a.mWindowAdded = true;
                r.mPreserveWindow = false;
                // Normally the ViewRoot sets up callbacks with the Activity
                // in addView->ViewRootImpl#setView. If we are instead reusing
                // the decor view we have to notify the view root that the
                // callbacks may have changed.
                ViewRootImpl impl = decor.getViewRootImpl();
                if (impl != null) {


                    impl.notifyChildRebuilt();
                }
            }
            if (a.mVisibleFromClient) {


                if (!a.mWindowAdded) {


                    a.mWindowAdded = true;
                    /*3.传入DecorView和当前布局参数WindowManager.LayoutParams*/
                    wm.addView(decor, l);
                } else {


                    // The activity will get a callback for this {@link LayoutParams} change
                    // earlier. However, at that time the decor will not be set (this is set
                    // in this method), so no action will be taken. This call ensures the
                    // callback occurs with the decor set.
                    a.onWindowAttributesChanged(l);
                }
            }
        }
		......
    }
wm.addView(decor, l);WindowManager接口的实现是WindowManagerImpl,即实际调用的是WindowManagerImpl中的addView方法
代码路径:framework/core/java/android/view/WindowManagerImpl.java
    @Override
    public void addView(@NonNull View view, @NonNull ViewGroup.LayoutParams params) {


        applyTokens(params);
        //转交给windowManagerGlobal,添加view
        mGlobal.addView(view, params, mContext.getDisplayNoVerify(), mParentWindow,
                mContext.getUserId());
    }
WindowManagerImpl对窗口的管理交给WindowManagerGlobal,调用WindowManagerGlobal的addView方法
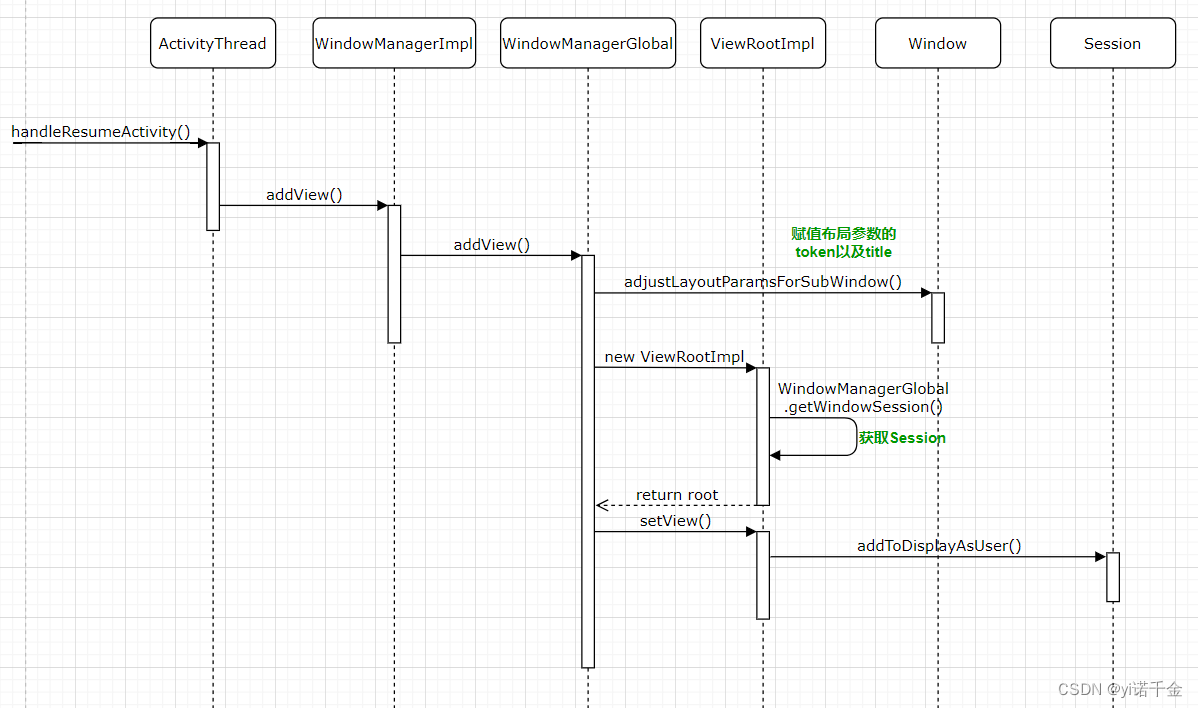
WindowManagerGlobal中对窗口的处理主要如下几个步骤:
1.对WindowManagerImpl传进来的参数进行检查。
2.设置WindowManager.LayoutParams中的token、title等相关属性。查看“【1.2 Token的创建与传递】”。
3.创建ViewRootImpl对象,并获取客户端与WMS通信的Session。查看“【1.3 ViewRootImpl的创建】”。
4.在WindowManagerGlobal中备份DecorView,WindowManager.LayoutParams以及ViewRootImpl。
5.调用ViewRootImpl,与WMS通信添加窗口。查看“【1.4 ViewRootImpl与WMS的通信】”。
代码路径:framework/core/java/android/view/WindowManagerGlobal.java
    public void addView(View view, ViewGroup.LayoutParams params,
            Display display, Window parentWindow, int userId) {


        /*1.对WindowManagerImpl传进来的参数进行检查*/
        if (view == null) {


            throw new IllegalArgumentException("view must not be null");
        }
        if (display == null) {


            throw new IllegalArgumentException("display must not be null");
        }
        if (!(params instanceof WindowManager.LayoutParams)) {


            throw new IllegalArgumentException("Params must be WindowManager.LayoutParams");
        }

        final WindowManager.LayoutParams wparams = (WindowManager.LayoutParams) params;
        //此处的ParentWindow即当Activity的PhoneWindow
        if (parentWindow != null) {


        	/*2.为wparams的token进行赋值*/
            parentWindow.adjustLayoutParamsForSubWindow(wparams);
        } else {


        	......
        }

        ViewRootImpl root;
        View panelParentView = null;

        synchronized (mLock) {


			......
            IWindowSession windowlessSession = null;
			......
            if (windowlessSession == null) {


           		/*3.新建ViewRootImpl,在新建时会通过WindowManagerGlobal获取session*/
                root = new ViewRootImpl(view.getContext(), display);
            } else {


                root = new ViewRootImpl(view.getContext(), display,
                        windowlessSession);
            }

            view.setLayoutParams(wparams);
			/*4.在WindowManagerGlobal中备份DecorView,WindowManager.LayoutParams以及ViewRootImpl。*/
			//当前view加入到view列表中
            mViews.add(view);
            //将新建的viewRootImpl加入到root列表中
            mRoots.add(root);
            //将当前布局参数加入到布局参数列表中
            mParams.add(wparams);

            // do this last because it fires off messages to start doing things
            try {


            	/*5.调用ViewRootImpl,设置view,panelParentView为null,与WMS通信添加窗口*/
                root.setView(view, wparams, panelParentView, userId);
            } catch (RuntimeException e) {


                // BadTokenException or InvalidDisplayException, clean up.
                if (index >= 0) {


                    removeViewLocked(index, true);
                }
                throw e;
            }
        }
    }
1.2 Token的创建与传递
parentWindow.adjustLayoutParamsForSubWindow(wparams);调用Window的adjustLayoutParamsForSubWindow()方法
在adjustLayoutParamsForSubWindow中会分别对WindowManager.LayoutParams中的token以及title进行赋值。
1.首先针对子窗口、系统窗口以及应用窗口做了不同的处理,此处我们只关注应用窗口的处理。
2.其次将当前PhoneWindow.mAppToken赋值给WindowManager.LayoutParams.token。
代码路径:framework/core/java/android/view/Window.java
    void adjustLayoutParamsForSubWindow(WindowManager.LayoutParams wp) {


        CharSequence curTitle = wp.getTitle();
        if (wp.type >= WindowManager.LayoutParams.FIRST_SUB_WINDOW &&
                wp.type <= WindowManager.LayoutParams.LAST_SUB_WINDOW) {


                //对子窗口的Token以及Title赋值
                ......
        } else if (wp.type >= WindowManager.LayoutParams.FIRST_SYSTEM_WINDOW &&
                wp.type <= WindowManager.LayoutParams.LAST_SYSTEM_WINDOW) {


                //对子窗口的Token以及Title赋值
                ......
        } else {


        	//对应用窗口的Token以及Title赋值
            if (wp.token == null) {


            	//将当前PhoneWindow的mAppToken赋值给wp.Token
                wp.token = mContainer == null ? mAppToken : mContainer.mAppToken;
            }
            //将Title设置为mAppName
            if ((curTitle == null || curTitle.length() == 0)
                    && mAppName != null) {


                wp.setTitle(mAppName);
            }
        }
        //设置为packageName
        if (wp.packageName == null) {


            wp.packageName = mContext.getPackageName();
        }
        ......
    }
此处的mAppToken便是在Activity启动时,在ATMS端创建的Token。
接下来我们看看Token是如何从ATMS端传递过来,并赋值给PhoneWindow.mAppToken的
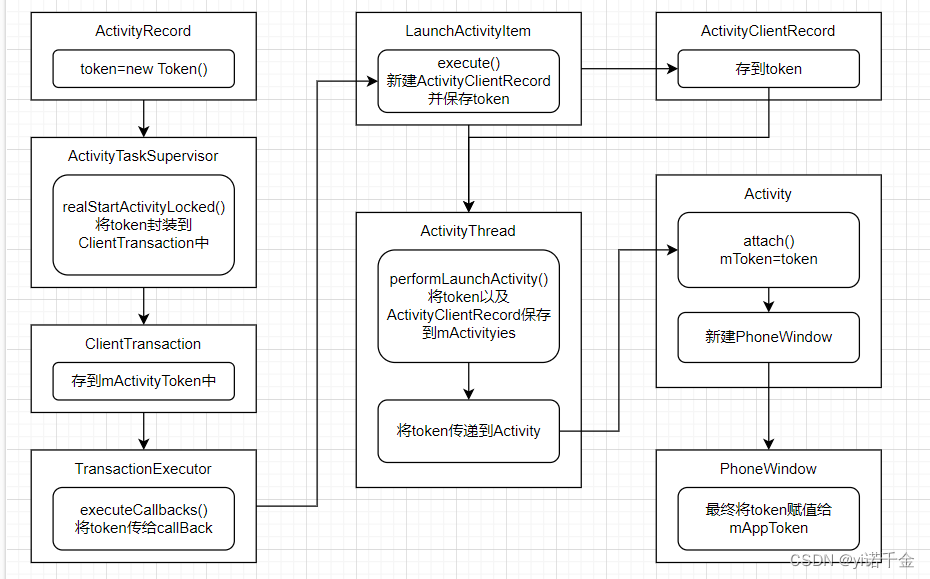
1.在ATMS端新建ActivityRecord时,便新建了Token。并赋值给ActivityRecord.token
ActivityRecord继承WindowToken
代码路径:framework/services/core/java/com/android/server/wm/ActivityRecord.java
 private ActivityRecord(ActivityTaskManagerService _service, WindowProcessController _caller,
            int _launchedFromPid, int _launchedFromUid, String _launchedFromPackage,
            @Nullable String _launchedFromFeature, Intent _intent, String _resolvedType,
            ActivityInfo aInfo, Configuration _configuration, ActivityRecord _resultTo,
            String _resultWho, int _reqCode, boolean _componentSpecified,
            boolean _rootVoiceInteraction, ActivityTaskSupervisor supervisor,
            ActivityOptions options, ActivityRecord sourceRecord, PersistableBundle persistentState,
            TaskDescription _taskDescription, long _createTime) {


        //新建Token
        super(_service.mWindowManager, new Token(), TYPE_APPLICATION, true,
                null /* displayContent */, false /* ownerCanManageAppTokens */);
        ......
}
2.将ActivityRecord.token封装在clientTransaction中,并将这个传递到客户端
代码路径:framework/services/core/java/com/android/server/wm/ActivityTaskSupervisor.java
    boolean realStartActivityLocked(ActivityRecord r, WindowProcessController proc,
            boolean andResume, boolean checkConfig) throws RemoteException {


        ......
        final Task task = r.getTask();
        final Task rootTask = task.getRootTask();
        ......

        try {


            ......

            try {


            	......
                // Create activity launch transaction.
                /*将ActivityRecord.token封装在clientTransaction中*/
                final ClientTransaction clientTransaction = ClientTransaction.obtain(
                        proc.getThread(), r.token);

                final boolean isTransitionForward = r.isTransitionForward();
                final IBinder fragmentToken = r.getTaskFragment().getFragmentToken();
                clientTransaction.addCallback(LaunchActivityItem.obtain(new Intent(r.intent),
                        System.identityHashCode(r), r.info,
                        // TODO: Have this take the merged configuration instead of separate global
                        // and override configs.
                        mergedConfiguration.getGlobalConfiguration(),
                        mergedConfiguration.getOverrideConfiguration(), r.compat,
                        r.getFilteredReferrer(r.launchedFromPackage), task.voiceInteractor,
                        proc.getReportedProcState(), r.getSavedState(), r.getPersistentSavedState(),
                        results, newIntents, r.takeOptions(), isTransitionForward,
                        proc.createProfilerInfoIfNeeded(), r.assistToken, activityClientController,
                        r.shareableActivityToken, r.getLaunchedFromBubble(), fragmentToken));
                ......

                // Schedule transaction.
                /*将clientTransaction传递给客户端*/
                mService.getLifecycleManager().scheduleTransaction(clientTransaction);
                ......

            } catch (RemoteException e) {


                ......
            }
        } finally {


            ......
        }
        ......
        return true;
    }
final ClientTransaction clientTransaction = ClientTransaction.obtain( proc.getThread(), r.token);
在ClientTransaction中调用obtain方法,把ActivityRecord.token存到mActivityToken
代码路径:framework/core/java/android/app/servertransaction/ClientTransaction.java
    /** Obtain an instance initialized with provided params. */
    public static ClientTransaction obtain(IApplicationThread client, IBinder activityToken) {


        ClientTransaction instance = ObjectPool.obtain(ClientTransaction.class);
        if (instance == null) {


        //创建ClientTransaction
            instance = new ClientTransaction();
        }
        instance.mClient = client;
        /*把ActivityRecord.token存到mActivityToken*/
        //private IBinder mActivityToken;
        instance.mActivityToken = activityToken;

        return instance;
    }
3.客户端从ClientTransaction中获取ATMS端传来的Token,并传递到LaunchActivityItem中
代码路径:framework/core/java/android/app/servertransaction/TransactionExecutor.java
   /** Cycle through all states requested by callbacks and execute them at proper times. */
    @VisibleForTesting
    public void executeCallbacks(ClientTransaction transaction) {


        final List<ClientTransactionItem> callbacks = transaction.getCallbacks();
        ......
        /*从ClientTransaction中获取ATMS端传来的Token*/
        final IBinder token = transaction.getActivityToken();
        ActivityClientRecord r = mTransactionHandler.getActivityClient(token);
        ......

        final int size = callbacks.size();
        for (int i = 0; i < size; ++i) {


            final ClientTransactionItem item = callbacks.get(i);
            ......
            /*将Token传递到LaunchActivityItem中*/
            item.execute(mTransactionHandler, token, mPendingActions);
            item.postExecute(mTransactionHandler, token, mPendingActions);
            ......
        }
    }
4.在LaunchActivityItem中将客户端传过来的Token保存在ActivityClientRecord.token中
代码路径:framework/core/java/android/app/servertransaction/LaunchActivityItem.java
    @Override
    public void execute(ClientTransactionHandler client, IBinder token,
            PendingTransactionActions pendingActions) {


        Trace.traceBegin(TRACE_TAG_ACTIVITY_MANAGER, "activityStart");
        //将客户端传过来的Token保存在ActivityClientRecord的token中
        ActivityClientRecord r = new ActivityClientRecord(token, mIntent, mIdent, mInfo,
                mOverrideConfig, mCompatInfo, mReferrer, mVoiceInteractor, mState, mPersistentState,
                mPendingResults, mPendingNewIntents, mActivityOptions, mIsForward, mProfilerInfo,
                client, mAssistToken, mShareableActivityToken, mLaunchedFromBubble,
                mTaskFragmentToken);
        client.handleLaunchActivity(r, pendingActions, null /* customIntent */);
        Trace.traceEnd(TRACE_TAG_ACTIVITY_MANAGER);
    }
client.handleLaunchActivity(r, pendingActions, null /* customIntent */);ClientTransactionHandler调用handleLaunchActivity方法,ClientTransactionHandler为抽象类,其子类为ActivityThread,即实际调用的是该类中的handleLaunchActivity(),有从该方法中调用到了performLaunchActivity()
5.客户端ActivityThread将ActivityClientRecord以及其对应的token保存在ActivityThread.mActivities数组中,并调用Activity.attach将Token传给Activity。
代码路径:framework/core/java/android/app/ActivityThread.java
    /**  Core implementation of activity launch. */
    private Activity performLaunchActivity(ActivityClientRecord r, Intent customIntent) {


    	......
        try {


            Application app = r.packageInfo.makeApplicationInner(false, mInstrumentation);
            ......
            synchronized (mResourcesManager) {


            	/*将ActivityClientRecord以及其对应的Token保存在mActivities中*/
            	//mActivities的类型为ArrayMap<IBinder, ActivityClientRecord>
                mActivities.put(r.token, r);
            }

            if (activity != null) {


                ......
                /*将Token赋值给Activity.mToken*/
                activity.attach(appContext, this, getInstrumentation(), r.token,
                        r.ident, app, r.intent, r.activityInfo, title, r.parent,
                        r.embeddedID, r.lastNonConfigurationInstances, config,
                        r.referrer, r.voiceInteractor, window, r.activityConfigCallback,
                        r.assistToken, r.shareableActivityToken);
                ......

        } catch (SuperNotCalledException e) {


            throw e;

        } catch (Exception e) {


        	......
        }

        return activity;
    }
6.在Activity中将客户端传来的Token赋值给Activity.mToken。此外在该方法中还新建了PhoneWindow,并将PhoneWindow.mAppToken也设置为客户端传过来的Token。
代码路径:framework/core/java/android/app/Activity.java
    @UnsupportedAppUsage(maxTargetSdk = Build.VERSION_CODES.R, trackingBug = 170729553)
    final void attach(Context context, ActivityThread aThread,
            Instrumentation instr, IBinder token, int ident,
            Application application, Intent intent, ActivityInfo info,
            CharSequence title, Activity parent, String id,
            NonConfigurationInstances lastNonConfigurationInstances,
            Configuration config, String referrer, IVoiceInteractor voiceInteractor,
            Window window, ActivityConfigCallback activityConfigCallback, IBinder assistToken,
            IBinder shareableActivityToken) {


        attachBaseContext(context);

        mFragments.attachHost(null /*parent*/);
        /*新建PhoneWindow*/
        mWindow = new PhoneWindow(this, window, activityConfigCallback);
        ......
        /*将客户端传过来的Token赋值给mToken*/
        mToken = token;
        ......
        /*PhoneWindow.mAppToken设置为当前客户端传递过来的Token*/
        mWindow.setWindowManager(
                (WindowManager)context.getSystemService(Context.WINDOW_SERVICE),
                mToken, mComponent.flattenToString(),
                (info.flags & ActivityInfo.FLAG_HARDWARE_ACCELERATED) != 0);
        ......
    }
PhoneWindow继承Window,setWindowManager实际调用的是其父类方法,把mAppToken设置为当前客户端传递过来的mToken
代码路径:framework/core/java/android/view/Window.java
    /**
     * Set the window manager for use by this Window to, for example,
     * display panels.  This is <em>not</em> used for displaying the
     * Window itself -- that must be done by the client.
     *
     * @param wm The window manager for adding new windows.
     */
    public void setWindowManager(WindowManager wm, IBinder appToken, String appName) {


    	//传递客户端的mToken给appToken
        setWindowManager(wm, appToken, appName, false);
    }

    /**
     * Set the window manager for use by this Window to, for example,
     * display panels.  This is <em>not</em> used for displaying the
     * Window itself -- that must be done by the client.
     *
     * @param wm The window manager for adding new windows.
     */
    public void setWindowManager(WindowManager wm, IBinder appToken, String appName,
            boolean hardwareAccelerated) {


        /*把appToken赋值给mAppToken*/
        mAppToken = appToken;
        mAppName = appName;
        mHardwareAccelerated = hardwareAccelerated;
        if (wm == null) {


            wm = (WindowManager)mContext.getSystemService(Context.WINDOW_SERVICE);
        }
        mWindowManager = ((WindowManagerImpl)wm).createLocalWindowManager(this);
    }
1.3 ViewRootImpl的创建
root = new ViewRootImpl(view.getContext(), display);之前在【1.1 Activity走到onresume后】的流程中有调用创建ViewRootImpl,这里我们看下ViewRootImpl的构造方法
代码路径:framework/core/java/android/view/ViewRootImpl.java
    public ViewRootImpl(Context context, Display display) {


        this(context, display, WindowManagerGlobal.getWindowSession(),
                false /* useSfChoreographer */);
    }

    public ViewRootImpl(@UiContext Context context, Display display, IWindowSession session) {


        this(context, display, session, false /* useSfChoreographer */);
    }

    public ViewRootImpl(@UiContext Context context, Display display, IWindowSession session,
            boolean useSfChoreographer) {


        mContext = context;
        mWindowSession = session;
        ......
    }
从这个构造方法中我们可以看出,通过WindowManagerGlobal.getWindowSession获取到客户端与WMS沟通的桥梁IWindowSession,并将其赋值给ViewRootImpl.mWindowSession。
下面我们查看WindowManagerGlobal中是如何获取Session的。
1.通过getWindowManagerService获取IWindowManager,而WindowManagerService则实现了这个Binder接口。
2.调用IWindowManager.openSession方法即WMS.openSession,在WMS端便会新建Session。至此客户端与WMS通信的桥梁便已经搭建好了
代码路径:framework/core/java/android/view/WindowManagerGlobal.java
    @UnsupportedAppUsage
    public static IWindowSession getWindowSession() {


        synchronized (WindowManagerGlobal.class) {


            if (sWindowSession == null) {


                try {


                    // Emulate the legacy behavior.  The global instance of InputMethodManager
                    // was instantiated here.
                    // TODO(b/116157766): Remove this hack after cleaning up @UnsupportedAppUsage
                    InputMethodManager.ensureDefaultInstanceForDefaultDisplayIfNecessary();
                    /*1.获取Binder*/
                    IWindowManager windowManager = getWindowManagerService();
                    /*2.调用WMS的openSession*/
                    sWindowSession = windowManager.openSession(
                            new IWindowSessionCallback.Stub() {


                                @Override
                                public void onAnimatorScaleChanged(float scale) {


                                    ValueAnimator.setDurationScale(scale);
                                }
                            });
                } catch (RemoteException e) {


                    throw e.rethrowFromSystemServer();
                }
            }
            return sWindowSession;
        }
    }
从代码中可以看出如果sWindowSession不为空则直接返回,sWindowSession为当前WindowManagerGlobal属性,且WindowManagerGloba又是单例的,所以客户端一个进程中只有一个IWindowSession与WMS通信。如果sWindowSession为空,则会创建IWindowSession。
调用WindowManagerService中的openSession,新建Session
代码路径:framework/services/core/java/com/android/server/wm/WindowManagerService.java
    @Override
    public IWindowSession openSession(IWindowSessionCallback callback) {


    	/*新建Session*/
        return new Session(this, callback);
    }
1.4 ViewRootImpl与WMS的通信
root.setView(view, wparams, panelParentView, userId);之前在【1.1 Activity走到onresume后】的流程中有调用ViewRootImpl与WMS的通信,继续看看
当前方法是与WMS进行通信添加窗口的入口,在此处我们只关注两点:
1.requestLayout()该方法会调用到doTraversal(),之后调用performTraversals(),最终调用到relayoutWindow()和reportDrawFinished()流程,在通过Session与服务端通信
2.mWindowSession.addToDisplayAsUser,与服务端进行Binder通信,调用Session的addToDisplayAsUser方法。
   /**
     * We have one child
     */
    public void setView(View view, WindowManager.LayoutParams attrs, View panelParentView) {


        setView(view, attrs, panelParentView, UserHandle.myUserId());
    }

    /**
     * We have one child
     */
    public void setView(View view, WindowManager.LayoutParams attrs, View panelParentView,
            int userId) {


        synchronized (this) {


            if (mView == null) {


                mView = view;
                ......
                //将布局参数拷贝纸mWindowAttributes
                mWindowAttributes.copyFrom(attrs);
                //设置包名
                if (mWindowAttributes.packageName == null) {


                    mWindowAttributes.packageName = mBasePackageName;
                }
                mWindowAttributes.privateFlags |=
                        WindowManager.LayoutParams.PRIVATE_FLAG_USE_BLAST;

                attrs = mWindowAttributes;
                ......
                // Keep track of the actual window flags supplied by the client.
                //获取当前布局的flags
                mClientWindowLayoutFlags = attrs.flags;
                ......
                int res; /* = WindowManagerImpl.ADD_OKAY; */

                // Schedule the first layout -before- adding to the window
                // manager, to make sure we do the relayout before receiving
                // any other events from the system.
                /*请求布局,对应服务端layoutWindow流程*/
                requestLayout();
                InputChannel inputChannel = null;
                if ((mWindowAttributes.inputFeatures
                        & WindowManager.LayoutParams.INPUT_FEATURE_NO_INPUT_CHANNEL) == 0) {


                    inputChannel = new InputChannel();
                }
                ......

                try {


                	......
                	/*与服务端进行Binder通信,调用Session的addToDisplayAsUser方法*/
                	//执行addWindow的相关流程
                    res = mWindowSession.addToDisplayAsUser(mWindow, mWindowAttributes,
                            getHostVisibility(), mDisplay.getDisplayId(), userId,
                            mInsetsController.getRequestedVisibilities(), inputChannel, mTempInsets,
                            mTempControls);
                    ......
                } catch (RemoteException e) {


                	......
                } finally {


                    if (restore) {


                        attrs.restore();
                    }
                }
                ......
                if (DEBUG_LAYOUT) Log.v(mTag, "Added window " + mWindow);
                if (res < WindowManagerGlobal.ADD_OKAY) {


                    mAttachInfo.mRootView = null;
                    mAdded = false;
                    mFallbackEventHandler.setView(null);
                    unscheduleTraversals();
                    setAccessibilityFocus(null, null);
                    switch (res) {


                        case WindowManagerGlobal.ADD_BAD_APP_TOKEN:
                        case WindowManagerGlobal.ADD_BAD_SUBWINDOW_TOKEN:
                            throw new WindowManager.BadTokenException(
                                    "Unable to add window -- token " + attrs.token
                                    + " is not valid; is your activity running?");
                        case WindowManagerGlobal.ADD_NOT_APP_TOKEN:
                            throw new WindowManager.BadTokenException(
                                    "Unable to add window -- token " + attrs.token
                                    + " is not for an application");
                        case WindowManagerGlobal.ADD_APP_EXITING:
                            throw new WindowManager.BadTokenException(
                                    "Unable to add window -- app for token " + attrs.token
                                    + " is exiting");
                        case WindowManagerGlobal.ADD_DUPLICATE_ADD:
                            throw new WindowManager.BadTokenException(
                                    "Unable to add window -- window " + mWindow
                                    + " has already been added");
                        case WindowManagerGlobal.ADD_STARTING_NOT_NEEDED:
                            // Silently ignore -- we would have just removed it
                            // right away, anyway.
                            return;
                        case WindowManagerGlobal.ADD_MULTIPLE_SINGLETON:
                            throw new WindowManager.BadTokenException("Unable to add window "
                                    + mWindow + " -- another window of type "
                                    + mWindowAttributes.type + " already exists");
                        case WindowManagerGlobal.ADD_PERMISSION_DENIED:
                            throw new WindowManager.BadTokenException("Unable to add window "
                                    + mWindow + " -- permission denied for window type "
                                    + mWindowAttributes.type);
                        case WindowManagerGlobal.ADD_INVALID_DISPLAY:
                            throw new WindowManager.InvalidDisplayException("Unable to add window "
                                    + mWindow + " -- the specified display can not be found");
                        case WindowManagerGlobal.ADD_INVALID_TYPE:
                            throw new WindowManager.InvalidDisplayException("Unable to add window "
                                    + mWindow + " -- the specified window type "
                                    + mWindowAttributes.type + " is not valid");
                        case WindowManagerGlobal.ADD_INVALID_USER:
                            throw new WindowManager.BadTokenException("Unable to add Window "
                                    + mWindow + " -- requested userId is not valid");
                    }
                    throw new RuntimeException(
                            "Unable to add window -- unknown error code " + res);
                }
                ......
            }
        }
    }
其中关键的添加代码为
res = mWindowSession.addToDisplayAsUser(mWindow, mWindowAttributes,
        getHostVisibility(), mDisplay.getDisplayId(), userId,
        mInsetsController.getRequestedVisibilities(), inputChannel, mTempInsets,
        mTempControls);
addToDisplayAsUser()方法最终会走到WindowManagerService.java的addWindow方法,addWindow方法的返回值最后会返回给res,之后回看ViewRootImpl的setView方法,返回值如果满足if (res < WindowManagerGlobal.ADD_OKAY)条件,那么会根据switch (res)中对应的case抛出异常。
至此,客户端流程结束,后面进入服务端流程。
2.服务端
2.1 窗口添加
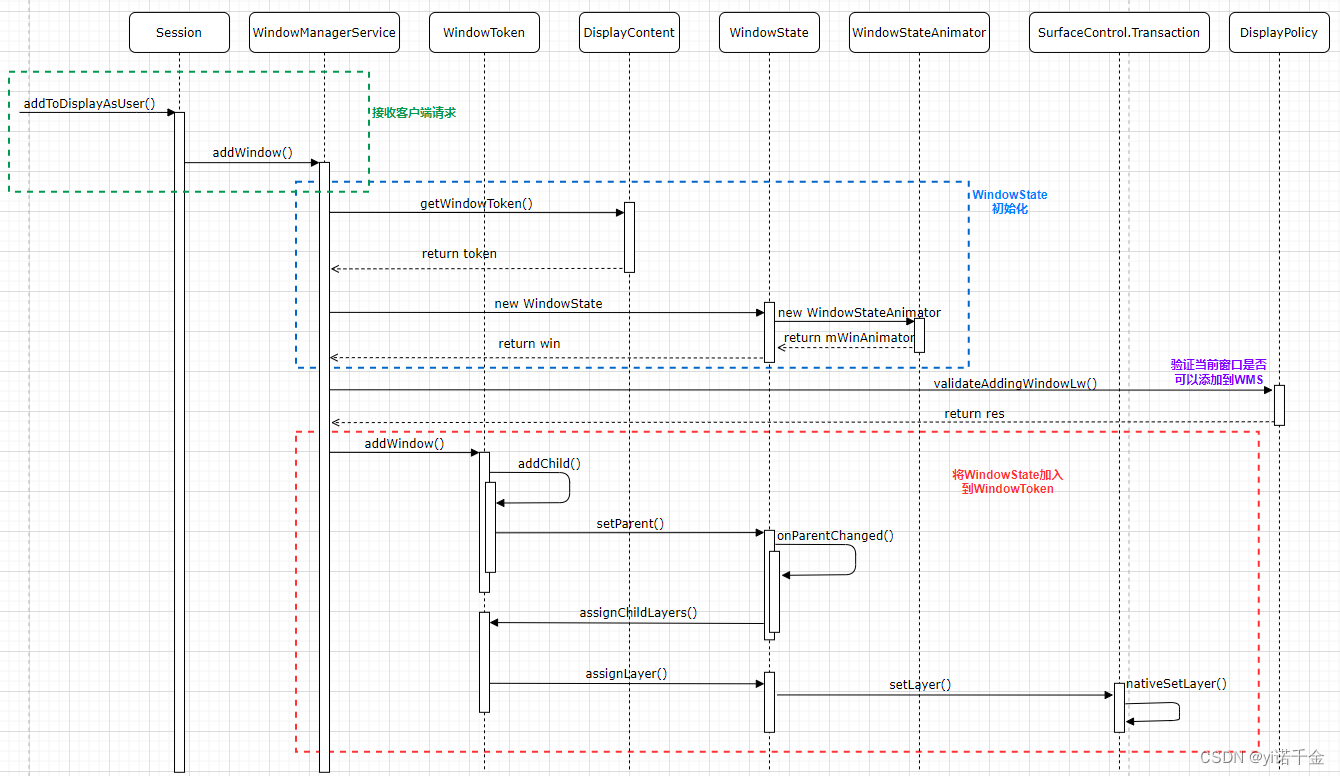
WMS通过Session接受客户端添加窗口的请求,因此WMS会新建WindowState、将WindowState加入到WindowToken,并更新WindowToken下所有WindowState的z-order。
客户端通过Binder通信调用WMS端的Session.addToDisplayAsUser进入addWindow的流程。
主要做了这三件事:
1.接收客户端请求
2.WindowState初始化
3.WindowState加入到WIndowToken
2.1.1 接收客户端请求
客户端传递给Session的参数
IWindow window:是WMS与客户端通信的句柄。
WindowManager.LayoutParams arrts:窗口布局参数。
viewVisibility:附着在窗口的rootView的可见性。
displayId:顾名思义,display id表示的是DisplayContent即屏幕的id。
InsetsVisibilities requestedVisibilities:当前对象的mVisibilities记录了insets的可见性。
InputChannel outInputChannel:InputDispatcher接收InputReader读取到的事件,分发给对应窗口,InputDispatcher属于system_server进程和各个应用不在同一进程,它们之间的联系靠的就是InputChannel。
InsetsState outInsetsState:用来保存系统中所有Insets的状态,该对象只是在客户端创建,内部属性需要在WMS端赋值。
InsetsSourceControl[] outActiveControls:InSetsSourceControl数组。该对象也是只在客户端创建,内部属性需要在WMS端赋值。
Session调用WMS.addWindow 将客户端传入的参数传递给WMS。
代码路径:framework/services/core/java/com/android/server/wm/Session.java
    @Override
    public int addToDisplayAsUser(IWindow window, WindowManager.LayoutParams attrs,
            int viewVisibility, int displayId, int userId, InsetsVisibilities requestedVisibilities,
            InputChannel outInputChannel, InsetsState outInsetsState,
            InsetsSourceControl[] outActiveControls) {


        return mService.addWindow(this, window, attrs, viewVisibility, displayId, userId,
                requestedVisibilities, outInputChannel, outInsetsState, outActiveControls);
    }
2.1.2 addWindow
添加窗口的主要逻辑均在WMS.addWindow执行,该方法主要实现以下功能:
1.首先进行权限验证以及各种条件判断。
2.根据客户端传来的token获取windowToken。
3.借助客户端传来的参数,创建WindowState实例,并将其加入到WMS. mWindowMap中。
4.将新建的WindowState加入到相应的WindowToken,并为每个窗口赋值一个z-order。
代码路径:framework/services/core/java/com/android/server/wm/WindowManagerService.java
public int addWindow(Session session, IWindow client, LayoutParams attrs, int viewVisibility,
int displayId, int requestUserId, InsetsVisibilities requestedVisibilities,
InputChannel outInputChannel, InsetsState outInsetsState,
InsetsSourceControl[] outActiveControls) {
......
/*1.进行权限验证以及各种条件判断*/
//判断调用者是否有权限add window
int res = mPolicy.checkAddPermission(attrs.type, isRoundedCornerOverlay, attrs.packageName,
appOp);
if (res != ADD_OKAY) {
return res;
}
WindowState parentWindow = null;
final int callingUid = Binder.getCallingUid();
final int callingPid = Binder.getCallingPid();
final long origId = Binder.clearCallingIdentity();
//获取将要添加的窗口类型
final int type = attrs.type;
synchronized (mGlobalLock) {
......
//根据displayId以及客户端传过来的token获取相应的displayContent
final DisplayContent displayContent = getDisplayContentOrCreate(displayId, attrs.token);
......
//判断mWindowMap中是否已经存在当前客户端的key,如果有则已经将当前客户端的window添加了,无需重复添加
if (mWindowMap.containsKey(client.asBinder())) {
ProtoLog.w(WM_ERROR, "Window %s is already added", client);
return WindowManagerGlobal.ADD_DUPLICATE_ADD;
}
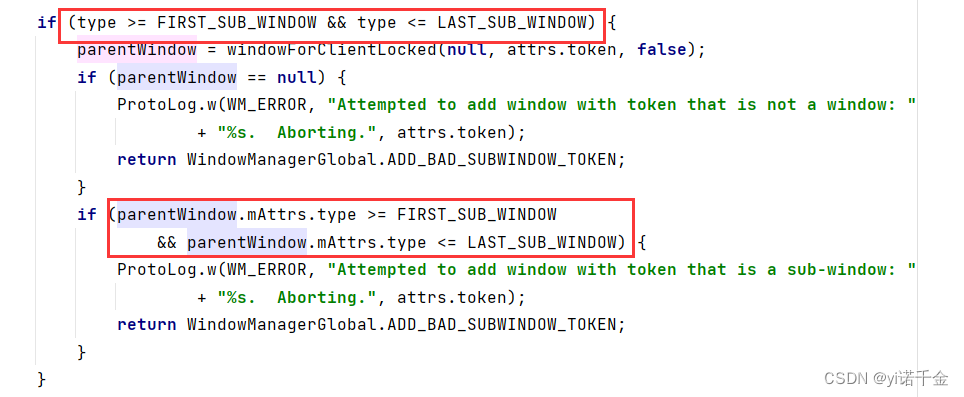
//判断是否是子窗口
if (type >= FIRST_SUB_WINDOW && type <= LAST_SUB_WINDOW) {
parentWindow = windowForClientLocked(null, attrs.token, false);
if (parentWindow == null) {
ProtoLog.w(WM_ERROR, "Attempted to add window with token that is not a window: "
+ "%s. Aborting.", attrs.token);
return WindowManagerGlobal.ADD_BAD_SUBWINDOW_TOKEN;
}
if (parentWindow.mAttrs.type >= FIRST_SUB_WINDOW
&& parentWindow.mAttrs.type <= LAST_SUB_WINDOW) {
ProtoLog.w(WM_ERROR, "Attempted to add window with token that is a sub-window: "
+ "%s. Aborting.", attrs.token);
return WindowManagerGlobal.ADD_BAD_SUBWINDOW_TOKEN;
}
}
//判断当前DisplayContent是否是私有的,只拥有该display或者display已经的应用才可以在其上创建
if (type == TYPE_PRIVATE_PRESENTATION && !displayContent.isPrivate()) {
ProtoLog.w(WM_ERROR,
"Attempted to add private presentation window to a non-private display. "
+ "Aborting.");
return WindowManagerGlobal.ADD_PERMISSION_DENIED;
}
......
ActivityRecord activity = null;
//设置是否有父窗口的标志位
final boolean hasParent = parentWindow != null;
// Use existing parent window token for child windows since they go in the same token
// as there parent window so we can apply the same policy on them.
/*2.根据客户端传来的token获取windowToken*/
//attrs.token去DisplayContent.mTokenMap中去取WindowToken
//那么WindowToken是什么时候加入到mTokenMap中的呢
//这就要追溯到Activity的启动时,加入到DisplayContent中
//在ActivityStarter.startActivityInner中调用addOrReparentStartingActivity通过addChild一步步调用到WindowContainert中。
//在调用setParent,最终通过onDisplayChanged将ActivityRecord加入到DisplayContent.mTokenMap中
WindowToken token = displayContent.getWindowToken(
hasParent ? parentWindow.mAttrs.token : attrs.token);
// If this is a child window, we want to apply the same type checking rules as the
// parent window type.
final int rootType = hasParent ? parentWindow.mAttrs.type : type;
boolean addToastWindowRequiresToken = false;
final IBinder windowContextToken = attrs.mWindowContextToken;
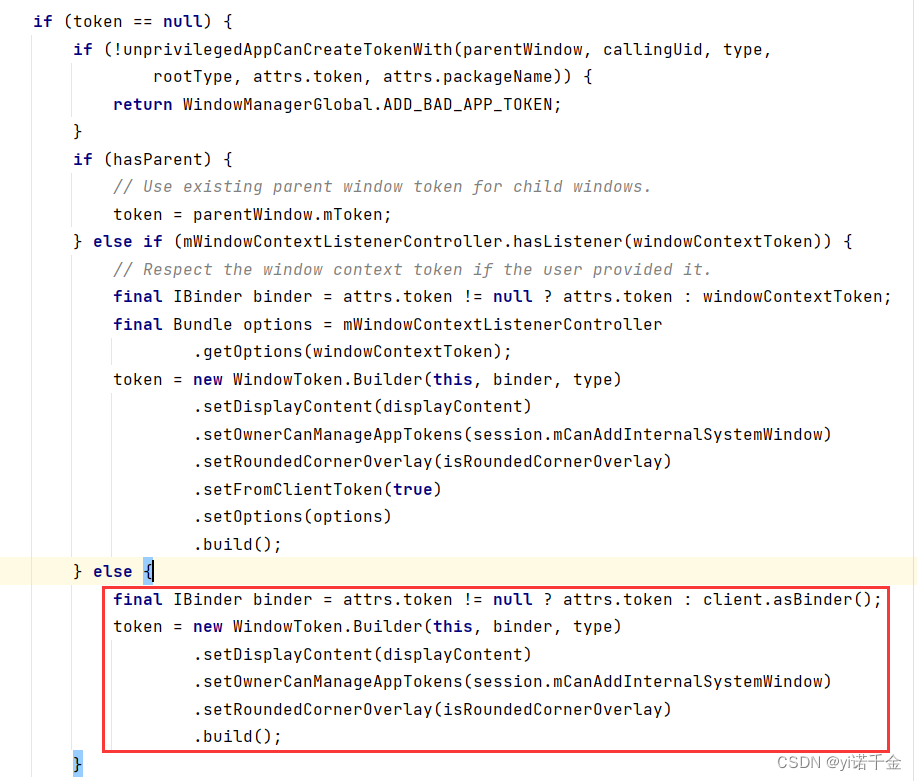
if (token == null) {
......
}else if (rootType >= FIRST_APPLICATION_WINDOW
&& rootType <= LAST_APPLICATION_WINDOW) {
//当前窗口为应用窗口,通过token,获取ActivityRecord
activity = token.asActivityRecord();
......
} else if (token.asActivityRecord() != null) {
ProtoLog.w(WM_ERROR, "Non-null activity for system window of rootType=%d",
rootType);
// It is not valid to use an app token with other system types; we will
// instead make a new token for it (as if null had been passed in for the token).
attrs.token = null;
token = new WindowToken.Builder(this, client.asBinder(), type)
.setDisplayContent(displayContent)
.setOwnerCanManageAppTokens(session.mCanAddInternalSystemWindow)
.build();
}
/*3.创建WindowState*/
final WindowState win = new WindowState(this, session, client, token, parentWindow,
appOp[0], attrs, viewVisibility, session.mUid, userId,
session.mCanAddInternalSystemWindow);
//将客户端传过来的Insets可见性赋值给WindowState的requestedVisibilities
win.setRequestedVisibilities(requestedVisibilities);
//验证当前窗口是否可以添加到WMS
res = displayPolicy.validateAddingWindowLw(attrs, callingPid, callingUid);
if (res != ADD_OKAY) {
return res;
}
//调用openInputChannel,初始化input相关通路
final boolean openInputChannels = (outInputChannel != null
&& (attrs.inputFeatures & INPUT_FEATURE_NO_INPUT_CHANNEL) == 0);
if (openInputChannels) {
win.openInputChannel(outInputChannel);
}
//创建SufaceSession用于SurfaceFlinger通信
win.attach();
//将客户端与WindowState加入到mWindowMap中
mWindowMap.put(client.asBinder(), win);
win.initAppOpsState();
......
/*4.将WindowState加入到WindowToken*/
win.mToken.addWindow(win);
......
return res;
}
mWindowMap保存了每个WindowState和客户端窗口的映射关系,客户端应用请求窗口操作时,通过mWindowMap查询到对应的WindowState
2.1.3 WindowToken的创建
token = new WindowToken.Builder(this, client.asBinder(), type)
        .setDisplayContent(displayContent)
        .setOwnerCanManageAppTokens(session.mCanAddInternalSystemWindow)
        .build();
这里调用的是其WindowToken自身的build方法创建
代码路径:frameworks/base/services/core/java/com/android/server/wm/WindowToken.java
WindowToken build() {


    return new WindowToken(mService, mToken, mType, mPersistOnEmpty, mDisplayContent,
            mOwnerCanManageAppTokens, mRoundedCornerOverlay, mFromClientToken, mOptions);
}

protected WindowToken(WindowManagerService service, IBinder _token, int type,
        boolean persistOnEmpty, DisplayContent dc, boolean ownerCanManageAppTokens,
        boolean roundedCornerOverlay, boolean fromClientToken, @Nullable Bundle options) {


    super(service);
    token = _token;
    windowType = type;
    mOptions = options;
    mPersistOnEmpty = persistOnEmpty;
    mOwnerCanManageAppTokens = ownerCanManageAppTokens;
    mRoundedCornerOverlay = roundedCornerOverlay;
    mFromClientToken = fromClientToken;
    if (dc != null) {


        dc.addWindowToken(token, this);
    }
}
dc.addWindowToken(token, this);在WindowToken构造方法中,调用DisplayContent.addWindowToken将WindowToken添加到以DisplayContent为根节点的WindowContainer层级结构中。
代码路径:frameworks/base/services/core/java/com/android/server/wm/DisplayContent.java
    void addWindowToken(IBinder binder, WindowToken token) {


        final DisplayContent dc = mWmService.mRoot.getWindowTokenDisplay(token);
        if (dc != null) {


            // We currently don't support adding a window token to the display if the display
            // already has the binder mapped to another token. If there is a use case for supporting
            // this moving forward we will either need to merge the WindowTokens some how or have
            // the binder map to a list of window tokens.
            throw new IllegalArgumentException("Can't map token=" + token + " to display="
                    + getName() + " already mapped to display=" + dc + " tokens=" + dc.mTokenMap);
        }
        if (binder == null) {


            throw new IllegalArgumentException("Can't map token=" + token + " to display="
                    + getName() + " binder is null");
        }
        if (token == null) {


            throw new IllegalArgumentException("Can't map null token to display="
                    + getName() + " binder=" + binder);
        }

        mTokenMap.put(binder, token);

        if (token.asActivityRecord() == null) {


            // Set displayContent for non-app token to prevent same token will add twice after
            // onDisplayChanged.
            // TODO: Check if it's fine that super.onDisplayChanged of WindowToken
            //  (WindowsContainer#onDisplayChanged) may skipped when token.mDisplayContent assigned.
            token.mDisplayContent = this;
            // Add non-app token to container hierarchy on the display. App tokens are added through
            // the parent container managing them (e.g. Tasks).
            //1.调用DisplayContent.findAreaForToken为当前WindowToken寻找一个合适的父容器,DisplayArea.Tokens对象。
            final DisplayArea.Tokens da = findAreaForToken(token).asTokens();
            //2.将WindowToken添加到父容器中。
            da.addChild(token);
        }
    }
这里我们分两步看
1.final DisplayArea.Tokens da = findAreaForToken(token).asTokens();调用DisplayContent.findAreaForToken为当前WindowToken寻找一个合适的父容器,DisplayArea.Tokens对象。
    /**
     * Finds the {@link DisplayArea} for the {@link WindowToken} to attach to.
     * <p>
     * Note that the differences between this API and
     * {@link RootDisplayArea#findAreaForTokenInLayer(WindowToken)} is that this API finds a
     * {@link DisplayArea} in {@link DisplayContent} level, which may find a {@link DisplayArea}
     * from multiple {@link RootDisplayArea RootDisplayAreas} under this {@link DisplayContent}'s
     * hierarchy, while {@link RootDisplayArea#findAreaForTokenInLayer(WindowToken)} finds a
     * {@link DisplayArea.Tokens} from a {@link DisplayArea.Tokens} list mapped to window layers.
     * </p>
     *
     * @see DisplayContent#findAreaForTokenInLayer(WindowToken)
     */
    DisplayArea findAreaForToken(WindowToken windowToken) {


        return findAreaForWindowType(windowToken.getWindowType(), windowToken.mOptions,
                windowToken.mOwnerCanManageAppTokens, windowToken.mRoundedCornerOverlay);
    }
为传入的WindowToken找到一个DisplayArea对象来添加进去。
    DisplayArea findAreaForWindowType(int windowType, Bundle options,
            boolean ownerCanManageAppToken, boolean roundedCornerOverlay) {


        // TODO(b/159767464): figure out how to find an appropriate TDA.
        //1.如果是App窗口,那么返回默认的TaskDisplayArea对象。
        if (windowType >= FIRST_APPLICATION_WINDOW && windowType <= LAST_APPLICATION_WINDOW) {


            return getDefaultTaskDisplayArea();
        }

        // Return IME container here because it could be in one of sub RootDisplayAreas depending on
        // the focused edit text. Also, the RootDisplayArea choosing strategy is implemented by
        // the server side, but not mSelectRootForWindowFunc customized by OEM.
        //2.如果是输入法窗口,那么返回ImeContainer。
        if (windowType == TYPE_INPUT_METHOD || windowType == TYPE_INPUT_METHOD_DIALOG) {


            return getImeContainer();
        }
        //3.如果是其他类型,继续寻找。
        return mDisplayAreaPolicy.findAreaForWindowType(windowType, options,
                ownerCanManageAppToken, roundedCornerOverlay);
    }
如果是App窗口,那么返回默认的TaskDisplayArea对象。
如果是输入法窗口,那么返回ImeContainer。
如果是其他类型,继续寻找。
mDisplayAreaPolicy.findAreaForWindowType(windowType, options, ownerCanManageAppToken, roundedCornerOverlay);调用的是DisplayAreaPolicy中的findAreaForWindowType方法,DisplayAreaPolicy为抽象类,DisplayAreaPolicyBuilder中的Result继承了该类
代码路径:frameworks/base/services/core/java/com/android/server/wm/DisplayAreaPolicyBuilder.java
static class Result extends DisplayAreaPolicy {


    ......
       @Override
       public DisplayArea.Tokens findAreaForWindowType(int type, Bundle options,
               boolean ownerCanManageAppTokens, boolean roundedCornerOverlay) {


           return mSelectRootForWindowFunc.apply(type, options).findAreaForWindowTypeInLayer(type,
                   ownerCanManageAppTokens, roundedCornerOverlay);
       }
       ......
代码路径:frameworks/base/services/core/java/com/android/server/wm/RootDisplayArea.java
  DisplayArea.Tokens findAreaForWindowTypeInLayer(int windowType, boolean ownerCanManageAppTokens,
           boolean roundedCornerOverlay) {


       //通过getWindowLayerFromTypeLw方法获取对应的窗口类型
       int windowLayerFromType = mWmService.mPolicy.getWindowLayerFromTypeLw(windowType,
               ownerCanManageAppTokens, roundedCornerOverlay);
       if (windowLayerFromType == APPLICATION_LAYER) {


           throw new IllegalArgumentException(
                   "There shouldn't be WindowToken on APPLICATION_LAYER");
       }
       return mAreaForLayer[windowLayerFromType];
   }
通过getWindowLayerFromTypeLw方法计算出该窗口的类型对应的层级值windowLayerFromType,然后从mAreaForLayer数组中,找到windowLayerFromType对应的那个DisplayArea.Tokens对象。
2. da.addChild(token);将WindowToken添加到父容器(叶子节点)中。
代码路径:frameworks/base/services/core/java/com/android/server/wm/DisplayArea.java
    /**
     * DisplayArea that contains WindowTokens, and orders them according to their type.
     */
    public static class Tokens extends DisplayArea<WindowToken> {


        ......
        void addChild(WindowToken token) {


            addChild(token, mWindowComparator);
        }
        ......
addChild(token, mWindowComparator);最终调用到WindowContainer.addChild方法添加WindowToken到叶子节点
2.1.4 WindowState初始化
在addWindow中初始化WindowState
final WindowState win = new WindowState(this, session, client, token, parentWindow,
        appOp[0], attrs, viewVisibility, session.mUid, userId,
        session.mCanAddInternalSystemWindow);
下面我们看一下在WindowState的实例化过程中,都做了什么。
1.根据客户端传过来的参数,对相关属性进行赋值。
2.根据当前窗口的类型获取mBaseLayer,当将WindowState加入到WindowToken时,该值用来确定加入窗口在WindowToken数组中的位置。
3.实例化WindowStateAnimator,该类会跟踪当前WIndowState的动画以及surface操作。
代码路径:framework/services/core/java/com/android/server/wm/WindowState.java
WindowState(WindowManagerService service, Session s, IWindow c, WindowToken token,
            WindowState parentWindow, int appOp, WindowManager.LayoutParams a, int viewVisibility,
            int ownerId, int showUserId, boolean ownerCanAddInternalSystemWindow,
            PowerManagerWrapper powerManagerWrapper) {


        /*1.根据客户端传递过来的参数,对相关属性进行赋值*/
        //调用WindowState的父类WindowContainer构造方法,将WMS赋值给其父类属性mWmService
        super(service);
        //获取事务
        mTmpTransaction = service.mTransactionFactory.get();
        //将Session赋值给mSession
        mSession = s;
        //将与客户端通信的Binder赋值给mClient
        mClient = c;
        mAppOp = appOp;
        //将当前activity的token赋值给mToken
        mToken = token;
        //通过token,获取当前窗口对的ActivityRecord
        mActivityRecord = mToken.asActivityRecord();
        //赋值id
        mOwnerUid = ownerId;
        mShowUserId = showUserId;
        //是否可以添加系统窗口的标志位
        mOwnerCanAddInternalSystemWindow = ownerCanAddInternalSystemWindow;
        mWindowId = new WindowId(this);
        //布局参数赋值给mAttrs
        mAttrs.copyFrom(a);
        //将surfaceInsets赋值给mLastSurfaceInsets
        mLastSurfaceInsets.set(mAttrs.surfaceInsets);
        //将窗口可见性赋值给mViewVisibility
        mViewVisibility = viewVisibility;
        //将窗口WindowManagerPolicy赋值给mPolicy
        mPolicy = mWmService.mPolicy;
        mContext = mWmService.mContext;
        ......
        /*2.获取当前窗口的BaseLayer*/
        if (mAttrs.type >= FIRST_SUB_WINDOW && mAttrs.type <= LAST_SUB_WINDOW) {


        	......
        } else {


            // The multiplier here is to reserve space for multiple
            // windows in the same type layer.
            //当前为应用窗口所以mPolicy.getWindowLayerLw(this)获取值为2,即应用层级
            //TYPE_LAYER_MULTIPLIER为同一类型的多窗口保留空间
            //TYPE_LAYER_OFFSET将同一组窗口移动到同一层中其他窗口的上方或者下方
            mBaseLayer = mPolicy.getWindowLayerLw(this)
                    * TYPE_LAYER_MULTIPLIER + TYPE_LAYER_OFFSET;
            mSubLayer = 0;
            mIsChildWindow = false;
            mLayoutAttached = false;
            mIsImWindow = mAttrs.type == TYPE_INPUT_METHOD
                    || mAttrs.type == TYPE_INPUT_METHOD_DIALOG;
            mIsWallpaper = mAttrs.type == TYPE_WALLPAPER;
        }
        ......
        /*3.新建windowStateAnimator,该类会跟踪当前WindowState的动画以及surface操作*/
        mWinAnimator = new WindowStateAnimator(this);
        //将透明度alpha赋值给mAlpha
        mWinAnimator.mAlpha = a.alpha;
		......
    }
2.1.5 将WindowState加入到WindowToken
在addWindow中将WindowState加入到WindowToken
win.mToken.addWindow(win);
WindowState加入到WindowToken中的具体过程:
1.将要加入的WindowState.mBaseLayer与WindowToken中现有的WindowState.mBaseLayer相比,按照mBaseLayer有小到大存放到数组中,若mBaseLayer相等,则后加入的WindowState放在数组后面。
代码路径:framework/services/core/java/com/android/server/wm/WindowToken.java
 void addWindow(final WindowState win) {


        ProtoLog.d(WM_DEBUG_FOCUS,
                "addWindow: win=%s Callers=%s", win, Debug.getCallers(5));

        if (win.isChildWindow()) {


            // Child windows are added to their parent windows.
            //如果是子窗口直接返回
            return;
        }
        // This token is created from WindowContext and the client requests to addView now, create a
        // surface for this token.
        if (mSurfaceControl == null) {


            createSurfaceControl(true /* force */);

            // Layers could have been assigned before the surface was created, update them again
            reassignLayer(getSyncTransaction());
        }
        if (!mChildren.contains(win)) {


            ProtoLog.v(WM_DEBUG_ADD_REMOVE, "Adding %s to %s", win, this);
            //调用WindowContainer.addChild方法
            addChild(win, mWindowComparator);
            mWmService.mWindowsChanged = true;
            // TODO: Should we also be setting layout needed here and other places?
        }
    }
 /**
   * Compares two child window of this token and returns -1 if the first is lesser than the
   * second in terms of z-order and 1 otherwise.
   */
  private final Comparator<WindowState> mWindowComparator =
          (WindowState newWindow, WindowState existingWindow) -> {


      final WindowToken token = WindowToken.this;
	  ......
	  //如果新窗口的mBaseLayer 不小于(大于等于)已经存在的WindowState的BaseLayer,则返回1,否则返回-1
      return isFirstChildWindowGreaterThanSecond(newWindow, existingWindow) ? 1 : -1;
  };
	/**
	 * Returns true if the new window is considered greater than the existing window in terms of
	 * z-order.
	 */
	protected boolean isFirstChildWindowGreaterThanSecond(WindowState newWindow,
	        WindowState existingWindow) {


	    // New window is considered greater if it has a higher or equal base layer.
	    //此处可以发现比较的是两个窗口的mBaseLayer
	    return newWindow.mBaseLayer >= existingWindow.mBaseLayer;
	}
我们看看WindowContainer.addChild方法
代码路径:framework/services/core/java/com/android/server/wm/WindowContainer.java
   /**
     * Adds the input window container has a child of this container in order based on the input
     * comparator.
     * @param child The window container to add as a child of this window container.
     * @param comparator Comparator to use in determining the position the child should be added to.
     *                   If null, the child will be added to the top.
     */
    @CallSuper
    protected void addChild(E child, Comparator<E> comparator) {


    	......
    	//记录插入数组的位置,若为-1则将windowState加入到后面
        int positionToAdd = -1;
        if (comparator != null) {


        	//判断当前WindowToken中WindowState的数量
        	//依次比较将要加入的窗口与已经存在的WindowState的BaseLayer
        	//mChildren越大放到数组最前面WindowToken
            final int count = mChildren.size();
            for (int i = 0; i < count; i++) {


            	//比较baseLayer,如果child大于列表中已经存在的,则需要返回1,否则返回-1
            	//新加入的的child大于mChildren.get(i)则返回1,小于则返回-1
            	//注:comparator比较器的逻辑见上面代码的mWindowComparator
                if (comparator.compare(child, mChildren.get(i)) < 0) {


                	//记录当前要插入的位置
                    positionToAdd = i;
                    break;
                }
            }
        }
		//如果新加入的窗口大于现在所有窗口
        if (positionToAdd == -1) {


        	//将该窗口加入到列表最后
            mChildren.add(child);
        } else {


            mChildren.add(positionToAdd, child);
        }

        // Set the parent after we've actually added a child in case a subclass depends on this.
        //此处将child的mParent设置为this
        child.setParent(this);
    }
2.将WindowState的mParent置为刚才的WindowToken,并更新其Parent的mTreeWeight。mTreeWeight记录了其子节点的数量。
继续查看WindowState的父类WindowContainer.setParent
    final protected void setParent(WindowContainer<WindowContainer> parent) {


    	//将当前WindowState的mParent设置为相应的WindowToken
        final WindowContainer oldParent = mParent;
        mParent = parent;

        if (mParent != null) {


        	//更新parent中的mTreeWeight属性
        	//mTreeWeight代表以parent的根节点的子树中的元素的数量
            mParent.onChildAdded(this);
        } else if (mSurfaceAnimator.hasLeash()) {


            mSurfaceAnimator.cancelAnimation();
        }
        if (!mReparenting) {


            onSyncReparent(oldParent, mParent);
            if (mParent != null && mParent.mDisplayContent != null
                    && mDisplayContent != mParent.mDisplayContent) {


                onDisplayChanged(mParent.mDisplayContent);
            }
            //计算显示layer
            onParentChanged(mParent, oldParent);
        }
    }
3.将WindowState加入到WindowToken之后,调用parent的assignChildLayers方法,调整其所有child的z-order。主要经历以下步骤:
初始化layer=0,代表着z-order。
遍历mChildren数组,判断Children是否需要提高到顶部(判断标志位mNeedsZBoost)。如果不需要则调用Children的assignLayer方法调整其z-order为layer,并将layer++。如果需要则执行下一遍循环。
再次遍历mChildren数组,判断Children是否需要提高到顶部。如果需要则则调用Children的assignLayer方法调整其z-order为layer,并将layer++。如果不需要则执行下一次循环。
继续看onParentChanged方法
/**
     * Callback that is triggered when @link WindowContainer#setParent(WindowContainer)} was called.
     * Supposed to be overridden and contain actions that should be executed after parent was set.
     */
    @Override
    void onParentChanged(ConfigurationContainer newParent, ConfigurationContainer oldParent) {


        onParentChanged(newParent, oldParent, null);
    }

    void onParentChanged(ConfigurationContainer newParent, ConfigurationContainer oldParent,
            PreAssignChildLayersCallback callback) {


        ......
        if (mSurfaceControl == null) {


            // If we don't yet have a surface, but we now have a parent, we should
            // build a surface.
            //创建一个SurfaceControl来调整窗口的z-order
            createSurfaceControl(false /*force*/);
        } else {


       		......
        }
        ......
        // Either way we need to ask the parent to assign us a Z-order.
        //进入WindowToken的父类WindowContainer中,调整窗口的z-order
        mParent.assignChildLayers();
        scheduleAnimation();
    }

    void assignChildLayers() {


        assignChildLayers(getSyncTransaction());
        scheduleAnimation();
    }

    void assignChildLayers(Transaction t) {


    //分配给当前窗口的z-order,初始化为0
        int layer = 0;

        // We use two passes as a way to promote children which
        // need Z-boosting to the end of the list.
        //此处会以parent为根节点向下遍历到子节点,再从下到上依次进行处理
        for (int j = 0; j < mChildren.size(); ++j) {


            final WindowContainer wc = mChildren.get(j);
            wc.assignChildLayers(t);
            //needsZBoot是用来判断当前窗口是否应该提升到容器的顶部
            //若不需要提升到容器的顶部
            if (!wc.needsZBoost()) {


            	//调用WindowState的父类WindowContainer中的assignLayer
                wc.assignLayer(t, layer++);
            }
        }
        //处理需要提升到容器顶部的窗口
        for (int j = 0; j < mChildren.size(); ++j) {


            final WindowContainer wc = mChildren.get(j);
            if (wc.needsZBoost()) {


                wc.assignLayer(t, layer++);
            }
        }
        if (mOverlayHost != null) {


            mOverlayHost.setLayer(t, layer++);
        }
    }
4.在Children的assignLayer中会首先判断此次要调整的layer与自己上次layer是否相等,不相等则最终会调用nativeSetLayer来调整自己的z-order。
    void assignLayer(Transaction t, int layer) {


        // Don't assign layers while a transition animation is playing
        // TODO(b/173528115): establish robust best-practices around z-order fighting.
        //如果正在执行Transaction,则不需要进行assignLayer
        if (mTransitionController.isPlaying()) return;
        //layer为此次要调整的z-order
        final boolean changed = layer != mLastLayer || mLastRelativeToLayer != null;
        //如果需要调整
        if (mSurfaceControl != null && changed) {


        	//调用setLayer调整窗口的z-order
            setLayer(t, layer);
            //将mLastLayer调整为新的z-order
            mLastLayer = layer;
            mLastRelativeToLayer = null;
        }
    }

    protected void setLayer(Transaction t, int layer) {


        if (mSurfaceFreezer.hasLeash()) {


       		......
        } else {


            // Route through surface animator to accommodate that our surface control might be
            // attached to the leash, and leash is attached to parent container.
            //调用SurfaceAnimator中的setLayer
            mSurfaceAnimator.setLayer(t, layer);
        }
    }
代码路径:framework/services/core/java/com/android/server/wm/SurfaceAnimator.java
    /**
     * Sets the layer of the surface.
     * <p>
     * When the layer of the surface needs to be adjusted, we need to set it on the leash if the
     * surface is reparented to the leash. This method takes care of that.
     */
    void setLayer(Transaction t, int layer) {


      	//调用SurfaceControl中的setlayer方法
        t.setLayer(mLeash != null ? mLeash : mAnimatable.getSurfaceControl(), layer);
    }
代码路径:framework/core/java/android/view/SurfaceControl.java
        /**
         * Set the Z-order for a given SurfaceControl, relative to it's siblings.
         * If two siblings share the same Z order the ordering is undefined. Surfaces
         * with a negative Z will be placed below the parent surface.
         *
         * @param sc The SurfaceControl to set the Z order on
         * @param z The Z-order
         * @return This Transaction.
         */
        @NonNull
        public Transaction setLayer(@NonNull SurfaceControl sc,
                @IntRange(from = Integer.MIN_VALUE, to = Integer.MAX_VALUE) int z) {


            //调用调整layer
            checkPreconditions(sc);
            nativeSetLayer(mNativeObject, sc.mNativeObject, z);
            return this;
        }
2.2 窗口位置计算
当WindowState加入到WindowToken并调整z-order之后,客户端会再次调用WMS执行窗口布局。
主要做了这三件事:
1.接收客户端请求
2.创建SurfaceControl
3.窗口大小位置计算
2.2.1 接收客户端请求
与addWindow流程的调用过程类似,WindowManagerService.relayoutWindow也是由客户端通过Session来调用的。
首先我们来看一下客户端给我们传递了哪些参数吧。
window:是WMS与客户端通信的Binder。
attrs:窗口的布局属性,根据attrs提供的属性来布局窗口。
requestWidth、requestHeight:客户端请求的窗口尺寸。
viewFlags:窗口的可见性。包括VISIBLE(0,view可见),INVISIBLE(4,view不可见,但是仍然占用布局空间)GONE(8,view不可见,不占用布局空间)
flags:定义一些布局行为。
outFrames:返回给客户端的,保存了重新布局之后的位置与大小。
mergedConfiguration:相关配置信息。
outSurfaceControl:返回给客户端的surfaceControl。
outInsetsState:用来保存系统中所有Insets的状态。
outActiveControls:InSetsSourceControl数组。
outSyncSeqIdBundle:与布局同步有关。
Session调用WMS.relayoutWindow将客户端传入的参数传递给WMS。
代码路径:framework/services/core/java/com/android/server/wm/Session.java
    @Override
    public int relayout(IWindow window, WindowManager.LayoutParams attrs,
            int requestedWidth, int requestedHeight, int viewFlags, int flags,
            ClientWindowFrames outFrames, MergedConfiguration mergedConfiguration,
            SurfaceControl outSurfaceControl, InsetsState outInsetsState,
            InsetsSourceControl[] outActiveControls, Bundle outSyncSeqIdBundle) {


        if (false) Slog.d(TAG_WM, ">>>>>> ENTERED relayout from "
                + Binder.getCallingPid());
        Trace.traceBegin(TRACE_TAG_WINDOW_MANAGER, mRelayoutTag);
        int res = mService.relayoutWindow(this, window, attrs,
                requestedWidth, requestedHeight, viewFlags, flags,
                outFrames, mergedConfiguration, outSurfaceControl, outInsetsState,
                outActiveControls, outSyncSeqIdBundle);
        Trace.traceEnd(TRACE_TAG_WINDOW_MANAGER);
        if (false) Slog.d(TAG_WM, "<<<<<< EXITING relayout to "
                + Binder.getCallingPid());
        return res;
    }
2.2.2 relayoutWindow
在WMS.relayoutWindow中主要做了以下事情:
1.根据客户端传过来的IWindow在mWindowMap获取窗口添加阶段创建的WindowState。
2.设置DisplayContent.mLayoutNeeded以及shouldRelayout标志位
3.Surface的创建流程。
4.窗口尺寸的计算以及Surface的状态变更。
代码路径:framework/services/core/java/com/android/server/wm/WindowManagerService.java
    public int relayoutWindow(Session session, IWindow client, LayoutParams attrs,
            int requestedWidth, int requestedHeight, int viewVisibility, int flags,
            ClientWindowFrames outFrames, MergedConfiguration mergedConfiguration,
            SurfaceControl outSurfaceControl, InsetsState outInsetsState,
            InsetsSourceControl[] outActiveControls, Bundle outSyncIdBundle) {


		......
        synchronized (mGlobalLock) {


        	/*1.根据客户端传过来的Iwindow从mWindowMap中获取对应的WindowState*/
            final WindowState win = windowForClientLocked(session, client, false);
            if (win == null) {


                return 0;
            }
            //获取DisplayContent、DisplayPolicy以及WindowStateAnimator
            final DisplayContent displayContent = win.getDisplayContent();
            final DisplayPolicy displayPolicy = displayContent.getDisplayPolicy();

            WindowStateAnimator winAnimator = win.mWinAnimator;
            if (viewVisibility != View.GONE) {


            	//根据客户端请求的窗口大小设置WindowState的requestedWidth, requestedHeight
            	//并设置WindowState.mLayoutNeeded为true
                win.setRequestedSize(requestedWidth, requestedHeight);
            }
            ......
            //根据请求的宽带和高度窗口缩放比例
            win.setWindowScale(win.mRequestedWidth, win.mRequestedHeight);
            ......
            //获取原来window的可见性,此时为INVISIBLE
            final int oldVisibility = win.mViewVisibility;
            ......
            //代表现在没有surface但应该很快就有标志位
            win.mRelayoutCalled = true;
            win.mInRelayout = true;
            //将当前窗口的可见性有原来的INVISIBLE调整为VISIBLE
            win.setViewVisibility(viewVisibility);
            ProtoLog.i(WM_DEBUG_SCREEN_ON,
                    "Relayout %s: oldVis=%d newVis=%d. %s", win, oldVisibility,
                            viewVisibility, new RuntimeException().fillInStackTrace());
            /*2.1.将displayContent中的布局标志为mLayoutNeeded置为true*/
            win.setDisplayLayoutNeeded();
            win.mGivenInsetsPending = (flags & WindowManagerGlobal.RELAYOUT_INSETS_PENDING) != 0;

            // We should only relayout if the view is visible, it is a starting window, or the
            // associated appToken is not hidden.
            /*2.2.判断是否允许relayout,此时为true*/
            //判断条件:view可见且(activityRecord不为空,或者布局类型为TYPE_APPLICATION_STARTING,或者窗口已经告诉客户端可以显示)
            final boolean shouldRelayout = viewVisibility == View.VISIBLE &&
                    (win.mActivityRecord == null || win.mAttrs.type == TYPE_APPLICATION_STARTING
                            || win.mActivityRecord.isClientVisible());
            ......
            // Create surfaceControl before surface placement otherwise layout will be skipped
            // (because WS.isGoneForLayout() is true when there is no surface.
            /*3.surface的创建流程*/
            if (shouldRelayout) {


                try {


                	//进入creatSurfaceControl开始创建SurfaceControl
                    result = createSurfaceControl(outSurfaceControl, result, win, winAnimator);
                } catch (Exception e) {


                	......
                    return 0;
                }
            }

            // We may be deferring layout passes at the moment, but since the client is interested
            // in the new out values right now we need to force a layout.
            /*4.窗口尺寸的计算以及Surface的状态变更*/
            //WindowSurfacePlacer在WMS初始化的时候创建
            mWindowPlacerLocked.performSurfacePlacement(true /* force */);
            ......
            //填充计算好的frame返回给客户端,更新mergedConfiguration对象
            win.fillClientWindowFramesAndConfiguration(outFrames, mergedConfiguration,
                    false /* useLatestConfig */, shouldRelayout);

            // Set resize-handled here because the values are sent back to the client.
            win.onResizeHandled();
            ......
        }

        Binder.restoreCallingIdentity(origId);
        //返回result
        return result;
    }
2.2.3 创建SurfaceControl
在relayoutWindow中创建SurfaceControl
result = createSurfaceControl(outSurfaceControl, result, win, winAnimator);
关于SurfaceControl的创建在WMS中主要做两件事:
1.调用WindwoStateAnimator执行具体的SurfaceControl的创建。
2.将创建的SurfaceControl赋值给客户端的outSurfaceControl。
代码路径:framework/services/core/java/com/android/server/wm/WindowManagerService.java
    private int createSurfaceControl(SurfaceControl outSurfaceControl, int result,
            WindowState win, WindowStateAnimator winAnimator) {


        ......
        WindowSurfaceController surfaceController;
        try {


            Trace.traceBegin(TRACE_TAG_WINDOW_MANAGER, "createSurfaceControl");
            /*
             * WindowStateAnimator用来帮助WindowState管理animator和surface基本操作的
             * 1.WMS将创建的surfaceContorl的操作交给windowAnimator来处理
             */
            surfaceController = winAnimator.createSurfaceLocked();
        } finally {


            Trace.traceEnd(TRACE_TAG_WINDOW_MANAGER);
        }
        if (surfaceController != null) {


        	/*2.将WMS的SurfaceControl赋值给客户端的outSurfaceControl*/
            surfaceController.getSurfaceControl(outSurfaceControl);
            ProtoLog.i(WM_SHOW_TRANSACTIONS, "OUT SURFACE %s: copied", outSurfaceControl);

        } else {


            // For some reason there isn't a surface.  Clear the
            // caller's object so they see the same state.
            ProtoLog.w(WM_ERROR, "Failed to create surface control for %s", win);
            outSurfaceControl.release();
        }

        return result;
    }
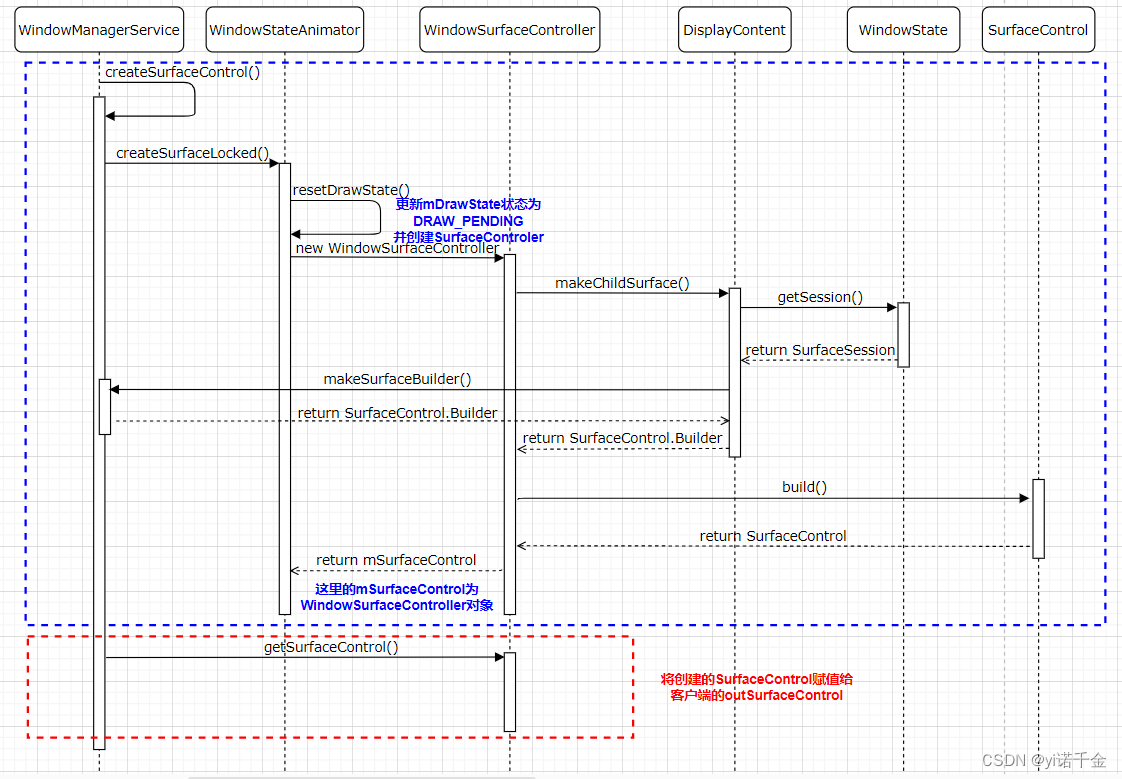
在WindowStateAnimator中创建SurfaceControl主要经过以下三个步骤:
1.重置Surface标志位,变更mDrawState状态为DRAW_PENDING。
2.通过实例化WindowSurfaceController来创建SurfaceControl。
3.处理Surface标志位,将其置为true,标志着当前WindowState已经有surface了
代码路径:framework/services/core/java/com/android/server/wm/WindowStateAnimator.java
   WindowSurfaceController createSurfaceLocked() {


        final WindowState w = mWin;

        //首先判断是否存在mSurfaceController
        if (mSurfaceController != null) {


            return mSurfaceController;
        }
		/*1.1.设置WindowState的mHasSurface设置为false*/
        w.setHasSurface(false);

        ProtoLog.i(WM_DEBUG_ANIM, "createSurface %s: mDrawState=DRAW_PENDING", this);
		/*1.2.将WindowStateAnimator中的DrawState设置为DRAW_PENDING*/
        resetDrawState();

        mService.makeWindowFreezingScreenIfNeededLocked(w);

		/*1.3.将surface创建flag设置为hidden*/
        int flags = SurfaceControl.HIDDEN;
        //获取windowState的布局参数
        final WindowManager.LayoutParams attrs = w.mAttrs;

        // Set up surface control with initial size.
        try {


       	 	......
       	 	/*2.创建WindowSurfaceController*/
       	 	//attrs.getTitle().toString()为当前activity的全路径名
       	 	//format为位图格式
       	 	//flags为surface创建的标志位(如:HIDDED(0x04,surface创建为隐藏),SKIP_SCREENSHOT(0x040,截屏时跳过此图层将不会包含在非主显示器上),SECURE(0X080,禁止复制表面的内容,屏幕截图和次要的非安全显示将呈现黑色内容而不是surface内容)等)
       	 	//attrs.type为窗口类型
            mSurfaceController = new WindowSurfaceController(attrs.getTitle().toString(), format,
                    flags, this, attrs.type);
            mSurfaceController.setColorSpaceAgnostic((attrs.privateFlags
                    & WindowManager.LayoutParams.PRIVATE_FLAG_COLOR_SPACE_AGNOSTIC) != 0);

			/*3.将WindowState的hasSurface标志设置为true,标志着道歉WindowState已经有surface了*/
            w.setHasSurface(true);
            ......
		} catch (OutOfResourcesException e) {


			......
		} catch (Exception e) {


			......
        }
		......
        return mSurfaceController;
    }
SurfaceControl的创建过程为典型的建造者模式
接下来看看WindowSurfaceController的构造方法
代码路径:framework/services/core/java/com/android/server/wm/WindowSurfaceController.java
WindowSurfaceController(String name, int format, int flags, WindowStateAnimator animator,
            int windowType) {


        //设置WindowStateAnimator
        mAnimator = animator;
		//窗口名
        title = name;
		//WMS对象
        mService = animator.mService;
        //WindowState对象
        final WindowState win = animator.mWin;
        //窗口类型
        mWindowType = windowType;
        //IWindowSession对象
        mWindowSession = win.mSession;

        Trace.traceBegin(TRACE_TAG_WINDOW_MANAGER, "new SurfaceControl");
        //makeSurface最终会调用到DisplayContent的makeChildSurface方法,返回SurfaceControl.Builder
        final SurfaceControl.Builder b = win.makeSurface()
                .setParent(win.getSurfaceControl())
                .setName(name)
                .setFormat(format)
                .setFlags(flags)
                .setMetadata(METADATA_WINDOW_TYPE, windowType)
                .setMetadata(METADATA_OWNER_UID, mWindowSession.mUid)
                .setMetadata(METADATA_OWNER_PID, mWindowSession.mPid)
                .setCallsite("WindowSurfaceController");
        ......
        //获取SurfaceControl实例对象
        mSurfaceControl = b.build();

        Trace.traceEnd(TRACE_TAG_WINDOW_MANAGER);
    }
两个关键方法win.makeSurface()和b.build()
1.final SurfaceControl.Builder b = win.makeSurface()
我们先来看看win.makeSurface(),windowState中没有makeSurface()方法,因此调用其父类WindowContainer的makeSurface()方法
代码路径:framework/services/core/java/com/android/server/wm/WindowContainer.java
    SurfaceControl.Builder makeSurface() {


        final WindowContainer p = getParent();
        return p.makeChildSurface(this);
    }
        /**
     * @param child The WindowContainer this child surface is for, or null if the Surface
     *              is not assosciated with a WindowContainer (e.g. a surface used for Dimming).
     */
    SurfaceControl.Builder makeChildSurface(WindowContainer child) {


        final WindowContainer p = getParent();
        // Give the parent a chance to set properties. In hierarchy v1 we rely
        // on this to set full-screen dimensions on all our Surface-less Layers.
        return p.makeChildSurface(child)
                .setParent(mSurfaceControl);
    }
最终会调用到DisplayContent的makeChildSurface
代码路径:framework/services/core/java/com/android/server/wm/DisplayContent.java
    @Override
    SurfaceControl.Builder makeChildSurface(WindowContainer child) {


    	//此时child为WindowState
    	//获取SurfaceSession,SurfaceSession的创建在Session.windowAddedLocked中,其最开始调用在WindowManagerService.addWindow中win.attach()中创建
        SurfaceSession s = child != null ? child.getSession() : getSession();
        //返回SurfaceControl.Builder
        final SurfaceControl.Builder b = mWmService.makeSurfaceBuilder(s).setContainerLayer();
        if (child == null) {


            return b;
        }
		//设置SurfaceControl.Builder的name以及parent
        return b.setName(child.getName())
                .setParent(mSurfaceControl);
    }
2.mSurfaceControl = b.build();
再来看看b.build(),调用SurfaceControl中的build
代码路径:framework/core/java/android/view/SurfaceControl.java
	/**
	  * Construct a new {@link SurfaceControl} with the set parameters. The builder
	  * remains valid.
	  */
	 @NonNull
	 public SurfaceControl build() {


	 	//检查width以及height,初始都应该为0
	     if (mWidth < 0 || mHeight < 0) {


	         throw new IllegalStateException(
	                 "width and height must be positive or unset");
	     }
	     if ((mWidth > 0 || mHeight > 0) && (isEffectLayer() || isContainerLayer())) {


	         throw new IllegalStateException(
	                 "Only buffer layers can set a valid buffer size.");
	     }

	     if ((mFlags & FX_SURFACE_MASK) == FX_SURFACE_NORMAL) {


	         setBLASTLayer();
	     }
	//创建SurfaceControl的实例
	     return new SurfaceControl(
	             mSession, mName, mWidth, mHeight, mFormat, mFlags, mParent, mMetadata,
	             mLocalOwnerView, mCallsite);
	 }

   /**
	* @param session  The surface session, must not be null.
	* @param name     The surface name, must not be null.
	* @param w        The surface initial width.
	* @param h        The surface initial height.
	* @param flags    The surface creation flags.
	* @param metadata Initial metadata.
	* @param callsite String uniquely identifying callsite that created this object. Used for
	*                 leakage tracking.
	* @throws throws OutOfResourcesException If the SurfaceControl cannot be created.
	*/
	private SurfaceControl(SurfaceSession session, String name, int w, int h, int format, int flags,
	     SurfaceControl parent, SparseIntArray metadata, WeakReference<View> localOwnerView,
	     String callsite)
	             throws OutOfResourcesException, IllegalArgumentException {


	 if (name == null) {


	     throw new IllegalArgumentException("name must not be null");
	 }

	 mName = name;
	 mWidth = w;
	 mHeight = h;
	 mLocalOwnerView = localOwnerView;
	 //创建Parcel用来传递数据
	 Parcel metaParcel = Parcel.obtain();
	 try {


	   	......
	   	//调用native层
	     mNativeObject = nativeCreate(session, name, w, h, format, flags,
	             parent != null ? parent.mNativeObject : 0, metaParcel);
	 } finally {


	     metaParcel.recycle();
	 }
	 if (mNativeObject == 0) {


	     throw new OutOfResourcesException(
	             "Couldn't allocate SurfaceControl native object");
	 }
	 mNativeHandle = nativeGetHandle(mNativeObject);
	 mCloseGuard.openWithCallSite("release", callsite);
	}
SurfaceControl的构造方法调用完成后,返回查看前面
result = createSurfaceControl(outSurfaceControl, result, win, winAnimator);
2.2.4 计算窗口大小位置
在relayoutWindow中计算窗口大小位置
mWindowPlacerLocked.performSurfacePlacement(true /* force */);
该流程我们分为三部分介绍:
1.该部分处理有关窗口布局循环的逻辑。
2.该部分处理Surface的状态变更,以及调用layoutWindowLw的流程。
3.计算窗口位置大小。
1.处理窗口布局循环
performSurfacePlacement是一个确定所有窗口的Surface的如何摆放,如何显示、显示在什么位置、显示区域多大的一个入口方法。
该方法主要设置了布局的循环条件,当mTraversalScheduled 标志位为true,且loopCount大于0。将会调用performSurfacePlacementLoop执行布局操作。
代码路径:framework/services/core/java/com/android/server/wm/WindowSurfacePlacer.java
    final void performSurfacePlacement(boolean force) {


        if (mDeferDepth > 0 && !force) {


            mDeferredRequests++;
            return;
        }
        //将循环的最大次数设置为6次
        int loopCount = 6;
        do {


        	//将该标志为设置为false
            mTraversalScheduled = false;
            //执行窗口布局操作
            performSurfacePlacementLoop();
            mService.mAnimationHandler.removeCallbacks(mPerformSurfacePlacement);
            loopCount--;
        //只有当mTraversalScheduled为true且循环次数大于0时,才会再次循环执行布局
        } while (mTraversalScheduled && loopCount > 0);
        mService.mRoot.mWallpaperActionPending = false;
    }
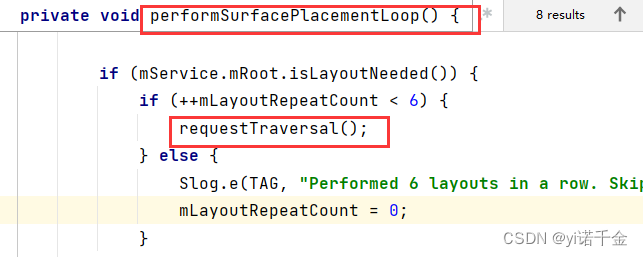
performSurfacePlacementLoop方法主要做两件事:
1.调用RootWindowContainer对所有窗口执行布局操作,
2.处理是否再次进行布局的逻辑。如果DisplayContent.mLayoutNeeded标志位为true且布局循环次数小于6次,则会将mTraversalScheduled标志位置为true,在performSurfacePlacement中会再次调用performSurfacePlacementLoop。
    private void performSurfacePlacementLoop() {


    	//若当前已经进行布局操作,则无需重复调用直接返回
        if (mInLayout) {


            ......
            return;
        }
        ......
        //将该标志位置为true,表示正在处于布局过程中
        mInLayout = true;
        ......
        try {


        	/*1.调用RootWindowContainer的performSurfacePlacement()方法对所有窗口执行布局操作*/
            mService.mRoot.performSurfacePlacement();

            mInLayout = false;

            if (mService.mRoot.isLayoutNeeded()) {


            	/*2.若需要布局,且布局次数小于6次,则需要再次请求布局*/
                if (++mLayoutRepeatCount < 6) {


                	//该方法中会将mTraversalScheduled标志位设置位true
                    requestTraversal();
                } else {


                    Slog.e(TAG, "Performed 6 layouts in a row. Skipping");
                    mLayoutRepeatCount = 0;
                }
            } else {


                mLayoutRepeatCount = 0;
            }

            if (mService.mWindowsChanged && !mService.mWindowChangeListeners.isEmpty()) {


                mService.mH.removeMessages(REPORT_WINDOWS_CHANGE);
                mService.mH.sendEmptyMessage(REPORT_WINDOWS_CHANGE);
            }
        } catch (RuntimeException e) {


            mInLayout = false;
            Slog.wtf(TAG, "Unhandled exception while laying out windows", e);
        }
    }
2.处理所有Surface的状态变更,以及调用layoutWindowLw的流程
mService.mRoot.performSurfacePlacement();
上面说到在RootWindowContainer.performSurfacePlacement()中调用了performSurfaceNoTrace()方法,该方法为实际的处理布局的方法,主要处理以下流程:
1.如果有焦点变化,更新焦点。
2.执行窗口尺寸计算,surface状态变更等操作。
3.将Surface状态变更为HAS_DRAWN,触发App触发动画。该过程在finishdrawing()中再详细分析。
4.如果壁纸有变化,更新壁纸。
5.再次处理焦点变化。
6.如果过程中由size或者位置变化,则通知客户端重新relayout。
7.销毁不可见的窗口
代码路径:framework/services/core/java/com/android/server/wm/RootWindowContainer.java
    void performSurfacePlacement() {


        Trace.traceBegin(TRACE_TAG_WINDOW_MANAGER, "performSurfacePlacement");
        try {


        	//调用performSurfacePlacementNoTrace()
            performSurfacePlacementNoTrace();
        } finally {


            Trace.traceEnd(TRACE_TAG_WINDOW_MANAGER);
        }
    }

    // "Something has changed!  Let's make it correct now."
    // TODO: Super long method that should be broken down...
    void performSurfacePlacementNoTrace() {


    	......
    	/*1.如果有焦点变化,更新焦点*/
        if (mWmService.mFocusMayChange) {


            mWmService.mFocusMayChange = false;
            mWmService.updateFocusedWindowLocked(
                    UPDATE_FOCUS_WILL_PLACE_SURFACES, false /*updateInputWindows*/);
        }
        ......

        Trace.traceBegin(TRACE_TAG_WINDOW_MANAGER, "applySurfaceChanges");
        //开启事务,获取GlobalTransactionWrapper对象
        mWmService.openSurfaceTransaction();
        try {


        	/*2.执行窗口尺寸计算,surface状态变更等操作*/
            applySurfaceChangesTransaction();
        } catch (RuntimeException e) {


            Slog.wtf(TAG, "Unhandled exception in Window Manager", e);
        } finally {


        	//关闭事务
            mWmService.closeSurfaceTransaction("performLayoutAndPlaceSurfaces");
            Trace.traceEnd(TRACE_TAG_WINDOW_MANAGER);
            if (SHOW_LIGHT_TRANSACTIONS) {


                Slog.i(TAG,
                        "<<< CLOSE TRANSACTION performLayoutAndPlaceSurfaces");
            }
        }
		......
		/*3.将Surface状态变更为HAS_DRAWN,触发App触发动画。该过程在“2.3.3mDrawState变更为HAS_DRAW”流程中再详细分析*/
        checkAppTransitionReady(surfacePlacer);
        ......
        /*4.遍历所有DisplayContent,如果壁纸有变化,更新壁纸*/
        for (int displayNdx = 0; displayNdx < mChildren.size(); ++displayNdx) {


            final DisplayContent displayContent = mChildren.get(displayNdx);
            //判断DisplayContent的壁纸是否需要改变
            if (displayContent.mWallpaperMayChange) {


                ProtoLog.v(WM_DEBUG_WALLPAPER, "Wallpaper may change!  Adjusting");
                displayContent.pendingLayoutChanges |= FINISH_LAYOUT_REDO_WALLPAPER;
                if (DEBUG_LAYOUT_REPEATS) {


                    surfacePlacer.debugLayoutRepeats("WallpaperMayChange",
                            displayContent.pendingLayoutChanges);
                }
            }
        }
        /*5.在此处理焦点变化*/
        if (mWmService.mFocusMayChange) {


            mWmService.mFocusMayChange = false;
            mWmService.updateFocusedWindowLocked(UPDATE_FOCUS_PLACING_SURFACES,
                    false /*updateInputWindows*/);
        }
        ......
        /*6.如果过程中size或者位置变化,则通知客户端重新relayout*/
        handleResizingWindows();

        if (mWmService.mDisplayFrozen) {


            ProtoLog.v(WM_DEBUG_ORIENTATION,
                    "With display frozen, orientationChangeComplete=%b",
                    mOrientationChangeComplete);
        }
        if (mOrientationChangeComplete) {


            if (mWmService.mWindowsFreezingScreen != WINDOWS_FREEZING_SCREENS_NONE) {


                mWmService.mWindowsFreezingScreen = WINDOWS_FREEZING_SCREENS_NONE;
                mWmService.mLastFinishedFreezeSource = mLastWindowFreezeSource;
                mWmService.mH.removeMessages(WINDOW_FREEZE_TIMEOUT);
            }
            mWmService.stopFreezingDisplayLocked();
        }

        // Destroy the surface of any windows that are no longer visible.
        /*7.销毁不可见的窗口*/
        i = mWmService.mDestroySurface.size();
        if (i > 0) {


            do {


                i--;
                WindowState win = mWmService.mDestroySurface.get(i);
                win.mDestroying = false;
                final DisplayContent displayContent = win.getDisplayContent();
                if (displayContent.mInputMethodWindow == win) {


                    displayContent.setInputMethodWindowLocked(null);
                }
                if (displayContent.mWallpaperController.isWallpaperTarget(win)) {


                    displayContent.pendingLayoutChanges |= FINISH_LAYOUT_REDO_WALLPAPER;
                }
                win.destroySurfaceUnchecked();
            } while (i > 0);
            mWmService.mDestroySurface.clear();
        }
        ......
    }
在applySurfaceChangesTransaction();方法中其主要执行:
1.水印、StrictMode警告框以及模拟器显示的布局。
2.遍历所有DisplayContent执行其applySurfaceChangesTransaction
我们一起看看这个方法
    private void applySurfaceChangesTransaction() {


        mHoldScreenWindow = null;
        mObscuringWindow = null;

        // TODO(multi-display): Support these features on secondary screens.
        /*1.水印、StrictMode警告框以及模拟器显示的布局*/
        //获取手机默认DisplayContent的信息
        final DisplayContent defaultDc = mWmService.getDefaultDisplayContentLocked();
        final DisplayInfo defaultInfo = defaultDc.getDisplayInfo();
        final int defaultDw = defaultInfo.logicalWidth;
        final int defaultDh = defaultInfo.logicalHeight;
        //布局水印
        if (mWmService.mWatermark != null) {


            mWmService.mWatermark.positionSurface(defaultDw, defaultDh, mDisplayTransaction);
        }
        //布局StrictMode警告框
        if (mWmService.mStrictModeFlash != null) {


            mWmService.mStrictModeFlash.positionSurface(defaultDw, defaultDh, mDisplayTransaction);
        }
        //布局模拟器显示覆盖
        if (mWmService.mEmulatorDisplayOverlay != null) {


            mWmService.mEmulatorDisplayOverlay.positionSurface(defaultDw, defaultDh,
                    mWmService.getDefaultDisplayRotation(), mDisplayTransaction);
        }
        /*2.遍历RootWindowContainer下所有DisplayContent执行其applySurfaceChangesTransaction()*/
        final int count = mChildren.size();
        for (int j = 0; j < count; ++j) {


            final DisplayContent dc = mChildren.get(j);
            dc.applySurfaceChangesTransaction();
        }

        // Give the display manager a chance to adjust properties like display rotation if it needs
        // to.
        mWmService.mDisplayManagerInternal.performTraversal(mDisplayTransaction);
        SurfaceControl.mergeToGlobalTransaction(mDisplayTransaction);
    }
接下来继续跟踪dc.applySurfaceChangesTransaction();
该方法主要
1.遍历所有窗口,计算窗口的布局大小,具体流程查看performLayoutNoTrace。(主要跟踪点)
2.surface的状态更改。(见“2.3.3mDrawState变更为HAS_DRAW”流程”)
3.处理surface的位置、大小以及显示等。(见“2.3.4 show Surface”流程”)
代码路径:framework/services/core/java/com/android/server/wm/DisplayContent.java
    void applySurfaceChangesTransaction() {


    	//获取WindowSurfacePlacer
        final WindowSurfacePlacer surfacePlacer = mWmService.mWindowPlacerLocked;
        ......
        // Perform a layout, if needed.
        /*1.执行布局,该方法最终会调用performLayoutNoTrace,计算窗口的布局参数*/
        performLayout(true /* initial */, false /* updateInputWindows */);
        ......
        Trace.traceBegin(TRACE_TAG_WINDOW_MANAGER, "applyWindowSurfaceChanges");
        try {


        	/*2.遍历所有窗口,主要是改变surface的状态。见“2.3.3mDrawState变更为HAS_DRAW”流程*/
            forAllWindows(mApplySurfaceChangesTransaction, true /* traverseTopToBottom */);
        } finally {


            Trace.traceEnd(TRACE_TAG_WINDOW_MANAGER);
        }
        /*3.处理各个surface的位置、大小以及是否要在屏幕上显示等。后面finishDrawing()流程中再跟踪*/
        prepareSurfaces();
        ......
    }
继续跟踪performLayout(true /* initial */, false /* updateInputWindows */);
该方法主要就是调用performLayoutNoTrace()方法,首先判断布局标志位mLayoutNeeded,该标志位在WMS.relayoutWindow中被置为true。
false则直接返回不会进行布局操作。
true则分别遍历父窗口和子窗口进行布局,我们暂且只分析父窗口的布局操作,查看mPerformLayout。
    void performLayout(boolean initial, boolean updateInputWindows) {


        Trace.traceBegin(TRACE_TAG_WINDOW_MANAGER, "performLayout");
        try {


        	//调用performLayoutNoTrace
            performLayoutNoTrace(initial, updateInputWindows);
        } finally {


            Trace.traceEnd(TRACE_TAG_WINDOW_MANAGER);
        }
    }

    private void performLayoutNoTrace(boolean initial, boolean updateInputWindows) {


   		 /*1.判断是否需要布局,不需要则直接返回,即判断布局标志位mLayoutNeeded是否为true*/
        if (!isLayoutNeeded()) {


            return;
        }
        //将DisplayContent.mLayoutNeeded属性置为false
        clearLayoutNeeded();
        ......
        // First perform layout of any root windows (not attached to another window).
        /*2.对所有顶级窗口进行布局*/
        //最终会回调mPerformLayout
        forAllWindows(mPerformLayout, true /* traverseTopToBottom */);

        // Now perform layout of attached windows, which usually depend on the position of the
        // window they are attached to. XXX does not deal with windows that are attached to windows
        // that are themselves attached.
        /*3.处理子窗口的布局*/
        //最终会回调mPerformLayoutAttached
        forAllWindows(mPerformLayoutAttached, true /* traverseTopToBottom */);
        ......
    }
forAllWindows(mPerformLayoutAttached, true /* traverseTopToBottom */);
当遍历到DisplayContent下的每个窗口时都会执行mPerformLayout,该方法会将WindowState.mLayoutNeeded标志位置false,并将具体的布局操作交给DisplayPolicy进行处理,见“3. 计算窗口位置大小“。
    private final Consumer<WindowState> mPerformLayout = w -> {


    	//如果当前窗口为子窗口则直接返回
        if (w.mLayoutAttached) {


            return;
        }

        // Don't do layout of a window if it is not visible, or soon won't be visible, to avoid
        // wasting time and funky changes while a window is animating away.
        //先判断当前窗口是否会不可见
        final boolean gone = w.isGoneForLayout();
        ......

        // If this view is GONE, then skip it -- keep the current frame, and let the caller know
        // so they can ignore it if they want.  (We do the normal layout for INVISIBLE windows,
        // since that means "perform layout as normal, just don't display").
        if (!gone || !w.mHaveFrame || w.mLayoutNeeded) {


            if (mTmpInitial) {


            	//设置窗口布局WindowFrames.mContentChanged为false
                w.resetContentChanged();
            }
            w.mSurfacePlacementNeeded = true;
            //此处将WindowState.mLayoutNeeded标志位置为false
            w.mLayoutNeeded = false;
            //判断当前窗口是否是第一次布局
            final boolean firstLayout = !w.isLaidOut();
            //调用DisplayPolicy.layoutWindowLw进行布局,根据DisplayFrames对象对WindowState.mWindowFrames中的各个Rect对象属性进行确定
            getDisplayPolicy().layoutWindowLw(w, null, mDisplayFrames);
            w.mLayoutSeq = mLayoutSeq;

            // If this is the first layout, we need to initialize the last frames and inset values,
            // as otherwise we'd immediately cause an unnecessary resize.
            if (firstLayout) {


                // The client may compute its actual requested size according to the first layout,
                // so we still request the window to resize if the current frame is empty.
                if (!w.getFrame().isEmpty()) {


                    w.updateLastFrames();
                }
                w.onResizeHandled();
            }

            if (DEBUG_LAYOUT) Slog.v(TAG, "  LAYOUT: mFrame=" + w.getFrame()
                    + " mParentFrame=" + w.getParentFrame()
                    + " mDisplayFrame=" + w.getDisplayFrame());
        }
    };
3.计算窗口位置大小
getDisplayPolicy().layoutWindowLw(w, null, mDisplayFrames);
layoutWindowLw主要做了以下三件事
1.首先会获DisplayFrames:DisplayContent新建时创建,内部数据由屏幕提供。
2.其次调用WindowLayout.computeFrames计算窗口布局大小。
3.最后调用WindowState.setFrames将计算的布局参数赋值给当前窗口的windowFrames。
代码路径:framework/services/core/java/com/android/server/wm/DisplayPolicy.java
    /**
     * Called for each window attached to the window manager as layout is proceeding. The
     * implementation of this function must take care of setting the window's frame, either here or
     * in finishLayout().
     *
     * @param win The window being positioned.
     * @param attached For sub-windows, the window it is attached to; this
     *                 window will already have had layoutWindow() called on it
     *                 so you can use its Rect.  Otherwise null.
     * @param displayFrames The display frames.
     */
    public void layoutWindowLw(WindowState win, WindowState attached, DisplayFrames displayFrames) {


    	//判断是否需要跳过布局
        if (win.skipLayout()) {


            return;
        }

        // This window might be in the simulated environment.
        // We invoke this to get the proper DisplayFrames.
        /*1.获取DisplayFrames*/
        displayFrames = win.getDisplayFrames(displayFrames);
        //获取某个方向的窗口布局参数
        final WindowManager.LayoutParams attrs = win.getLayoutingAttrs(displayFrames.mRotation);
        //null
        final Rect attachedWindowFrame = attached != null ? attached.getFrame() : null;

        // If this window has different LayoutParams for rotations, we cannot trust its requested
        // size. Because it might have not sent its requested size for the new rotation.
        final boolean trustedSize = attrs == win.mAttrs;
        final int requestedWidth = trustedSize ? win.mRequestedWidth : UNSPECIFIED_LENGTH;
        final int requestedHeight = trustedSize ? win.mRequestedHeight : UNSPECIFIED_LENGTH;
        /*2.调用WindowLayout.computeFrames计算窗口布局大小*/
        mWindowLayout.computeFrames(attrs, win.getInsetsState(), displayFrames.mDisplayCutoutSafe,
                win.getBounds(), win.getWindowingMode(), requestedWidth, requestedHeight,
                win.getRequestedVisibilities(), attachedWindowFrame, win.mGlobalScale,
                sTmpClientFrames);
        /*3.将计算的布局参数赋值给windowFrames*/
        win.setFrames(sTmpClientFrames, win.mRequestedWidth, win.mRequestedHeight);
    }
先来看看computeFrames
mWindowLayout.computeFrames(attrs, win.getInsetsState(), displayFrames.mDisplayCutoutSafe,
                win.getBounds(), win.getWindowingMode(), requestedWidth, requestedHeight,
                win.getRequestedVisibilities(), attachedWindowFrame, win.mGlobalScale,
                sTmpClientFrames);
留坑
再来看看setFrames
win.setFrames(sTmpClientFrames, win.mRequestedWidth, win.mRequestedHeight);
留坑
2.3 窗口状态刷新
当应用端执行measure-layout-draw之后,便会调用WMS.finishDrawingWindow,处理Surface的状态变更并将Surface show出来。
首先还是看一下该阶段的流程图,对整个流程有个初步的了解。
将整个流程分为三部分:
1.WMS接受客户端请求,将mDrawState更新为COMMIT_DRAW_PENDING,并请求窗口布局。
2.mDrawState更新为HAS_DRAW,再次请求窗口布局。
3.执行show Surface。
2.3.1 接受客户端请求
代码路径:framework/services/core/java/com/android/server/wm/Session.java
    @Override
    public void finishDrawing(IWindow window,
            @Nullable SurfaceControl.Transaction postDrawTransaction, int seqId) {


        if (DEBUG) Slog.v(TAG_WM, "IWindow finishDrawing called for " + window);
        //调用WMS中的finishDrawingWindow处理
        mService.finishDrawingWindow(this, window, postDrawTransaction, seqId);
    }
2.3.2 finishDrawingWindow
1.在WMS中根据客户端的Binder在mWindowMap中获取对应的WindowState。
2.调用WindowState.finishDrawing执行mDrawState的状态变更。
3.将WindowState.mLayoutNeeded标志位置为true。
4.请求进行布局刷新。
代码路径:framework/services/core/java/com/android/server/wm/WindowManagerService.java
    void finishDrawingWindow(Session session, IWindow client,
            @Nullable SurfaceControl.Transaction postDrawTransaction, int seqId) {


        if (postDrawTransaction != null) {


            postDrawTransaction.sanitize();
        }

        final long origId = Binder.clearCallingIdentity();
        try {


            synchronized (mGlobalLock) {


            	/*1.根据客户端的Binder在mWindowMap中获取对应的WindowState*/
                WindowState win = windowForClientLocked(session, client, false);
                ProtoLog.d(WM_DEBUG_ADD_REMOVE, "finishDrawingWindow: %s mDrawState=%s",
                        win, (win != null ? win.mWinAnimator.drawStateToString() : "null"));
                /*2.finishDrawing执行mDrawState的状态更变*/
                if (win != null && win.finishDrawing(postDrawTransaction, seqId)) {


                    if (win.hasWallpaper()) {


                        win.getDisplayContent().pendingLayoutChanges |=
                                WindowManagerPolicy.FINISH_LAYOUT_REDO_WALLPAPER;
                    }
                    /*3.将当前WindowState.mLayoutNeeded置为true*/
                    //该标志位是判断是否进行窗口大小尺寸计算的条件之一
                    win.setDisplayLayoutNeeded();
                    /*4.请求进行布局刷新*/
                    mWindowPlacerLocked.requestTraversal();
                }
            }
        } finally {


            Binder.restoreCallingIdentity(origId);
        }
    }
1.mDrawState的状态更变
在finishDrawingWindow中调用WindowState的finishDrawing方法
win.finishDrawing(postDrawTransaction, seqId)
这个方法主要调用了WindowStateAnimator的finishDrawingLocked进行状态更变
代码路径:framework/services/core/java/com/android/server/wm/WindowState.java
   boolean finishDrawing(SurfaceControl.Transaction postDrawTransaction, int syncSeqId) {


   		......
   		//调用WindowStateAnimator.finishDrawingLocked,会将mDrawState的状态更改为COMMIT_DRAW_PENDING
        final boolean layoutNeeded =
                mWinAnimator.finishDrawingLocked(postDrawTransaction, mClientWasDrawingForSync);
        mClientWasDrawingForSync = false;
        // We always want to force a traversal after a finish draw for blast sync.
        return !skipLayout && (hasSyncHandlers || layoutNeeded);
    }
我们继续看看WindowStateAnimator中的finishDrawingLocked()方法
首先判断mDrawState的状态是否为DRAW_PENDING,在我们创建SurfaceControl时,会将mDrawState状态更新为DRAW_PENDING。因此接下来将状态调整为COMMIT_DRAW_PENDING。
代码路径:framework/services/core/java/com/android/server/wm/WindowStateAnimator.java
    boolean finishDrawingLocked(SurfaceControl.Transaction postDrawTransaction,
            boolean forceApplyNow) {


        ......
        boolean layoutNeeded = false;

        if (mDrawState == DRAW_PENDING) {


        	......
        	//如果当前状态为DRAW_PENDING,则将mDrawState更变为COMMIT_DRAW_PENDING
            mDrawState = COMMIT_DRAW_PENDING;
            layoutNeeded = true;
        }
        ......
        return layoutNeeded;
    }
2.请求布局刷新
在finishDrawingWindow中请求布局刷新
mWindowPlacerLocked.requestTraversal();
requestTraversal中主要做了两件事:
1.首先将遍历标志为mTraversalSchedule置为true。
2.其次发送handle消息mPerformSurfacePlacement
    void requestTraversal() {


    	//判断遍历标志mTraversalScheduled是否为true
        if (mTraversalScheduled) {


            return;
        }

        // Set as scheduled even the request will be deferred because mDeferredRequests is also
        // increased, then the end of deferring will perform the request.
        //将遍历标志位置为true
        mTraversalScheduled = true;
        if (mDeferDepth > 0) {


            mDeferredRequests++;
            if (DEBUG) Slog.i(TAG, "Defer requestTraversal " + Debug.getCallers(3));
            return;
        }
        //发送handle消息,处理消息会调用mPerformSurfacePlacement
        mService.mAnimationHandler.post(mPerformSurfacePlacement);
    }
mPerformSurfacePlacement会新建一个线程调用performSurfacePlacement。
performSurfacePlacement方法我们在讲relayoutWindow相关流程的时候讲过,这是执行遍历布局的入口。可以回看下【2.2.4 计算窗口大小位置中的“1.处理窗口布局循环”】
    private class Traverser implements Runnable {


        @Override
        public void run() {


            synchronized (mService.mGlobalLock) {


            	//调用执行performSurfacePlacement
                performSurfacePlacement();
            }
        }
    }

    private final Traverser mPerformSurfacePlacement = new Traverser();

    final void performSurfacePlacement(boolean force) {


    	//当mDeferDepth大于0且force为false时,则将延迟布局请求数+1,并直接返回
        if (mDeferDepth > 0 && !force) {


            mDeferredRequests++;
            return;
        }
        //将循环的最大次数设置为6次
        int loopCount = 6;
        do {


        	//将该标志为设置为false
            mTraversalScheduled = false;
            //执行窗口布局操作
            performSurfacePlacementLoop();
            mService.mAnimationHandler.removeCallbacks(mPerformSurfacePlacement);
            loopCount--;
        //只有当mTraversalScheduled为true且循环次数大于0时,才会再次循环执行布局
        } while (mTraversalScheduled && loopCount > 0);
        mService.mRoot.mWallpaperActionPending = false;
    }

    private void performSurfacePlacementLoop() {


    	//若当前已经进行布局操作,则无需重复调用直接返回
        if (mInLayout) {


            ......
            return;
        }
        ......
        //将该标志位置为true,表示正在处于布局过程中
        mInLayout = true;
        ......
        try {


        	/*1.调用RootWindowContainer的performSurfacePlacement()方法对所有窗口执行布局操作*/
            mService.mRoot.performSurfacePlacement();

            mInLayout = false;

            if (mService.mRoot.isLayoutNeeded()) {


            	/*2.若需要布局,且布局次数小于6次,则需要再次请求布局*/
                if (++mLayoutRepeatCount < 6) {


                	//该方法中会将mTraversalScheduled标志位设置位true
                    requestTraversal();
                } else {


                    Slog.e(TAG, "Performed 6 layouts in a row. Skipping");
                    mLayoutRepeatCount = 0;
                }
            } else {


                mLayoutRepeatCount = 0;
            }

            if (mService.mWindowsChanged && !mService.mWindowChangeListeners.isEmpty()) {


                mService.mH.removeMessages(REPORT_WINDOWS_CHANGE);
                mService.mH.sendEmptyMessage(REPORT_WINDOWS_CHANGE);
            }
        } catch (RuntimeException e) {


            mInLayout = false;
            Slog.wtf(TAG, "Unhandled exception while laying out windows", e);
        }
    }
代码路径:framework/services/core/java/com/android/server/wm/RootWindowContainer.java
    void performSurfacePlacement() {


        Trace.traceBegin(TRACE_TAG_WINDOW_MANAGER, "performSurfacePlacement");
        try {


        	//调用performSurfacePlacementNoTrace()
            performSurfacePlacementNoTrace();
        } finally {


            Trace.traceEnd(TRACE_TAG_WINDOW_MANAGER);
        }
    }

    // "Something has changed!  Let's make it correct now."
    // TODO: Super long method that should be broken down...
    void performSurfacePlacementNoTrace() {


    	......
    	/*1.如果有焦点变化,更新焦点*/
        if (mWmService.mFocusMayChange) {


            mWmService.mFocusMayChange = false;
            mWmService.updateFocusedWindowLocked(
                    UPDATE_FOCUS_WILL_PLACE_SURFACES, false /*updateInputWindows*/);
        }
        ......

        Trace.traceBegin(TRACE_TAG_WINDOW_MANAGER, "applySurfaceChanges");
        //开启事务,获取GlobalTransactionWrapper对象
        mWmService.openSurfaceTransaction();
        try {


        	/*2.执行窗口尺寸计算,surface状态变更等操作*/
            applySurfaceChangesTransaction();
        } catch (RuntimeException e) {


            Slog.wtf(TAG, "Unhandled exception in Window Manager", e);
        } finally {


        	//关闭事务,把事务提交
            mWmService.closeSurfaceTransaction("performLayoutAndPlaceSurfaces");
            Trace.traceEnd(TRACE_TAG_WINDOW_MANAGER);
            if (SHOW_LIGHT_TRANSACTIONS) {


                Slog.i(TAG,
                        "<<< CLOSE TRANSACTION performLayoutAndPlaceSurfaces");
            }
        }
		......
		/*3.将Surface状态变更为HAS_DRAWN,触发App触发动画。该过程在“2.3.3mDrawState变更为HAS_DRAW”流程中再详细分析*/
        checkAppTransitionReady(surfacePlacer);
        ......
        /*4.遍历所有DisplayContent,如果壁纸有变化,更新壁纸*/
        for (int displayNdx = 0; displayNdx < mChildren.size(); ++displayNdx) {


            final DisplayContent displayContent = mChildren.get(displayNdx);
            //判断DisplayContent的壁纸是否需要改变
            if (displayContent.mWallpaperMayChange) {


                ProtoLog.v(WM_DEBUG_WALLPAPER, "Wallpaper may change!  Adjusting");
                displayContent.pendingLayoutChanges |= FINISH_LAYOUT_REDO_WALLPAPER;
                if (DEBUG_LAYOUT_REPEATS) {


                    surfacePlacer.debugLayoutRepeats("WallpaperMayChange",
                            displayContent.pendingLayoutChanges);
                }
            }
        }
        /*5.在此处理焦点变化*/
        if (mWmService.mFocusMayChange) {


            mWmService.mFocusMayChange = false;
            mWmService.updateFocusedWindowLocked(UPDATE_FOCUS_PLACING_SURFACES,
                    false /*updateInputWindows*/);
        }
        ......
        /*6.如果过程中size或者位置变化,则通知客户端重新relayout*/
        handleResizingWindows();

        if (mWmService.mDisplayFrozen) {


            ProtoLog.v(WM_DEBUG_ORIENTATION,
                    "With display frozen, orientationChangeComplete=%b",
                    mOrientationChangeComplete);
        }
        if (mOrientationChangeComplete) {


            if (mWmService.mWindowsFreezingScreen != WINDOWS_FREEZING_SCREENS_NONE) {


                mWmService.mWindowsFreezingScreen = WINDOWS_FREEZING_SCREENS_NONE;
                mWmService.mLastFinishedFreezeSource = mLastWindowFreezeSource;
                mWmService.mH.removeMessages(WINDOW_FREEZE_TIMEOUT);
            }
            mWmService.stopFreezingDisplayLocked();
        }

        // Destroy the surface of any windows that are no longer visible.
        /*7.销毁不可见的窗口*/
        i = mWmService.mDestroySurface.size();
        if (i > 0) {


            do {


                i--;
                WindowState win = mWmService.mDestroySurface.get(i);
                win.mDestroying = false;
                final DisplayContent displayContent = win.getDisplayContent();
                if (displayContent.mInputMethodWindow == win) {


                    displayContent.setInputMethodWindowLocked(null);
                }
                if (displayContent.mWallpaperController.isWallpaperTarget(win)) {


                    displayContent.pendingLayoutChanges |= FINISH_LAYOUT_REDO_WALLPAPER;
                }
                win.destroySurfaceUnchecked();
            } while (i > 0);
            mWmService.mDestroySurface.clear();
        }
        ......
    }
这里我们主要关注applySurfaceChangesTransaction();和checkAppTransitionReady(surfacePlacer);
* 窗口位置计算与窗口状态刷新流程不同点
可以发现,窗口位置计算流程与窗口状态刷新流程都调用了performSurfacePlacement,两次调用的主要不同点在于:
1.窗口状态刷新流程在DisplayContent.applySurfaceChangesTransaction中调用mApplySurfaceChangesTransaction,处理mDrawState状态。
2.窗口状态刷新流程在RootWindowContainer.performSurfacePlacementNoTrace中调用checkAppTransitionReady,处理mDrawState状态变更为HAS_DRAWN,触发Activity过渡动画。
3.窗口状态刷新流程在WindowSurfacePlacementLoop.performSurfacePlacementLoop中会调用requestTraversal,请求再次布局。
4.窗口状态刷新流程在DisplayContent.applySurfaceChangesTransaction中调用prepareSurfaces()处理处理surface的位置、大小以及显示等。
2.3.3 mDrawState变更为HAS_DRAW
1.mApplySurfaceChangesTransaction
RootWindowContainer的applySurfaceChangesTransaction()方法最终会调用到DisplayContent中调用的applySurfaceChangesTransaction()方法,我们接着该方法中的mApplySurfaceChangesTransaction跟踪。
forAllWindows(mApplySurfaceChangesTransaction, true /* traverseTopToBottom */);
如果当前WindowState存在surfaceControl,则进入到WindowStateAnimator进行mDrawState的状态更变。
代码路径:framework/services/core/java/com/android/server/wm/DisplayContent.java
    private final Consumer<WindowState> mApplySurfaceChangesTransaction = w -> {


	    ......
        //首先判断当前windowState的是否有surfaceControl
        if (w.mHasSurface) {


            // Take care of the window being ready to display.
            //调用WindowStateAnimator的commitFinishDrawingLocked()方法
            final boolean committed = winAnimator.commitFinishDrawingLocked();
            ......
        }
        ......
    };
继续看看WindowStateAnimator的commitFinishDrawingLocked()方法
final boolean committed = winAnimator.commitFinishDrawingLocked();
1.对mDrawState的状态进行过滤,非COMMIT_DRAW_PENDING和READY_TO_SHOW则直接返回。
2.此时我们的mDrawState已经在“【2.3.2 finishDrawingWindow】”将状态更新为COMMIT_DRAW_PENDING,因此此处将其变更为READY_TO_SHOW。
代码路径:framework/services/core/java/com/android/server/wm/WindowStateAnimator.java
    // This must be called while inside a transaction.
    boolean commitFinishDrawingLocked() {


    	//非COMMIT_DRAW_PENDING和READY_TO_SHOW则直接返回
        if (mDrawState != COMMIT_DRAW_PENDING && mDrawState != READY_TO_SHOW) {


            return false;
        }
        ProtoLog.i(WM_DEBUG_ANIM, "commitFinishDrawingLocked: mDrawState=READY_TO_SHOW %s",
                mSurfaceController);
        //将状态更变为READY_TO_SHOW
        mDrawState = READY_TO_SHOW;
        boolean result = false;
        final ActivityRecord activity = mWin.mActivityRecord;
        //如果ActivityRecord为空,或者canShowWindows()为true,或者窗口类型为启动窗口,则直接进入到WindowState.performShowLocked()流程
        //进入performShowLocked()流程后mDrawState更新HAS_DRAWN
        //由于非这三种情况最终也会调用到performShowLocked(),因此下面这种情况我们暂不讨论
        if (activity == null || activity.canShowWindows()
                || mWin.mAttrs.type == TYPE_APPLICATION_STARTING) {


            result = mWin.performShowLocked();
        }
        return result;
    }
2.checkAppTransitionReady()
这里我们继续跟踪RootWindowContainer.performSurfacePlacementNoTrace()方法中的checkAppTransitionReady()方法
checkAppTransitionReady(surfacePlacer);
该方法会遍历所有DisplayContent,处理activity的过滤动画,此处我们只有跟踪有关mDrawState状态更变的相关代码
代码路径:framework/services/core/java/com/android/server/wm/RootWindowContainer.java
    private void checkAppTransitionReady(WindowSurfacePlacer surfacePlacer) {


        // Trace all displays app transition by Z-order for pending layout change.
        for (int i = mChildren.size() - 1; i >= 0; --i) {


            final DisplayContent curDisplay = mChildren.get(i);

            // If we are ready to perform an app transition, check through all of the app tokens
            // to be shown and see if they are ready to go.
            //检查所有要显示的app token,是否已经准备就绪
            if (curDisplay.mAppTransition.isReady()) {


                // handleAppTransitionReady may modify curDisplay.pendingLayoutChanges.
                curDisplay.mAppTransitionController.handleAppTransitionReady();
                if (DEBUG_LAYOUT_REPEATS) {


                    surfacePlacer.debugLayoutRepeats("after handleAppTransitionReady",
                            curDisplay.pendingLayoutChanges);
                }
            }
            ......
        }
    }
调用AppTransitionController的handleAppTransitionReady()方法,该方法主要还是在处理activity的过渡动画,但是在应用过渡动画时,还做了以下事情
1.分别调用 handleClosingApps以及handleOpeningApps对要关闭的和要打开的Activity进行可见性更新。
2.由于activity的可见性变更,将DisplayContent.mLayoutNeeded设置为true,该标志位在DisplayContent.performLayoutNoTrace中用来判断是否对当前Displaycontent下的所有窗口进行刷新。
代码路径:framework/services/core/java/com/android/server/wm/AppTransitionController.java
    /**
     * Handle application transition for given display.
     */
    void handleAppTransitionReady() {


    	......
        try {


        	//应用app transition动画
            applyAnimations(openingAppsForAnimation, closingAppsForAnimation, transit, animLp,
                    voiceInteraction);
            /*1.1处理closing activity可见性*/
            handleClosingApps();
            /*1.2处理opening actvity可见性*/
            handleOpeningApps();
            ......
        } finally {


            mService.mSurfaceAnimationRunner.continueStartingAnimations();
        }
        ......

        // This has changed the visibility of windows, so perform
        // a new layout to get them all up-to-date.
        /*2.由于activity的可见性变更,将DisplayContent.mLayoutNeeded标志位置为true*/
        mDisplayContent.setLayoutNeeded();
        ......
    }
我们先看看 handleClosingApps()
该方法中主要的作用就是将所有即将close的activity的mVisible标志设置为false。该标志位在后续prepareSurfaces中是判断是否show surface的条件之一。
   private void handleClosingApps() {


        final ArraySet<ActivityRecord> closingApps = mDisplayContent.mClosingApps;
        final int appsCount = closingApps.size();

        for (int i = 0; i < appsCount; i++) {


            final ActivityRecord app = closingApps.valueAt(i);
            ProtoLog.v(WM_DEBUG_APP_TRANSITIONS, "Now closing app %s", app);
            //设置activity的可见性,将mVisible设置为false
            app.commitVisibility(false /* visible */, false /* performLayout */);
            app.updateReportedVisibilityLocked();
            // Force the allDrawn flag, because we want to start
            // this guy's animations regardless of whether it's
            // gotten drawn.
            //强制将allDrawn设置为true
            app.allDrawn = true;
            ......
        }
    }
再看看,与handleClosingApps类似,主要处理两件事情:
1.将所有即将open的activity的mVisible标志位设置为true.
2.调用ActivityRecord.showAllWindowsLocked(),最终会调用到WindowState.performShowLocked() ,处理mDrawState的状态变更
    private void handleOpeningApps() {


        final ArraySet<ActivityRecord> openingApps = mDisplayContent.mOpeningApps;
        final int appsCount = openingApps.size();

        for (int i = 0; i < appsCount; i++) {


            final ActivityRecord app = openingApps.valueAt(i);
            ProtoLog.v(WM_DEBUG_APP_TRANSITIONS, "Now opening app %s", app);
            /*1.设置activity的可见性,将mVisible设置为true*/
            app.commitVisibility(true /* visible */, false /* performLayout */);
            ......
            if (SHOW_LIGHT_TRANSACTIONS) Slog.i(TAG,
                    ">>> OPEN TRANSACTION handleAppTransitionReady()");
            //开启事务
            mService.openSurfaceTransaction();
            try {


            	/*2.此方法最终会调用到WindowState.performShowLocked*/
                app.showAllWindowsLocked();
            } finally {


			//关闭事务
            mService.closeSurfaceTransaction("handleAppTransitionReady");
                if (SHOW_LIGHT_TRANSACTIONS) Slog.i(TAG,
                        "<<< CLOSE TRANSACTION handleAppTransitionReady()");
            }
            ......
        }
    }
app.commitVisibility(true /* visible */, false /* performLayout */);
先调用到ActivityRecord的howAllWindowsLocked()
代码路径:framework/services/core/java/com/android/server/wm/ActivityRecord.java
    /**
     * This must be called while inside a transaction.
     */
    void showAllWindowsLocked() {


        forAllWindows(windowState -> {


            if (DEBUG_VISIBILITY) Slog.v(TAG, "performing show on: " + windowState);
            windowState.performShowLocked();
        }, false /* traverseTopToBottom */);
    }
windowState.performShowLocked();
再调用到WindowState的performShowLocked()
将mDrawState的状态由READY_TO_SHOW变更为HAS_DRAW
代码路径:framework/services/core/java/com/android/server/wm/WindowState.java
    // This must be called while inside a transaction.
    boolean performShowLocked() {


    	......
		//获取WindowStateAnimator.mDrawState
        final int drawState = mWinAnimator.mDrawState;
        //这里判断(drawState 状态为HAS_DRAWN 或者READY_TO_SHOW)且ActivityRecord不为空
        if ((drawState == HAS_DRAWN || drawState == READY_TO_SHOW) && mActivityRecord != null) {


        	//窗口类型不为启动窗口
            if (mAttrs.type != TYPE_APPLICATION_STARTING) {


                mActivityRecord.onFirstWindowDrawn(this);
            } else {


                mActivityRecord.onStartingWindowDrawn();
            }
        }
		//如果当前mDrawState的状态不为READY_TO_SHOW ,则直接返回
        if (mWinAnimator.mDrawState != READY_TO_SHOW || !isReadyForDisplay()) {


            return false;
        }
        ......
        // Force the show in the next prepareSurfaceLocked() call.
        mWinAnimator.mLastAlpha = -1;
        ProtoLog.v(WM_DEBUG_ANIM, "performShowLocked: mDrawState=HAS_DRAWN in %s", this);
        //设置mDrawState的状态为HAS_DRAWN
        mWinAnimator.mDrawState = HAS_DRAWN;
        mWmService.scheduleAnimationLocked();
        ......
        return true;
    }
3.再次请求布局
回到WindowSurfacePlacer中通过requestTraversals(),再次请求布局,该方法将mTraversalScheduled标志位设置为true的判断条件有两个:
1.遍历所有DisplayContent.mLayoutNeeded标志为是否为true。(由于AppTransitionController.handleAppTransitionReady阶段已经将mLayoutNeeded置为true,因此该条件为真)
2.重复布局的次数不能超过6次,该条件也为真。(因为当前还只是第一次布局)
代码路径:framework/services/core/java/com/android/server/wm/WindowSurfacePlacer.java
    private void performSurfacePlacementLoop() {


    	......
        try {


        	......
        	/*1.遍历所有DisplayContent.mLayoutNeeded标志位是否为true*/
            if (mService.mRoot.isLayoutNeeded()) {


            	/*2.如果需要布局,且布局次数小于6次,则需要再次请求布局*/
                if (++mLayoutRepeatCount < 6) {


                	//该方法中会将mTraversalScheduled标志位设置位true
                    requestTraversal();
                } else {


                    Slog.e(TAG, "Performed 6 layouts in a row. Skipping");
                    mLayoutRepeatCount = 0;
                }
            } else {


                mLayoutRepeatCount = 0;
            }
            ......
        } catch (RuntimeException e) {


        ......
        }
    }
接下来进入第二次布局循环,其主要目的是为了show surface
2.3.4 show Surface
在第二次循环中,我们主要关注DisplayContent中applySurfaceChangesTransaction()方法调用的prepareSurfaces()
该方法最终会调用到根容器WindowContainer,来遍历所有子容器中的prepareSurfaces。
代码路径:framework/services/core/java/com/android/server/wm/DisplayContent.java
    @Override
    void prepareSurfaces() {


        Trace.traceBegin(TRACE_TAG_WINDOW_MANAGER, "prepareSurfaces");
        try {


        	//获取事务
            final Transaction transaction = getPendingTransaction();
            //调用其父类方法
            super.prepareSurfaces();

            // TODO: Once we totally eliminate global transaction we will pass transaction in here
            //       rather than merging to global.
            SurfaceControl.mergeToGlobalTransaction(transaction);
        } finally {


            Trace.traceEnd(TRACE_TAG_WINDOW_MANAGER);
        }
    }
调用其父类方法super.prepareSurfaces();
DisplayContent的父类为WindowContainer
代码路径:framework/services/core/java/com/android/server/wm/WindowContainer.java
    void prepareSurfaces() {


        // If a leash has been set when the transaction was committed, then the leash reparent has
        // been committed.
        mCommittedReparentToAnimationLeash = mSurfaceAnimator.hasLeash();
        //调用所有子容器中的prepareSurfaces
        for (int i = 0; i < mChildren.size(); i++) {


            mChildren.get(i).prepareSurfaces();
        }
    }
mChildren.get(i).prepareSurfaces();在WindowState.prepareSurfaces中,主要做了两方面工作。
1.将mWindowFrames中计算出来的left以及top设置surface位置,并调整窗口比例。
2.控制surface的可见性,查看WindowStateAnimator.prepareSurfaceLocked
代码路径:framework/services/core/java/com/android/server/wm/WindowState.java
    void prepareSurfaces() {


        mIsDimming = false;
        applyDims();
        //实际调用的是其父类WindowContainer的方法
        /*1.最终调用自身的updateSurfacePosition()(自身有重写该方法)计算surface的位置*/
        updateSurfacePositionNonOrganized();
        // Send information to SurfaceFlinger about the priority of the current window.
        updateFrameRateSelectionPriorityIfNeeded();
        //更新窗口比例
        updateScaleIfNeeded();

		/*2.控制surface的可见性,调用WindowStateAnimator的prepareSurfaceLocked()方法*/
        mWinAnimator.prepareSurfaceLocked(getSyncTransaction());
        super.prepareSurfaces();
    }

    @Override
    @VisibleForTesting
    void updateSurfacePosition(Transaction t) {


        if (mSurfaceControl == null) {


            return;
        }

		......
        mSurfacePlacementNeeded = false;
        //将mSurfacePosition的left以及top设置mWindowFrames中计算出来的left以及top,并根据parent进行偏移
        transformFrameToSurfacePosition(mWindowFrames.mFrame.left, mWindowFrames.mFrame.top,
                mSurfacePosition);
		//根据壁纸的比例对SurfacePosition进行调整
        if (mWallpaperScale != 1f) {


            final Rect bounds = getLastReportedBounds();
            Matrix matrix = mTmpMatrix;
            matrix.setTranslate(mXOffset, mYOffset);
            matrix.postScale(mWallpaperScale, mWallpaperScale, bounds.exactCenterX(),
                    bounds.exactCenterY());
            matrix.getValues(mTmpMatrixArray);
            mSurfacePosition.offset(Math.round(mTmpMatrixArray[Matrix.MTRANS_X]),
                Math.round(mTmpMatrixArray[Matrix.MTRANS_Y]));
        } else {


            mSurfacePosition.offset(mXOffset, mYOffset);
        }
        ......
    }
mWinAnimator.prepareSurfaceLocked(getSyncTransaction()); 调用WindowStateAnimator的prepareSurfaceLocked()方法,该则真正的处理触发surface show的逻辑。主要分为两部分。
1.将计算的alpha应用于当前surface。
2.判断是否调用showSurfaceRobustlyLocked将surface show出来。
代码路径:framework/services/core/java/com/android/server/wm/WindowStateAnimator.java
   void prepareSurfaceLocked(SurfaceControl.Transaction t) {


        final WindowState w = mWin;
        //首先判断是否有SurfaceControl
        if (!hasSurface()) {


        	......
            return;
        }
		//设置mShowAlpha
        computeShownFrameLocked();

		//判断parentWindow是否hidden,或者当前窗口是否on-screen
        if (w.isParentWindowHidden() || !w.isOnScreen()) {


        	......
        } else if (mLastAlpha != mShownAlpha
                || mLastHidden) {


            mLastAlpha = mShownAlpha;
            ProtoLog.i(WM_SHOW_TRANSACTIONS,
                    "SURFACE controller=%s alpha=%f HScale=%f, VScale=%f: %s",
                    mSurfaceController, mShownAlpha, w.mHScale, w.mVScale, w);
            /*1.设置surface的alpha*/
            boolean prepared =
                mSurfaceController.prepareToShowInTransaction(t, mShownAlpha);
            //如果当前状态为HAS_DRAWN
            if (prepared && mDrawState == HAS_DRAWN) {


                if (mLastHidden) {


                /*2.触发show surface*/
                    if (showSurfaceRobustlyLocked(t)) {


                        mAnimator.requestRemovalOfReplacedWindows(w);
                        //设置mLastHidden为false
                        mLastHidden = false;
                        .......
                    } else {


                        w.setOrientationChanging(false);
                    }
                }
            }
        } else {


            if (mWin.isAnimating(TRANSITION | PARENTS)) {


                ProtoLog.v(WM_DEBUG_ANIM, "prepareSurface: No changes in animation for %s", this);
            }
        }

		......
    }
从上述代码中可以看出触发showSurfaceRobustlyLocked的判断条件有以下几点:
1.w.isParentWindowHidden判断其parent的mHidden是否为true,此时当前窗口没有parent直接返回false
2.w.isOnScreen,判断当前窗口是否在屏幕上,如果该窗口mVisible为true或者在不可见之前正在运行动画,判断为在屏幕上。我们在上次布局的AppTransitionController.handleAppTransitionReady阶段将当前窗口的mVisible置为了true,因此w.isOnScreen返回true。
3.mLastAlpha != mShownAlpha以及mLastHidden满足其一即可,此处我们分析mLastHidden,该标志位在创建SurfaceControl或者hide surface时会被置为true,因为当前窗口才刚刚被创建,因此mLastHidden为true。
经过以上判断可以得出我们顺利触发showSurfaceRobustlyLocked
后面通过WindowStateAnimator将show SurfaceControl的请求传递给了WindowSurfaceController
    /**
     * Have the surface flinger show a surface, robustly dealing with
     * error conditions.  In particular, if there is not enough memory
     * to show the surface, then we will try to get rid of other surfaces
     * in order to succeed.
     *
     * @return Returns true if the surface was successfully shown.
     */
    private boolean showSurfaceRobustlyLocked(SurfaceControl.Transaction t) {


    	//WindowStateAnimator将show SurfaceControl的请求传递给了WindowSurfaceController
    	//调用WindowSurfaceController的showRobustly方法
        boolean shown = mSurfaceController.showRobustly(t);
        //如果没有成功返回false
        if (!shown)
            return false;

        t.merge(mPostDrawTransaction);
        return true;
    }
在WindowSurfaceController中,首先判断标志位mSurfaceShown,若为true则直接返回;若为false,则将mSurfaceShown置为true,并调用SurfaceControl.show。至此真正的绘图已经显示出来,但是否真正的被用户看见,还需要看其parent是否被show。
代码路径:framework/services/core/java/com/android/server/wm/WindowSurfaceController.java
    boolean showRobustly(SurfaceControl.Transaction t) {


    	......

		//首先判断surface是否已经shown
        if (mSurfaceShown) {


            return true;
        }
		//将mSurfaceShown设置为true
        setShown(true);
        //调用SurfceControl中的show方法,将surface show出来
        t.show(mSurfaceControl);
        if (mAnimator.mIsWallpaper) {


            EventLog.writeEvent(EventLogTags.WM_WALLPAPER_SURFACE,
                    mAnimator.mWin.getDisplayId(), 1 /* request shown */);
        }
        return true;
    }
从SurfaceControl的创建以及show的流程上看,可以发现WMS是通过WindowSurfaceController对SurfaceControl进行管理的。
最后我们看一下SurfaceControl中的show方法
代码路径:frameworks/base/core/java/android/view/SurfaceControl.java
        /**
         * Request that a given surface and it's sub-tree be shown.
         *
         * @param sc The surface to show.
         * @return This transaction.
         * @hide
         */
        @UnsupportedAppUsage
        public Transaction show(SurfaceControl sc) {


            checkPreconditions(sc);
            nativeSetFlags(mNativeObject, sc.mNativeObject, 0, SURFACE_HIDDEN);
            return this;
        }
2.4 performSurfacePlacement()流程总结
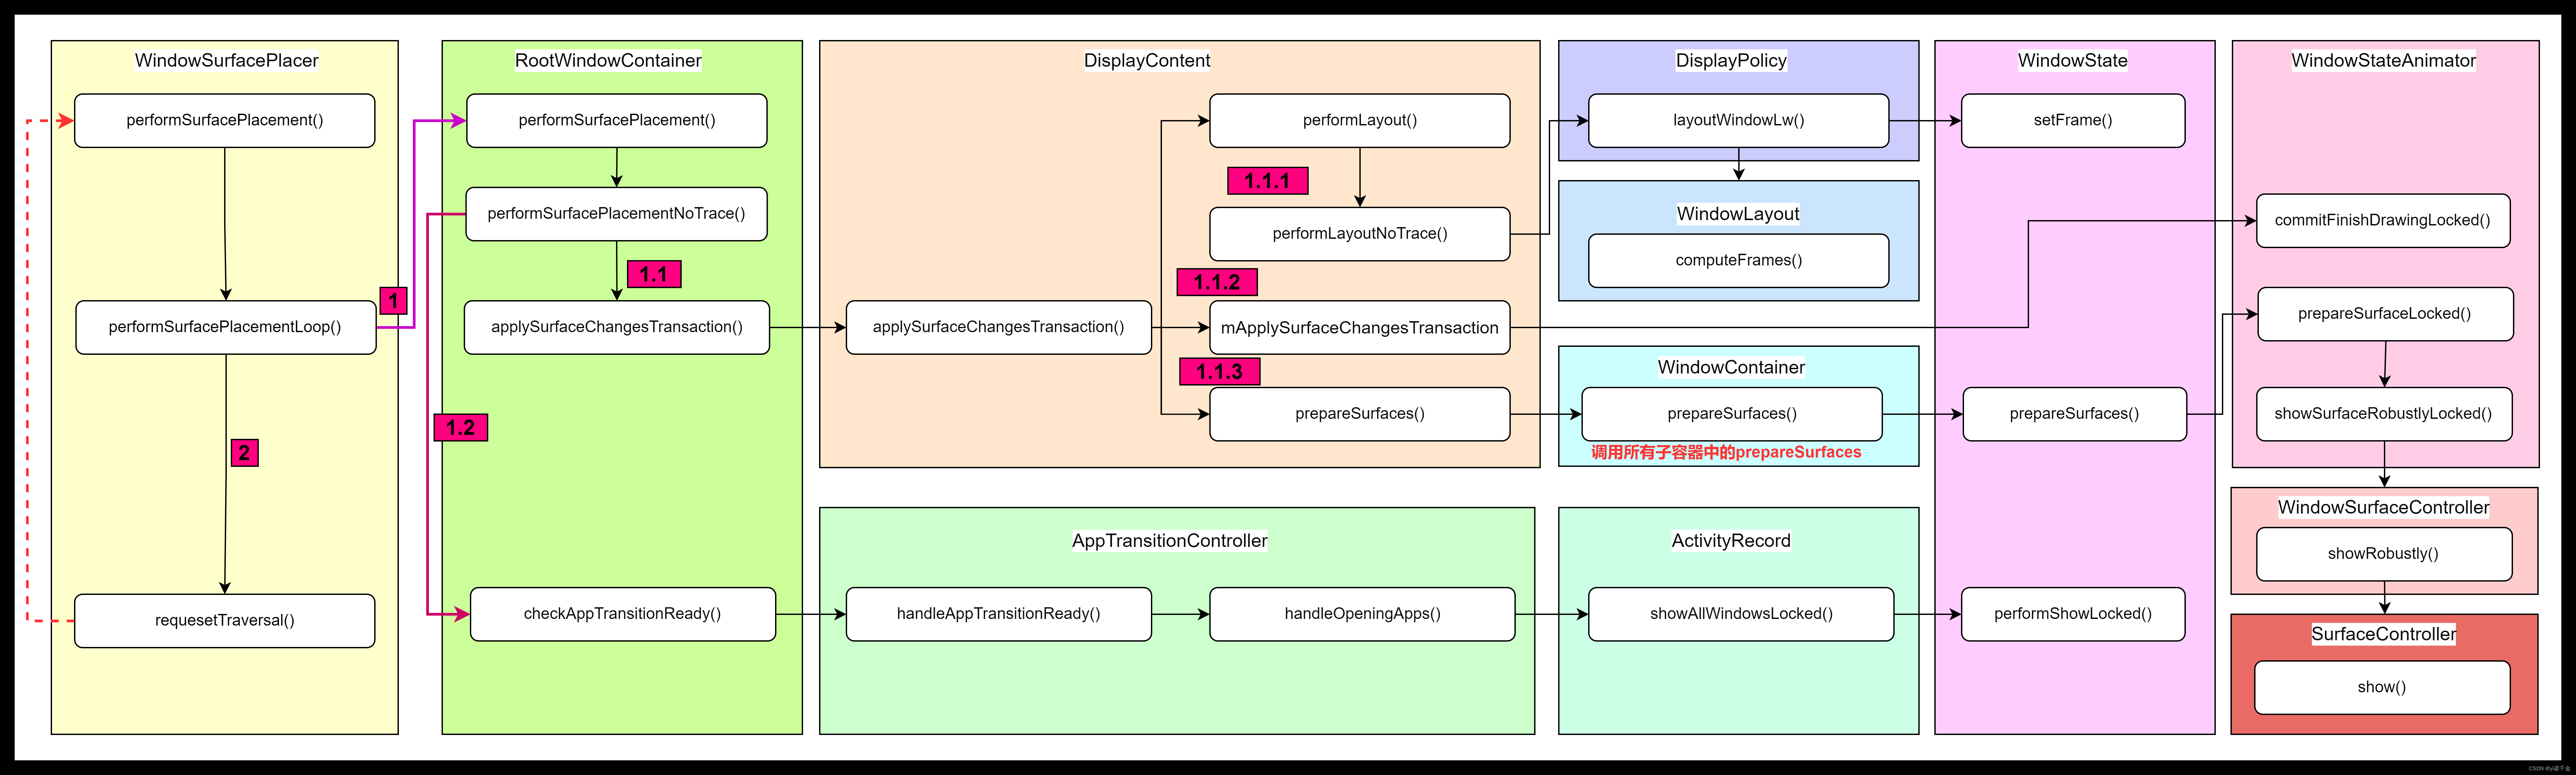
在“【2.2 窗口位置计算】”以及“【2.3 窗口状态刷新】”部分均调用了WindowSurfacePlacer.performSurfacePlacement(),实际上任何窗口属性变化都会触发该方法,但我们在performSurfacePlacement中只关注了窗口位置大小计算以及窗口状态变更的相关流程。此处再对该流程进行简单的梳理。
当调用到WindowSurfacePlacer.performSurfacePlacement()时首先会执行“1”更新所有窗口的大小以及状态信息,在执行“2”处理是否在此调用执行performSurfacePlacement。
1.1.1:主要调用computeFrames,计算窗口的尺寸大小。
1.1.2:主要处理mDrawState的状态变更,在commitFinishDrawingLocked中会将处于DRAW_PENDING状态的mDrawState更新为COMMIT_DRAW_PENDING。
1.1.3:主要根据computerFrames中计算出来的窗口大小来设置Surface的位置,并调用SurfaceControl.show()将窗口show出来。
1.2:将处于COMMIT_DRAW_PENDING状态的mDrawState更新为READY_TO_SHOW,并将DisplayContent.mLayoutNeeded设置为true。在“2”中会判断该标志位来处理是否再次调用performSurfacePlacement的操作。