迁移学习(Transfer Learning)是机器学习中的一个重要研究话题,也是在实践中具有重要价值的一类技术。Transfer learning focuses on storing knowledge gained while solving one problem and applying it to a different but related problem. 举例来说,在之前的文章中,我们曾经介绍过VGG16,它是由来自牛津大学的研究团队训练的一个针对ImageNet进行图像识别与分类的深度CNN网络。在ImageNet中,图像的中物体的类别多达1000种。当面对另外一个image dataset时,我们能否最大程度地利用已经训练好的VGG16来完成我们的任务,或者说是将VGG16中已经学到的经验“迁移”到新到问题中呢?本文就来带你一探究竟。
一、问题介绍
首先来看一下我们要解决的问题。这个问题源自于Kaggle网站曾经举行过的一项竞赛,如下图所示,竞赛的主题是设计能够分辨图像中的动物是猫还是狗的方法,你可以从【3】中获得我们实验所需的数据集。

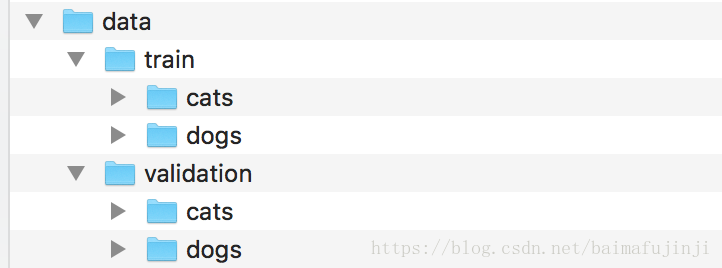
原始数据集中包含12,500张猫的图片和12,500张狗的图片,我们仅从中各取前1000张来作为训练数据,并再各去400张来作为验证数据。然后创建如下图所示的目录结构,用来存放上述提到的这些图像文件:
为了最大限度地利用有限的训练数据,we will "augment" them via a number of random transformations, so that our model would never see twice the exact same picture. This helps prevent overfitting and helps the model generalize better. 为此,Keras中提供了非常方便的图像数据预处理API,也就是keras.preprocessing.image.ImageDataGenerator类,该类主要提供了两类功能:
- configure random transformations and normalization operations to be done on your image data during training
- instantiate generators of augmented image batches (and their labels) via .flow(data, labels) or .flow_from_directory(directory).
来看一个简单的例子:
- from keras.preprocessing.image import ImageDataGenerator
- datagen = ImageDataGenerator(
- rotation_range=40,
- width_shift_range=0.2,
- height_shift_range=0.2,
- rescale=1./255,
- shear_range=0.2,
- zoom_range=0.2,
- horizontal_flip=True,
- fill_mode='nearest')
注意这里我们仅仅列出了部分选项,下面简单来看看它们到底是什么意思:
- rotation_range is a value in degrees (0-180), a range within which to randomly rotate pictures
- width_shift and height_shift are ranges (as a fraction of total width or height) within which to randomly translate pictures vertically or horizontally
- rescale is a value by which we will multiply the data before any other processing. Our original images consist in RGB coefficients in the 0-255, but such values would be too high for our models to process (given a typical learning rate), so we target values between 0 and 1 instead by scaling with a 1/255. factor.
- shear_range is for randomly applying shearing transformations
- zoom_range is for randomly zooming inside pictures
- horizontal_flip is for randomly flipping half of the images horizontally --relevant when there are no assumptions of horizontal assymetry (e.g. real-world pictures).
- fill_mode is the strategy used for filling in newly created pixels, which can appear after a rotation or a width/height shift.
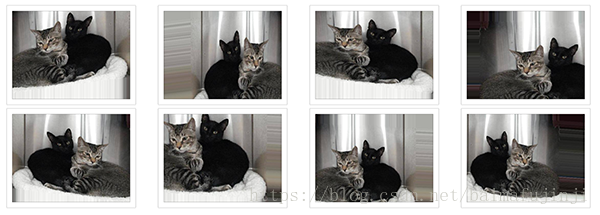
继续前面的代码,现在让我们用这个工具来产生一些图片,并将它们存入一个临时的文件夹中,注意为了便于展示,这里舍弃了rescale选项。
- img = load_img('data/train/cats/cat.0.jpg') # this is a PIL image
- x = img_to_array(img) # this is a Numpy array with shape (3, 150, 150)
- x = x.reshape((1,) + x.shape) # a Numpy array with shape (1, 3, 150, 150):一张图,三个通道,图像的尺寸(宽与高)
- # the .flow() command below generates batches of randomly transformed images
- # and saves the results to the `preview/` directory
- i = 0
- for batch in datagen.flow(x, batch_size=1,
- save_to_dir='preview', save_prefix='cat', save_format='jpeg'):
- i += 1
- if i > 20:
- break # otherwise the generator would loop indefinitely
你会看到一张图就被参数化地生成了多张图:
二、修改VGG16,得到一个90%准确率的分类器
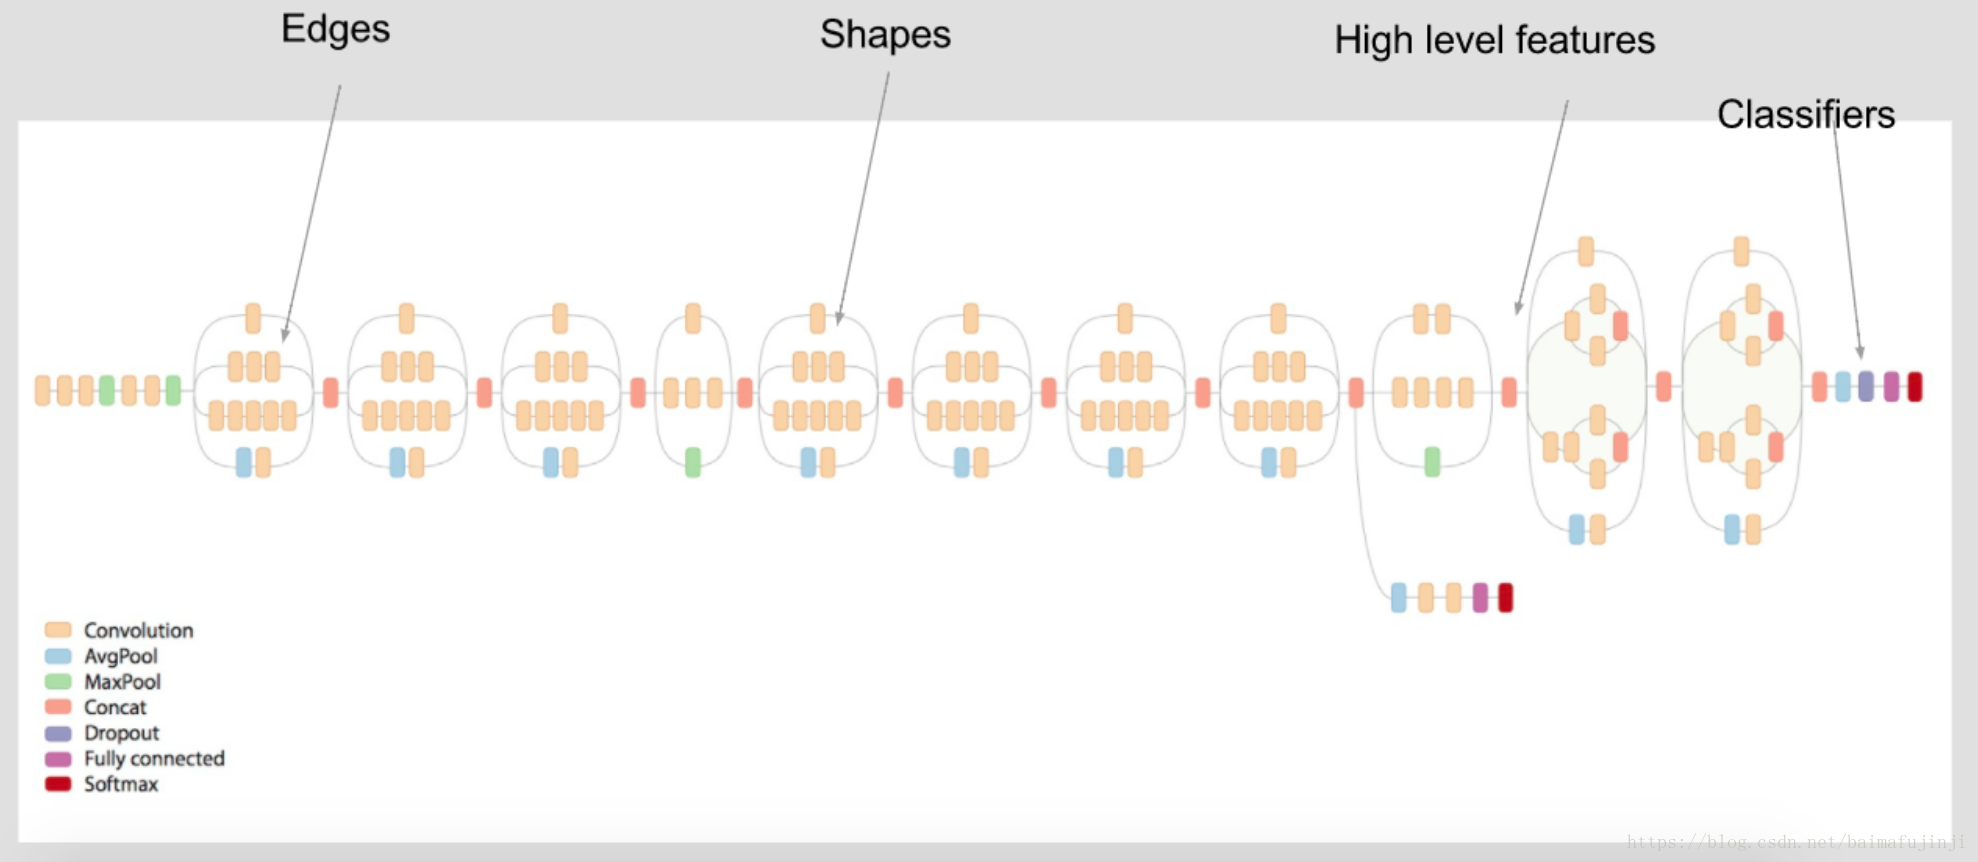
在迁移学习中,面对不同类型的问题,通常我们会有多种不同的应对策略。现在的基本情况是我们有一个在 large dataset 上已经训练好的DNN,也就是VGG。VGG would have already learned features that are useful for most computer vision problems。例如,像下图所示的一个DNN,其中的某些层学到了Edges信息,有些层学到了Shapes信息,等等。
在【4】中,我们已经介绍过VGG16的基本结构了。Because the ImageNet dataset contains several "cat" classes (persian cat, siamese cat...) and many "dog" classes among its total of 1000 classes, this model will already have learned features that are relevant to our classification problem. 或者说我们现在的问题(区别猫和狗)的规模可以认为是VGG本来要解决之问题的一个子集。回忆之前介绍过的VGG网络结构,在最后一次池化操作之后,模型紧接着就是若干fully-connected层,并最终经由一个softmax predictions来输出结果。
于是,我们设想:only instantiate the convolutional part of the model, everything up to the fully-connected layers. We will then run this model on our training and validation data once, recording the output (the "bottleneck features" from the VGG16 model: the last activation maps before the fully-connected layers) in two numpy arrays. Then we will train a small fully-connected model on top of the stored features. 也就是说,相当于我们用前面的若干卷积层来作为图像特征的提取和编码器,经过一次计算,训练数据和验证数据都被“编码”了,而这些编码中就蕴含着它们的特征。然后我们将这些新的编码输入到最后的全连接层,用来训练最后的softmax分类器,如下图所示。

The reason why we are storing the features offline rather than adding our fully-connected model directly on top of a frozen convolutional base and running the whole thing, is computational effiency. Running VGG16 is expensive, especially if you're working on CPU, and we want to only do it once. Note that this prevents us from using data augmentation.
下面来看具体的实现代码,首先引入必要的包,并定义一些全局变量,主要是后面会用到的一些参数设定。
- import numpy as np
- from PIL import Image
- from keras.preprocessing.image import ImageDataGenerator
- from keras.models import Sequential
- from keras.layers import Dropout, Flatten, Dense
- from keras import applications
- # dimensions of our images.
- img_width, img_height = 150, 150
- top_model_weights_path = 'bottleneck_fc_model.h5'
- train_data_dir = 'data/train'
- validation_data_dir = 'data/validation'
- nb_train_samples = 2000
- nb_validation_samples = 800
- epochs = 50
- batch_size = 16
因为我们需要用到预定义的VGG16模型,Keras也已经为你准备好了,但如果你是首次在Keras中用到VGG16,那么Keras会需要从网上下载模型的参数。你可以用下面这行语句来验证一下你是否已经有VGG16(当然这之于当前的例子并非是必须的),如果没有,模型就会被下载到本机,以后就可以直接使用了。
- vgg16_model = applications.vgg16.VGG16()
如果你使用的是Python 3.6,在下载VGG16时,出现错误信息表示SSL证书有问题(SSL: CERTIFICATE_VERIFY_FAILED),你可以使用下面的语句来解决问题。但这不在本文的讨论范围之内,遂不再赘述。
- import ssl
- ssl._create_default_https_context = ssl._create_unverified_context
接下来就是我们经由最后一个卷积层获得(测试集和验证集)特征编码,并将其存储起来备用的步骤:
- def save_bottlebeck_features():
- datagen = ImageDataGenerator(rescale=1. / 255)
- # build the VGG16 network
- model = applications.VGG16(include_top=False, weights='imagenet')
- generator = datagen.flow_from_directory(
- train_data_dir,
- target_size=(img_width, img_height),
- batch_size=batch_size,
- class_mode=None,
- shuffle=False)
- bottleneck_features_train = model.predict_generator(
- generator, nb_train_samples // batch_size)
- np.save('bottleneck_features_train.npy', bottleneck_features_train)
- generator = datagen.flow_from_directory(
- validation_data_dir,
- target_size=(img_width, img_height),
- batch_size=batch_size,
- class_mode=None,
- shuffle=False)
- bottleneck_features_validation = model.predict_generator(
- generator, nb_validation_samples // batch_size)
- np.save('bottleneck_features_validation.npy', bottleneck_features_validation)
最后,定义自己的softmax层,并进行训练。
- def train_top_model():
- train_data = np.load('bottleneck_features_train.npy')
- train_labels = np.array(
- [0] * (nb_train_samples // 2) + [1] * (nb_train_samples // 2))
- validation_data = np.load('bottleneck_features_validation.npy')
- validation_labels = np.array(
- [0] * (nb_validation_samples // 2) + [1] * (nb_validation_samples // 2))
- model = Sequential()
- model.add(Flatten(input_shape=train_data.shape[1:]))
- model.add(Dense(256, activation='relu'))
- model.add(Dropout(0.5))
- model.add(Dense(1, activation='sigmoid'))
- model.compile(optimizer='rmsprop',
- loss='binary_crossentropy', metrics=['accuracy'])
- model.fit(train_data, train_labels,
- epochs=epochs,
- batch_size=batch_size,
- validation_data=(validation_data, validation_labels))
- model.save_weights(top_model_weights_path)
通过函数调用,来将整个过程串接起来。
- save_bottlebeck_features()
- train_top_model()
执行上述代码,你会发现,在很短的训练时间内,分类器的准确率就已经可以达到90%了。
- 2000/2000 [==============================] - 4s 2ms/step - loss: 0.0289 - acc: 0.9910 - val_loss: 0.7655 - val_acc: 0.8900
- Epoch 24/50
- 2000/2000 [==============================] - 4s 2ms/step - loss: 0.0281 - acc: 0.9900 - val_loss: 0.6330 - val_acc: 0.9050
- Epoch 25/50
- 2000/2000 [==============================] - 4s 2ms/step - loss: 0.0261 - acc: 0.9915 - val_loss: 0.6413 - val_acc: 0.9075
- Epoch 26/50
三、更进一步,得到一个94%的分类器
还能不能做得更好,我们很自然会想到,或许可以多训练一部分网络。也就是说,我们可以尝试 "fine-tune" the last convolutional block of the VGG16 model alongside the top-level classifier. Fine-tuning consist in starting from a trained network, then re-training it on a new dataset using very small weight updates。注意,这里我们说small weight updates。为此,fine-tuning should be done with a very slow learning rate, and typically with the SGD optimizer rather than an adaptative learning rate optimizer such as RMSProp. This is to make sure that the magnitude of the updates stays very small, so as not to wreck the previously learned features。
如下图所示,我们首先instantiate the convolutional base of VGG16 and load its weights;然后,在top的位置加入先前定义的全连接网络(绿色部分),并载入训练好的权重;然后将VGG模型中的前四个卷积块(蓝色部分)冻结,即训练时不更新它们的权重。

下面来看具体的实现代码,首先还是引入必要的包,并定义一些全局变量:
- import numpy as np
- from PIL import Image
- from keras.preprocessing.image import ImageDataGenerator
- from keras.models import Sequential, Model
- from keras.layers import Dropout, Flatten, Dense
- from keras import applications
- from keras import optimizers
- # dimensions of our images.
- img_width, img_height = 150, 150
- train_data_dir = 'data/train'
- validation_data_dir =www.yongshiyule178.com 'data/validation'
- nb_train_samples = 2000
- nb_validation_samples = 800
- epochs = 50
- batch_size = 16
- # path to the model weights files.
- top_model_weights_path = 'bottleneck_fc_model.h5'
按照之前所说的,instantiate the convolutional base of VGG16 and load its weights:
- # build the VGG16 network
- base_model = applications.VGG16(weights='imagenet', include_top=False, input_shape=(150,150,3))
- print('Model loaded.')
After instantiating the VGG base and loading its weights, we add our previously trained fully-connected classifier on top:
- # build a classifier model to put on top of the convolutional model
- top_model = Sequential(www.bomaoyule.cn/ )
- top_model.add(Flatten(input_shape=base_model.output_shape[1:]))
- top_model.add(Dense(256, activation='relu'))
- top_model.add(Dropout(0.5))
- top_model.add(Dense(1, activation='sigmoid')www.078881.cn )
- # note that it is necessary to start with a fully-trained
- # classifier, including the top classifier,
- # in order to successfully do fine-tuning
- top_model.load_weights(top_model_weights_path)
- # add the model on top of the convolutional base
- model = Model(inputs=base_model.input, outputs=top_model(base_model.output))
然后将最后一个卷几块之前的卷积层全部冻结:
- # set the first 15 layers (up to the last conv block)
- # to non-trainable (weights will not be updated)
- for layer in model.layers[:15]:
- layer.trainable = False
- # compile the model with a www.yingka178.com SGD/momentum optimizer
- # and a very slow learning rate.
- model.compile(loss='binary_crossentropy',
- optimizer=optimizers.SGD(lr=1e-4, momentum=0.9),
- metrics=['accuracy'])
准备数据:
- # prepare data augmentation configuration
- train_datagen = ImageDataGenerator(
- rescale=1./255,
- shear_range=0.2,
- zoom_range=0.2,
- horizontal_flip=True)
- test_datagen = ImageDataGenerator(rescale=1./255)
- train_generator = train_datagen.flow_from_directory(
- train_data_dir,
- target_size=(img_height, www.mcyllpt.com/ img_width),
- batch_size=batch_size,
- class_mode='binary')
- validation_generator = test_datagen.flow_from_directory(
- validation_data_dir,
- target_size=(img_height, www.meiwanyule.cn img_width),
- batch_size=batch_size,
- class_mode='binary')
最后来训练新的模型:
- # fine-tune the model
- model.fit_generator(
- train_generator,
- steps_per_epoch=nb_train_samples // batch_size,
- epochs=epochs,
- validation_data=validation_generator,
- validation_steps=nb_validation_samples // batch_size)
注意到,这里使用的是fit_generator而不是fit。运行机器学习算法时,很多人一开始都会有意无意将数据集默认直接装进显卡显存中,如果处理大型数据集(例如图片尺寸很大)或是网络很深且隐藏层很宽,也可能造成显存不足。这个情况随着工作的深入会经常碰到,解决方法其实很多人知道,就是分块装入。以Keras为例,默认情况下用fit方法载数据,就是全部载入。换用fit_generator方法就会以自己手写的方法用yield逐块装入。查阅Keras的帮助文档【2】,可知fit_generator的说明是“Trains the model on data generated batch-by-batch by a Python generator (or an instance of Sequence).”,其声明形式如下:
- fit_generator(self, generator, steps_per_epoch=None, epochs=1,
- verbose=1, callbacks=None,
- validation_data=None, validation_steps=None,
- class_weight=None, max_queue_size=10, workers=1,
- use_multiprocessing=False, shuffle=True, initial_epoch=0)
其中,the generator is run in parallel to the model, for efficiency. For instance, this allows you to do real-time data augmentation on images on CPU in parallel to training your model on GPU.
这里摘录关于generator的描述如下:A generator or an instance of Sequence (keras.utils.Sequence) object in order to avoid duplicate data when using multiprocessing. The output of the generator must be either
- a tuple (inputs, targets)
- a tuple (inputs, targets, sample_weights).
This tuple (a single output of the generator) makes a single batch. Therefore, all arrays in this tuple must have the same length (equal to the size of this batch). Different batches may have different sizes. For example, the last batch of the epoch is commonly smaller than the others, if the size of the dataset is not divisible by the batch size. The generator is expected to loop over its data indefinitely. An epoch finishes when steps_per_epoch batches have been seen by the model.
最后,训练上述模型,可以得到94%以上的准确率,但训练这个模型的耗时会远远大于上一个模型。当这仍然比重新训练整个VGG模型要高效很多了。