一、什么是插槽
我们使用 <slot> 作为一个占位符,父组件就可以把要传递的内容显示到占位符所在位置上,提高组件使用的灵活性。
二、插槽内容
父组件向子组件传递一些模板片段,让子组件在它们的组件中渲染这些片段。
例:
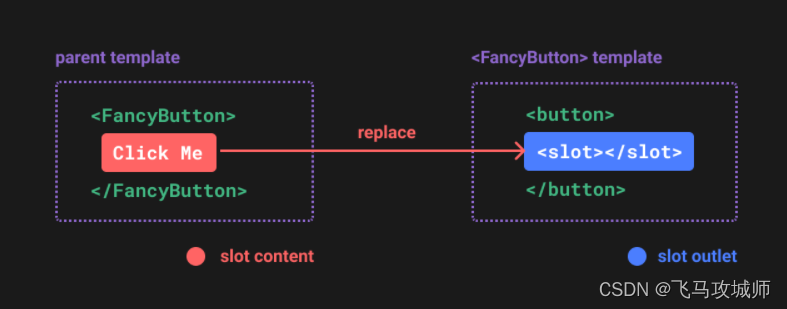
<!-- 父组件 -->
<FancyButton>
	<!-- 插槽内容 -->
	click me
</FancyButton>

<!-- 子组件 -->
<button class="fancy-btn">
	<!-- 插槽出口 -->
  	<slot></slot>
</button>
渲染结果:
<button class="fancy-btn">Click me!</button>
解释: <slot> 元素是一个插槽出口 (slot outlet),标示了父组件提供的插槽内容 (slot content) 将在哪里被渲染。
原理图:
三、渲染作用域
插槽内容可以访问到父组件的数据作用域,因为插槽内容本身是在父组件模板中定义的。
例:
<!-- message 是父组件的数据 -->
<FancyButton>{

   { message }}</FancyButton>
解释: 父组件模板中的表达式只能访问父组件的作用域;子组件模板中的表达式只能访问子组件的作用域。
四、默认内容
在外部没有提供任何内容的情况下,可以为插槽指定默认内容。
例:
<!-- 父组件 -->
<SubmitButton />

<!-- 子组件 -->
<button type="submit">
  <slot>
  	<!-- 默认内容 -->
    Submit
  </slot>
</button>
渲染结果:
<button type="submit">Submit</button>
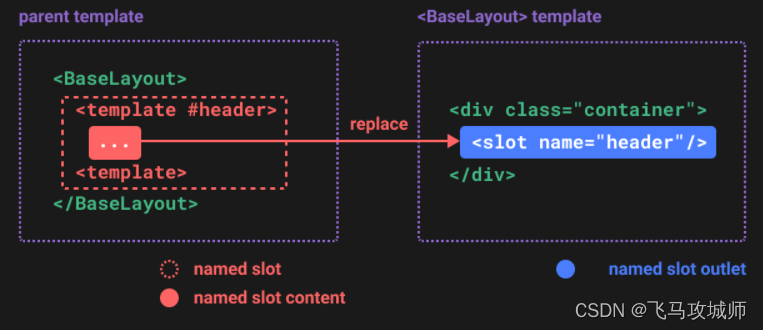
五、具名插槽
<slot> 元素可以有一个特殊的 attribute name,用来给各个插槽分配唯一的 ID,以确定每一处要渲染的内容:
例:
<!-- 子组件 -->
<div class="container">
  <header>
    <slot name="header"></slot>
  </header>
  <main>
    <slot></slot>
  </main>
  <footer>
    <slot name="footer"></slot>
  </footer>
</div>

<!-- 父组件 -->
<BaseLayout>
  <template #header>
    <h1>Here might be a page title</h1>
  </template>

  <template #default>
    <p>A paragraph for the main content.</p>
    <p>And another one.</p>
  </template>

  <template #footer>
    <p>Here's some contact info</p>
  </template>
</BaseLayout>
解释: 这类带 name 的插槽被称为具名插槽 (named slots)。没有提供 name 的 <slot> 出口会隐式地命名为“default”。v-slot 有对应的简写 #,因此 <template v-slot:header> 可以简写为 <template #header>,其意思就是“将这部分模板片段传入子组件的 header 插槽中”。
原理图:
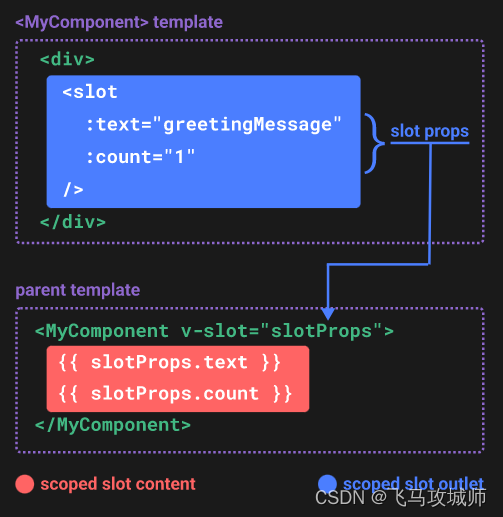
六、作用域插槽
父组件设置的插槽的内容需要用到子组件域内的数据。要做到这一点,我们需要让子组件在渲染时将一部分数据提供给插槽。
例:
<!-- 子组件 -->
<div>
  <slot :text="greetingMessage" :count="1"></slot>
</div>

<!-- 父组件 -->
<MyComponent v-slot="slotProps">
  {

   { slotProps.text }} {

   { slotProps.count }}
</MyComponent>
解释: 子组件传入插槽的 props 作为 v-slot 指令的值,可以在插槽内的表达式中访问。
原理图: