文章目录
一、前言
本文基于spring-boot-2.2.14.BUILD-SNAPSHOT源码分析prepareContext准备应用上下文这一步骤。
二、prepareContext
承接上文,本文继续SpringApplication的run方法往下分析,看prepareContext这行代码

请求参数:
| 参数类型 | 参数简要说明 |
|---|---|
| ConfigurableApplicationContext context | createApplicationContext()方法的返回值,代表应用上下文 |
| ConfigurableEnvironment environment | 系统的环境变量信息的接口类 |
| SpringApplicationRunListeners listeners | SpringApplicationRunListener的集合类 |
| ApplicationArguments applicationArguments | 应用参数 |
| Banner printedBanner | 打印的Banner信息 |
进入方法实现:
private void prepareContext(ConfigurableApplicationContext context, ConfigurableEnvironment environment,
			SpringApplicationRunListeners listeners, ApplicationArguments applicationArguments, Banner printedBanner) {


	// 1、设置环境对象
	//统一ApplicationContext和Application,使用Application的environment
	context.setEnvironment(environment);
	// 2、注册组件 设置ApplicationContext的beanNameGenerator、resourceLoader、
	postProcessApplicationContext(context);
	// 3、应用初始化器对ApplicationContext进行初始化处理(Initializers在构造SpringApplication时就从spring.factories中加载到了)
	applyInitializers(context);
	// 4、发布ApplicationContext准备妥当事件
	listeners.contextPrepared(context);
	// 5、打印startup日志信息
	if (this.logStartupInfo) {


		logStartupInfo(context.getParent() == null);
		logStartupProfileInfo(context);
	}
	// 6 、添加特定的单例beans到 beanFactory中
	// Add boot specific singleton beans
	ConfigurableListableBeanFactory beanFactory = context.getBeanFactory();
	beanFactory.registerSingleton("springApplicationArguments", applicationArguments);
	if (printedBanner != null) {


		beanFactory.registerSingleton("springBootBanner", printedBanner);
	}
	if (beanFactory instanceof DefaultListableBeanFactory) {


		((DefaultListableBeanFactory) beanFactory)
				.setAllowBeanDefinitionOverriding(this.allowBeanDefinitionOverriding);
	}
	if (this.lazyInitialization) {
		context.addBeanFactoryPostProcessor(new LazyInitializationBeanFactoryPostProcessor());
	}
	// Load the sources加载资源
	Set<Object> sources = getAllSources();
	Assert.notEmpty(sources, "Sources must not be empty");
	// 加载启动类,见启动类注入容器中
	load(context, sources.toArray(new Object[0]));
	// 触发contextLoaded事件
	listeners.contextLoaded(context);
}
准备应用上下文环境AnnotationConfigServletWebServerApplicationContext, 执行了以下8个步骤
- 统一ApplicationContext和Application使用的environment
- 后置处理ApplicationContext
- 执行Initializers
- 发布contextPrepared事件
- 打印启动和profile日志
- 注册单例bean
- 加载启动类
- 发布contextLoaded事件
2.1、context.setEnvironment
统一ApplicationContext和Application使用的environment
public class AnnotationConfigServletWebServerApplicationContext
        extends ServletWebServerApplicationContext implements AnnotationConfigRegistry {


    @Override
    public void setEnvironment(ConfigurableEnvironment environment) {


        //显式调用父类AbstractApplicationContext的setEnvironment方法
        super.setEnvironment(environment);
        //调用AnnotatedBeanDefinitionReader#setEnvironment()方法
        this.reader.setEnvironment(environment);
        //ClassPathBeanDefinitionScanner继承了ClassPathScanningCandidateComponentProvider,所以调用了父类setEnvironment方法
        this.scanner.setEnvironment(environment);
    }

}
将context中相关的environment全部替换成SpringApplication中创建的environment。还记得《SpringBoot源码分析(5)–createApplicationContext创建应用上下文》中的疑问吗,引申下就是:之前我们的应用中有两个environment,一个在context中,一个在SpringApplication中。经过此方法后,就只会存在SpringApplication中的environment了,而context中的原environment会被回收。
关于这点我们上篇有提到过一个瑕疵,因为这里虽然替换了容器原生的environement,但之前初始化SpringBootExceptionReporter的时候,已经把原生的environment设置到了异常分析器中,这些分析器持有的environment没有得到同步的更新,并不是我们真正使用的环境对象。
2.2、postProcessApplicationContext(context);
执行了以下三步
- 设置ApplicationContext的beanNameGenerator
- 设置ApplicationContext的resourceLoader和classLoader
- 设置ApplicationContext的类型转换Service
protected void postProcessApplicationContext(ConfigurableApplicationContext context) {
//beanNameGenerator默认为null,所以此处没有设置
if (this.beanNameGenerator != null) {
//如果beanNameGenerator不为空
//那么注册一个名为internalConfigurationBeanNameGenerator
//值为beanNameGenerator的单例bean
context.getBeanFactory().registerSingleton(
AnnotationConfigUtils.CONFIGURATION_BEAN_NAME_GENERATOR,
this.beanNameGenerator);
}
//resourceLoader默认为null,所以此处没有设置
if (this.resourceLoader != null) {
//如果resourceLoader不为空
if (context instanceof GenericApplicationContext) {
//context是GenericApplicationContext子类
//那么设置上下文context的resourceLoader
((GenericApplicationContext) context)
.setResourceLoader(this.resourceLoader);
}
if (context instanceof DefaultResourceLoader) {
//如果当前上下文是DefaultResourceLoader的子类
//那么设置上下文context的classLoader
((DefaultResourceLoader) context)
.setClassLoader(this.resourceLoader.getClassLoader());
}
}
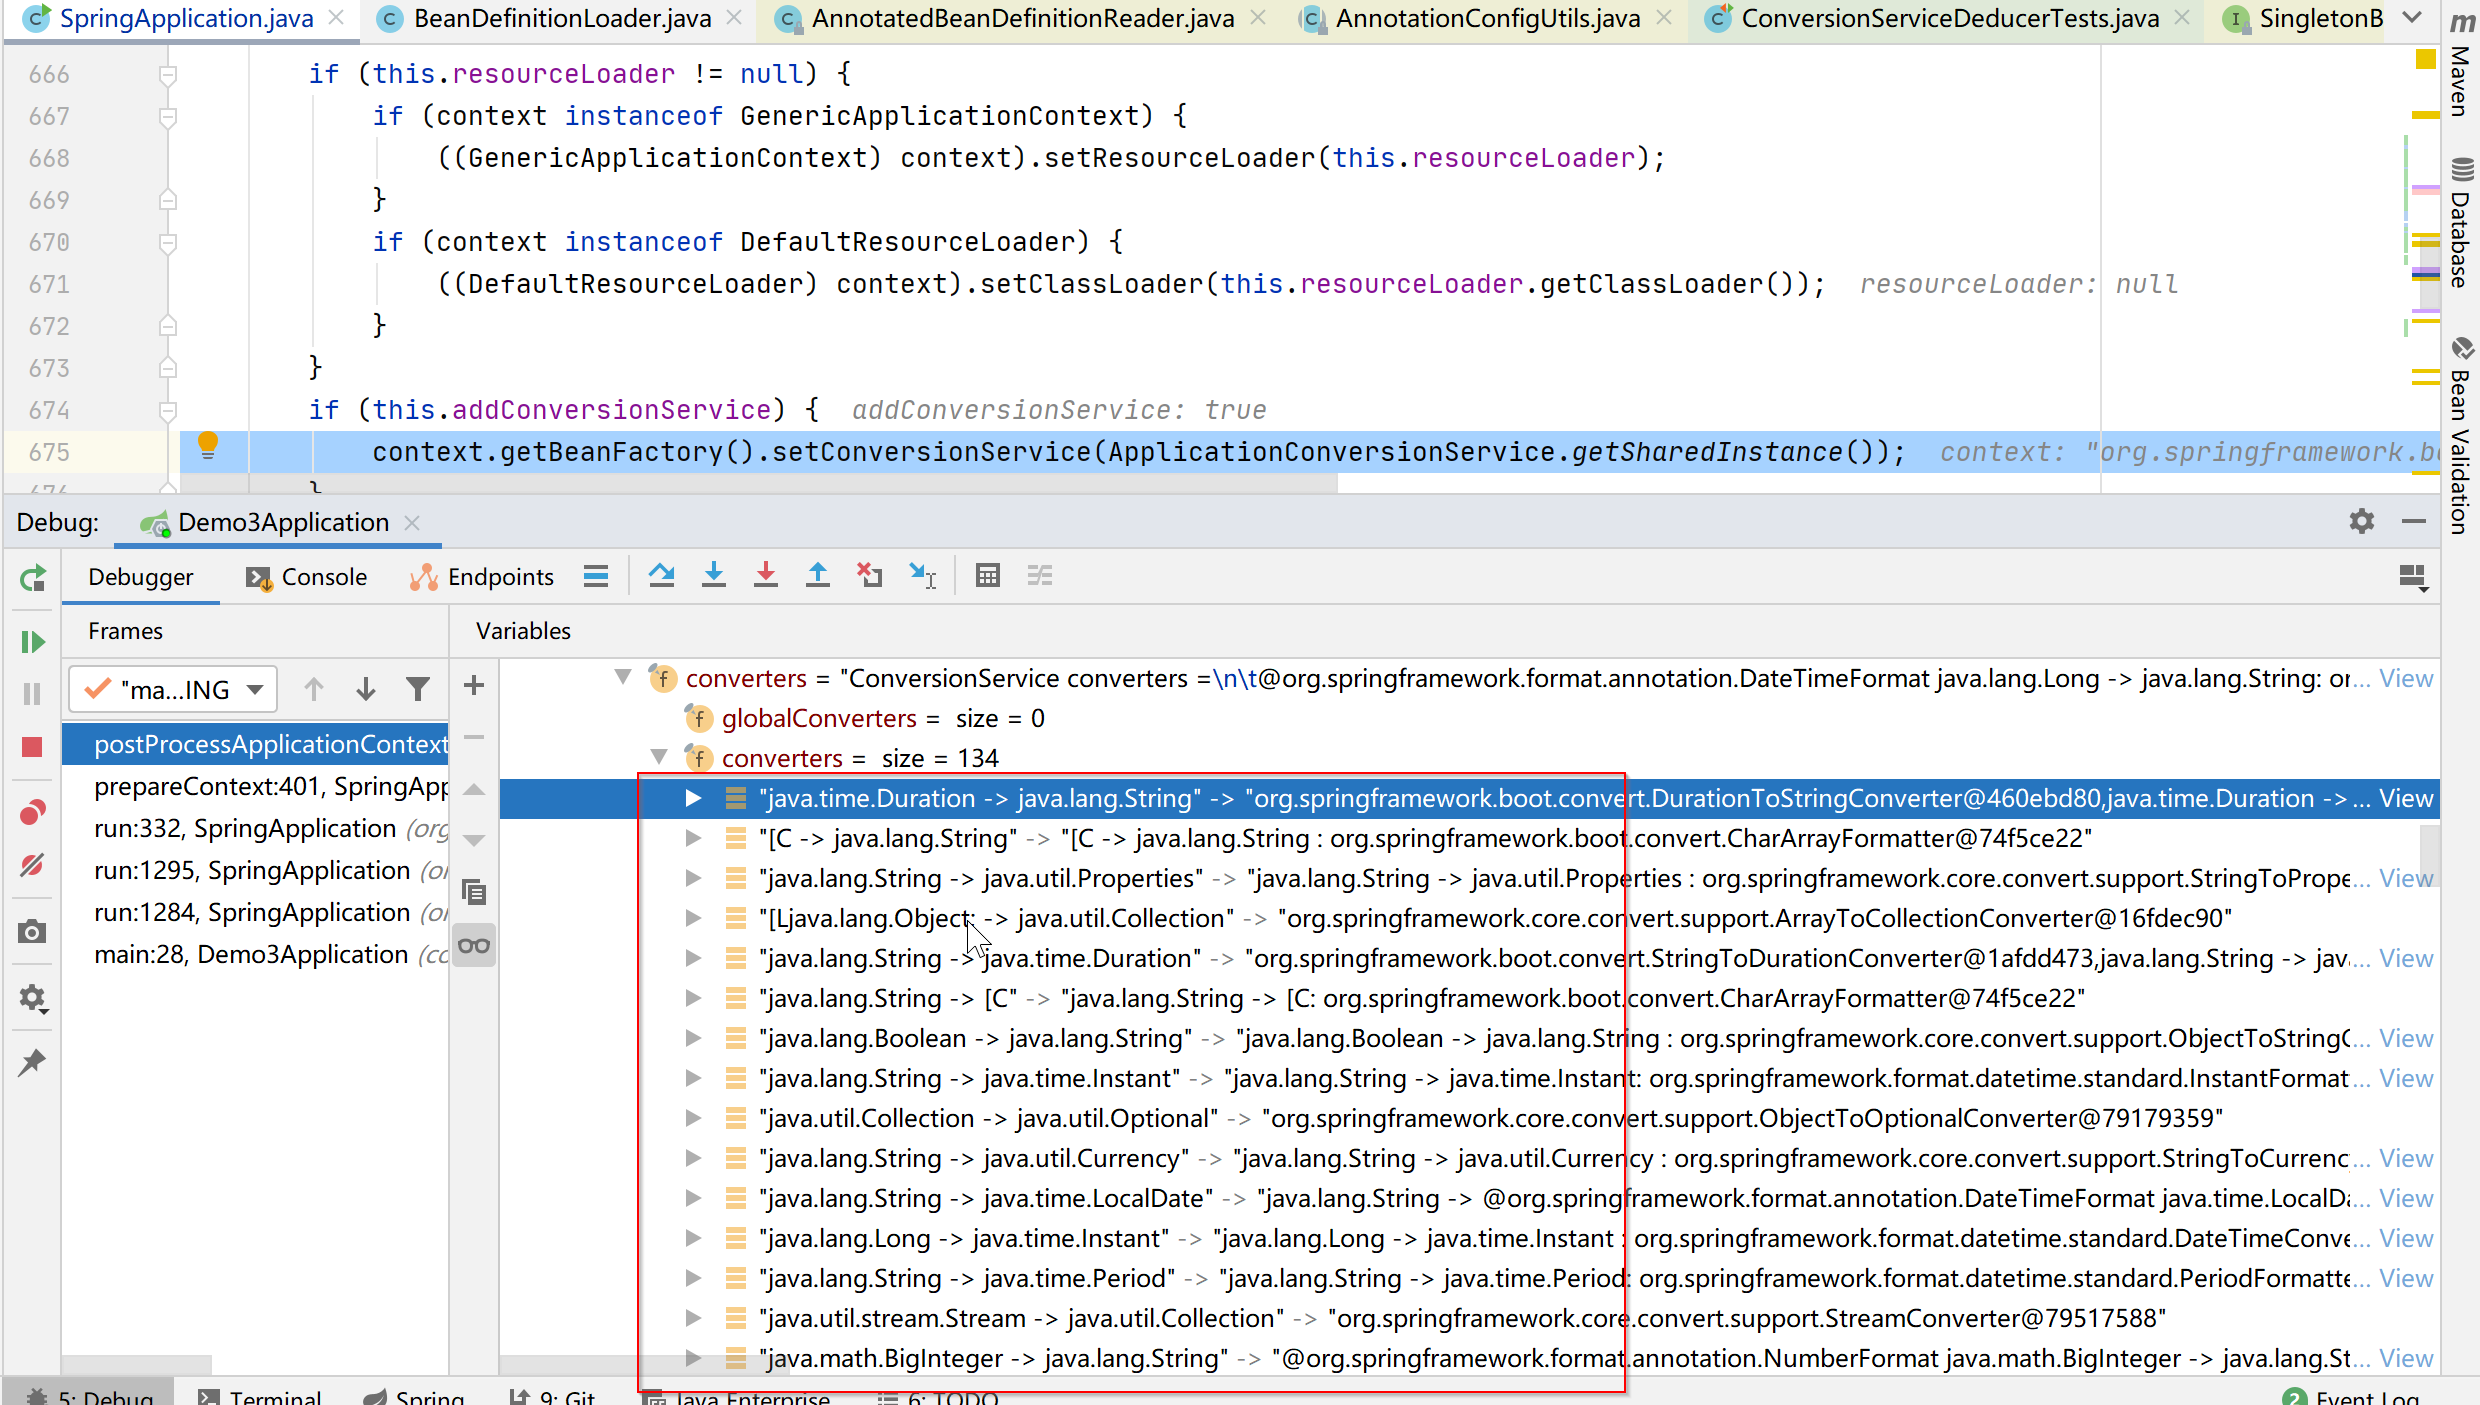
//this.addConversionService默认为true
if (this.addConversionService) {
//设置类型转换Service
context.getBeanFactory().setConversionService(
ApplicationConversionService.getSharedInstance());
}
}
首先看SpringApplication对象中有没有自定义的BeanNameGenerator,有的话就注册到容器的单例池,这个对象是用来给容器中的Bean生成名字的,Spring容器new出来的时候会默认生成一个,默认的命名策略就是类名小写,不过SpringApplication中的该对象默认是null的
然后看SpringApplication对象有没有自定义ResourceLoader,有的话就赋值给容器,这个我们之前也分析过,默认也是null的
最后一个if分支,addConversionService在SpringApplication对象的构造函数里就默认设置为true,所以会走if,它为容器设置了一个ConversonService,这个类是用来做类型转换的,比如String转Integer等等,其实在之前的文章中已经见过几次了
2.3、applyInitializers(context)
加载的是META-INF/spring.factories中的ApplicationContextInitializer列表 ,并依次调用其initialize方法
protected void applyInitializers(ConfigurableApplicationContext context) {


	for (ApplicationContextInitializer initializer : getInitializers()) {


	    //断言判断initializer的类型是否符合条件
		Class<?> requiredType = GenericTypeResolver.resolveTypeArgument(initializer.getClass(),
				ApplicationContextInitializer.class);
		Assert.isInstanceOf(requiredType, context, "Unable to call initializer.");
		//执行各个initializer的初始化initialize方法
		initializer.initialize(context);
	}
}
initializers在SpringApplication初始化期间获取到,获取源码可参考《SpringBoot源码分析(2)–SpringBoot启动源码(万字图文源码debug讲解springboot启动原理)》, 一共获取到7个初始化器:
- DelegatingApplicationContextInitializer
- SharedMetadataReaderFactoryContextInitializer
- ContextIdApplicationContextInitializer
- ConfigurationWarningsApplicationContextInitializer
- ServerPortInfoApplicationContextInitializer
- ConditionEvaluationReportLoggingListener
- RSocketPortInfoApplicationContextInitializer
本文先梳理prepareContext方法的脉络,至于这些内置的ApplicationContextInitializer做了哪些初始化,我们下篇文章《SpringBoot源码分析(8)–内置ApplicationContextInitializer》单独分析
所有的这些初始化类都没有进行启动服务的实质性操作,都是通过注册对象,埋点,后面invokeBeanFactoryPostProcessors才真正调用初始化方法,而且在项目启动之前
2.4、发布ApplicationContextInitializedEvent事件
// 4、发布ApplicationContext准备妥当事件
listeners.contextPrepared(context);
Application容器初始化完成事件, 对该事件感兴趣的监听器有
- BackgroundPreinitializer
- DelegatingApplicationListener
BackgroundPreinitializer
扩展点, 后台进程初始化器, 用于多线程执行后台耗时任务, 在这里不处理ApplicationContextInitializedEvent事件
DelegatingApplicationListener
扩展点, 代理监听器, 继续分发事件, 不处理ApplicationContextInitializedEvent事件
2.5、打印启动和profile日志
//logStartupInfo默认为true
if (this.logStartupInfo) {


    //判断是否有父容器,打印项目启动信息
    // Starting Demo3Application on pcname with PID 12372 (E:\workspace\demo3\target\classes started by username in E:\workspace\demo3)
    logStartupInfo(context.getParent() == null);

    //打印profile
    //No active profile set, falling back to default profiles: default
    logStartupProfileInfo(context);
}
这段代码判断当前容器是否有父容器,如果没有的话就认为是项目启动的根容器,会打印一行日志,包括启动类、当前的服务器名、项目路径、PID等
2023-07-18 10:35:07.105  INFO 3136 --- [           main] com.example.demo.Demo3Application        : Starting Demo3Application on hualsd with PID 3136 (D:\WorkSpace\demo3\target\classes started by 188 in D:\WorkSpace\demo3)
2023-07-18 10:35:32.693  INFO 3136 --- [           main] com.example.demo.Demo3Application        : The following profiles are active: sit
2.6、注册单例Bean
注册了两个单例Bean
- 命令行参数bean, 名称为springApplicationArguments, 值为applicationArgument
- banner bean, 名称为springBootBanner, 值为printedBanner
//注册命令行参数bean
beanFactory.registerSingleton("springApplicationArguments", applicationArguments);
if (printedBanner != null) {


    //banner bean
    beanFactory.registerSingleton("springBootBanner", printedBanner);
}
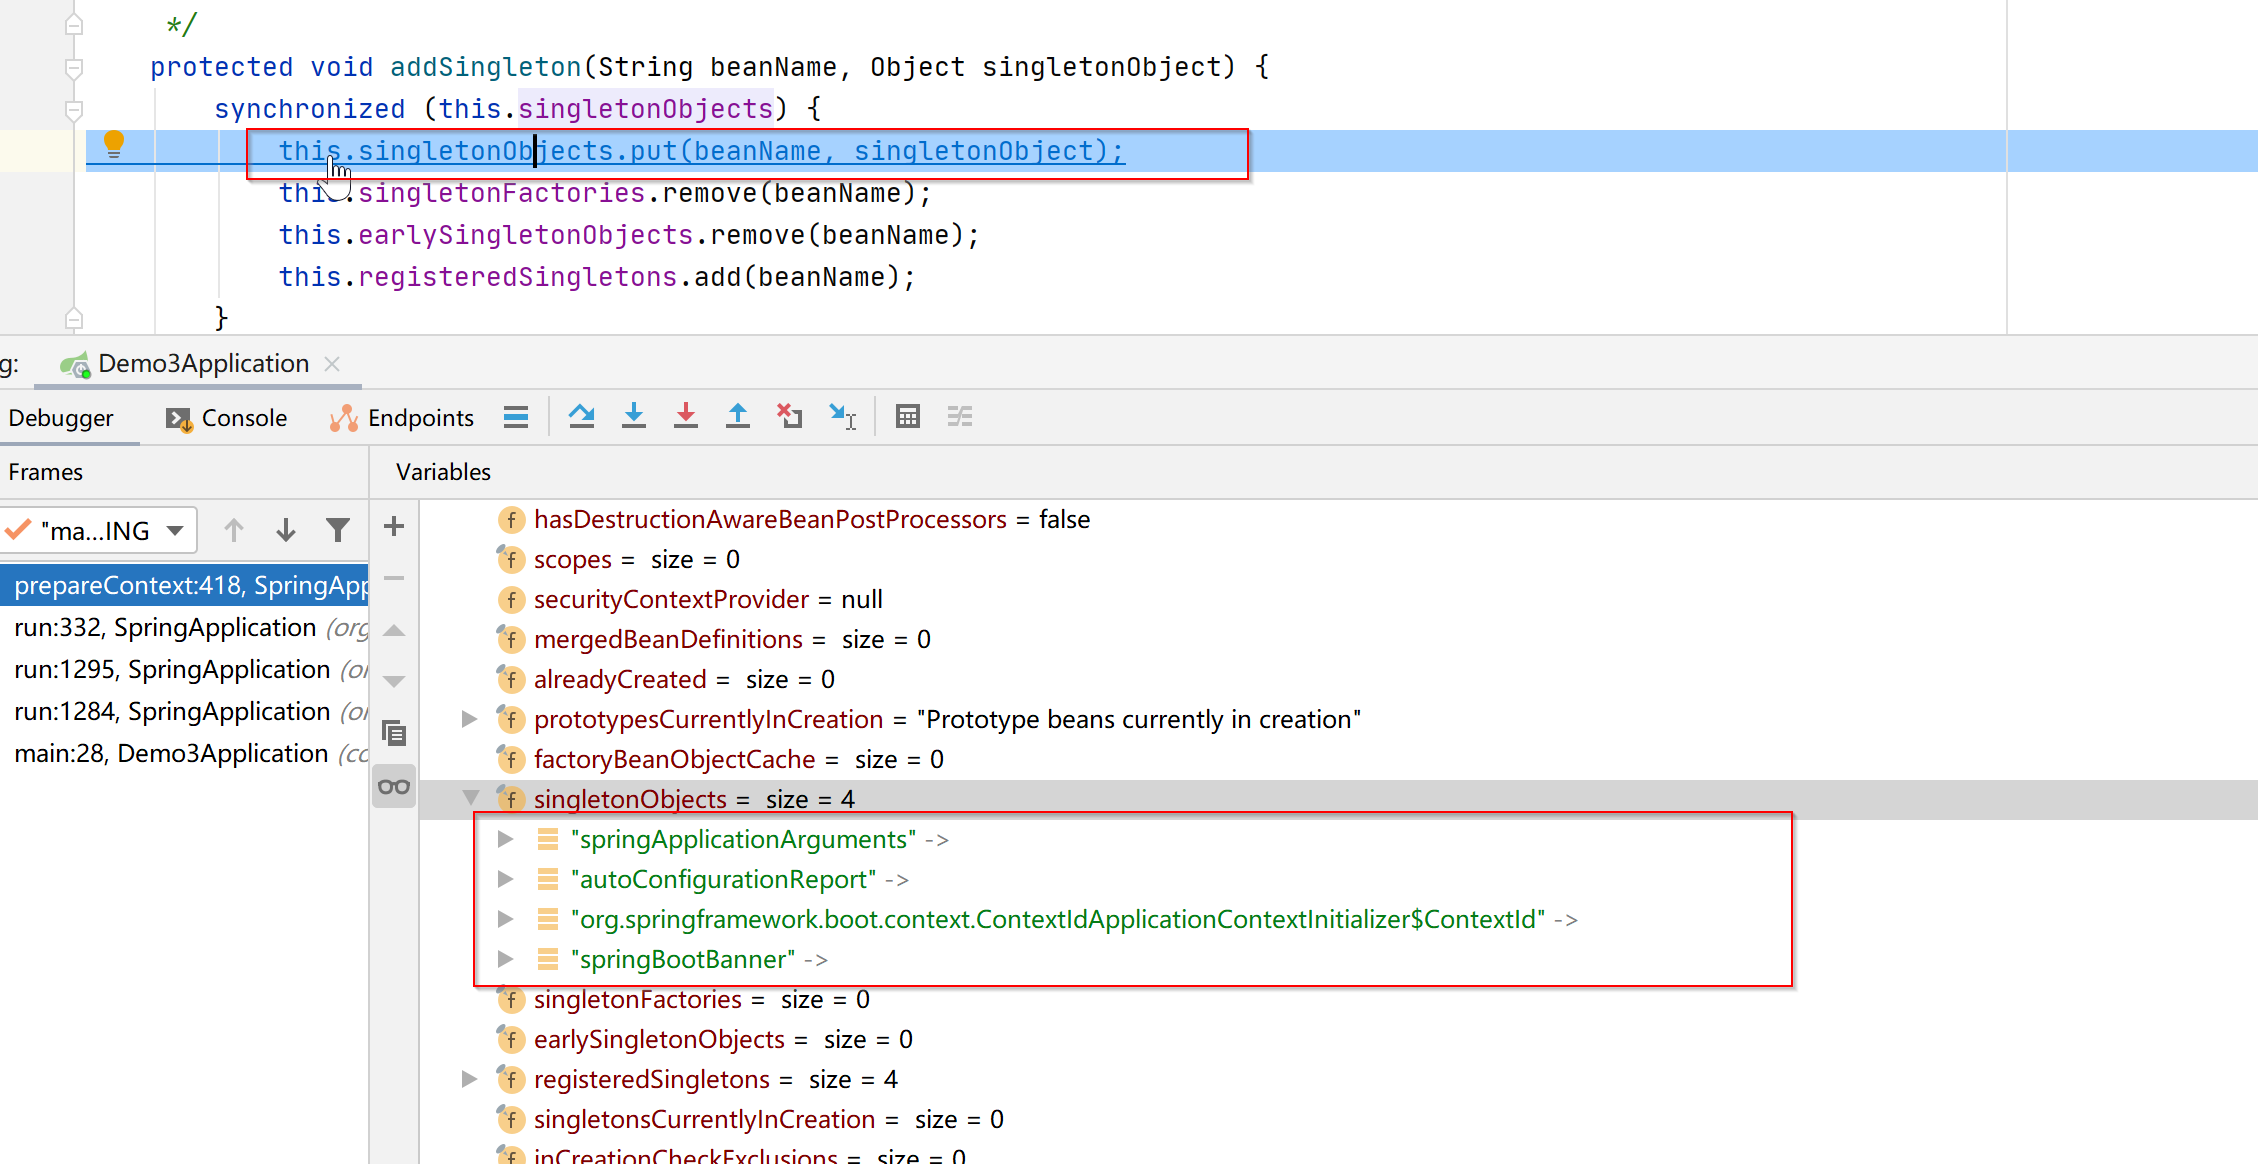
最终registerSingleton方法会把他们注册到singletonObjects容器中,从名字我们就可以看出来,这是个存放单例对象的容器。
2.6.1、手工注册单例Bean流程
调用DefaultListableBeanFactory#registerSingleton方法, 显示调用父类DefaultSingletonBeanRegistry#registerSingleton方法
DefaultListableBeanFactory 手工注册单例Bean
手工注册单例Bean, 不同于扫描bean定义, 然后注册单例bean, 手工注册的单例Bean, 没有维护到beanDefinitionMap中, 而是将beanName维护到manualSingletonNames中
public class DefaultListableBeanFactory extends AbstractAutowireCapableBeanFactory
        implements ConfigurableListableBeanFactory, BeanDefinitionRegistry, Serializable {


    //注册单例bean
    public void registerSingleton(String beanName, Object singletonObject) throws IllegalStateException {


        super.registerSingleton(beanName, singletonObject);

        //判断bean的创建过程是否已经开始了
        //调用抽象父类AbstractBeanFactory#hasBeanCreationStarted()方法
        //判断AbstractBeanFactory成员变量alreadyCreated Set不为空
        if (hasBeanCreationStarted()) {


            //bean创建过程已经开始了
            //锁住成员变量beanDefinitionMap
            synchronized (this.beanDefinitionMap) {


                if (!this.beanDefinitionMap.containsKey(beanName)) {


                    //如果bean定义Map,  beanDefinitionMap已经包含了bean
                    //维护到手工单例bean名称manualSingletonNames中
                    Set<String> updatedSingletons = new LinkedHashSet<>(this.manualSingletonNames.size() + 1);
                    updatedSingletons.addAll(this.manualSingletonNames);
                    updatedSingletons.add(beanName);
                    this.manualSingletonNames = updatedSingletons;
                }
            }
        }
        else {


            // bean还没有注册过, 仍处于启动注册阶段
            if (!this.beanDefinitionMap.containsKey(beanName)) {


                //如果beanDefinitionMap不包含beanName
                //那么添加到manualSingletonNames
                this.manualSingletonNames.add(beanName);
            }
        }

        //清空allBeanNamesByType和singletonBeanNamesByType
        clearByTypeCache();
    }
}
DefaultSingletonBeanRegistry手工注册单例Bean
将beanName添加到registeredSingletons中, beanName和对应的对象保存singletonObjects中, 并删除beanName对应的beanFactory, earlySingleton
//默认单例bean注册器
public class DefaultSingletonBeanRegistry extends SimpleAliasRegistry implements SingletonBeanRegistry {


    //缓存单例bean, key为bean名称,value为bean实例
    private final Map<String, Object> singletonObjects = new ConcurrentHashMap<>(256);

    //缓存beanFactory, key为bean名称, value为beanFactory
    private final Map<String, ObjectFactory<?>> singletonFactories = new HashMap<>(16);

    //早期单例缓存, key为bean名称, value为bean实例
    //为了解决循环依赖而引入的
    private final Map<String, Object> earlySingletonObjects = new HashMap<>(16);

    //单例bean名称set
    private final Set<String> registeredSingletons = new LinkedHashSet<>(256);

    //正在创建的单例bean名称set
    private final Set<String> singletonsCurrentlyInCreation =
            Collections.newSetFromMap(new ConcurrentHashMap<>(16));


    //手工注册单例bean
    @Override
    public void registerSingleton(String beanName, Object singletonObject) throws IllegalStateException {


        //判断名称和值不可以为空
        Assert.notNull(beanName, "Bean name must not be null");
        Assert.notNull(singletonObject, "Singleton object must not be null");
        synchronized (this.singletonObjects) {


            //判断bean是否为空
            Object oldObject = this.singletonObjects.get(beanName);
            if (oldObject != null) {


                //不为空抛异常
                throw new IllegalStateException("Could not register object [" + singletonObject +
                        "] under bean name '" + beanName + "': there is already object [" + oldObject + "] bound");
            }
            //添加一个单例bean
            addSingleton(beanName, singletonObject);
        }
    }

    //添加一个单例bean
    protected void addSingleton(String beanName, Object singletonObject) {


        synchronized (this.singletonObjects) {


            //保存到singletonObjects的map中
            this.singletonObjects.put(beanName, singletonObject);
            this.singletonFactories.remove(beanName);
            this.earlySingletonObjects.remove(beanName);
            //添加beanName
            this.registeredSingletons.add(beanName);
        }
    }
}
接着注册单例bean继续往下分析。
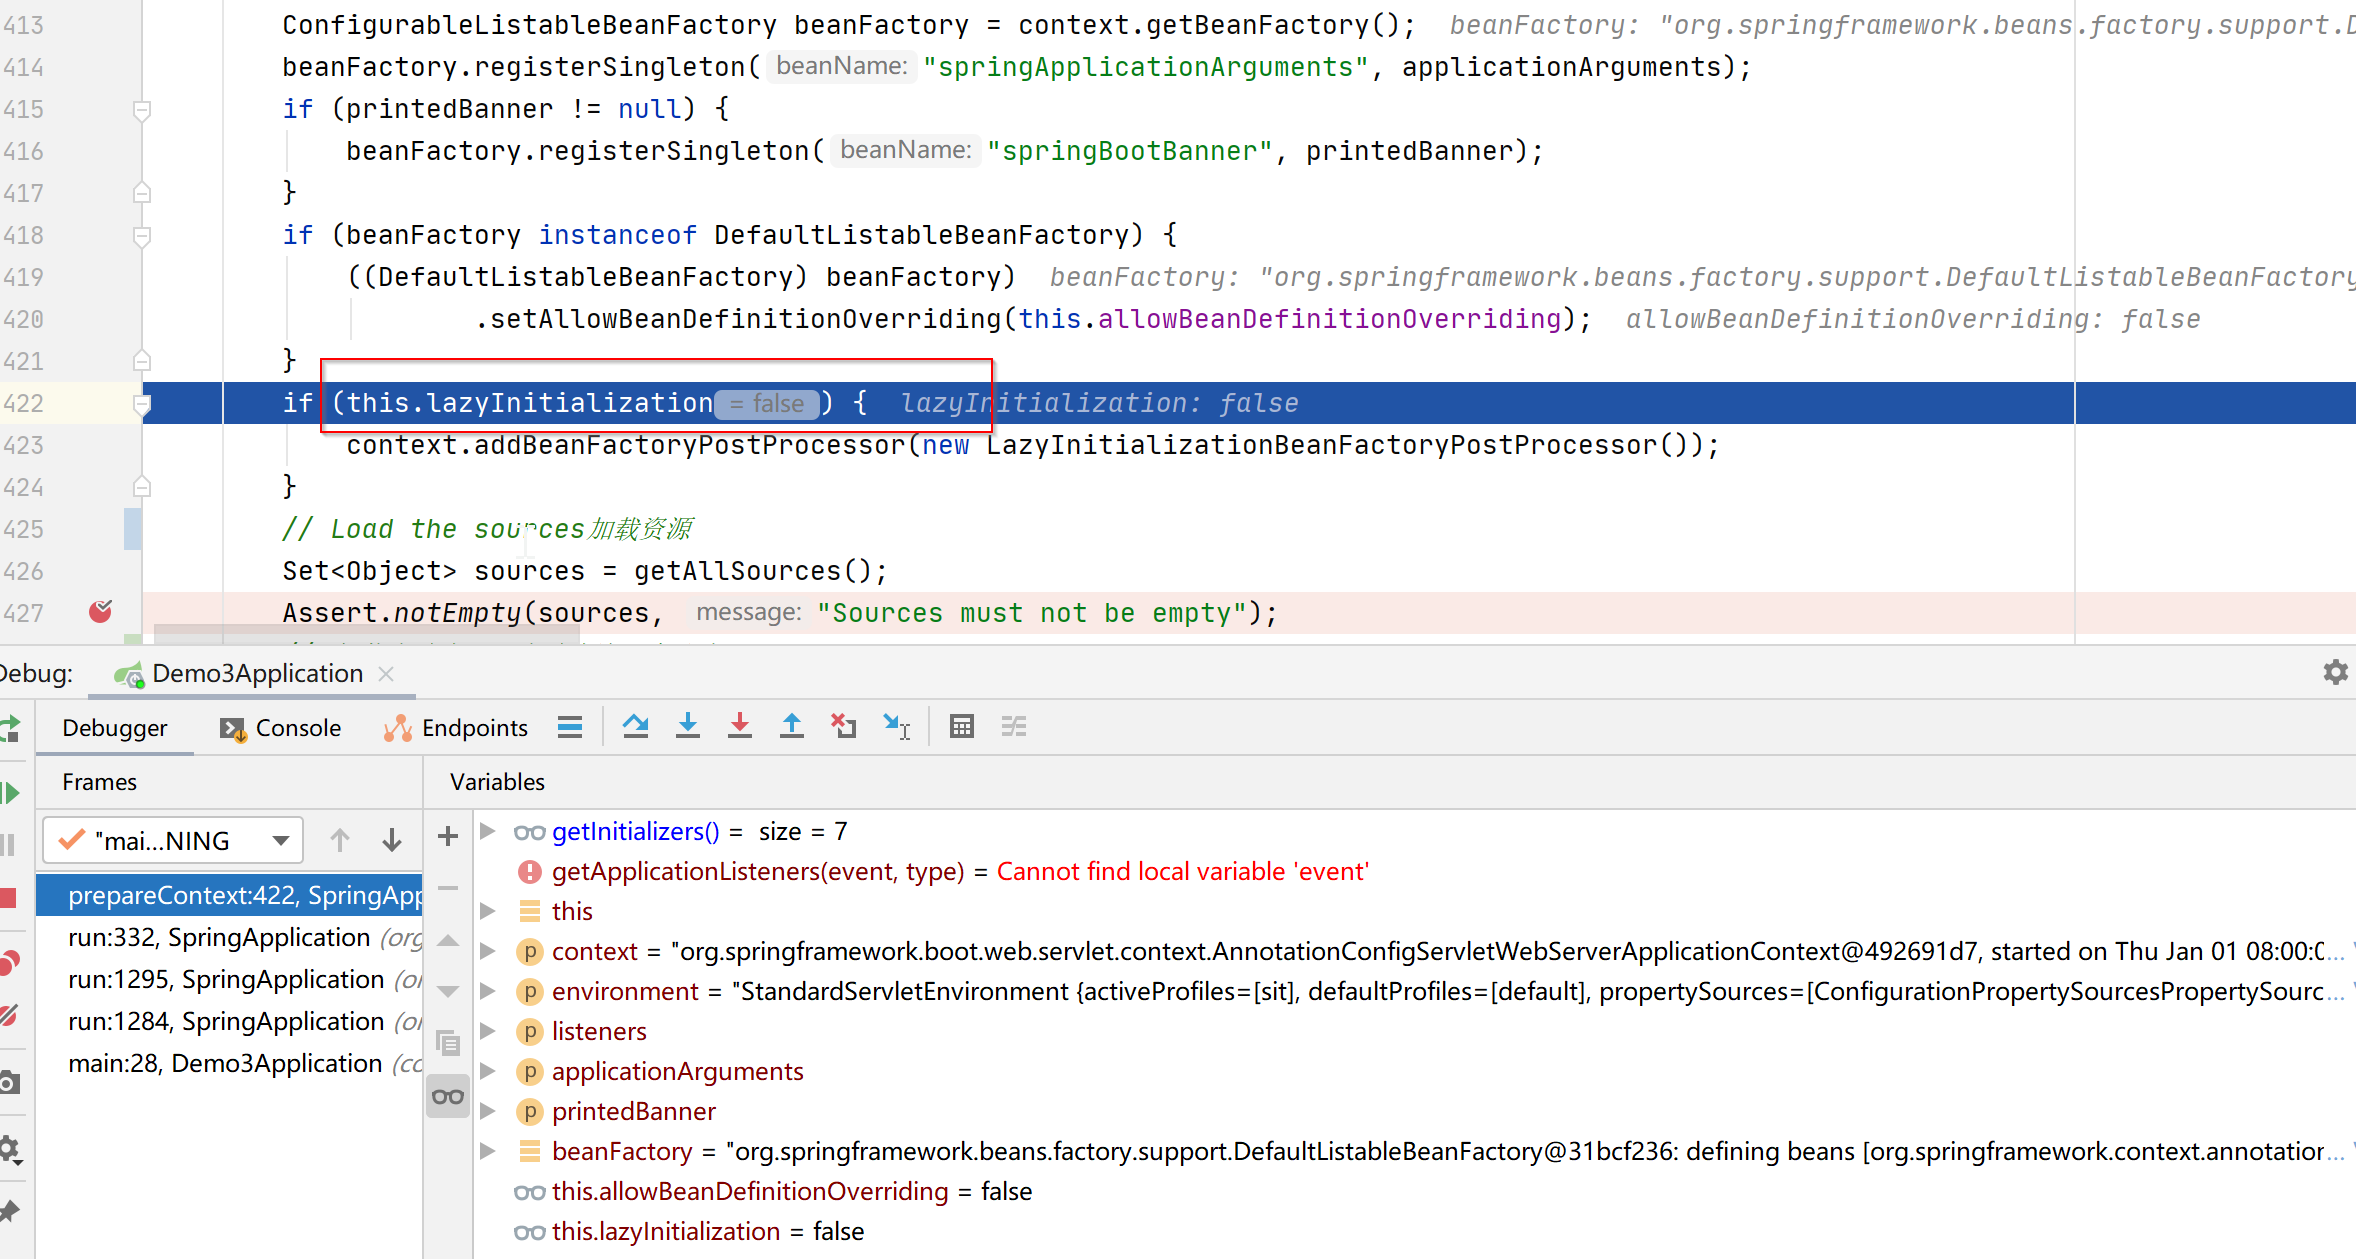
设置是否允许同名覆盖(setAllowBeanDefinitionOverriding),默认情况下为false(allowBeanDefinitionOverriding属性默认值)。如果为true,后面的BeanDefinition数据会将前面的覆盖掉。
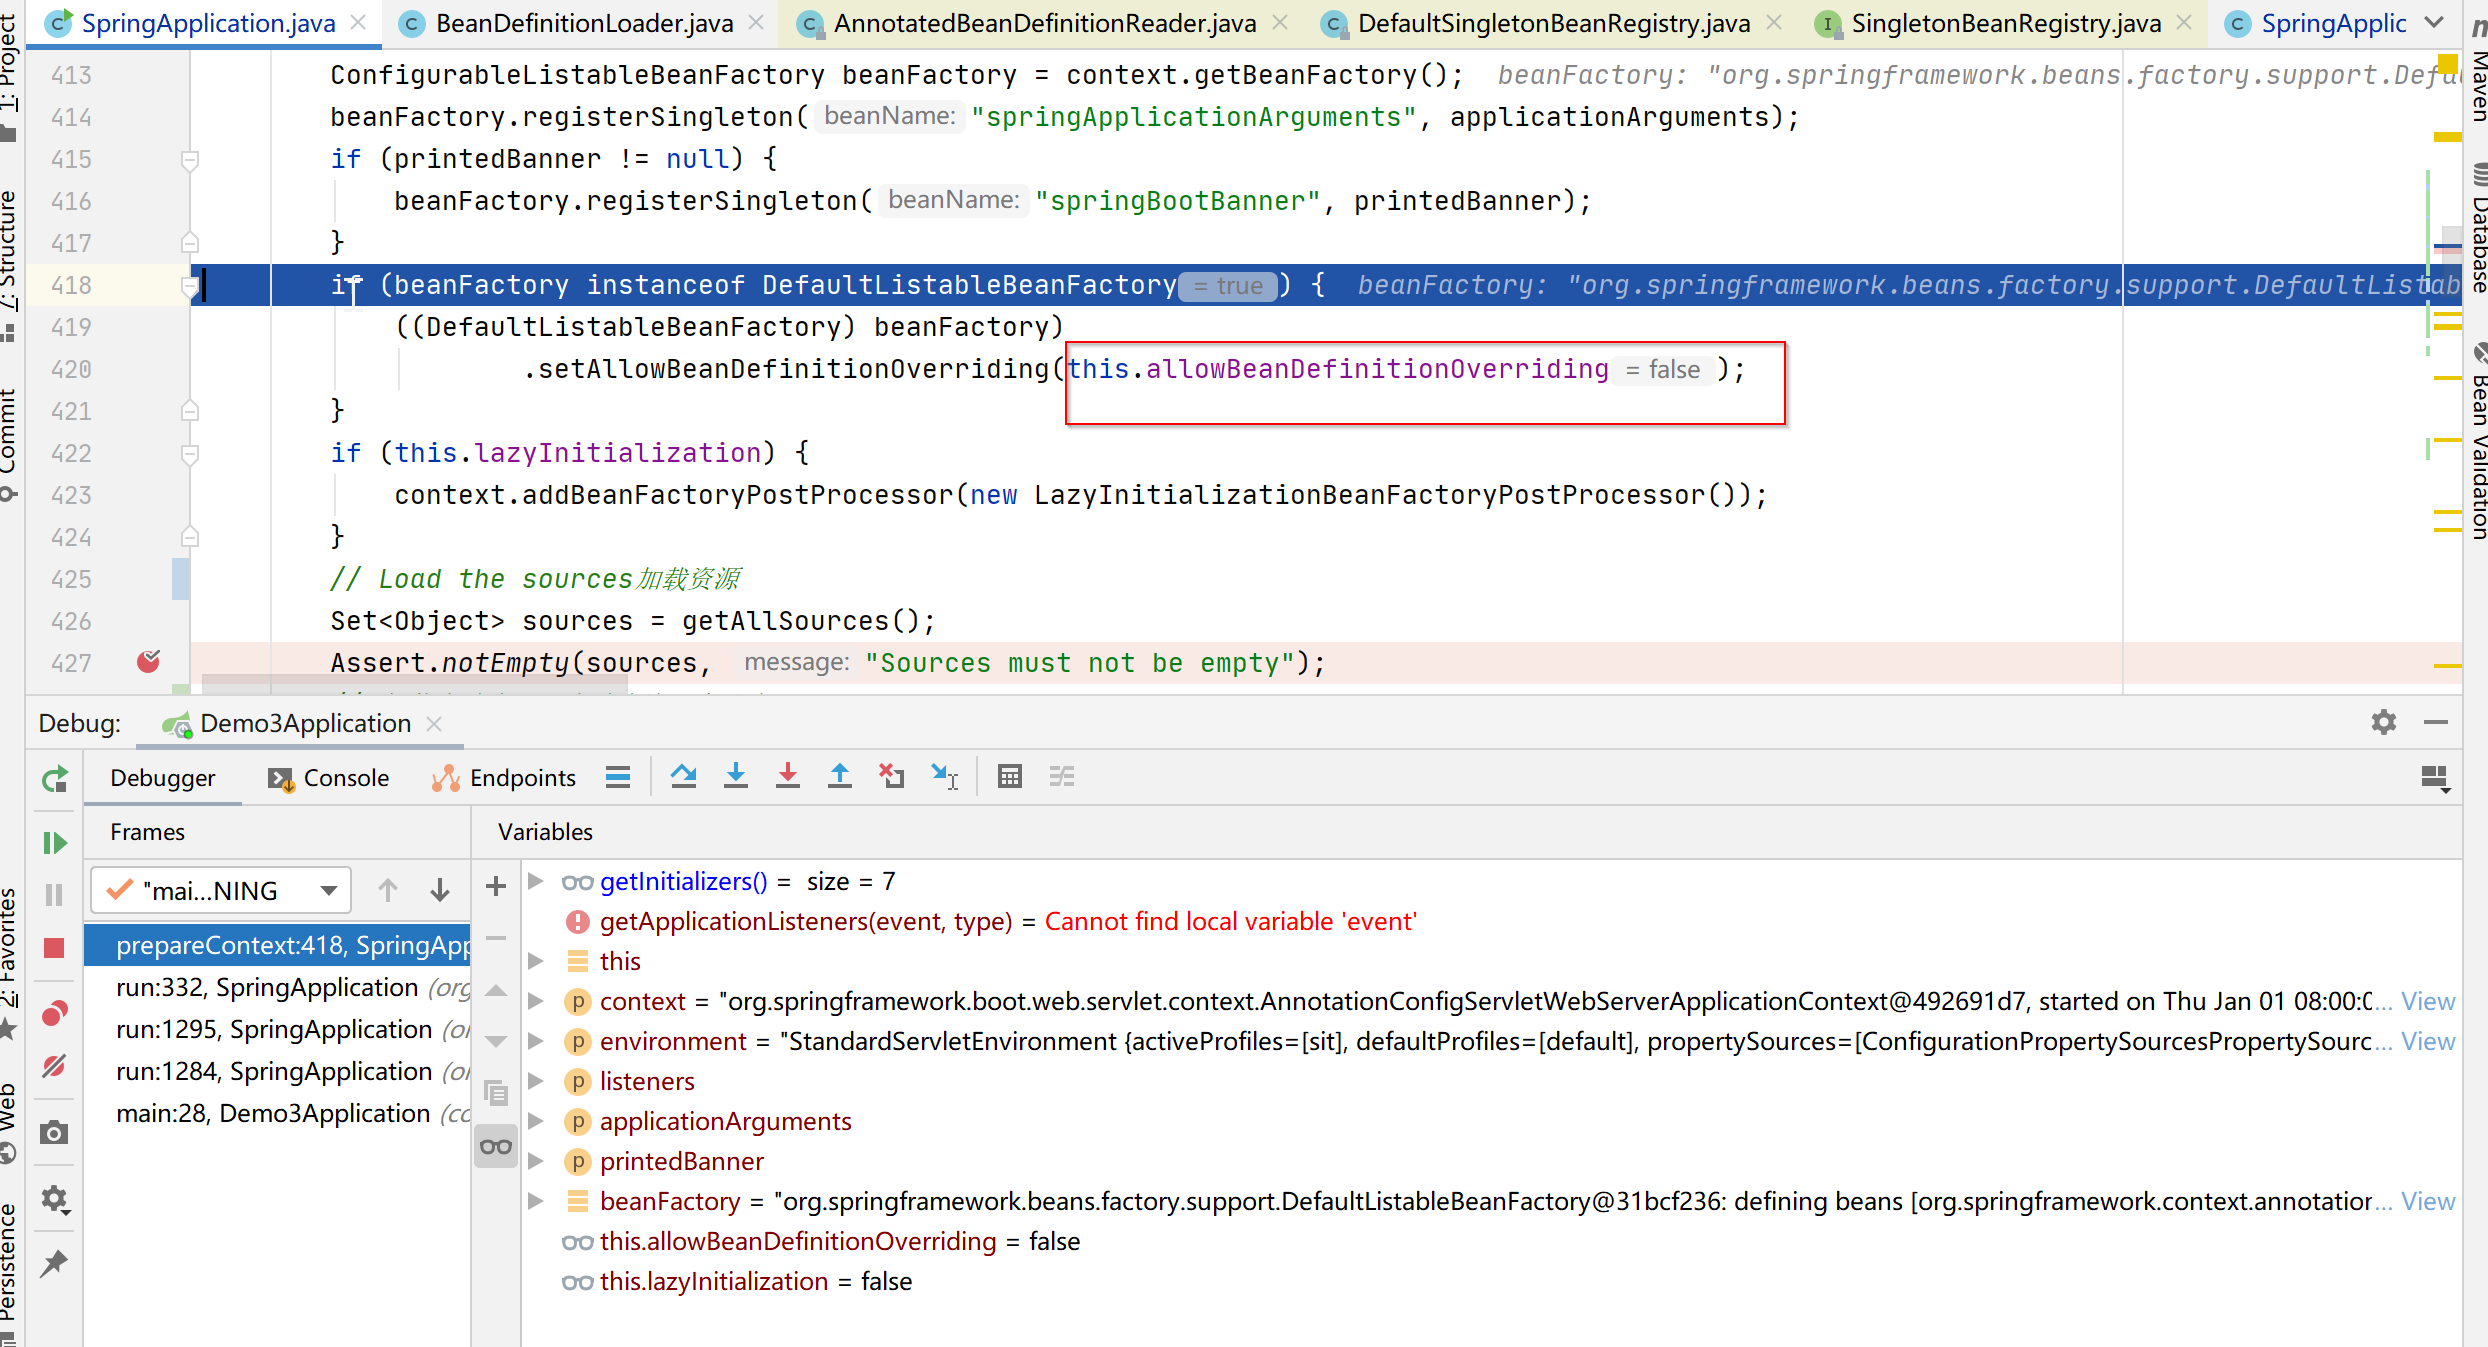
添加beanFactory懒加载后置处理器(addBeanFactoryPostProcessor),由于默认情况下并未启动懒加载,所以默认情况下懒加载后置处理器也不会被添加
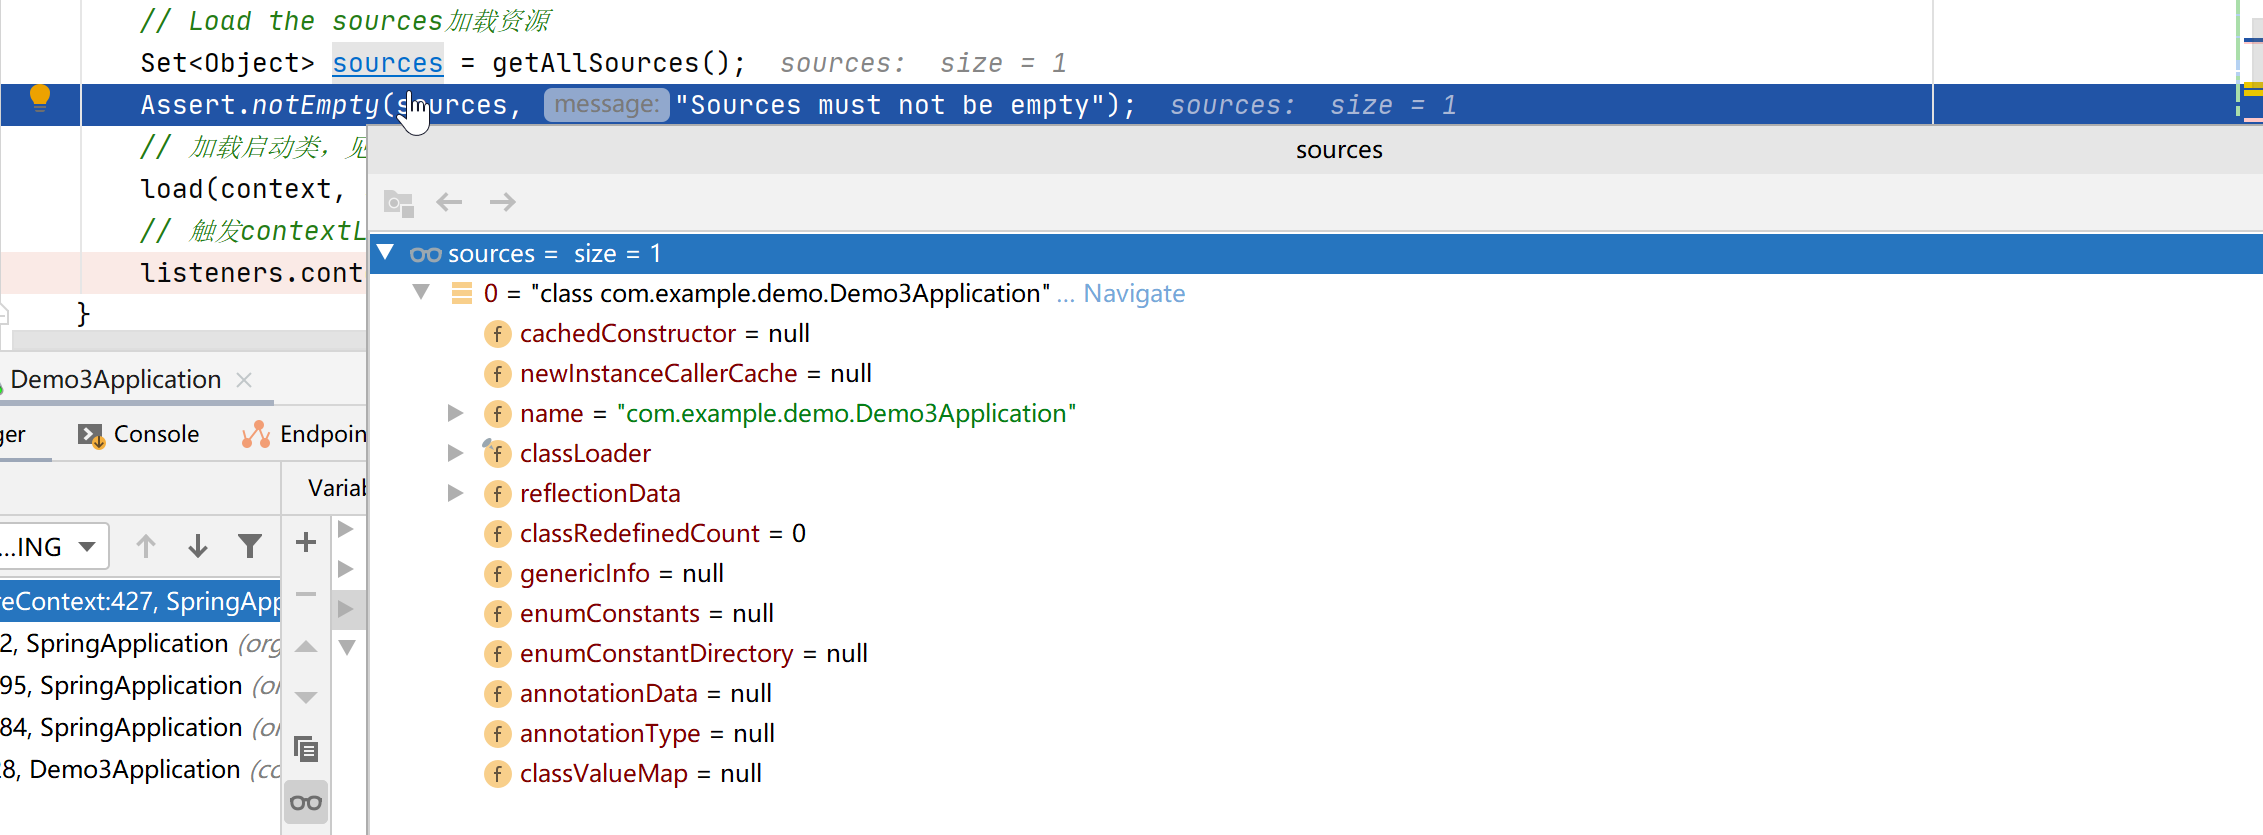
2.7、初始化BeanDefinitionLoader, 加载Application
接下来看一个比较重要的load方法
Set<Object> sources = this.getAllSources();
Assert.notEmpty(sources, "Sources must not be empty");
this.load(context, sources.toArray(new Object[0]));
getAllSources获取的是SpringApplication对象的primarySources属性,而该属性在SpringApplication构造函数中赋了值,也就是我们的启动类Demo3Application.class
接下来进入load方法
protected void load(ApplicationContext context, Object[] sources) {


    if (logger.isDebugEnabled()) {


        logger.debug(
                "Loading source " + StringUtils.arrayToCommaDelimitedString(sources));
    }
    //实例化BeanDefinitionLoader
    BeanDefinitionLoader loader = createBeanDefinitionLoader(
            getBeanDefinitionRegistry(context), sources);
    //this.beanNameGenerator为null
    if (this.beanNameGenerator != null) {


        loader.setBeanNameGenerator(this.beanNameGenerator);
    }
    //this.resourceLoader为null
    if (this.resourceLoader != null) {


        loader.setResourceLoader(this.resourceLoader);
    }
    //this.environment为null
    if (this.environment != null) {


        loader.setEnvironment(this.environment);
    }
    //调用load()方法,加载各个sources
    loader.load();
}
首先生成一个BeanDefinitionLoader, 用于加载SpringApplication的成员变量sources, 当前sources列表中只有Demo3Application.class一个对象。
先通过createBeanDefinitionLoader方法创建一个BeanDefinitionLoader,它可以将一个类加载成BeanDefinition,第一个参数就是spring容器,第二个参数是我们的启动类。
BeanDefinitionLoader构造方法
  /**
 * 构造函数
   */
  BeanDefinitionLoader(BeanDefinitionRegistry registry, Object... sources) {


      Assert.notNull(registry, "Registry must not be null");
      Assert.notEmpty(sources, "Sources must not be empty");
      //传入的sources, 目前只有Demo3Application.class
      this.sources = sources;
      this.annotatedReader = new AnnotatedBeanDefinitionReader(registry);
      this.xmlReader = new XmlBeanDefinitionReader(registry);
      if (isGroovyPresent()) {


          //使用了groovy
          this.groovyReader = new GroovyBeanDefinitionReader(registry);
      }
      this.scanner = new ClassPathBeanDefinitionScanner(registry);
      //排除sources扫描
      this.scanner.addExcludeFilter(new ClassExcludeFilter(sources));
  }
在BeanDefinitionLoader的构造方法中,会创建一个AnnotatedBeanDefinitionReader对象,这个类在spring容器的构造函数中已经创建过一次了,这里没有直接使用spring容器的,而是又新建了一个,会重复走一遍Reader的构造流程,但是其中往spring容器注册bean的方法执行前都做了判空的校验,所以不会重复注册,类似如下代码
if (!registry.containsBeanDefinition("org.springframework.context.annotation.internalAutowiredAnnotationProcessor")) {


    def = new RootBeanDefinition(AutowiredAnnotationBeanPostProcessor.class);
    def.setSource(source);
    beanDefs.add(registerPostProcessor(registry, def, "org.springframework.context.annotation.internalAutowiredAnnotationProcessor"));
}
回到load方法,接下来几个if分支都不会进,默认情况下SpringApplication中的beanNameGenerator、resourceLoader、environment都是null,注意我们真正使用的environment是在SpringApplication对象的run方法中创建的,并没有赋值给它自己的environment变量,所以这里依然是null
进入最后一行load方法
 /**
  * 加载sources
  */
 public int load() {


     int count = 0;
     for (Object source : this.sources) {


         count += load(source);
     }
     return count;
 }
正常情况下启动类只有一个,继续跟进load方法
//加载Object资源
private int load(Object source) {


    Assert.notNull(source, "Source must not be null");
    if (source instanceof Class<?>) {


        //加载类资源
        return load((Class<?>) source);
    }
    if (source instanceof Resource) {
        //加载Resource资源
        return load((Resource) source);
    }
    if (source instanceof Package) {
        //加载Package资源
        return load((Package) source);
    }
    if (source instanceof CharSequence) {
        //加载字符串资源
        return load((CharSequence) source);
    }
    throw new IllegalArgumentException("Invalid source type " + source.getClass());
}
我们启动类是class类型,走第一个分支
//加载类资源
private int load(Class<?> source) {


    if (isGroovyPresent()
            && GroovyBeanDefinitionSource.class.isAssignableFrom(source)) {


        // 使用了groovy,加载groovy资源
        GroovyBeanDefinitionSource loader = BeanUtils.instantiateClass(source,
                GroovyBeanDefinitionSource.class);
        load(loader);
    }
    //如果有@Component注解
    if (isComponent(source)) {


        this.annotatedReader.register(source);
        return 1;
    }
    return 0;
}
isComponent方法判断启动类上是否有@Component注解,启动类加了@SpringBootApplication注解,它是一个复合注解,内部包含了@Component注解,所以这个分支成立,进入register方法
public class AnnotatedBeanDefinitionReader {


    //Class列表注册Bean定义
    public void register(Class<?>... annotatedClasses) {


        for (Class<?> annotatedClass : annotatedClasses) {


            //单个Bean注册
            registerBean(annotatedClass);
        }
    }
}
registerBean调用doRegisterBean
public class AnnotatedBeanDefinitionReader {


     //单个Class注册bean
    public void registerBean(Class<?> annotatedClass) {


        doRegisterBean(annotatedClass, null, null, null);
    }

}
最终将我们的启动类转化为BeanDefinition注册到spring容器的BeanDefinitionMap中,后续会以此为起点,开始扫描项目中的Controller、Service等等注册到容器中
 //注册Bean定义
  <T> void doRegisterBean(Class<T> annotatedClass, @Nullable Supplier<T> instanceSupplier, @Nullable String name,
          @Nullable Class<? extends Annotation>[] qualifiers, BeanDefinitionCustomizer... definitionCustomizers) {


      //生成注解BeanDefinition
      AnnotatedGenericBeanDefinition abd = new AnnotatedGenericBeanDefinition(annotatedClass);

      //判断是否符合@Conditional注解的条件
      //不满足的话, 就不注册Bean
      if (this.conditionEvaluator.shouldSkip(abd.getMetadata())) {


          return;
      }
      //设置instanceSupplier, //AbstractAutowireCapableBeanFactory#createBeanInstance中调用了instanceSupplier.get()生成bean实例
      abd.setInstanceSupplier(instanceSupplier);
      //Scope元空间
      ScopeMetadata scopeMetadata = this.scopeMetadataResolver.resolveScopeMetadata(abd);
      abd.setScope(scopeMetadata.getScopeName());
      //生成Bean名称
      String beanName = (name != null ? name : this.beanNameGenerator.generateBeanName(abd, this.registry));

      //处理Lazy, Primary, DependsOn, Role, Description注解
      AnnotationConfigUtils.processCommonDefinitionAnnotations(abd);
      if (qualifiers != null) {


          for (Class<? extends Annotation> qualifier : qualifiers) {


              if (Primary.class == qualifier) {


                  abd.setPrimary(true);
              }
              else if (Lazy.class == qualifier) {


                  abd.setLazyInit(true);
              }
              else {


                  abd.addQualifier(new AutowireCandidateQualifier(qualifier));
              }
          }
      }
      for (BeanDefinitionCustomizer customizer : definitionCustomizers) {


          //beanDefinition定制器
          customizer.customize(abd);
      }

      //bean定义容器
      BeanDefinitionHolder definitionHolder = new BeanDefinitionHolder(abd, beanName);

      //Scope代理模式处理
      //ScopedProxyMode.DEFAULT和NO不需要代理处理
      //INTERFACES使用JDK动态代理
      //TARGET_CLASS使用CGLIB动态代理
      definitionHolder = AnnotationConfigUtils.applyScopedProxyMode(scopeMetadata, definitionHolder, this.registry);

      //注册Bean定义
      BeanDefinitionReaderUtils.registerBeanDefinition(definitionHolder, this.registry);
  }
执行完毕后,可以看到Spring容器的BeanDefinitionMap中,已经添加了我们的启动类,而前面几个类都是在new容器的时候,内部AnnotatedBeanDefinitionReader初始化的过程中注册到容器里的

2.8、发布contextLoaded事件
调用listeners.contextLoaded(context), 发布了一个ApplicationPreparedEvent事件。
跟之前的事件发布机制一样,最终调用了EventPublishingRunListener的contextLoaded方法
public void contextLoaded(ConfigurableApplicationContext context) {


	for (ApplicationListener<?> listener : this.application.getListeners()) {


		if (listener instanceof ApplicationContextAware) {


			((ApplicationContextAware) listener).setApplicationContext(context);
		}
		context.addApplicationListener(listener);
	}
	this.initialMulticaster.multicastEvent(new ApplicationPreparedEvent(this.application, this.args, context));
}
这个for循环,遍历了SpringApplication对象所有的监听器,也就是最开始创建SpringApplication的时候,从META-INF/spring.factories中加载到的ApplicationListener,在循环中,判断Listener是否实现了ApplicationContextAware接口,如果是的话就把Spring容器赋给他
这个Aware的回调本来也是在Spring容器refresh的过程执行的,但是由于这里的监听器可能仅仅是存储在容器的一个列表属性里,而并不会注册到容器中,也就不会作为Bean管理起来,后续就没办法真正在spring容器的refresh过程以正常的方式触发回调,所以就在这里手动赋值了
然后在for循环的最后一个条件里,将其添加到spring容器的监听器列表,我们之前有提到过,容器启动后,事件发布的职能会转交给容器进行,而这里正是重要的一步,将内置的监听器列表交给了容器,有了监听器列表, 自然可以向它们广播事件了
最后发布事件ApplicationPreparedEvent,发布流程跟之前一样,最终感兴趣的监听器有四个:
- ConfigFileApplicationListener
- LoggingApplicationListener
- BackgroundPreinitializer
- DelegatingApplicationListener
2.8.1、ConfigFileApplicationListener
配置文件监听器
public class ConfigFileApplicationListener
        implements EnvironmentPostProcessor, SmartApplicationListener, Ordered {


    //事件处理
    @Override
    public void onApplicationEvent(ApplicationEvent event) {


        if (event instanceof ApplicationEnvironmentPreparedEvent) {


            onApplicationEnvironmentPreparedEvent(
                    (ApplicationEnvironmentPreparedEvent) event);
        }
        if (event instanceof ApplicationPreparedEvent) {


            //处理ApplicationPreparedEvent
            onApplicationPreparedEvent(event);
        }
    }

    //处理ApplicationPreparedEvent
    private void onApplicationPreparedEvent(ApplicationEvent event) {


        this.logger.switchTo(ConfigFileApplicationListener.class);
        addPostProcessors(((ApplicationPreparedEvent) event).getApplicationContext());
    }

    //applicationContext中添加一个PropertySourceOrderingPostProcessor
    protected void addPostProcessors(ConfigurableApplicationContext context) {


        //用于重排序PropertySourceOrderingPostProcessor
        context.addBeanFactoryPostProcessor(
                new PropertySourceOrderingPostProcessor(context));
    }
}
2.8.2、LoggingApplicationListener
日志监听器
public class LoggingApplicationListener implements GenericApplicationListener {


    private void onApplicationPreparedEvent(ApplicationPreparedEvent event) {


        ConfigurableListableBeanFactory beanFactory = event.getApplicationContext()
                .getBeanFactory();
        //注册日志单例bean
        if (!beanFactory.containsBean(LOGGING_SYSTEM_BEAN_NAME)) {


            beanFactory.registerSingleton(LOGGING_SYSTEM_BEAN_NAME, this.loggingSystem);
        }
    }

}
2.8.3、BackgroundPreinitializer
后台预初始化器, 当前不做任务处理, 方便以后扩展
2.8.4、DelegatingApplicationListener
代理监听器, 不做任何处理, 方便以后扩展
三、总结
这一步的主要作用是为下面刷新applicationContext做准备
- 统一了ApplicationContext和Application的environment
- 设置ApplicationContext的beanNameGenerator,resouceLoader和classLoader, - 并设置beanFactory的类型转换Service
- 执行Initializer
- 发布ApplicationContextInitializedEvent
- 打印启动日志和profile日志
- 手工注册命令行和banner两个单例Bean
- 初始化BeanDefinitionLoader, 加载启动类sources
- 发布contextLoaded事件