2017.9.28更新(新增下拉轮播放大效果)
github更新地址:点击打开链接

关键代码
- (void)scrollViewDidScroll:(UIScrollView *)scrollView
{
    CGFloat offsetY = scrollView.contentOffset.y;
    if (offsetY >=0) {
        offsetY = 0;
    }
    [self.bannerView mas_updateConstraints:^(MASConstraintMaker *make) {
        make.top.equalTo(self.containerBackView).with.offset(offsetY);
    }];
}

基本上每个App都会有需求要做轮播图,有些需求很简单,根本没什么花样,单纯的我以前自己用ScrollView写了一个
楼主超级SB示例

首先咱们有五张图片,那么我们就要在第一张和最后一张后面各放一张(共n+2),差不多就是
5 1 2 3 4 5 1,当用户从左1顺着滚动到右5的时候,再往后滚,显示出来的就是放在右5后面的右1图片,当这张欺骗用户的图片右1显示的时候,立刻把ScrollView的contentoffset设置到原先左1的位子,接着用户就可以继续向后滚动,这就是循环滚动,那么咱们亡国后滚动也是如此,当从左1滚动到左5的时候,当左5显示的时候,把ScrollView的ContentOffSet设置到右5的位子。这种做法当图片很多的时候,这不就坑爹了么!!!
楼主一丢丢SB示例

这样看来性能根本就不好,图片全部加载出来了,如果非要考虑性能优化的话,也只能用三张图片进行操作,左中右三张图片就可以实现,每次滚动后就更新位子。
但是有个问题是它是当图片停止滚动的时候再去重新设置contentOffset的

-(void)scrollViewDidEndDecelerating:(UIScrollView *)scrollView
也就是根本实现不了循环轮播了

但是,你以为这就完了么,像我这么爱学习的人


当我遇到了这个开源组件SDCycleScrollView
该组件是通过CollectionView来实现的,item的个数可以无限多,每个cell的复用就不会对性能产生影响
这给我的感觉真的是
来一组图
它可以横着滚,竖着滚,文字滚,图片滚,文字图片一起滚。。。。。。以上这几种模式基本能满足工作上的需求,但是,有个需求根本满足不了我好么
进阶一 简单用法(下图展示的所有SD文件,箭头标注的是主要的两个)

self.automaticallyAdjustsScrollViewInsets =  NO;
    NSArray *images = @[@"http://twt.img.iwala.net/upload/118c59e1b27fd575.jpg",
                        @"http://twt.img.iwala.net/upload/357797c67b3f7033.jpg",
                        @"http://twt.img.iwala.net/upload/a9a69883ba624e67.jpg",
                        @"http://twt.img.iwala.net/upload/858913320bff6162.jpg",
                        @"http://twt.img.iwala.net/upload/21359667942b4065.jpg",
                        @"http://twt.img.iwala.net/upload/93f0689ec10d5033.jpg"];
    [self.tableView registerClass:[UITableViewCell class] forCellReuseIdentifier:@"cell"];
    self.tableView.rowHeight = 66;

    UIView *headBackView = [[UIView alloc] initWithFrame:CGRectMake(0, 0, 375, 150)];
    self.tableView.tableHeaderView = headBackView;

    self.bannerView = [SDCycleScrollView cycleScrollViewWithFrame:CGRectMake(0, 0, 375, 203) delegate:self placeholderImage:nil];
    // 一个Category给用颜色做ImageView 用15宽2高做一个长方形图片 当前图片
    self.bannerView.currentPageDotImage = [UIImage imageWithColor:[UIColor redColor] forSize:CGSizeMake(15, 2)];
    // 同上做一个 其他图片
    self.bannerView.pageDotImage = [UIImage imageWithColor:[UIColor whiteColor] forSize:CGSizeMake(15, 2)];
    // 加载网络数组图片 我个人认为这个就有点坑了,理论上这里只能给网络加载的图片实现轮播,但是如果你要DIY一些图片上的文字,就要修改源码了
    self.bannerView.imageURLStringsGroup = images;
    // 每张图对应的文字数组
    //self.bannerView.titlesGroup = @[@"第一张",@"第二章",@"第三章",@"第四章",@"第五章"];
    // 加载本地图片
    //self.bannerView.localizationImageNamesGroup = @[放本地图片];
    //默认两秒 自动滚动时间
    //self.bannerView.autoScrollTimeInterval = 5.0f;
    // 是否无限滚动 默认YES
    //self.bannerView.infiniteLoop = YES;
    // 是否自动滚动 是否自动滚动 默认YES
    //self.bannerView.autoScroll = YES;
    // 滚动方向 默认水平
    //self.bannerView.scrollDirection = UICollectionViewScrollDirectionVertical;
    [headBackView addSubview:self.bannerView];
这里有个小细节,UI美眉如果没有给咱们PageController的图片那可咋整呢,不怕,看下面这个UIImage的Category,给一个颜色和Size,画一个需要的就行了,脸皮够厚那就直接让你们的UI画一个吧
+ (UIImage*)imageWithColor:(UIColor *)color forSize:(CGSize)size
{
    if (size.width <= 0 || size.height<= 0 )
    {
        return nil;
    }
    CGRect rect = CGRectMake(0, 0, size.width, size.height);
    UIGraphicsBeginImageContext(rect.size);
    CGContextRef context = UIGraphicsGetCurrentContext();
    CGContextSetFillColorWithColor(context, [color CGColor]);
    CGContextFillRect(context, rect);
    UIImage *img = UIGraphicsGetImageFromCurrentImageContext();
    UIGraphicsEndImageContext();
    return img;
}
进阶二 自定义用法(咱们自己加一个自定义View进去,有兴趣的可以用Xib试试)

说到自定义,我还特地发邮件给原作者让他给咱们出个接口可以自定义,暴露几个接口可以自定义应该会挺好用的。
估计人家看到邮件是这样的

需求如下,是要给这种样式进行轮播
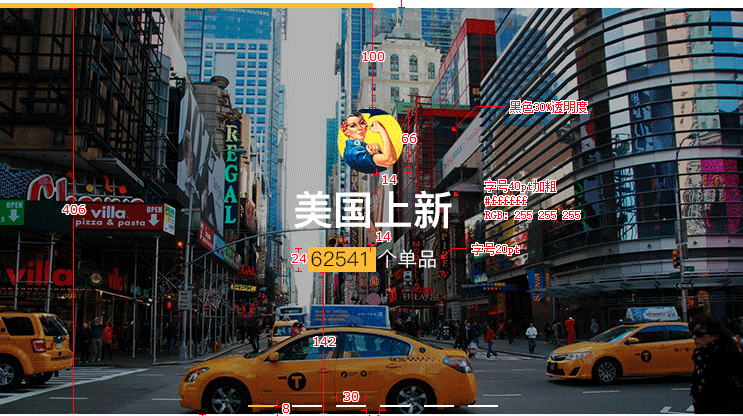
看图大致就是底部是一个ImageView,但是如果是单单一个ImageView的话就好办了,直接用他的方法就可以实现了,传个数组进去就好了,但是还要加一个蒙版的头部在上面跟着滚动啊
加入两个新增的文件之后
首先在SDCycleScrollView.h新增字段
//////////////////////  新增字段  //////////////////////
@property (nonatomic,assign) BOOL needMask;
@property (nonatomic,copy) NSArray *countryNames;
@property (nonatomic,copy) NSArray *countryNumbers;
然后在.m文件中增加方法,由于我们是要更改的Cell的样式而已,所以找到Cell的加载方法
- (UICollectionViewCell *)collectionView:(UICollectionView *)collectionView cellForItemAtIndexPath:(NSIndexPath *)indexPath
具体实现如下
if (self.needMask)
    {
        cell.mkjBannerMask.countryLabel.text = self.countryNames[itemIndex];
        NSMutableAttributedString *attribute = [[NSMutableAttributedString alloc] init];
        NSAttributedString *string1 = [[NSAttributedString alloc] initWithString:self.countryNumbers[itemIndex] attributes:

                                       @{NSFontAttributeName : [[[UIDevice currentDevice] systemVersion] floatValue] > 8.1 ?
                                         [UIFont systemFontOfSize:16 weight:UIFontWeightLight] : [UIFont fontWithName:@"HelveticaNeue-Light" size:16] ,
                                         NSForegroundColorAttributeName: [UIColor blackColor],
                                         NSBackgroundColorAttributeName : [UIColor colorWithRed:255 / 255.0 green:194 / 255.0 blue:1 / 255.0 alpha:1]}];
        NSAttributedString *string2 = [[NSAttributedString alloc] initWithString:@" 个单品" attributes:
                                       @{NSForegroundColorAttributeName : [UIColor whiteColor],
                                         NSFontAttributeName : [UIFont systemFontOfSize:16]}];
        [attribute appendAttributedString:string1];
        [attribute appendAttributedString:string2];
        cell.mkjBannerMask.productNumberLable.attributedText = attribute;
        cell.isShow = self.needMask;
    }
之后肯定在具体的cell加载里面进行需要的布局
// 给Banner增加蒙版
@property (nonatomic,strong) SDCustomMaskView *mkjBannerMask;
@property (nonatomic,assign) BOOL isShow;
- (instancetype)initWithFrame:(CGRect)frame
{
    if (self = [super initWithFrame:frame]) {
        [self setupImageView];
        [self setupTitleLabel];
        // 新增蒙版View
        [self setupMaskView];
    }

    return self;
}
- (void)setupMaskView
{
    SDCustomMaskView *customMask = [[SDCustomMaskView alloc] init];
    customMask.backgroundColor = [[UIColor blackColor] colorWithAlphaComponent:0.3];
    _mkjBannerMask = customMask;
    [self.contentView addSubview:customMask];
}
- (void)layoutSubviews
{
    [super layoutSubviews];

    _imageView.frame = self.bounds;
    // 最后一步,当布局cell子视图的时候调用,这个时候需要根据外部接口YES or NO来进行是否给Frame
    // 默认字段是NO,当YES的时候就加载,这里可以根据具体的需求随意更改,各位想怎么加载就加载什么样式
    if (self.isShow) {
        _mkjBannerMask.frame = self.bounds;
    }
    CGFloat titleLabelW = self.sd_width;
    CGFloat titleLabelH = _titleLabelHeight;
    CGFloat titleLabelX = 0;
    CGFloat titleLabelY = self.sd_height - titleLabelH;
    _titleLabel.frame = CGRectMake(titleLabelX, titleLabelY, titleLabelW, titleLabelH);
    _titleLabel.hidden = !_titleLabel.text;
}
效果如下 上面是没设置的自定义的,下面是开了自定义的,各位还想改成什么样式都随意,本身就是用collectionView的cell加载的,根据上面的思路改改Cell就OK啦