前言:Hello大家好,我是Dream。 今天来学习一下如何使用OpenCV实现手势音量控制,欢迎大家一起前来探讨学习~
一、需要的库及功能介绍
本次实验需要使用OpenCV和mediapipe库进行手势识别,并利用手势距离控制电脑音量。
导入库:
- cv2:OpenCV库,用于读取摄像头视频流和图像处理。
- mediapipe:mediapipe库,用于手部关键点检测和手势识别。
- ctypes和comtypes:用于与操作系统的音频接口进行交互。
- pycaw:pycaw库,用于控制电脑音量。
功能:
- 初始化mediapipe和音量控制模块,获取音量范围。
- 打开摄像头,读取视频流。
- 对每一帧图像进行处理:
- 转换图像为RGB格式。
- 使用mediapipe检测手部关键点。
- 如果检测到手部关键点:
- 在图像中标注手指关键点和手势连线。
- 解析手指关键点坐标。
- 根据拇指和食指指尖的坐标,计算手势距离。
- 将手势距离转换为音量大小,并控制电脑音量。
- 显示处理后的图像。
- 循环执行前述步骤,直到手动停止程序或关闭摄像头。
注意事项:
- 在运行代码之前,需要安装相关库(opencv、mediapipe、pycaw)。
- 需要连接音频设备并使其可访问。
- 检测到多个手部时,只处理第一个检测到的手部。
- 检测到手指关键点时,将索引指为0的关键点作为拇指的指尖,索引指为1的关键点作为食指的指尖。
cv2.VideoCapture()函数参数问题

这并没有错。但在树莓派上调用时需要更改参数,改为:
cap = cv2.VideoCapture(1)
调用电脑摄像头时:
电脑在用cv2.VideoCapture(0)时,程序结束后会有报错:
[ WARN:0] SourceReaderCB::~SourceReaderCB terminating async callback
需要改为:
cv2.VideoCapture(0,cv2.CAP_DSHOW)
二、导入所需要的模块
# 导入OpenCV
import cv2
# 导入mediapipe
import mediapipe as mp
# 导入电脑音量控制模块
from ctypes import cast, POINTER
from comtypes import CLSCTX_ALL
from pycaw.pycaw import AudioUtilities, IAudioEndpointVolume

# 导入其他依赖包
import time
import math
import numpy as np
三、初始化 HandControlVolume 类
class HandControlVolume:
    def __init__(self):
        """
        初始化 HandControlVolume 类的实例

        初始化 mediapipe 对象,用于手部关键点检测和手势识别。
        获取电脑音量接口,并获取音量范围。
        """
        # 初始化 medialpipe
        self.mp_drawing = mp.solutions.drawing_utils
        self.mp_drawing_styles = mp.solutions.drawing_styles
        self.mp_hands = mp.solutions.hands

        # 获取电脑音量范围
        devices = AudioUtilities.GetSpeakers()
        interface = devices.Activate(
            IAudioEndpointVolume._iid_, CLSCTX_ALL, None)
        self.volume = cast(interface, POINTER(IAudioEndpointVolume))
        self.volume.SetMute(0, None)
        self.volume_range = self.volume.GetVolumeRange()
- 初始化 mediapipe 对象,用于手部关键点检测和手势识别。
- 获取电脑音量接口,并获取音量范围。
四、主函数
1.计算刷新率
-
初始化刷新率的计算,记录当前时间作为初始时间。
-
使用
OpenCV打开视频流,此处读取摄像头设备,默认使用设备ID为0。 -
设置视频流的分辨率为指定的
resize_w和resize_h大小,并将图像resize为该尺寸。 -
在使用hands对象之前,使用
with语句创建一个上下文环境,设置手部检测和追踪的相关参数,包括最小检测置信度、最小追踪置信度和最大手的数量。 -
进入循环,判断视频流是否打开。使用
cap.read()函数从视频流中读取一帧图像,返回的success表示是否读取成功,image则是读取到的图像。 -
对读取到的图像进行
resize,将其调整为指定的大小。如果读取失败,则打印提示信息并继续下一次循环。
# 主函数
    def recognize(self):
        # 计算刷新率
        fpsTime = time.time()

        # OpenCV读取视频流
        cap = cv2.VideoCapture(0)
        # 视频分辨率
        resize_w = 640
        resize_h = 480

        # 画面显示初始化参数
        rect_height = 0
        rect_percent_text = 0

        with self.mp_hands.Hands(min_detection_confidence=0.7,
                                 min_tracking_confidence=0.5,
                                 max_num_hands=2) as hands:
            while cap.isOpened():
                success, image = cap.read()
                image = cv2.resize(image, (resize_w, resize_h))

                if not success:
                    print("空帧.")
                    continue
2.提高性能
-
将图像的可写标志image.flags.writeable设置为False,以便进行内存优化。
-
将图像从BGR格式转换为RGB格式,这是因为MediaPipe模型处理的输入要求为RGB格式。
-
对图像进行水平翻转,即镜像操作,以使图像更符合常见的镜像显示。
-
使用MediaPipe模型对图像进行处理,得到结果。
-
将图像的可写标志image.flags.writeable设置为True,以重新启用对图像的写入操作。
-
将图像从RGB格式转换回BGR格式,以便后续的显示和处理。
这些优化操作旨在提高程序的性能和效率。其中,将图像的可写标志设置为False可以减少不必要的内存拷贝,转换图像的格式和镜像操作则是为了符合MediaPipe模型的输入要求和更好地进行手势识别。最后,将图像转换回BGR格式是为了与OpenCV的显示函数兼容。
                # 提高性能
                image.flags.writeable = False
                # 转为RGB
                image = cv2.cvtColor(image, cv2.COLOR_BGR2RGB)
                # 镜像
                image = cv2.flip(image, 1)
                # mediapipe模型处理
                results = hands.process(image)

                image.flags.writeable = True
                image = cv2.cvtColor(image, cv2.COLOR_RGB2BGR)
3.判断是否有手掌
-
判断
results.multi_hand_landmarks是否存在,即是否检测到手掌。如果存在,则继续执行下面的代码。 -
遍历
results.multi_hand_landmarks中的每个hand_landmarks,即遍历每个检测到的手掌。 -
使用
self.mp_drawing.draw_landmarks函数将检测到的手掌标注在图像上,包括手指的关键点和手指之间的连接线。
# 判断是否有手掌
                if results.multi_hand_landmarks:
                    # 遍历每个手掌
                    for hand_landmarks in results.multi_hand_landmarks:
                        # 在画面标注手指
                        self.mp_drawing.draw_landmarks(
                            image,
                            hand_landmarks,
                            self.mp_hands.HAND_CONNECTIONS,
                            self.mp_drawing_styles.get_default_hand_landmarks_style(),
                            self.mp_drawing_styles.get_default_hand_connections_style())
4.解析手指,存入各个手指坐标
首先解析手指的坐标,并存入landmark_list列表中。然后,根据手指的坐标计算出大拇指和食指的指尖坐标,以及两者的中间点坐标。接下来,绘制了大拇指、食指和两者之间的连线,并使用勾股定理计算了两个指尖之间的长度。
-
创建一个空的landmark_list列表用于存储手指坐标。
-
遍历手部关键点的每个元素,将每个关键点的id、x、y和z坐标存储在一个列表中,然后将该列表添加到landmark_list中。
-
判断landmark_list是否不为空,如果不为空,继续执行下面的代码。
-
从landmark_list中获取大拇指指尖坐标的列表项,然后计算出在图像上的像素坐标。
-
从landmark_list中获取食指指尖坐标的列表项,然后计算出在图像上的像素坐标。
-
计算大拇指指尖和食指指尖的中间点坐标。
-
绘制大拇指和食指的指尖点,以及中间点。
-
绘制大拇指和食指之间的连线。
-
使用勾股定理计算大拇指指尖和食指指尖之间的长度,保存在line_len中。
 # 解析手指,存入各个手指坐标
                        landmark_list = []
                        for landmark_id, finger_axis in enumerate(
                                hand_landmarks.landmark):
                            landmark_list.append([
                                landmark_id, finger_axis.x, finger_axis.y,
                                finger_axis.z
                            ])
                        if landmark_list:
                            # 获取大拇指指尖坐标
                            thumb_finger_tip = landmark_list[4]
                            thumb_finger_tip_x = math.ceil(thumb_finger_tip[1] * resize_w)
                            thumb_finger_tip_y = math.ceil(thumb_finger_tip[2] * resize_h)
                            # 获取食指指尖坐标
                            index_finger_tip = landmark_list[8]
                            index_finger_tip_x = math.ceil(index_finger_tip[1] * resize_w)
                            index_finger_tip_y = math.ceil(index_finger_tip[2] * resize_h)
                            # 中间点
                            finger_middle_point = (thumb_finger_tip_x + index_finger_tip_x) // 2, (
                                    thumb_finger_tip_y + index_finger_tip_y) // 2
                            # print(thumb_finger_tip_x)
                            thumb_finger_point = (thumb_finger_tip_x, thumb_finger_tip_y)
                            index_finger_point = (index_finger_tip_x, index_finger_tip_y)
                            # 画指尖2点
                            image = cv2.circle(image, thumb_finger_point, 10, (255, 0, 255), -1)
                            image = cv2.circle(image, index_finger_point, 10, (255, 0, 255), -1)
                            image = cv2.circle(image, finger_middle_point, 10, (255, 0, 255), -1)
                            # 画2点连线
                            image = cv2.line(image, thumb_finger_point, index_finger_point, (255, 0, 255), 5)
                            # 勾股定理计算长度
                            line_len = math.hypot((index_finger_tip_x - thumb_finger_tip_x),
                                                  (index_finger_tip_y - thumb_finger_tip_y))
5.获取电脑最大最小音量
实现获取电脑的最大和最小音量,并将指尖的长度映射到音量范围和矩形显示上,然后将映射后的音量值设置为电脑的音量。具体过程如下:
-
self.volume_range[0]和self.volume_range[1]分别获取电脑的最小音量和最大音量。 -
np.interp函数将指尖的长度line_len映射到从50到300的范围,再映射到最小音量和最大音量的范围,得到音量值vol。 -
np.interp函数将指尖的长度line_len映射到从50到300的范围,再映射到从0到200的范围,得到矩形的高度rect_height。 -
np.interp函数将指尖的长度line_len映射到从50到300的范围,再映射到从0到100的范围,得到矩形百分比显示的数值rect_percent_text。 -
self.volume.SetMasterVolumeLevel方法将音量值vol设置为电脑的音量。
# 获取电脑最大最小音量
                            min_volume = self.volume_range[0]
                            max_volume = self.volume_range[1]
                            # 将指尖长度映射到音量上
                            vol = np.interp(line_len, [50, 300], [min_volume, max_volume])
                            # 将指尖长度映射到矩形显示上
                            rect_height = np.interp(line_len, [50, 300], [0, 200])
                            rect_percent_text = np.interp(line_len, [50, 300], [0, 100])

                            # 设置电脑音量
                            self.volume.SetMasterVolumeLevel(vol, None)
6.显示矩形
cv2.putText函数来在图像上显示矩形框的百分比值;
cv2.rectangle函数来绘制矩形框并填充颜色;
cv2.putText函数来在图像上显示当前帧的刷新率FPS;
cv2.imshow函数来显示处理后的图像;
cv2.waitKey函数等待按键输入,当按下ESC键或关闭窗口时退出程序;
HandControlVolume类的recognize方法调用了手势识别的功能。
# 显示矩形
                cv2.putText(image, str(math.ceil(rect_percent_text)) + "%", (10, 350),
                            cv2.FONT_HERSHEY_PLAIN, 3, (255, 0, 0), 3)
                image = cv2.rectangle(image, (30, 100), (70, 300), (255, 0, 0), 3)
                image = cv2.rectangle(image, (30, math.ceil(300 - rect_height)), (70, 300), (255, 0, 0), -1)

                # 显示刷新率FPS
                cTime = time.time()
                fps_text = 1 / (cTime - fpsTime)
                fpsTime = cTime
                cv2.putText(image, "FPS: " + str(int(fps_text)), (10, 70),
                            cv2.FONT_HERSHEY_PLAIN, 3, (255, 0, 0), 3)
                # 显示画面
                cv2.imshow('MediaPipe Hands', image)
                if cv2.waitKey(5) & 0xFF == 27 or cv2.getWindowProperty('MediaPipe Hands', cv2.WND_PROP_VISIBLE) < 1:
                    break
            cap.release()


# 开始程序
control = HandControlVolume()
control.recognize()
五、实战演示
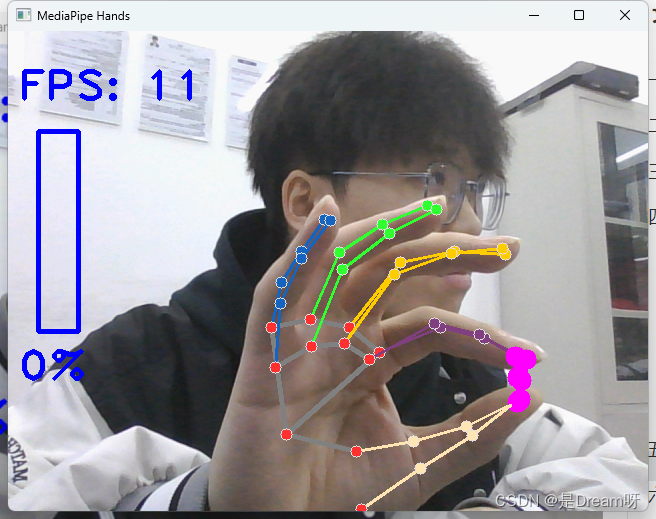

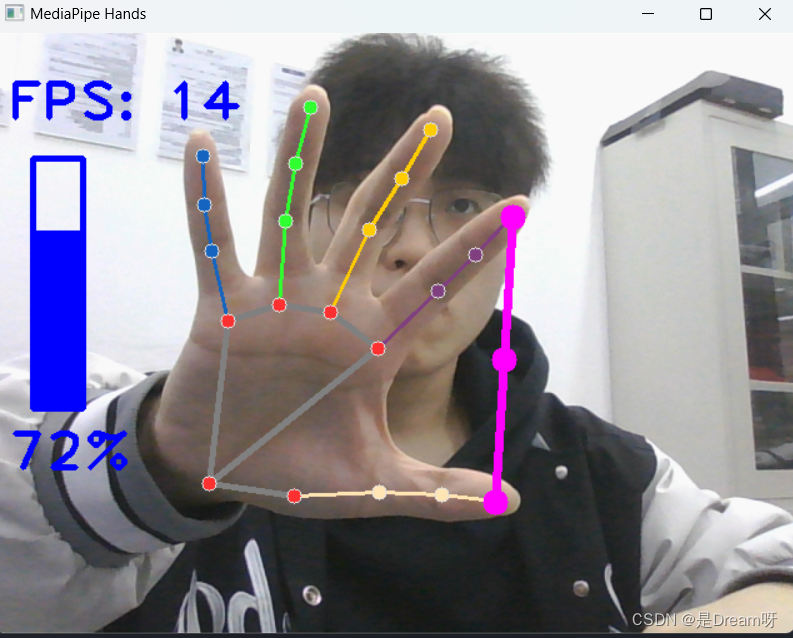
通过演示我们可以发现,食指与大拇指之间在屏幕中的的距离越远,那么我们的音量会越大,反之越小,实现了通过手势对音量的控制。
六、源码分享
import cv2
import mediapipe as mp
from ctypes import cast, POINTER
from comtypes import CLSCTX_ALL
from pycaw.pycaw import AudioUtilities, IAudioEndpointVolume
import time
import math
import numpy as np


class HandControlVolume:
    def __init__(self):
        # 初始化medialpipe
        self.mp_drawing = mp.solutions.drawing_utils
        self.mp_drawing_styles = mp.solutions.drawing_styles
        self.mp_hands = mp.solutions.hands

        # 获取电脑音量范围
        devices = AudioUtilities.GetSpeakers()
        interface = devices.Activate(
            IAudioEndpointVolume._iid_, CLSCTX_ALL, None)
        self.volume = cast(interface, POINTER(IAudioEndpointVolume))
        self.volume.SetMute(0, None)
        self.volume_range = self.volume.GetVolumeRange()

    # 主函数
    def recognize(self):
        # 计算刷新率
        fpsTime = time.time()

        # OpenCV读取视频流
        cap = cv2.VideoCapture(0)
        # 视频分辨率
        resize_w = 640
        resize_h = 480

        # 画面显示初始化参数
        rect_height = 0
        rect_percent_text = 0

        with self.mp_hands.Hands(min_detection_confidence=0.7,
                                 min_tracking_confidence=0.5,
                                 max_num_hands=2) as hands:
            while cap.isOpened():
                success, image = cap.read()
                image = cv2.resize(image, (resize_w, resize_h))

                if not success:
                    print("空帧.")
                    continue

                # 提高性能
                image.flags.writeable = False
                # 转为RGB
                image = cv2.cvtColor(image, cv2.COLOR_BGR2RGB)
                # 镜像
                image = cv2.flip(image, 1)
                # mediapipe模型处理
                results = hands.process(image)

                image.flags.writeable = True
                image = cv2.cvtColor(image, cv2.COLOR_RGB2BGR)
                # 判断是否有手掌
                if results.multi_hand_landmarks:
                    # 遍历每个手掌
                    for hand_landmarks in results.multi_hand_landmarks:
                        # 在画面标注手指
                        self.mp_drawing.draw_landmarks(
                            image,
                            hand_landmarks,
                            self.mp_hands.HAND_CONNECTIONS,
                            self.mp_drawing_styles.get_default_hand_landmarks_style(),
                            self.mp_drawing_styles.get_default_hand_connections_style())

                        # 解析手指,存入各个手指坐标
                        landmark_list = []
                        for landmark_id, finger_axis in enumerate(
                                hand_landmarks.landmark):
                            landmark_list.append([
                                landmark_id, finger_axis.x, finger_axis.y,
                                finger_axis.z
                            ])
                        if landmark_list:
                            # 获取大拇指指尖坐标
                            thumb_finger_tip = landmark_list[4]
                            thumb_finger_tip_x = math.ceil(thumb_finger_tip[1] * resize_w)
                            thumb_finger_tip_y = math.ceil(thumb_finger_tip[2] * resize_h)
                            # 获取食指指尖坐标
                            index_finger_tip = landmark_list[8]
                            index_finger_tip_x = math.ceil(index_finger_tip[1] * resize_w)
                            index_finger_tip_y = math.ceil(index_finger_tip[2] * resize_h)
                            # 中间点
                            finger_middle_point = (thumb_finger_tip_x + index_finger_tip_x) // 2, (
                                    thumb_finger_tip_y + index_finger_tip_y) // 2
                            # print(thumb_finger_tip_x)
                            thumb_finger_point = (thumb_finger_tip_x, thumb_finger_tip_y)
                            index_finger_point = (index_finger_tip_x, index_finger_tip_y)
                            # 画指尖2点
                            image = cv2.circle(image, thumb_finger_point, 10, (255, 0, 255), -1)
                            image = cv2.circle(image, index_finger_point, 10, (255, 0, 255), -1)
                            image = cv2.circle(image, finger_middle_point, 10, (255, 0, 255), -1)
                            # 画2点连线
                            image = cv2.line(image, thumb_finger_point, index_finger_point, (255, 0, 255), 5)
                            # 勾股定理计算长度
                            line_len = math.hypot((index_finger_tip_x - thumb_finger_tip_x),
                                                  (index_finger_tip_y - thumb_finger_tip_y))

                            # 获取电脑最大最小音量
                            min_volume = self.volume_range[0]
                            max_volume = self.volume_range[1]
                            # 将指尖长度映射到音量上
                            vol = np.interp(line_len, [50, 300], [min_volume, max_volume])
                            # 将指尖长度映射到矩形显示上
                            rect_height = np.interp(line_len, [50, 300], [0, 200])
                            rect_percent_text = np.interp(line_len, [50, 300], [0, 100])

                            # 设置电脑音量
                            self.volume.SetMasterVolumeLevel(vol, None)

                # 显示矩形
                cv2.putText(image, str(math.ceil(rect_percent_text)) + "%", (10, 350),
                            cv2.FONT_HERSHEY_PLAIN, 3, (255, 0, 0), 3)
                image = cv2.rectangle(image, (30, 100), (70, 300), (255, 0, 0), 3)
                image = cv2.rectangle(image, (30, math.ceil(300 - rect_height)), (70, 300), (255, 0, 0), -1)

                # 显示刷新率FPS
                cTime = time.time()
                fps_text = 1 / (cTime - fpsTime)
                fpsTime = cTime
                cv2.putText(image, "FPS: " + str(int(fps_text)), (10, 70),
                            cv2.FONT_HERSHEY_PLAIN, 3, (255, 0, 0), 3)
                # 显示画面
                cv2.imshow('xyp', image)
                if cv2.waitKey(5) & 0xFF == 27 or cv2.getWindowProperty('MediaPipe Hands', cv2.WND_PROP_VISIBLE) < 1:
                    break
            cap.release()
control = HandControlVolume()
control.recognize()