第二十五章: 图像查找、图像拼接
当我们找到了两张图像的特征点,又把特征点都匹配上了后,我们就可以进行图像查找、图像拼接等工作了。
图像查找就是查找图像A在图像B的哪里,查找到后就可以直接替换了,就达到抠图的效果了。
图像拼接就是根据两张图像的匹配到的特征点拼接到一起,形成一个全景图像。
本章用两个案例来说明实现流程。
但是,不管是图像查找还是图像拼接,都需要用到单应性矩阵,所以要提前说明一下这个矩阵。其实这个矩阵就是我们第五章几何变换中的透视变换矩阵,建议先去第五章认真看一下透视变换。
-
直观上再理解一下什么是单应性矩阵
看下图,假设现在有两个相机,就是下图左上和右上的两个点,从这两个点对下面的图像拍照。先看X点,左相机拍到的X点对应在image1的x, 右相机拍到的X点对应在image2的x'点。所以相同平面上的一个点,两个相机的角度不一样,这个平面上的点在照片上映射的点的位置就不一样。
那如何将对应的点都一一对应起来?用单应性矩阵,下图中的H就是单应性矩阵。image1上的点和H运算就得到image2上对应点的位置,同理,image1和H运算可以得到对应点的实景位置,image2和H运算也可以得到对应点的实景位置。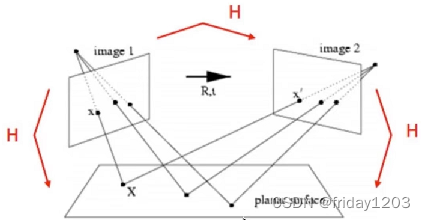
注意,我这里说的拍摄实景是一个二维平面,这里只涉及二维平面到二维平面的映射。如果拍摄实景是三维立体的,就不是这么简单的一一对应了,还会有一些比如相机的中心点,三维实景的深度等细节,图形学中有这部分知识点,这里不讲。 -
单应性矩阵的作用?
1、调整图像角度
如下图所示,当我们拍摄信用卡的时候,是斜着拍的,要提取信用卡上的卡号,那就得先把斜着的照片转正,这样才能很好的提取数字。单应性矩阵就可以起到转正的作用。
2、局部替换
左图是一个广告牌,我们想更换广告牌里面的内容,比如右图,让广告牌的内容变成右图。此时就要用到单应性矩阵,通过映射变换我们可以将自己喜欢的广告打到广告牌中,就不用手工抠图了。
-
API
在opencv中,单应性矩阵的获取有专门的api,我们只要把原始图片image1和目的图片image2当作参数传入api中,就可以获取这个矩阵了。
H,_ = cv2.findHomography(scrPts, dstPts, cv2.RANSAC, 5.0)
srcPts = np.float32([kp_template[m.queryIdx].pt for m in good]).reshape(-1,1,2)
dstPts = np.float32([kp_orig[m.trainIdx].pt for m in good]).reshape(-1,1,2)
good是一个列表,列表里面的元素是flann匹配后的matchs对象,这个对象也就是good里面的元素,包括三个属性,queryIdx、trainIdx、distance三个属性
我们先把good里面的对象逐个拿出,就是m
然后再找m的queryIdx属性,返回的就是模板图像的特征点的索引值, 然后我们用这个索引值索引模板图像的特征点对象kp_template[m.queryIdx]
模板图像的特征点对象有一个.pt属性,就返回特征点在模板图的x,y坐标
然后,我们再把这个x,y坐标reshape(-1,1,2),得到的模板图的特征点集合,把这个集合当作参数scrPts传入单应性矩阵生成api
dstPts同理。 -
#例25.1 图像查找案例
import cv2
import numpy as np
import matplotlib.pyplot as plt

img_template = cv2.imread(r'C:\Users\25584\Desktop\opencv_search.png')   #模板  (120, 70, 3)
img_template_gray = cv2.cvtColor(img_template, cv2.COLOR_BGR2GRAY)
img_orig = cv2.imread(r'C:\Users\25584\Desktop\opencv_orig.png')  #原图  (600, 868, 3)
img_orig_gray = cv2.cvtColor(img_orig, cv2.COLOR_BGR2GRAY)

sift = cv2.xfeatures2d.SIFT_create()    #创建特征检测器SIFT
kp_template, des_template = sift.detectAndCompute(img_template_gray, None)        #进行检测
kp_orig, des_orig = sift.detectAndCompute(img_orig_gray, None)

flann = cv2.FlannBasedMatcher(dict(algorithm=1, trees=5), dict(checks=50))       #创建匹配器flann
matchs = flann.knnMatch(des_template, des_orig, 2)  #调用knnMatch方法进行匹配,这里参数k设为2,

good = []   #对匹配的点进行一个过滤
for i, (m,n) in enumerate(matchs):
    if m.distance < 0.7 * n.distance:
        good.append(m)


#------通过获取的匹配点,去查找单应性矩阵,然后通过单应性矩阵的透视变换找到想找的图像------------
if len(good) >= 4:
    srcPts = np.float32([kp_template[m.queryIdx].pt for m in good]).reshape(-1,1,2)
    dstPts = np.float32([kp_orig[m.trainIdx].pt for m in good]).reshape(-1,1,2)

    H, _ = cv2.findHomography(srcPts, dstPts, cv2.RANSAC, 5.0)
    h,w = img_template.shape[:2]
    pts = np.float32([[0,0],[0,h-1], [w-1,h-1], [w-1,0]]).reshape(-1,1,2)
    dst = cv2.perspectiveTransform(pts, H)
    img = img_orig.copy()
    cv2.polylines(img, [np.int32(dst)], True, (0,0,255))

else:
    print('the number of good is less than 4.')
    exit()

img_matchs = cv2.drawMatchesKnn(img_template, kp_template, img_orig, kp_orig, [good], outImg=img)

#---------------可视化----------------------------------
Fig=plt.figure(figsize=(16,14))
Grid=plt.GridSpec(3,8)
axes1=Fig.add_subplot(Grid[1,0]), plt.imshow(img_template[:,:,::-1]), plt.box(), plt.xticks([]), plt.yticks([]), plt.title('template')
axes2=Fig.add_subplot(Grid[0:4,1:3]), plt.imshow(img_orig[:,:,::-1]), plt.box(), plt.xticks([]), plt.yticks([]), plt.title('orig img')
axes3=Fig.add_subplot(Grid[0:4,3:6]), plt.imshow(img_matchs[:,:,::-1]), plt.box(), plt.xticks([]), plt.yticks([]), plt.title('match img')
axes4=Fig.add_subplot(Grid[0:4,6:8]), plt.imshow(img[:,:,::-1]), plt.box(), plt.xticks([]), plt.yticks([]), plt.title('search img')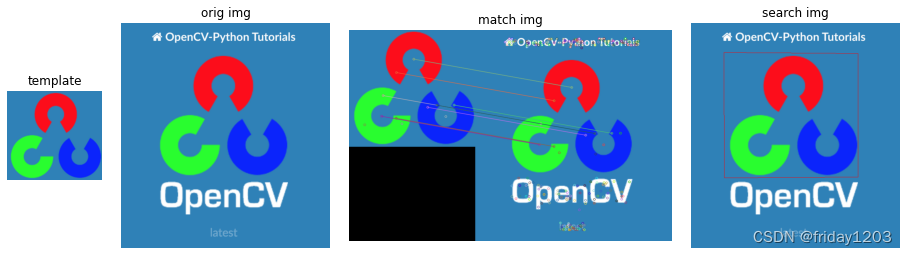

((<DMatch 0000022FEA3EAFD0>, <DMatch 0000022FEA8B0210>),
 (<DMatch 0000022FEAA37530>, <DMatch 0000022FEAA37430>),
 (<DMatch 0000022FEAA371B0>, <DMatch 0000022FEAA373D0>),
 (<DMatch 0000022FEAA4CD50>, <DMatch 0000022FEAA4CDD0>),
 (<DMatch 0000022FEAA4CE50>, <DMatch 0000022FEAA4CDB0>),
 (<DMatch 0000022FEAA4CD10>, <DMatch 0000022FEAA4CD30>),
 (<DMatch 0000022FEAA4C470>, <DMatch 0000022FEAA4CE10>),
 (<DMatch 0000022FEAA4CFB0>, <DMatch 0000022FEAA4CF90>),
 (<DMatch 0000022FEAA4CCF0>, <DMatch 0000022FEAA4CE30>),
 (<DMatch 0000022FEAA4CED0>, <DMatch 0000022FEAA4CD70>),
 (<DMatch 0000022FEAA4CDF0>, <DMatch 0000022FEAA4CF70>),
 (<DMatch 0000022FEAA4CF30>, <DMatch 0000022FEAA4CEF0>),
 (<DMatch 0000022FEAA4CE90>, <DMatch 0000022FEAA4CEB0>),
 (<DMatch 0000022FEAA4CF10>, <DMatch 0000022FEAA4CE70>),
 (<DMatch 0000022FEAA4CF50>, <DMatch 0000022FEA423030>),
 (<DMatch 0000022FEA423050>, <DMatch 0000022FEA423070>),
 (<DMatch 0000022FEA423090>, <DMatch 0000022FEA4230B0>),
 (<DMatch 0000022FEA4230D0>, <DMatch 0000022FEA4230F0>))