欢迎关注我的CSDN:https://spike.blog.csdn.net/
本文地址:https://spike.blog.csdn.net/article/details/134463035
在配置算法项目时,因网络下载速度的原因,导致默认的 conda 与 pytorch 包安装缓慢,需要配置新的 conda 与 pip 源,以及下载安装 pytorch 环境。
1. 配置 conda 与 pip 源
配置 conda 清华源,vim ~/.condarc 添加:
channels:
  - defaults
show_channel_urls: true
default_channels:
  - https://mirrors.tuna.tsinghua.edu.cn/anaconda/pkgs/main
  - https://mirrors.tuna.tsinghua.edu.cn/anaconda/pkgs/r
  - https://mirrors.tuna.tsinghua.edu.cn/anaconda/pkgs/msys2
custom_channels:
  conda-forge: https://mirrors.tuna.tsinghua.edu.cn/anaconda/cloud
  msys2: https://mirrors.tuna.tsinghua.edu.cn/anaconda/cloud
  bioconda: https://mirrors.tuna.tsinghua.edu.cn/anaconda/cloud
  menpo: https://mirrors.tuna.tsinghua.edu.cn/anaconda/cloud
  pytorch: https://mirrors.tuna.tsinghua.edu.cn/anaconda/cloud
  simpleitk: https://mirrors.tuna.tsinghua.edu.cn/anaconda/cloud
channel_priority: disabled
allow_conda_downgrades: true
配置 pip 阿里云源,先删除其他 pip 配置,再配置新的 pip 源,即:
rm /opt/conda/pip.conf
rm /root/.config/pip/pip.conf
vim ~/.pip/pip.conf
配置 pip 源包括 阿里云(aliyun) 与 Nvidia,如下:
[global]
no-cache-dir = true
index-url = http://mirrors.aliyun.com/pypi/simple/
extra-index-url = https://pypi.ngc.nvidia.com
trusted-host = mirrors.aliyun.com pypi.ngc.nvidia.com
2. PyTorch
安装 conda 环境,初始化 conda和更新 conda,再创建特定的 conda 环境,即:
conda init bash
source ~/.bashrc
conda update -n base -c conda-forge conda
conda env list
conda create -y -n [your name] python=3.9
需要注意,尽量指定 python 版本。
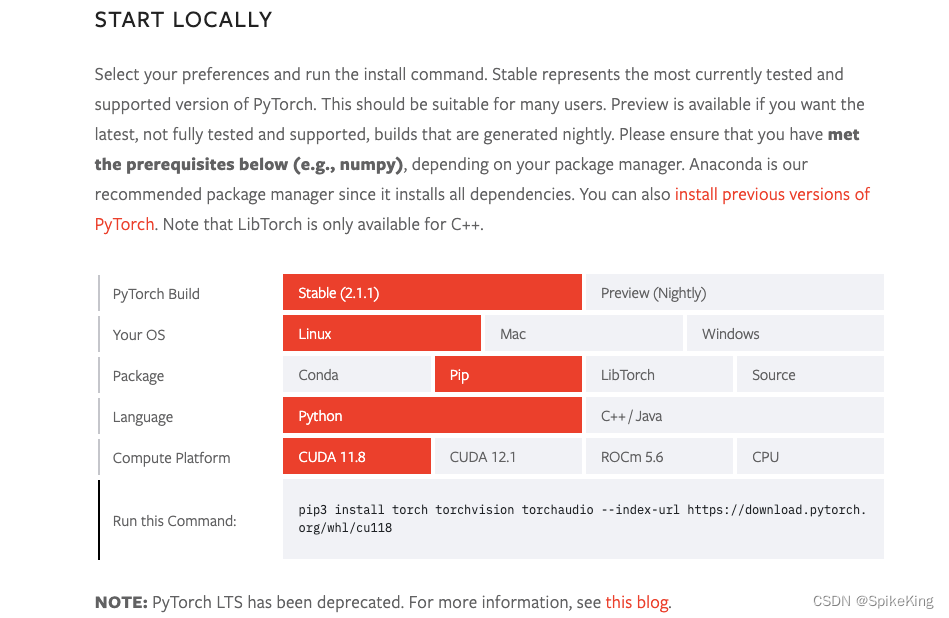
PyTorch 安装官网:https://pytorch.org/get-started/locally/,之前版本的路径:https://pytorch.org/get-started/previous-versions/
主要包括 2 个版本:最新的 2.+,之前的1.31+版本。根据网络条件,选择不同的安装方式,需要注意的是:
- conda 安装,需要 nvidia 源,目前没有比较快速的 nvidia 源,
- 可选:
nvidia: https://mirrors.sustech.edu.cn/anaconda-extra/cloud/nvidia/,测试速度一般 - 参考:GitHub - 重新考虑增加 anaconda 的 nvidia channel
- 可选:
- pip 安装,来源于 https://download.pytorch.org/whl/
- 下载速度因网络而异,忽快忽慢,经常中断。
- 建议直接下载之后安装。
可以根据具体的安装命令选择下载的包,例如:

pip install torch==1.13.1+cu117 torchvision==0.14.1+cu117 torchaudio==0.13.1 --extra-index-url https://download.pytorch.org/whl/cu117
需要注意:
- 选择正确的 cuda 版本,如 cu117。
- 选择正确的 python 版本,这个与创建 conda 环境相关,也可以进入 python 命令查看。
- 选择正确的环境,例如 linux_x86_64,是一般服务器的环境。
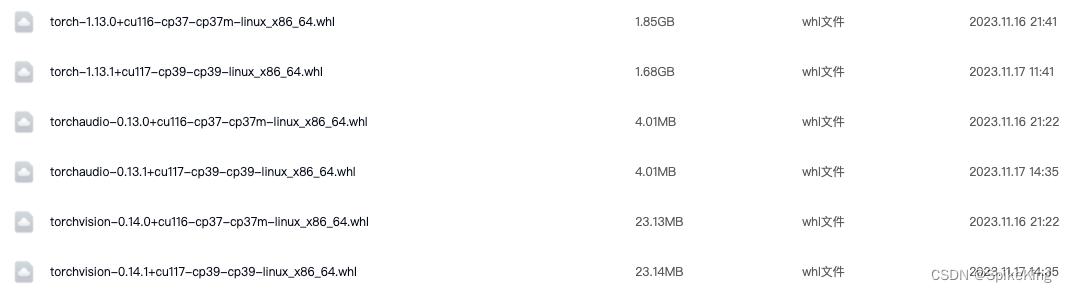
例如下载地址 https://download.pytorch.org/whl/,则需要下载的包:
pip install torch-1.13.1+cu117-cp39-cp39-linux_x86_64.whl
pip install torchvision-0.14.1+cu117-cp39-cp39-linux_x86_64.whl
pip install torchaudio-0.13.1+cu117-cp39-cp39-linux_x86_64.whl
可以上传至百度网盘,使用 bypy 包下载到服务器,使用 pip 进行安装,注意安装顺序是torch、torchvision、torchaudio,其他包默认安装,即可。
需要注意的是,如果遇到 segment fault ,参考 蛋白质结构预测 ESMFold 算法的工程配置:
import torch
segment fault(core dumped) # 报错
则使用 unset LD_LIBRARY_PATH,即可,并且在文件 .bashrc、 .profile、 /etc/profile中查看,是否清除。
cat ~/.bashrc | grep LD_LIBRARY_PATH
cat ~/.profile | grep LD_LIBRARY_PATH
cat /etc/profile | grep LD_LIBRARY_PATH
PyTorch 的简易测试命令:
python

import torch
print(torch.__version__)  # 1.13.1
print(torch.cuda.is_available())  # True
exit()