目录
step7:在ambari-hadoop1节点上安装mysql5.7
step7: Assign Slaves and Client
所需安装包下载地址:
链接:https://pan.baidu.com/s/1_97GbKRw_fxoGyOMDHeVag
提取码:chjr
安装环境经典3节点,均为虚拟机的centos7,需要设置为静态IP

节点服务器基础配置
step1:更改各节点主机名
(三节点都执行,设置各自节点主机名)
hostnamectl set-hostname ambari-hadoop1
hostnamectl set-hostname ambari-hadoop2
hostnamectl set-hostname ambari-hadoop3
step2:更改hosts文件
(三节点都执行)
vim /etc/hosts
step3:关闭防火墙
(三节点均执行)
# 关闭防火墙
systemctl stop firewalld
# 查看防火墙状态
systemctl status firewalld
#设置开机关闭防火墙服务
systemctl disable firewalld
step4:禁用selinux
(三节点均执行)
# 永久性关闭selinux(重启服务器生效)
vim /etc/selinux/config
# 查看selinux状态
getenforce
# disabled为永久关闭,permissive为临时关闭,enforcing为开启
编辑config文件内容如下:

step5:配置免密登录
(三节点均需要)
#生成密钥一路回车
ssh-keygen -t rsa
#分发密钥
ssh-copy-id 192.168.10.101
ssh-copy-id 192.168.10.102
ssh-copy-id 192.168.10.103
验证免密登录是否成功,各节点间相互ssh

step6:配置各节点JDK
三节点均执行
#各个节点创建该目录
mkdir /usr/java

#将jdk压缩包上传至ambari-hadoop1的/usr/java目录下
#将压缩包分发各个节点
scp ./jdk-8u371-linux-x64.tar.gz ambari-hadoop2:/usr/java/
scp ./jdk-8u371-linux-x64.tar.gz ambari-hadoop3:/usr/java/
#各个节点执行解压缩命令
tar -zxvf jdk-8u371-linux-x64.tar.gz
配置jdk环境变量
# 编辑/etc/profile,文末插入以下内容:
# set java
export JAVA_HOME=/usr/java/jdk1.8.0_151
export PATH=$JAVA_HOME/bin:$PATH


#使环境变量生效
source /etc/profile

#安装验证
java -version

step7:在ambari-hadoop1节点上安装mysql5.7
1. 检查本地资源库中是否有mysql的rpm包
rpm -qa | grep mysql
# 删除相关rpm包
rpm -ev <rpm包名> --nodeps
2. 搭建mysql5.7的yum源
# 执行这一步命令,会下载 mysql5.7 的 rpm包
wget https://dev.mysql.com/get/mysql57-community-release-el7-11.noarch.rpm
# 安装第一步下载的rpm文件,安装成功后,会在 /etc/yum.repos.d/ 目录下会增加两个文件
yum -y install mysql57-community-release-el7-11.noarch.rpm
# 查看mysql57的安装源是否可用,如不可用请自行修改配置文件(/etc/yum.repos.d/mysql-community.repo)使mysql57下面的enable=1
# 若有mysql其它版本的安装源可用,也请自行修改配置文件使其enable=0
yum repolist enabled | grep mysql
3. 安装mysql
yum install mysql-community-server启动并设置mysql
#启动mysql服务
[root@ambari-hadoop1 mysql]# service  mysqld start
Redirecting to /bin/systemctl start mysqld.service
#查看mysql服务状态
[root@ambari-hadoop1 mysql]# service  mysqld status
Redirecting to /bin/systemctl status mysqld.service
● mysqld.service - MySQL Server
   Loaded: loaded (/usr/lib/systemd/system/mysqld.service; enabled; vendor preset: disabled)
   Active: active (running) since 二 2023-11-14 10:33:43 CST; 4s ago
     Docs: man:mysqld(8)
           http://dev.mysql.com/doc/refman/en/using-systemd.html
  Process: 2108 ExecStart=/usr/sbin/mysqld --daemonize --pid-file=/var/run/mysqld/mysqld.pid $MYSQLD_OPTS (code=exited, status=0/SUCCESS)
  Process: 2059 ExecStartPre=/usr/bin/mysqld_pre_systemd (code=exited, status=0/SUCCESS)
 Main PID: 2111 (mysqld)
   CGroup: /system.slice/mysqld.service
           └─2111 /usr/sbin/mysqld --daemonize --pid-file=/var/run/mysqld/mysqld.pid

11月 14 10:33:35 ambari-hadoop1 systemd[1]: Starting MySQL Server...
11月 14 10:33:43 ambari-hadoop1 systemd[1]: Started MySQL Server.
#设置mysql服务开机自启
[root@ambari-hadoop1 mysql]# service  mysqld enable
The service command supports only basic LSB actions (start, stop, restart, try-restart, reload, force-reload, status). For other actions, please try to use systemctl.
#设置mysql服务开机自启
[root@ambari-hadoop1 mysql]# systemctl enable mysqld
#获取root密码
[root@ambari-hadoop1 mysql]# cat /var/log/mysqld.log | grep password
2023-11-14T02:33:39.830185Z 1 [Note] A temporary password is generated for root@localhost: qsPnEu*ei3Vc
#登录mysql
[root@ambari-hadoop1 mysql]# mysql -uroot -pqsPnEu*ei3Vc
mysql: [Warning] Using a password on the command line interface can be insecure.
Welcome to the MySQL monitor.  Commands end with ; or \g.
Your MySQL connection id is 2
Server version: 5.7.29

Copyright (c) 2000, 2020, Oracle and/or its affiliates. All rights reserved.

Oracle is a registered trademark of Oracle Corporation and/or its
affiliates. Other names may be trademarks of their respective
owners.

Type 'help;' or '\h' for help. Type '\c' to clear the current input statement.
#设置稍简单密码
mysql> set password=password("Wangt@123");
Query OK, 0 rows affected, 1 warning (0.00 sec)
#降低密码强度要求
mysql> set global validate_password_length=4;
Query OK, 0 rows affected (0.00 sec)
#降低密码强度要求
mysql> set global validate_password_policy=0;
Query OK, 0 rows affected (0.00 sec)
#设置root的简单密码
mysql>  set password=password("123456");
Query OK, 0 rows affected, 1 warning (0.00 sec)
#切换至mysql库
mysql> use mysql
Reading table information for completion of table and column names
You can turn off this feature to get a quicker startup with -A

Database changed
#设置root账号可以从任意IP地址登录
mysql> update user set host="%" where user="root";
Query OK, 1 row affected (0.00 sec)
Rows matched: 1  Changed: 1  Warnings: 0
#刷新配置
mysql> flush privileges;
Query OK, 0 rows affected (0.00 sec)
#离开mysql
mysql> quit;
Bye
#查看mysql版本
[root@ambari-hadoop1 mysql]# mysql -V
mysql  Ver 14.14 Distrib 5.7.29, for Linux (x86_64) using  EditLine wrapper
step8:创建ambari用户并设置权限
[root@ambari-hadoop1 mysql]# mysql -uroot -p123456
mysql: [Warning] Using a password on the command line interface can be insecure.
Welcome to the MySQL monitor.  Commands end with ; or \g.
Your MySQL connection id is 3
Server version: 5.7.29 MySQL Community Server (GPL)

Copyright (c) 2000, 2020, Oracle and/or its affiliates. All rights reserved.

Oracle is a registered trademark of Oracle Corporation and/or its
affiliates. Other names may be trademarks of their respective
owners.

Type 'help;' or '\h' for help. Type '\c' to clear the current input statement.
#创建名为 'ambari' 的用户,限定只能从本地主机连接,并设置密码为 'ambari'
mysql> CREATE USER 'ambari'@'localhost' IDENTIFIED BY 'ambari';
Query OK, 0 rows affected (0.00 sec)
#为 'ambari' 用户在本地主机授予所有数据库的全部权限
mysql> GRANT ALL PRIVILEGES ON *.* TO 'ambari'@'localhost';
Query OK, 0 rows affected (0.00 sec)
#创建名为 'ambari' 的用户,允许从任何主机连接,并设置密码为 'ambari'
mysql> CREATE USER 'ambari'@'%' IDENTIFIED BY 'ambari';
Query OK, 0 rows affected (0.00 sec)
#为 'ambari' 用户在任何主机授予所有数据库的全部权限
mysql> GRANT ALL PRIVILEGES ON *.* TO 'ambari'@'%';
Query OK, 0 rows affected (0.00 sec)
#刷新配置
mysql> FLUSH PRIVILEGES;
Query OK, 0 rows affected (0.00 sec)
使用ambari用户创建ambari数据库
[root@ambari-hadoop1 mysql]# mysql -uambari -pambari
mysql: [Warning] Using a password on the command line interface can be insecure.
Welcome to the MySQL monitor.  Commands end with ; or \g.
Your MySQL connection id is 4
Server version: 5.7.29 MySQL Community Server (GPL)

Copyright (c) 2000, 2020, Oracle and/or its affiliates. All rights reserved.

Oracle is a registered trademark of Oracle Corporation and/or its
affiliates. Other names may be trademarks of their respective
owners.

Type 'help;' or '\h' for help. Type '\c' to clear the current input statement.
#创建使用utf-8编码名为ambari的数据库
mysql> CREATE DATABASE ambari character set utf8 collate utf8_general_ci;
Query OK, 1 row affected (0.00 sec)

mysql> quit
Bye
[root@ambari-hadoop1 mysql]#
step8:三节点之间设置时钟同步
三节点上均执行ntp安装命令:yum -y install ntp
修改ambari-hadoop1节点上的/etc/ntp.conf配置文件
# For more information about this file, see the man pages
# ntp.conf(5), ntp_acc(5), ntp_auth(5), ntp_clock(5), ntp_misc(5), ntp_mon(5).

driftfile /var/lib/ntp/drift

# Permit time synchronization with our time source, but do not
# permit the source to query or modify the service on this system.

#nomodify: 禁止对本地系统进行时间修改。这确保了NTP服务器不能通过NTP协议更改本地系统的时间
#notrap: 阻止通过ntpdc工具的控制命令,以及通过ntpdc和ntpq工具的monlist查询命令
#授权所有192.168.10.101~192.168.10.255网段上的所有机器可以从这台机器上查询和同步时间
restrict 192.168.10.101 mask 255.255.255.0 nomodify notrap

# Permit all access over the loopback interface.  This could
# be tightened as well, but to do so would effect some of
# the administrative functions.
#这一行表示允许来自本地回环接口(loopback interface)的访问。
restrict 127.0.0.1
#这一行是 IPv6 地址的配置,它表示允许来自 IPv6 的本地回环接口的访问
restrict ::1

# Hosts on local network are less restricted.
#restrict 192.168.1.0 mask 255.255.255.0 nomodify notrap

# Use public servers from the pool.ntp.org project.
# Please consider joining the pool (http://www.pool.ntp.org/join.html).
#server 0.centos.pool.ntp.org iburst
#server 1.centos.pool.ntp.org iburst
#server 2.centos.pool.ntp.org iburst
#server 3.centos.pool.ntp.org iburst

#127.127.1.1 是 NTP 中的本地时钟源,通常被称为 "local clock"。
#这个地址表示本地系统的内部时钟,NTP 使用这个本地时钟源来保持时间同步,即使没有外部时钟源可用。
#iburst: 表示采用快速初始同步。当 NTP 服务启动时,会尝试快速同步时间
server 127.127.1.1 iburst

#broadcast 192.168.1.255 autokey	# broadcast server
#broadcastclient			# broadcast client
#broadcast 224.0.1.1 autokey		# multicast server
#multicastclient 224.0.1.1		# multicast client
#manycastserver 239.255.254.254		# manycast server
#manycastclient 239.255.254.254 autokey # manycast client

# Enable public key cryptography.
#crypto

includefile /etc/ntp/crypto/pw

# Key file containing the keys and key identifiers used when operating
# with symmetric key cryptography.
keys /etc/ntp/keys

# Specify the key identifiers which are trusted.
#trustedkey 4 8 42

# Specify the key identifier to use with the ntpdc utility.
#requestkey 8

# Specify the key identifier to use with the ntpq utility.
#controlkey 8

# Enable writing of statistics records.
#statistics clockstats cryptostats loopstats peerstats

# Disable the monitoring facility to prevent amplification attacks using ntpdc
# monlist command when default restrict does not include the noquery flag. See
# CVE-2013-5211 for more details.
# Note: Monitoring will not be disabled with the limited restriction flag.
disable monitor
修改ambari-hadoop2、ambari-hadoop3上的/etc/ntp.conf配置文件
# For more information about this file, see the man pages
# ntp.conf(5), ntp_acc(5), ntp_auth(5), ntp_clock(5), ntp_misc(5), ntp_mon(5).

driftfile /var/lib/ntp/drift

# Permit time synchronization with our time source, but do not
# permit the source to query or modify the service on this system.
restrict 192.168.10.101  nomodify notrap  noquery

# Permit all access over the loopback interface.  This could
# be tightened as well, but to do so would effect some of
# the administrative functions.
restrict 127.0.0.1
restrict ::1

# Hosts on local network are less restricted.
#restrict 192.168.1.0 mask 255.255.255.0 nomodify notrap

# Use public servers from the pool.ntp.org project.
# Please consider joining the pool (http://www.pool.ntp.org/join.html).
#server 0.centos.pool.ntp.org iburst
#server 1.centos.pool.ntp.org iburst
#server 2.centos.pool.ntp.org iburst
#server 3.centos.pool.ntp.org iburst

server 192.168.10.101 iburst
#broadcast 192.168.1.255 autokey	# broadcast server
#broadcastclient			# broadcast client
#broadcast 224.0.1.1 autokey		# multicast server
#multicastclient 224.0.1.1		# multicast client
#manycastserver 239.255.254.254		# manycast server
#manycastclient 239.255.254.254 autokey # manycast client

# Enable public key cryptography.
#crypto

includefile /etc/ntp/crypto/pw

# Key file containing the keys and key identifiers used when operating
# with symmetric key cryptography.
keys /etc/ntp/keys

# Specify the key identifiers which are trusted.
#trustedkey 4 8 42

# Specify the key identifier to use with the ntpdc utility.
#requestkey 8

# Specify the key identifier to use with the ntpq utility.
#controlkey 8

# Enable writing of statistics records.
#statistics clockstats cryptostats loopstats peerstats

# Disable the monitoring facility to prevent amplification attacks using ntpdc
# monlist command when default restrict does not include the noquery flag. See
# CVE-2013-5211 for more details.
# Note: Monitoring will not be disabled with the limited restriction flag.
disable monitor
每个节点上均执行ntp服务启动和自启命令
[root@ambari-hadoop1 etc]# service ntpd start
Redirecting to /bin/systemctl start ntpd.service
[root@ambari-hadoop1 etc]# service ntpd status
Redirecting to /bin/systemctl status ntpd.service
● ntpd.service - Network Time Service
   Loaded: loaded (/usr/lib/systemd/system/ntpd.service; disabled; vendor preset: disabled)
   Active: active (running) since 二 2023-11-14 16:32:59 CST; 4s ago
  Process: 12267 ExecStart=/usr/sbin/ntpd -u ntp:ntp $OPTIONS (code=exited, status=0/SUCCESS)
 Main PID: 12268 (ntpd)
   CGroup: /system.slice/ntpd.service
           └─12268 /usr/sbin/ntpd -u ntp:ntp -g

11月 14 16:32:59 ambari-hadoop1 ntpd[12268]: Listen and drop on 1 v6wildcard :: UDP 123
11月 14 16:32:59 ambari-hadoop1 ntpd[12268]: Listen normally on 2 lo 127.0.0.1 UDP 123
11月 14 16:32:59 ambari-hadoop1 ntpd[12268]: Listen normally on 3 ens33 192.168.10.101 UDP 123
11月 14 16:32:59 ambari-hadoop1 ntpd[12268]: Listen normally on 4 lo ::1 UDP 123
11月 14 16:32:59 ambari-hadoop1 ntpd[12268]: Listen normally on 5 ens33 fe80::9d70:dc84:5...23
11月 14 16:32:59 ambari-hadoop1 ntpd[12268]: Listening on routing socket on fd #22 for in...es
11月 14 16:32:59 ambari-hadoop1 ntpd[12268]: 0.0.0.0 c016 06 restart
11月 14 16:32:59 ambari-hadoop1 ntpd[12268]: 0.0.0.0 c012 02 freq_set kernel 0.000 PPM
11月 14 16:32:59 ambari-hadoop1 ntpd[12268]: 0.0.0.0 c011 01 freq_not_set
11月 14 16:33:00 ambari-hadoop1 ntpd[12268]: 0.0.0.0 c514 04 freq_mode
Hint: Some lines were ellipsized, use -l to show in full.
#设置ntp开机自启
[root@ambari-hadoop1 etc]# systemctl enable ntpd.service
step9:安装httpd和wget服务
ambari-hadoop1节点执行
# 安装httpd
yum -y install httpd.x86_64
systemctl enable httpd.service
systemctl start httpd.service
# 安装wget
yum -y install wget
将以下压缩包上传至/var/www/html
 将上述压缩包全部解压至当前目录

新建ambari.repo文件,将文件放入/etc/yum.repos.d/目录下
[ambari]
name=ambari
baseurl=http://ambari-hadoop1/ambari/centos7/2.7.5.0-72
enabled=1
gpgcheck=0
step10:主节点安装ambari-server
ambari-hadoop1执行
yum -y install ambari-server将mysql-connector-java.jar拷贝到/usr/share/java目录下

修改配置文件
echo server.jdbc.driver.path=/usr/share/java/mysql-connector-java.jar >> /etc/ambari-server/conf/ambari.properties安装ambari-server
ambari-server setup

设置amabri安装驱动设置
ambari-server setup --jdbc-db=mysql --jdbc-driver=/usr/share/java/mysql-connector-java.jar
step11:初始化数据库
[root@ambari-hadoop1 yum.repos.d]# mysql -uambari -pambari
mysql: [Warning] Using a password on the command line interface can be insecure.
Welcome to the MySQL monitor.  Commands end with ; or \g.
Your MySQL connection id is 5
Server version: 5.7.29 MySQL Community Server (GPL)

Copyright (c) 2000, 2020, Oracle and/or its affiliates. All rights reserved.

Oracle is a registered trademark of Oracle Corporation and/or its
affiliates. Other names may be trademarks of their respective
owners.

Type 'help;' or '\h' for help. Type '\c' to clear the current input statement.

mysql> use ambari;
Database changed
mysql> source /var/lib/ambari-server/resources/Ambari-DDL-MySQL-CREATE.sql
启动ambari-server服务
ambari-server start可能遇到的问题
启动失败,查看日志

Caused by: java.sql.SQLException: null, message from server: "Host '192.168.10.101' is blocked because of many connection errors; unblock with 'mysqladmin flush-hosts'"

set global max_connect_errors=1000;调大链接数
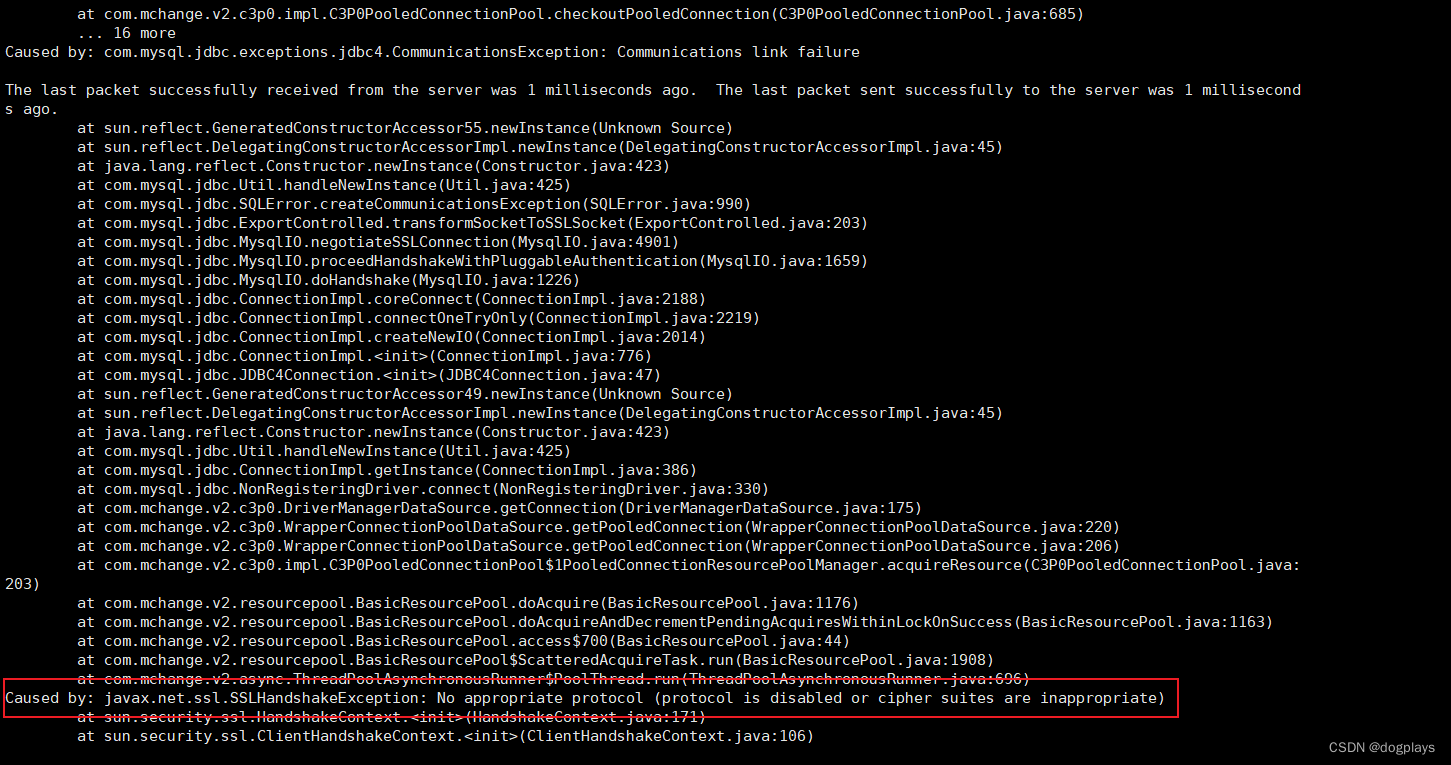
重启还是报错:Caused by: javax.net.ssl.SSLHandshakeException: No appropriate protocol (protocol is disabled or cipher suites are inappropriate)
找到ambari配置文件并进行修改
[root@ambari-hadoop1 etc]# sudo find / -type f -name ambari.properties
/etc/ambari-server/conf/ambari.properties
[root@ambari-hadoop1 etc]# vim /etc/ambari-server/conf/ambari.properties 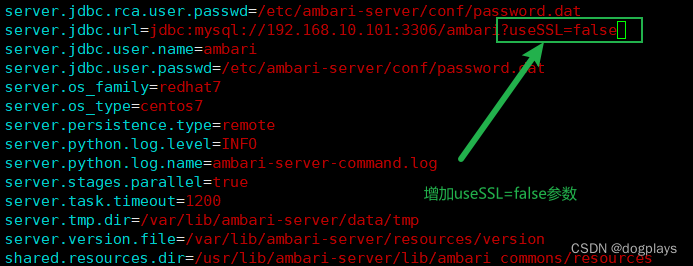 OK,重新启动又遇到新问题Caused by: java.sql.SQLException: Access denied for user 'ambari'@'ambari-hadoop1' (using password: YES)

可能用户密码不正确,找到密码存储位置


重新启动,访问http://ambari-hadoop1:8080/#/login,输入初始账号admin密码admin
 利用ambari web部署HDP

step1:设置集群名称
 step2:select version
步骤由于压缩包版本为HDP-3.1.5
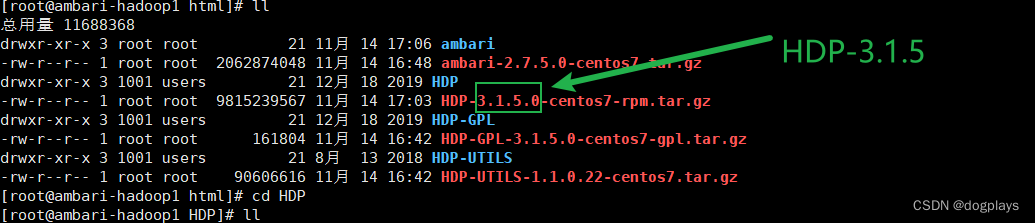 所以需要更改安装版本
 在/var/www/html/HDP/centos7/3.1.5.0-152路径下查找到3.1.5版本的配置文件,将该文件下载到本机windows然后再“选择文件”,将配置文件上传


然后配置HDP、HDP-UTILSB本地源信息

 step3 Install Options

私钥所在位置~/.ssh/id_rsa
 step4: Confirm Hosts

step5 Choose service
这步骤主要选择所需组件进行安装

step6:Assign Masters
规划各个节点所承担的组件服务,由于虚拟机内存有限只能雨露均沾减少压力,大家可根据实际情况自行分配

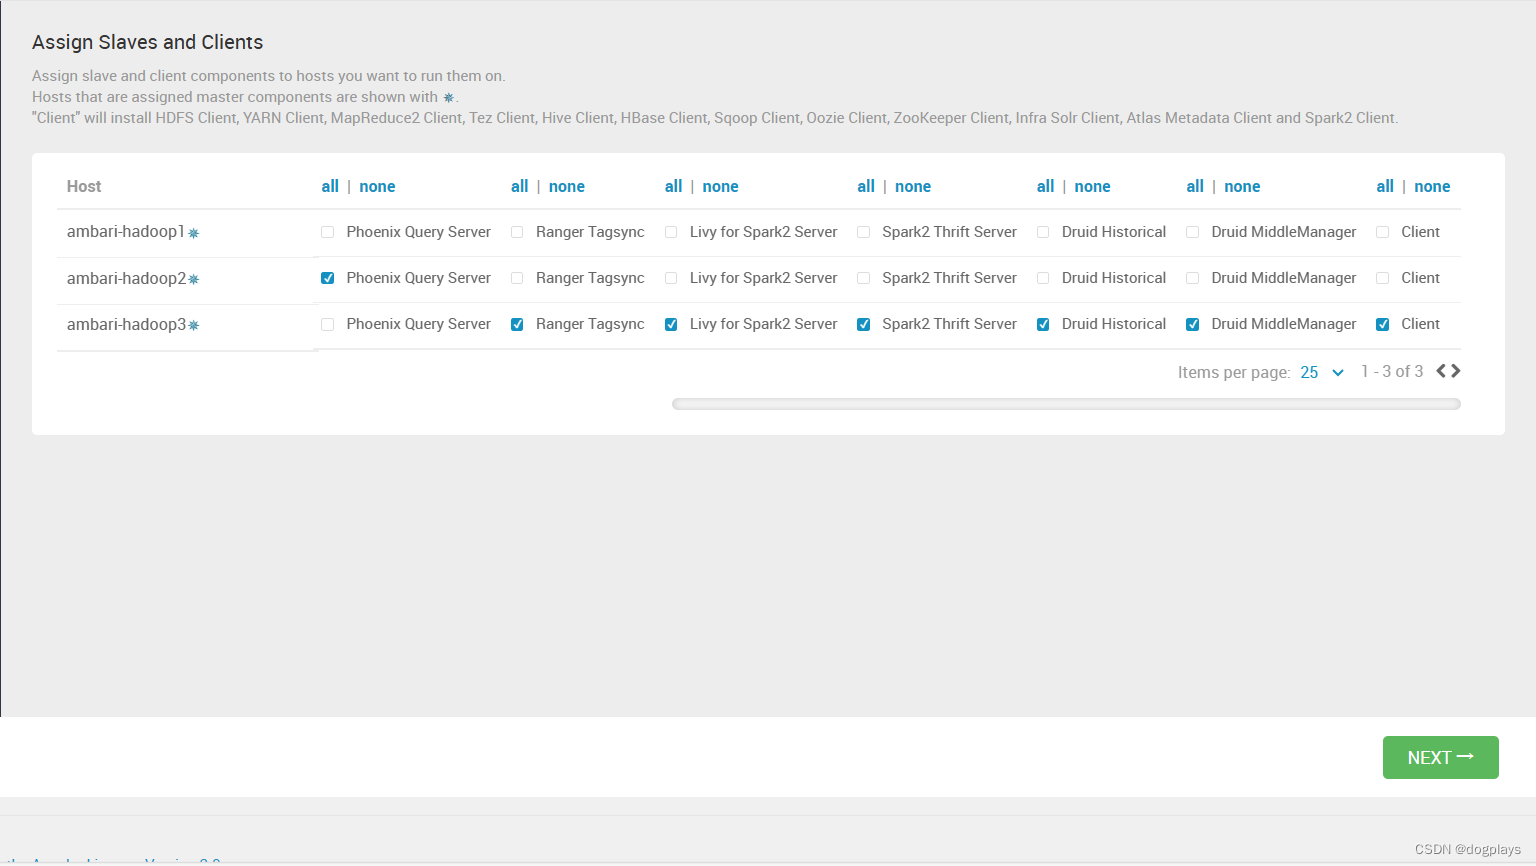
step7: Assign Slaves and Clients
主要用于分配各个组件的从服务和客户端,例如nodemanager(根据实际情况配置)
密码用户自行定义(我这里由于本地环境,简单易记都是12345678)

创建oozie数据库和oozie用户
mysql> CREATE USER 'oozie'@'%' IDENTIFIED BY '123456';
Query OK, 0 rows affected (0.01 sec)

mysql> GRANT ALL PRIVILEGES ON oozie.* TO 'oozie'@'%';
Query OK, 0 rows affected (0.00 sec)

mysql> FLUSH PRIVILEGES;
Query OK, 0 rows affected (0.00 sec)

mysql> CREATE DATABASE oozie character set utf8 collate utf8_general_ci;
配置各组件需要使用的数据库连接信息

superset数据库类型选择mysql

oozie也同样选择mysql数据库类型

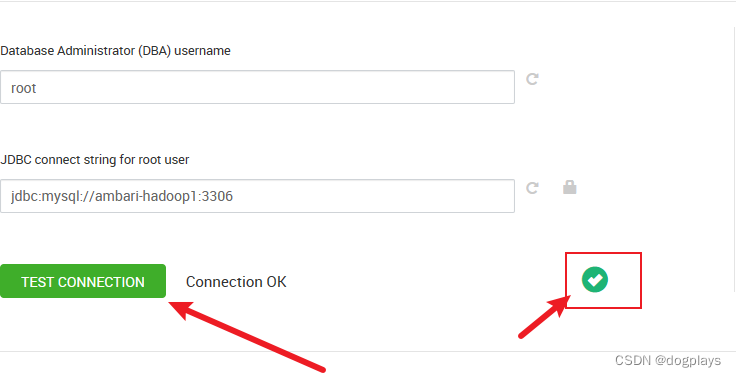
配置完数据库连接信息后,需要点击”TEST CONNECTION“ 按钮测试连接
接下来主要配置各组件一些 数据存放路径(这里我保持不变默认,可自行更改)

下一页面显示一些组件用户信息(这里我同样默认不做修改)
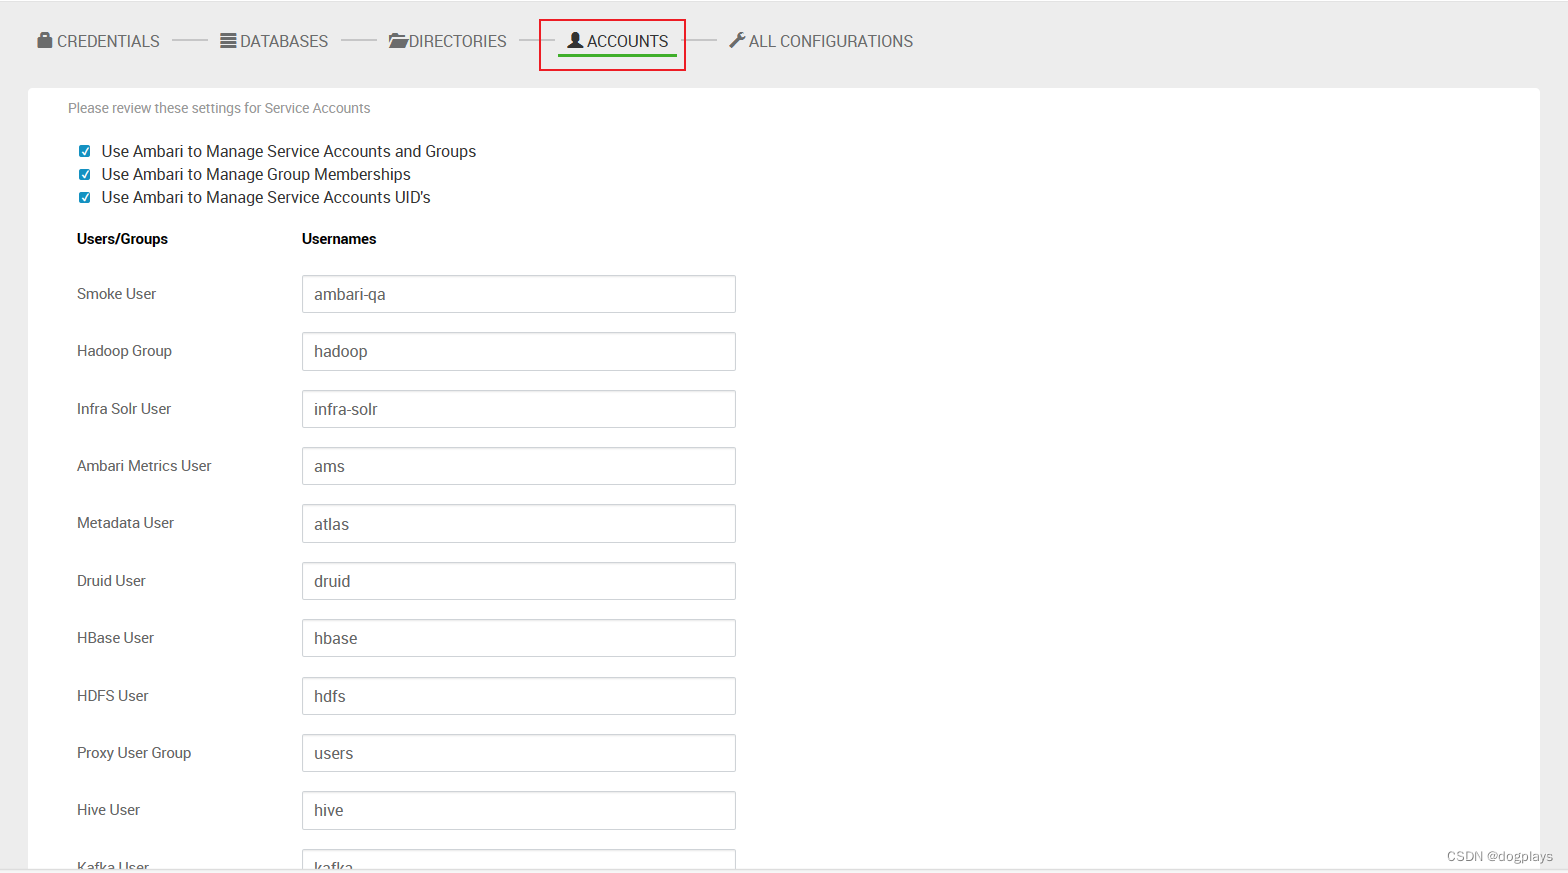 最后一页面就是各组件详细的配置内容了(我这里默认不做变更)

注意有些组件密码又强制要求,可以点击定位问题:

右侧问题提示图标中的问题都解决完成后,可以NEXT下一步

注意:我在测试数据库连接时,需要以下问题:
Establishing SSL connection without server's identity verification is not recommended. According to MySQL 5.5.45+, 5.6.26+ and 5.7.6+ requirements SSL connection must be established by default if explicit option isn't set. For compliance with existing applications not using SSL the verifyServerCertificate property is set to 'false'. You need either to explicitly disable SSL by setting useSSL=false, or set useSSL=true and provide truststore for server certificate verification.
 然后我选择关闭mysql数据库的SSL,在/etc/my.cnf中添加一行“skip_ssl”

重启mysql服务后,查询SSL验证是否关闭,成功关闭disable

再次验证,测试连接成功:
 根据MySQL 5.5.45+、5.6.26+和5.7.6+的要求,如果不设置显式选项,则必须建立默认的SSL连接。需要通过设置useSSL=false来显式禁用SSL,或者设置useSSL=true并为服务器证书验证提供信任存储。因为我是本机虚拟机测试环境,所以选择关闭SSL验证,但是实际生产环境中可以选择降低mysql版本或者其他方式,在不关闭服务器SSL验证的情况下解决该问题。
在最后一步安装过程中,安装 Grafana Install中遇到“RuntimeError: Failed to execute command '/usr/bin/yum -y install ambari-metrics-monitor', exited with code '1', message: 'http://mirrors.ustc.edu.cn/centos/7.9.2009/os/x86_64/Packages/cpp-4.8.5-44.el7.x86_64.rpm: [Errno 14] curl#6 - "Could not resolve host: mirrors.ustc.edu.cn; Unknown error”问题
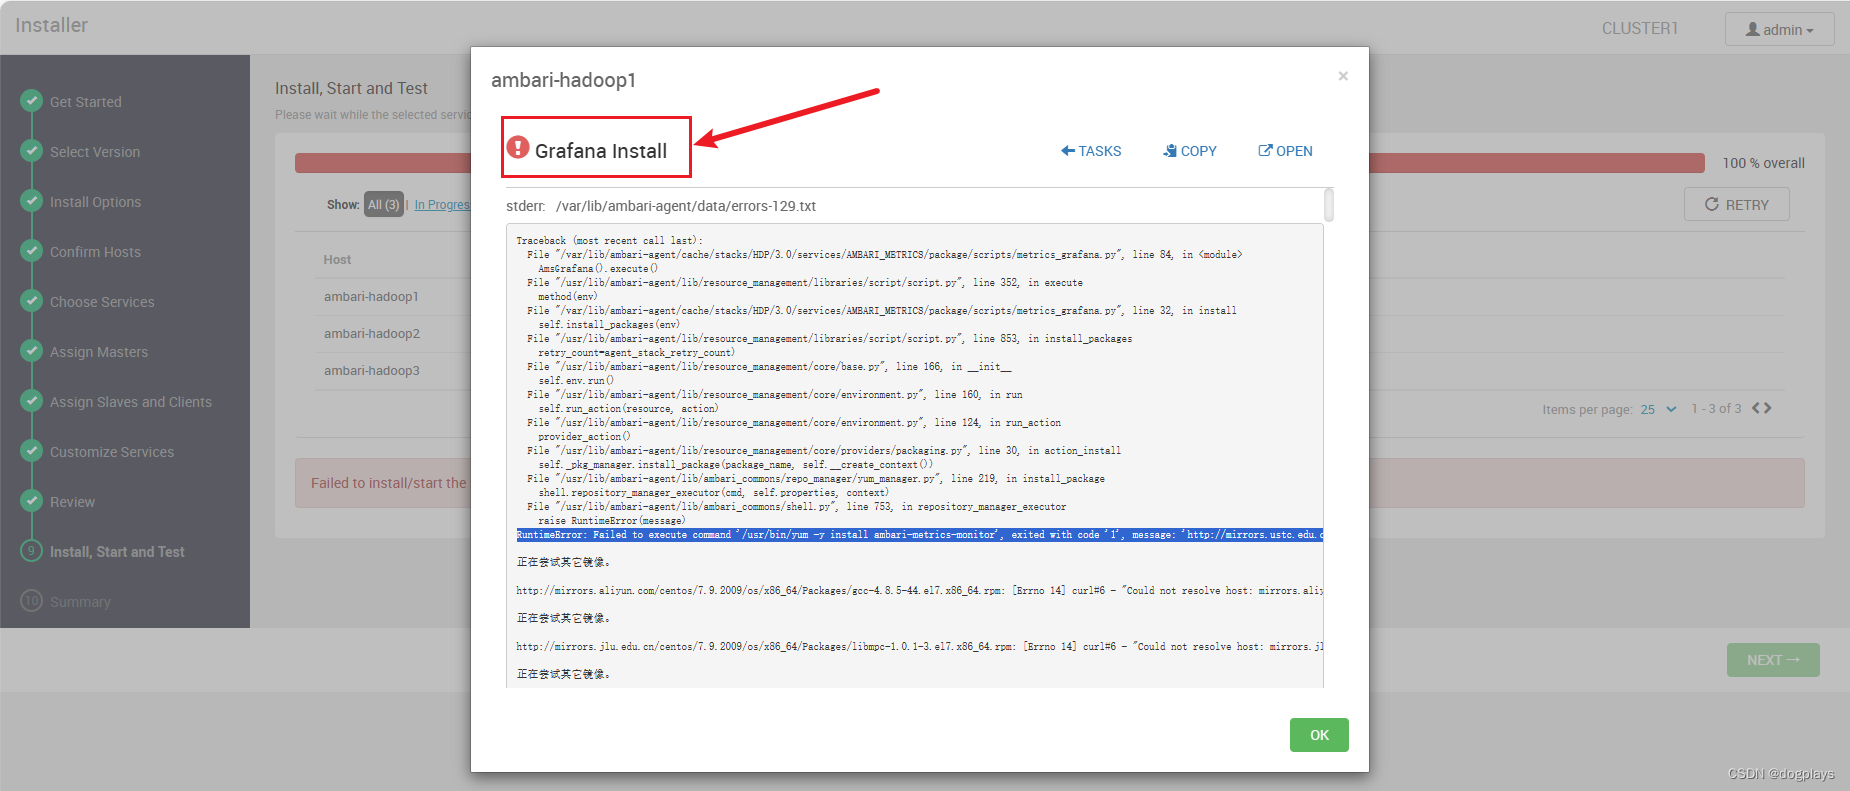
看起来应该是通过"http://mirrors.ustc.edu.cn/centos/7.9.2009/os/x86_64/Packages/cpp-4.8.5-44.el7.x86_64.rpm"这个url去获取安装包,但是遇到了关于host:mirrors.ustc.edu.cn的未知错误,首先ambari-hadoop1节点能够ping通mirrors.ustc.edu.cn,并且URL能正常访问,问题可能是网络波动,那再尝试点击右上角retry按钮


经过一段时间等待后,安装完成但是还是出现了一些警告,点击警告查看具体告警信息

但是由于不能再点击retry了,所以只能next下一步了 安装服务组件成功后,仍然有许多警告,后续手动启动失败服务并一个个解决
详细见我另一篇博客:ambari 服务组件报错解决-CSDN博客