在上周的文章中,我们讲述了OrionX vGPU研发测试场景下最佳实践之SSH模式,今天,让我们走进 Jupyter模式下的最佳实践。
-
Jupyter模式:Jupyter是最近几年算法人员使用比较多的一种工具,很多企业已经将其改造集成开发工具,将Jupyter部署在容器或者虚机给算法人员使用。
环境准备
环境包含物理机器或者虚机,网络环境、GPU卡,操作系统以及容器平台。
硬件环境
本次POC环境准备三台虚机,其中一台CPU节点,两台GPU节点,每台GPU节点有一块T4卡。
操作系统为ubuntu 18.04
管理网络:千兆TCP
远程调用网络:100G RDMA
Kubernetes环境
三个节点安装k8s环境,可以使用kubeadm来安装,或者一些部署工具:
-
kubekey
扫描二维码关注公众号,回复: 17247729 查看本文章
-
kuboard-spray
当前部署kubernetes环境如下:
root@sc-poc-master-1:~# kubectl get node
NAME              STATUS   ROLES                         AGE    VERSION
sc-poc-master-1   Ready    control-plane,master,worker   166d   v1.21.5
sc-poc-worker-1   Ready    worker                        166d   v1.21.5
sc-poc-worker-2   Ready    worker                        166d   v1.21.5
其中master为CPU节点,worker节点为2个T4 GPU节点。
OrionX vGPU池化环境
参考趋动科技《OrionX 实施方案-k8s版》
部署完之后我们可以在orion的namespace查看OrionX组件:
root@sc-poc-master-1:~# kubectl get pod -n orion
NAME                                 READY   STATUS    RESTARTS   AGE
orion-container-runtime-hgb5p        1/1     Running   3          63d
orion-container-runtime-qmghq        1/1     Running   1          63d
orion-container-runtime-rhc7s        1/1     Running   1          46d
orion-exporter-fw7vr                 1/1     Running   0          2d21h
orion-exporter-j98kj                 1/1     Running   0          2d21h
orion-gui-controller-all-in-one-0    1/1     Running   2          87d
orion-plugin-87grh                   1/1     Running   6          87d
orion-plugin-kw8dc                   1/1     Running   8          87d
orion-plugin-xpvgz                   1/1     Running   8          87d
orion-scheduler-5d5bbd5bc9-bb486     2/2     Running   7          87d
orion-server-6gjrh                   1/1     Running   1          74d
orion-server-p87qk                   1/1     Running   4          87d
orion-server-sdhwt                   1/1     Running   1          74d
开发机场景:JupyterLab模式
jupyterlab包含了jupyter notebook的所有功能,并升级增加了很多功能。其支持python、R、java等多种编程语言及markdown、letex等写作语言及公式输入,可以集编程与写作于一身,非常适合于代码学习,笔记记录、演示及教学等。jupyter lab相比notebook最大的更新是模块化的界面,可以在同一个窗口以标签的形式同时打开好几个文档,同时插件管理非常强大,使用起来要比jupyter notebook功能丰富许多。
JupyterLab作为一种基于web的集成开发环境,你可以使用它编写notebook、操作终端、编辑markdown文本、打开交互模式、查看csv文件及图片等功能。
本次场景,我们通过k8s部署jupyterlab来进行基本的机器学习开发,同时我们集成一个开源算法进行实践。
制作镜像
我们使用官方的pytorch镜像或者TensorFlow镜像作为Base镜像来编译一个新的jupyterlab镜像,在使用的时候就有cuda和框架了,省去很多时间。本次我们先以pytorch镜像来进行编译新镜像,新建一个Dockerfile
FROM pytorch/pytorch:1.8.1-cuda10.2-cudnn7-devel
#USER root
RUN sed -i 's/archive.ubuntu.com/mirrors.aliyun.com/g' /etc/apt/sources.list && \
    rm /etc/apt/sources.list.d/cuda.list && \
    rm /etc/apt/sources.list.d/nvidia-ml.list && \
    apt update -y  && \
    apt install -y nodejs npm curl vim wget git && \
    apt install -y language-pack-zh-hans  && \
    pip3 install  -i https://pypi.tuna.tsinghua.edu.cn/simple/ jupyterlab   && \
    pip3 install  -i https://pypi.tuna.tsinghua.edu.cn/simple/ jupyterlab-language-pack-zh-CN

RUN pip install pillow && \
    pip install cmake && \
    pip install dlib && \
    pip install face_recognition && \
    pip install matplotlib && \
    pip install scipy

ENV LANG='zh_CN.utf8'
CMD ["/bin/bash","-c","jupyter lab --ip=0.0.0.0 --no-browser --allow-root --port=8888 --NotebookApp.token='' --NotebookApp.password=''  --NotebookApp.allow_origin='*'"]
我们使用了pytorch 1.8.1 cuda 10.2的镜像,然后将ubuntu的软件源改成阿里云的,同时删除nvidia的源,否则会因为网络问题无法安装其他软件。安装jupyterlab和一些基本的科学计算的库,重新build
docker build -t pytorch/pytorch:1.8.1-cuda10.2-cudnn7-devel-jupyterlab .build完之后,我们得到一个新的镜像pytorch/pytorch:1.8.1-cuda10.2-cudnn7-devel-jupyterlab,接下来我们部署该镜像
部署jupyterlab
通过yaml部署,由于该Pod需要对外提供服务,所以我们要暴露8888端口,同时创建svc和ingress提供对外服务地址
jupyterlab的yaml文件如下:
apiVersion: apps/v1
kind: Deployment
metadata:
  annotations:
  name: jupyterlab-orion
  namespace: orion
spec:
  replicas: 1
  selector:
    matchLabels:
      name: jupyterlab-orion
  template:
    metadata:
      labels:
        name: jupyterlab-orion
    spec:
      nodeName: sc-poc-worker-2
      #hostNetwork: true
      schedulerName: orion-scheduler
      containers:
      - name: jupyterlab-orion
        image: pytorch/pytorch:1.8.1-cuda10.2-cudnn7-devel-jupyterlab
        ports:
        - containerPort: 8888
        imagePullPolicy: IfNotPresent
        resources:
          requests:
            virtaitech.com/gpu: 1
          limits:
            virtaitech.com/gpu: 1
        env:
          - name : ORION_GMEM
            value : "5000"
          - name : ORION_RATIO
            value : "50"
          - name: ORION_VGPU
            value: "1"
          - name: ORION_RESERVED
            value: "0"
          - name: ORION_CROSS_NODE
            value: "0"
          - name: ORION_TASK_IDLE_TIME
            value: "30s"
          - name: ORION_EXPORT_CMD
            value: "env | grep ORION; orion-smi -j"
          - name : ORION_GROUP_ID
            valueFrom:
              fieldRef:
                fieldPath: metadata.uid
          - name: ORION_K8S_POD_NAME
            valueFrom:
             fieldRef:
               fieldPath: metadata.name
          - name: ORION_K8S_POD_UID
            valueFrom:
              fieldRef:
                fieldPath: metadata.uid
          - name: ORION_K8S_POD_NS
            valueFrom:
              fieldRef:
                fieldPath: metadata.namespace

---
apiVersion: v1
kind: Service
metadata:
  labels:
    name: jupyterlab-orion
  name: jupyterlab-orion
  namespace: orion
spec:
  ports:
    - name: web
      port: 8888
      protocol: TCP
      targetPort: 8888
  selector:
    name: jupyterlab-orion
  type: ClusterIP
我这边是使用traefik搭建的ingress服务,所以给jupyterlab创建的ingress如下:
apiVersion: networking.k8s.io/v1
kind: Ingress
metadata:
  name: jupyterlab-ingress
  annotations:
    kubernetes.io/ingress.class: traefik
    traefik.ingress.kubernetes.io/router.entrypoints: web
spec:
  rules:
  - host: jupyterlab.10.10.10.180.nip.io
    http:
      paths:
      - pathType: Prefix
        path: /
        backend:
          service:
            name: jupyterlab-orion
            port:
              number: 8888
两个yaml文件部署完之后,通过ingress地址可以访问该jupyterlab了
简单测试下pytorch是否可以正常调用vGPU,代码样例:
import torch
from torch import nn

if_cuda = torch.cuda.is_available()
print("if_cuda=",if_cuda)

gpu_count = torch.cuda.device_count()
print("gpu_count=",gpu_count)

torch.cuda.get_device_name(0)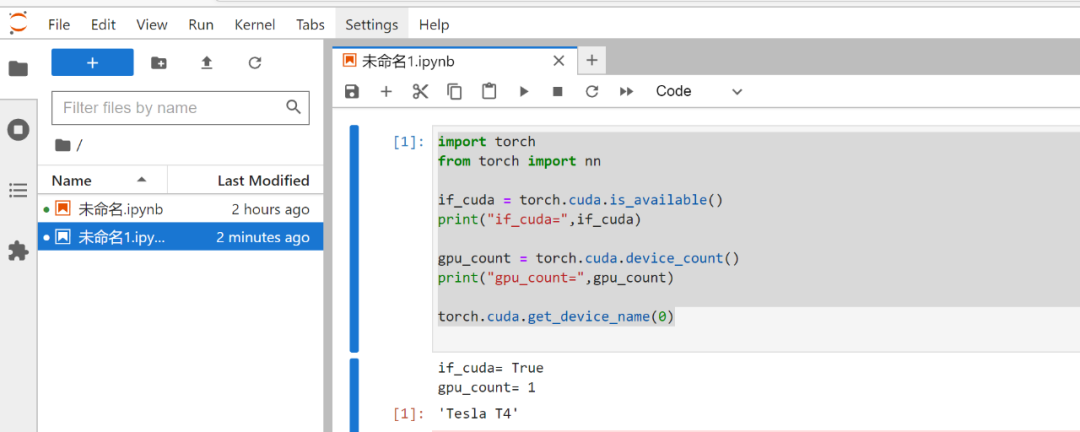
通过pytorch的api我们可以直接拿到GPU的信息,跟物理卡是一致的,物理卡是T4,vGPU同样是T4,此时vGPU是分配了一块卡,所以显示的数量也是一样的,根据pytorch拿到的信息我们可以发现对于上层的框架而言调用vGPU资源跟调用物理GPU资源是一样的,不会有什么改变,那对于上层的应用来说也是透明的使用vGPU资源。
跑一个demo
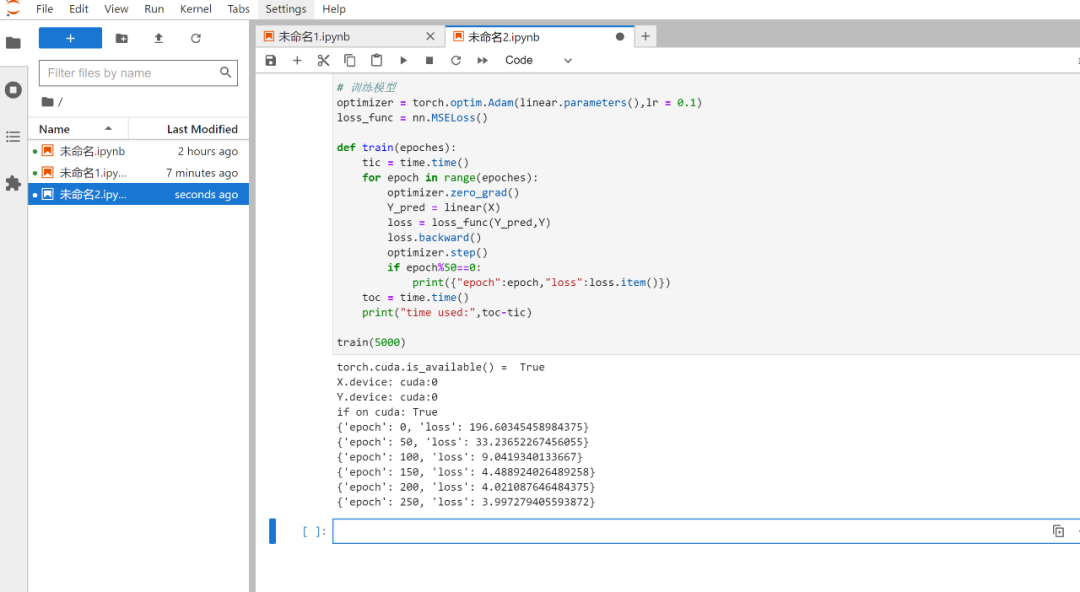
我们在jupyterlab中跑一个pytorch线性回归代码测试下pytorch调用vGPU是否正常使用。我们之前启动pod的时候申请了50%的算力和5G的显存
代码如下:
import time
import torch
from torch import nn

# 准备数据
n = 1000000 #样本数量

X = 10*torch.rand([n,2])-5.0  #torch.rand是均匀分布
w0 = torch.tensor([[2.0,-3.0]])
b0 = torch.tensor([[10.0]])
Y = [email protected]() + b0 + torch.normal( 0.0,2.0,size = [n,1])  # @表示矩阵乘法,增加正态扰动

# 移动到GPU上
print("torch.cuda.is_available() = ",torch.cuda.is_available())
X = X.cuda()
Y = Y.cuda()
print("X.device:",X.device)
print("Y.device:",Y.device)


# 定义模型
class LinearRegression(nn.Module):
    def __init__(self):
        super().__init__()
        self.w = nn.Parameter(torch.randn_like(w0))
        self.b = nn.Parameter(torch.zeros_like(b0))
    #正向传播
    def forward(self,x):
        return [email protected]() + self.b

linear = LinearRegression()

# 移动模型到GPU上
device = torch.device("cuda:0" if torch.cuda.is_available() else "cpu")
linear.to(device)

#查看模型是否已经移动到GPU上
print("if on cuda:",next(linear.parameters()).is_cuda)

# 训练模型
optimizer = torch.optim.Adam(linear.parameters(),lr = 0.1)
loss_func = nn.MSELoss()

def train(epoches):
    tic = time.time()
    for epoch in range(epoches):
        optimizer.zero_grad()
        Y_pred = linear(X)
        loss = loss_func(Y_pred,Y)
        loss.backward()
        optimizer.step()
        if epoch%50==0:
            print({"epoch":epoch,"loss":loss.item()})
    toc = time.time()
    print("time used:",toc-tic)

train(5000)
运行结果如下:
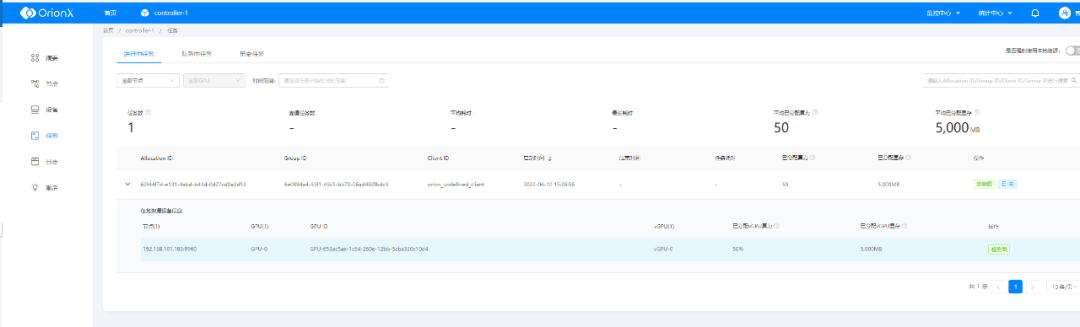
OrionX申请资源情况如下

综上,我们在jupyterlab中通过pytorch调用vGPU能正常使用。
项目实践
我们基于一个开源项目animegan2-pytorch在jupyterlab进行实际的开发体验,它可以将视频、人物、风景动漫化,我们本次使用的是pytorch版本的实现,项目地址为:https://github.com/bryandlee/animegan2-pytorch
为了方便使用我们需要做一些准备工作,1、准备一个nfs server用来持久化 2、将该项目clone下来存入nfs中去,我在nfs server建了一个目录/mnt/nfs_share/animegan2-pytorch,然后把该项目拷贝进去;3、下载一个人脸关键点模型shape_predictor_68_face_landmarks.dat,后续可以直接使用该模型,当然你也可以训练自己的人脸关键点检测模型,该模型下载地址
https://github.com/davisking/dlib-models,将下载的模型同样拷贝到/mnt/nfs_share/animegan2-pytorch目录下面。接下来我们就将这个目录挂载给jupyterlab的pod里面,具体的挂载参考YAML文件如下:
apiVersion: apps/v1
kind: Deployment
metadata:
  annotations:
  name: jupyterlab-orion
  namespace: orion
spec:
  replicas: 1
  selector:
    matchLabels:
      name: jupyterlab-orion
  template:
    metadata:
      labels:
        name: jupyterlab-orion
    spec:
      nodeName: sc-poc-worker-2
      #hostNetwork: true
      schedulerName: orion-scheduler
      volumes:
        - name: animegan2-data
          nfs:
           server: 10.10.10.180
           path: /mnt/nfs_share/animegan2-pytorch

      containers:
      - name: jupyterlab-orion
        image: pytorch/pytorch:1.8.1-cuda10.2-cudnn7-devel-jupyterlab
        volumeMounts:
          - name: animegan2-data
            mountPath: /workspace/animegan2-pytorch
        ports:
        - containerPort: 8888
        imagePullPolicy: IfNotPresent
        resources:
          requests:
            virtaitech.com/gpu: 1
          limits:
            virtaitech.com/gpu: 1
        env:
          - name : ORION_GMEM
            value : "5000"
          - name : ORION_RATIO
            value : "50"
          - name: ORION_VGPU
            value: "1"
          - name: ORION_RESERVED
            value: "0"
          - name: ORION_CROSS_NODE
            value: "0"
          - name: ORION_TASK_IDLE_TIME
            value: "30s"
          - name: ORION_EXPORT_CMD
            value: "env | grep ORION; orion-smi -j"
          - name : ORION_GROUP_ID
            valueFrom:
              fieldRef:
                fieldPath: metadata.uid
          - name: ORION_K8S_POD_NAME
            valueFrom:
             fieldRef:
               fieldPath: metadata.name
          - name: ORION_K8S_POD_UID
            valueFrom:
              fieldRef:
                fieldPath: metadata.uid
          - name: ORION_K8S_POD_NS
            valueFrom:
              fieldRef:
                fieldPath: metadata.namespace

---
apiVersion: v1
kind: Service
metadata:
  labels:
    name: jupyterlab-orion
  name: jupyterlab-orion
  namespace: orion
spec:
  ports:
    - name: web
      port: 8888
      protocol: TCP
      targetPort: 8888
  selector:
    name: jupyterlab-orion
type: ClusterIP我们把该nfs上的目录直接挂载在jupyterlab的/workspace/animegan2-pytorch目录下面,启动之后我们通过ingress方式登录该jupyterlab就可以看到挂载的项目了

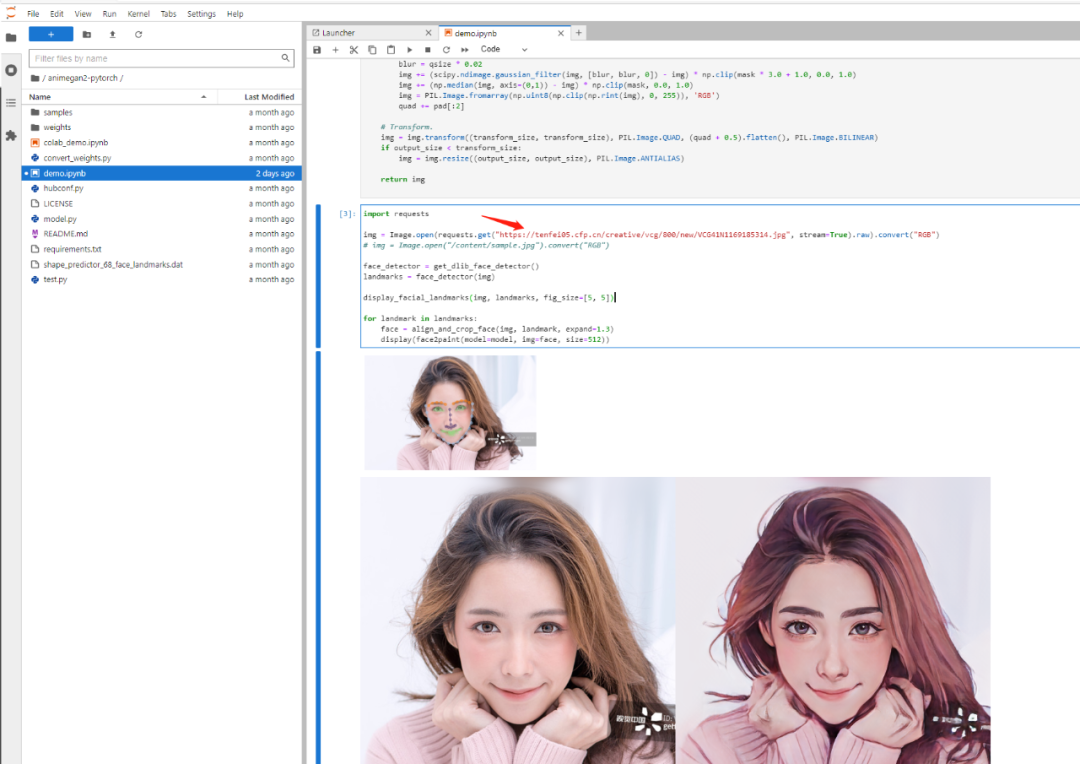
双击demo.ipynb我们就可以运行该项目了,但是实际上在运行的时候他会在用户的根目录寻找一些文件,如果没有的话会自动下载,这些文件实际上就是animegan2-pytorch项目里面的文件,由于github很不稳定,所以我们可以手动的在terminal里面把这些文件复制到相关目录,需要复制两个目录,1、复制animegan2-pytorch整个目录到/root/.cache/torch/hub/bryandlee_animegan2-pytorch_main;2、复制animegan2-pytorch目录下的weights目录到 /root/.cache/torch/hub/checkpoints,这样我们就可以在jupyterlab直接运行该demo了,我们可以通过点击run all cells来运行
运行的时候我们就可以看到他会调用我们复制的这些目录文件了。
该demo自带了马斯克的人像来进行动漫化,我们也可以找一些图片链接进行替换来运行该demo
运行的时候我们通过OrionX GUI可以查看运行的任务和使用的资源
以上就是OrionX vGPU在Jupyter模式下的开发机场景的最佳实践,OrionX AI算力资源池化解决方案针对GPU管理粗放给出了相应的解决思路,旨在为用户提高GPU利用率、提供灵活调度平台、统一管理算力资源,实现弹性扩展,按需使用。我们将在以后的文章中继续分享OrionX vGPU基于CodeServer模式下的开发实践,欢迎留言探讨!