目录
2.3.1 第一种方法:参考【1.2.2】直接上传redis.conf
2.3.2 复制之前redis_6379的配置文件redis.conf
一、Redis主容器redis_6379搭建
1.1 容器搜索拉取redis镜像
1.1.1 搜索redis镜像
【命令:搜索redis镜像】
docker search redis【示例】
[root@localhost ~]# docker search redis
NAME                                DESCRIPTION                                      STARS     OFFICIAL   AUTOMATED
redis                               Redis is an open source key-value store that…   12200     [OK]
redislabs/redisearch                Redis With the RedisSearch module pre-loaded…   56
redislabs/redisinsight              RedisInsight - The GUI for Redis                 88

【...中间省略一部分未展示】

redislabs/redisai                                                                    5
redislabs/olmtest                   Test artefact for OLM CSV                        0
bitnami/redis                       Bitnami Redis Docker Image                       259                  [OK]
redislabs/olm-bundle                                                                 0
redislabs/redisml                   A Redis module that implements several machi…   3                    [OK]
【示意图】

1.1.2 拉取redis镜像(通常选择第一个热度最高)
【命令:拉取redis镜像】
docker pull redis【示例】
[root@localhost ~]# docker pull redis
Using default tag: latest
latest: Pulling from library/redis
a2abf6c4d29d: Pull complete
c7a4e4382001: Pull complete
4044b9ba67c9: Pull complete
c8388a79482f: Pull complete
413c8bb60be2: Pull complete
1abfd3011519: Pull complete
Digest: sha256:db485f2e245b5b3329fdc7eff4eb00f913e09d8feb9ca720788059fdc2ed8339
Status: Downloaded newer image for redis:latest
docker.io/library/redis:latest

[root@localhost ~]# docker image ls
REPOSITORY   TAG       IMAGE ID       CREATED         SIZE
redis        latest    7614ae9453d1   18 months ago   113MB
mysql        latest    3218b38490ce   18 months ago   516MB
1.2 创建容器redis_6379
1.2.1 创建相关文件夹和文件
【命令】
mkdir -p redis/6379/conf redis/6379/data redis/6379/log【示例】
root@localhost ~]# cd /
[root@localhost /]# ls
bin  boot  dev  etc  home  lib  lib64  media  mnt  opt  proc  root  run  sbin  srv  sys  tmp  usr  var
[root@localhost /]# cd usr
[root@localhost usr]# ls
bin  etc  games  include  lib  lib64  libexec  local  mytest  sbin  share  src  tmp
[root@localhost usr]# cd local
[root@localhost local]# ls
bin  etc  games  include  lib  lib64  libexec  sbin  share  software  src
[root@localhost local]# cd software
[root@localhost software]# ls
jdk  mysql

[root@localhost software]# mkdir -p redis/6379/conf redis/6379/data redis/6379/log

[root@localhost software]# ls
jdk  mysql  redis
[root@localhost software]# cd redis
[root@localhost redis]# tree
.
└── 6379
    ├── conf
    ├── data
    └── log

4 directories, 0 files
[root@localhost 6379]#
1.2.2 上传redis.conf到conf文件夹
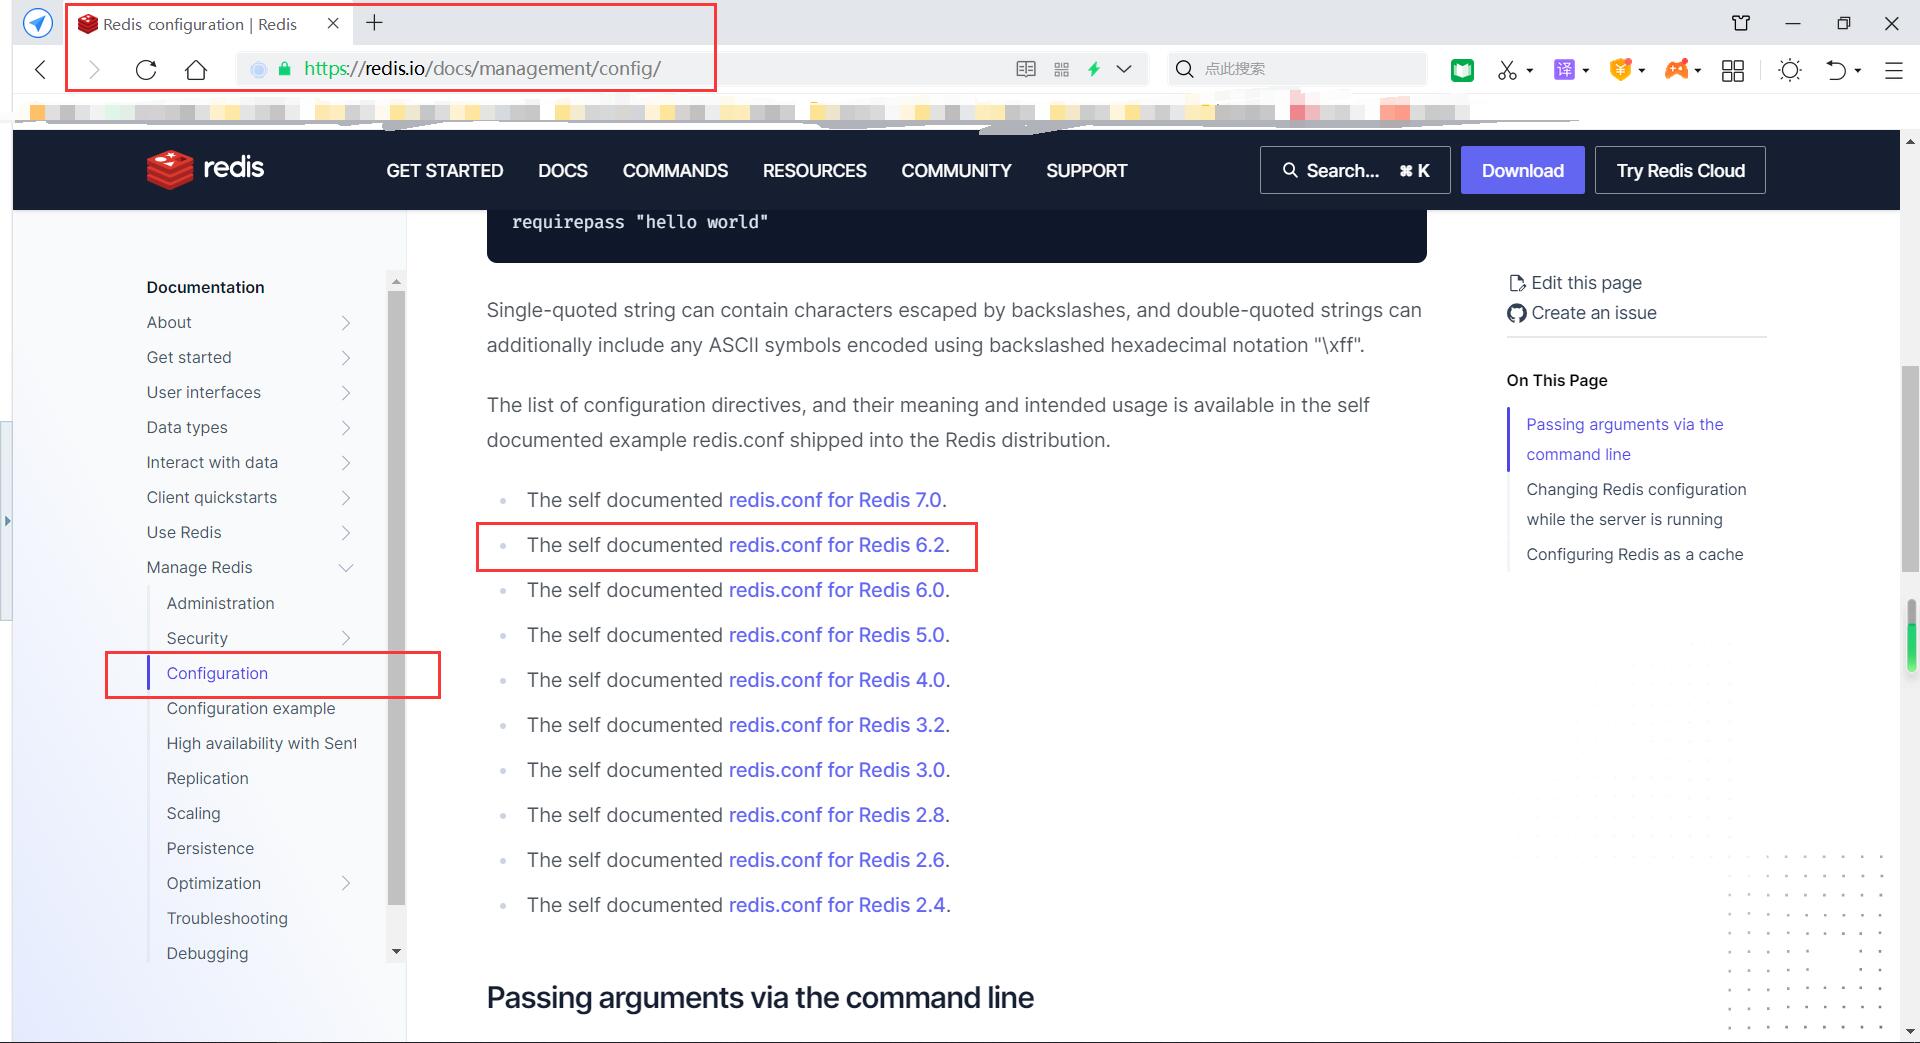
1.2.2.1 将redis.conf文件从官网下载
【示意图:redis.conf文件官网下载】
1.2.2.2 上传redis.conf到conf文件夹
【示意图:上传redis.conf到conf文件夹】

1.2.3 创建日志文件redis.log并修改可写入权限
1.2.3.1 创建日志文件redis.log
【命令:创建日志文件redis.log】
touch redis.log【示例】
[root@localhost redis]# ls
6379
[root@localhost redis]# cd 6379
[root@localhost 6379]# ls
conf data log
[root@localhost 6379]# cd log
[root@localhost log]# ls
[root@localhost log]# touch redis.log
[root@localhost log]# ls
redis.log
[root@localhost log]# cd ..
[root@localhost 6379]# tree
.
├── conf
│ └── redis.conf
├── data
└── log
└── redis.log
3 directories, 2 files
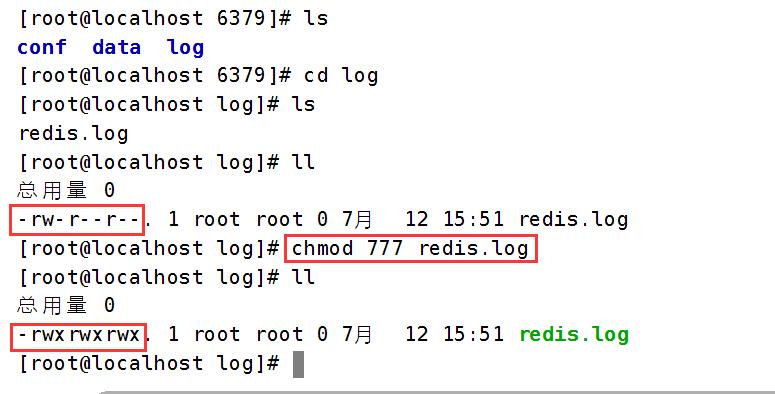
[root@localhost 6379]#1.2.3.2 修改redis.log可写入权限
【命令:修改redis.log可写入权限】
chmod 777 redis.log【示例】
[root@localhost 6379]# ls
conf  data  log
[root@localhost 6379]# cd log
[root@localhost log]# ls
redis.log
[root@localhost log]# ll
总用量 0
-rw-r--r--. 1 root root 0 7月  12 15:51 redis.log

[root@localhost log]# chmod 777 redis.log

[root@localhost log]# ll
总用量 0
-rwxrwxrwx. 1 root root 0 7月  12 15:51 redis.log
[root@localhost log]#
【示意图】
1.2.4 修改redis.conf文件
【命令:修改redis.conf文件】
vim redis.conf【示例】
[root@localhost log]# cd ..
[root@localhost 6379]# ls
conf  data  log
[root@localhost 6379]# cd conf
[root@localhost conf]# ls
redis.conf
[root@localhost conf]# vim redis.conf


进入redis.conf配置文件后
先输入命令 :set number 显示行数
再insert进入插入(即可修改)

【之后修改内容如下:】
第75行:  bind 0.0.0.0                   # ip 允许远程连接
第94行:  protected-mode no
第98行:  port 6379
第304行: logfile "/var/log/redis.log"   # 容器内的日志位置
第1254行:appendonly yes                 # 持久化
         requirepass 123456             # 密码(可以不设)
【示意图】


1.2.5 创建运行容器
1.2.5.1 创建运行容器
【命令:创建运行容器】
docker run -it \
--name redis_6379 \
--privileged \
-p 6379:6379 \
--network wn_docker_net \
--ip 172.18.12.10 \
-v /usr/local/software/redis/6379/conf/redis.conf:/usr/local/etc/redis/redis.conf \
-v /usr/local/software/redis/6379/data/:/data \
-v /usr/local/software/redis/6379/log/redis.log:/var/log/redis.log \
-d redis \
/usr/local/etc/redis/redis.conf
【示例】
[root@localhost conf]# docker run -it \
> --name redis_6379 \
> --privileged \
> -p 6379:6379 \
> --network wn_docker_net \
> --ip 172.18.12.10 \
> -v /usr/local/software/redis/6379/conf/redis.conf:/usr/local/etc/redis/redis.conf \
> -v /usr/local/software/redis/6379/data/:/data \
> -v /usr/local/software/redis/6379/log/redis.log:/var/log/redis.log \
> -d redis \
> /usr/local/etc/redis/redis.conf
a53717f1449d97c0f20e79138594225d846fe301e5c0a375c5a704441e25a931
1.2.5.2 检查进程是否启动
【命令:检查进程是否启动】
docker ps【示例】
docker [root@localhost conf]# docker ps
CONTAINER ID   IMAGE     COMMAND                   CREATED         STATUS         PORTS                                                  NAMES
a53717f1449d   redis     "docker-entrypoint.s…"   9 seconds ago   Up 3 seconds   0.0.0.0:6379->6379/tcp, :::6379->6379/tcp              redis_6379
【示意图】

1.2.5.3 检查(查看)日志
- 最后有Ready to accept connections即配置成功了
【命令:检查(查看)日志】
docker logs redis_6379

# 但是我们已经配置了日志文件redis.log,上述命令就不再起作用了,而是直接在文件中显示,可以这样查看:

cat redis.log
【示例】
[root@localhost conf]# docker logs redis_6379
[root@localhost conf]# cd ..
[root@localhost 6379]# cd log
[root@localhost log]# ls
redis.log
[root@localhost log]# cat redis.log
1:C 12 Jul 2023 08:03:55.469 # oO0OoO0OoO0Oo Redis is starting oO0OoO0OoO0Oo
1:C 12 Jul 2023 08:03:55.470 # Redis version=6.2.6, bits=64, commit=00000000, modified=0, pid=1, just started
1:C 12 Jul 2023 08:03:55.470 # Configuration loaded
1:M 12 Jul 2023 08:03:55.470 * monotonic clock: POSIX clock_gettime
1:M 12 Jul 2023 08:03:55.471 * Running mode=standalone, port=6379.
1:M 12 Jul 2023 08:03:55.471 # WARNING: The TCP backlog setting of 511 cannot be enforced because /proc/sys/net/core/somaxconn is set to the lower value of 128.
1:M 12 Jul 2023 08:03:55.471 # Server initialized
1:M 12 Jul 2023 08:03:55.471 # WARNING overcommit_memory is set to 0! Background save may fail under low memory condition. To fix this issue add 'vm.overcommit_memory = 1' to /etc/sysctl.conf and then reboot or run the command 'sysctl vm.overcommit_memory=1' for this to take effect.
1:M 12 Jul 2023 08:03:55.471 * Ready to accept connections
[root@localhost log]#
【示意图】

1.3 测试redis
【命令:测试redis】
docker exec -it redis_6379 bash

redis-cli

ping
【示例】
[root@localhost log]# docker exec -it redis_6379 bash
root@a53717f1449d:/data# redis-cli
127.0.0.1:6379> ping
PONG
127.0.0.1:6379> exit
root@a53717f1449d:/data# exit
exit
[root@localhost log]#
1.4 打开防火墙,暴露出去
【命令:打开防火墙,暴露出去】
firewall-cmd --zone=public --add-port=6379/tcp --permanent

firewall-cmd --reload
【示例】
[root@localhost log]# firewall-cmd --zone=public --add-port=6379/tcp --permanent
success

[root@localhost log]# firewall-cmd --reload
success
root@localhost log]# docker exec -it redis_6379 bash
root@a53717f1449d:/data# redis-cli
127.0.0.1:6379> set wnhz0712 zsf
OK
127.0.0.1:6379> get wnhz0712
"zsf"
127.0.0.1:6379> keys *
1) "wnhz0712"
127.0.0.1:6379> 二、 Redis从容器redis_6380搭建
2.1 创建相关文件夹和文件
【命令】
mkdir -p 6380/conf 6380/data 6380/log 【示例】
[root@localhost ~]# cd /usr/local/software
[root@localhost software]# ls
jdk  mysql  redis
[root@localhost software]# cd redis
[root@localhost redis]# ls
6379

[root@localhost redis]# mkdir -p 6380/conf 6380/data 6380/log

[root@localhost redis]# ls
6379  6380
[root@localhost redis]# cd 6380
[root@localhost 6380]# ls
conf  data  log
[root@localhost 6380]#
2.2 创建日志文件redis.log并修改可写入权限
2.2.1 创建日志文件redis.log
【命令:创建日志文件redis.log】
touch redis.log【示例】
[root@localhost 6380]# cd log
[root@localhost log]# touch redis.log
[root@localhost log]# ls
redis.log
[root@localhost log]#
2.2.2 修改redis.log可写入权限
【命令:修改redis.log可写入权限】
chmod 777 redis.log【示例】
[root@localhost log]# chmod 777 redis.log
[root@localhost log]# ll
总用量 0
-rwxrwxrwx. 1 root root 0 7月  13 16:53 redis.log
[root@localhost log]#
2.3 上传redis.conf到conf文件夹
2.3.1 第一种方法:参考【1.2.2】直接上传redis.conf
2.3.2 复制之前redis_6379的配置文件redis.conf
【示意图】

【命令:复制redis.conf文件】
cp redis.conf ../../6380/conf【示例】
[root@localhost log]# cd ..
[root@localhost 6380]# ls
conf  data  log
[root@localhost 6380]# cd ..
[root@localhost redis]# ls
6379  6380
[root@localhost redis]# cd 6379
[root@localhost 6379]# ls
conf  data  log
[root@localhost 6379]# cd conf
[root@localhost conf]# ls
redis.conf
[root@localhost conf]# pwd
/usr/local/software/redis/6379/conf

[root@localhost conf]# cp redis.conf ../../6380/conf

[root@localhost conf]# cd /usr/local/software/redis/6380/conf
[root@localhost conf]# ls
redis.conf
[root@localhost conf]# pwd
/usr/local/software/redis/6380/conf
2.4 修改redis.conf文件
【命令:修改redis.conf文件】
docker inspect redis_6379 |grep IPA
# 查看Redis主容器redis_6379的地址

vim redis.conf
【示意图】

【注】查出主容器redis_6379的地址:172.18.12.10,在配置文件redis.conf中需要用到并更改replicaof 172.18.12.10 6379
【示例】
[root@localhost conf]# docker ps
CONTAINER ID   IMAGE     COMMAND                   CREATED        STATUS       PORTS                                                  NAMES
a53717f1449d   redis     "docker-entrypoint.s…"   25 hours ago   Up 5 hours   0.0.0.0:6379->6379/tcp, :::6379->6379/tcp              redis_6379

[root@localhost conf]# docker inspect redis_6379 |grep IPA
            "SecondaryIPAddresses": null,
            "IPAddress": "",
                    "IPAMConfig": {
                    "IPAddress": "172.18.12.10",

# 查出主容器redis_6379的地址:172.18.12.10,在配置文件redis.conf中需要更改replicaof 172.18.12.10 6379

[root@localhost conf]# ls
redis.conf

[root@localhost conf]# vim redis.conf


进入redis.conf配置文件后
先输入命令 :set number 显示行数
再insert进入插入(即可修改)

【之后修改内容如下:】
第75行:  bind 0.0.0.0                   # ip 允许远程连接
第94行:  protected-mode no
第98行:  port 6379
第304行: logfile "/var/log/redis.log"   # 容器内的日志位置
第479行: replicaof 172.18.12.10 6379    # 追随某个地址的redis,被追随的地址即172.18.12.10为主节点,追随的为从地址
第480行: slave-read-only no             # 设置从容器slave的只读权限
第1255行:appendonly yes                 # 持久化
         requirepass 123456             # 密码(可以不设)
【示意图】


2.5 创建运行容器
【命令:创建运行容器】
docker run -it \
--name redis_6380 \
--privileged \
-p 6380:6379 \
--network wn_docker_net \
--ip 172.18.12.11 \
-v /usr/local/software/redis/6380/conf/redis.conf:/usr/local/etc/redis/redis.conf \
-v /usr/local/software/redis/6380/data/:/data \
-v /usr/local/software/redis/6380/log/redis.log:/var/log/redis.log \
-d redis \
/usr/local/etc/redis/redis.conf
【注意】与【1.2.5】不同的是端口号6380和ip地址172.18.12.11,注意区别比较
【示例】
[root@localhost conf]# docker run -it \
> --name redis_6380 \
> --privileged \
> -p 6380:6379 \
> --network wn_docker_net \
> --ip 172.18.12.11 \
> -v /usr/local/software/redis/6380/conf/redis.conf:/usr/local/etc/redis/redis.conf \
> -v /usr/local/software/redis/6380/data/:/data \
> -v /usr/local/software/redis/6380/log/redis.log:/var/log/redis.log \
> -d redis \
> /usr/local/etc/redis/redis.conf
29eac40ca4d7893fcb03367996bd4f4f45b2def739f5e14c8f43a87584020e9f
2.6 检查进程是否启动
【命令:检查进程是否启动】
docker ps【示例】
[root@localhost log]# docker ps
CONTAINER ID   IMAGE     COMMAND                   CREATED        STATUS        PORTS                                                  NAMES
29eac40ca4d7   redis     "docker-entrypoint.s…"   5 hours ago    Up 5 hours    0.0.0.0:6380->6379/tcp, :::6380->6379/tcp              redis_6380
a53717f1449d   redis     "docker-entrypoint.s…"   30 hours ago   Up 10 hours   0.0.0.0:6379->6379/tcp, :::6379->6379/tcp              redis_6379
[root@localhost log]#
2.7 检查(查看)日志
- 最后有Ready to accept connections即配置成功了
【命令:检查(查看)日志】
docker logs redis_6380

# 但是我们已经配置了日志文件redis.log,上述命令就不再起作用了,而是直接在文件中显示,可以这样查看:

cat redis.log
【示例】
[root@localhost log]# cd /usr/local/software/redis/6380/log
[root@localhost log]# ls
redis.log

[root@localhost log]# docker logs redis_6379

[root@localhost log]# cat redis.log
1:C 13 Jul 2023 09:13:20.731 # oO0OoO0OoO0Oo Redis is starting oO0OoO0OoO0Oo
1:C 13 Jul 2023 09:13:20.731 # Redis version=6.2.6, bits=64, commit=00000000, modified=0, pid=1, just started
1:C 13 Jul 2023 09:13:20.731 # Configuration loaded
1:S 13 Jul 2023 09:13:20.732 * monotonic clock: POSIX clock_gettime
1:S 13 Jul 2023 09:13:20.732 * Running mode=standalone, port=6379.
1:S 13 Jul 2023 09:13:20.732 # WARNING: The TCP backlog setting of 511 cannot be enforced because /proc/sys/net/core/somaxconn is set to the lower value of 128.
1:S 13 Jul 2023 09:13:20.732 # Server initialized
1:S 13 Jul 2023 09:13:20.733 # WARNING overcommit_memory is set to 0! Background save may fail under low memory condition. To fix this issue add 'vm.overcommit_memory = 1' to /etc/sysctl.conf and then reboot or run the command 'sysctl vm.overcommit_memory=1' for this to take effect.
1:S 13 Jul 2023 09:13:20.733 * Ready to accept connections
[root@localhost log]#
2.8 测试redis
【命令:测试redis】
docker exec -it redis_6380 bash

redis-cli

info replication
【示例】
[root@localhost conf]# docker exec -it redis_6380 bash
root@29eac40ca4d7:/data# redis-cli
127.0.0.1:6379> info replication
# Replication
role:slave
master_host:172.18.12.10
master_port:6379
master_link_status:up
master_last_io_seconds_ago:8
master_sync_in_progress:0
slave_read_repl_offset:70
slave_repl_offset:70
slave_priority:100
slave_read_only:1
replica_announced:1
connected_slaves:0
master_failover_state:no-failover
master_replid:e3f5862faa1ac57f592d26bc5af6c4d558718867
master_replid2:0000000000000000000000000000000000000000
master_repl_offset:70
second_repl_offset:-1
repl_backlog_active:1
repl_backlog_size:1048576
repl_backlog_first_byte_offset:1
repl_backlog_histlen:70
127.0.0.1:6379> exit
root@29eac40ca4d7:/data# exit
exit

[root@localhost conf]# docker exec -it redis_6379 bash
root@a53717f1449d:/data# redis-cli
127.0.0.1:6379> info replication
# Replication
role:master
connected_slaves:1
slave0:ip=172.18.12.11,port=6379,state=online,offset=154,lag=1
master_failover_state:no-failover
master_replid:e3f5862faa1ac57f592d26bc5af6c4d558718867
master_replid2:0000000000000000000000000000000000000000
master_repl_offset:154
second_repl_offset:-1
repl_backlog_active:1
repl_backlog_size:1048576
repl_backlog_first_byte_offset:1
repl_backlog_histlen:154
127.0.0.1:6379> exit
root@a53717f1449d:/data# exit
exit
[root@localhost conf]#
【示意图】


