相信大部分小伙伴在登录注册页面都看到过这样的验证码图片:

今天就带大家用实现一波这种验证码图片的生成,这在Django开发中可以拿来即用~
1. 首先导入必要的库:
import random
from PIL import Image, ImageDraw, ImageFont, ImageFilter
import os
验证码图片是需要画的,因此必须要使用python中画图工具,这里使用pillow,pip install pillow即可,然后在项目代码中导入PIL即可,注意,一定是PIL而不是pillow!如果你import pillow会报错。
2. 为了增加代码的可移植性,需要将字体文件的路径写成自动获取的绝对路径:
cur_filename = os.path.basename(os.path.abspath(__file__))
font_path = os.path.abspath(__file__).strip(cur_filename)
ttf_path = os.path.join(font_path, 'Monaco.ttf')
3. 由于验证码图片中的字体多种多样,需要额外下载需要的字体文件,我这里使用的是Monaco.ttf,下载地址http://d.xiazaiziti.com/en_fonts/fonts/m/Monaco.ttf
下载完成后,将字体文件放在代码目录同一级即可。
4. 用PIL画验证码图片
# 这里生成5个验证码元素:char_length=5
def check_code(width=120, height=30, char_length=5, font_file=ttf_path, font_size=28):
code = []
img = Image.new(mode='RGB', size=(width, height), color=(255, 255, 255))
draw = ImageDraw.Draw(img, mode='RGB')
def rndChar():
"""
生成随机字母
:return:
"""
# 如果想生成数字验证码用这一行
# return str(random.randint(0, 9))
# 生成字母验证码
return chr(random.randint(65, 90))
def rndColor():
"""
生成随机颜色
:return:
"""
# 可以根据自己的需求改颜色
return (random.randint(0, 255), random.randint(10, 255), random.randint(64, 255))
# 写文字
font = ImageFont.truetype(font_file, font_size)
for i in range(char_length):
char = rndChar()
code.append(char)
h = random.randint(0, 4)
# 将画布char_length等分,第一个字在第一等分:乘以0,第二个字在第二等分:乘以1……
draw.text([i * width / char_length, h], char, font=font, fill=rndColor())
# 写干扰点
for i in range(40):
draw.point([random.randint(0, width), random.randint(0, height)], fill=rndColor())
# 写干扰圆圈
for i in range(40):
draw.point([random.randint(0, width), random.randint(0, height)], fill=rndColor())
x = random.randint(0, width)
y = random.randint(0, height)
# PIL中draw.arc()方法是用来绘制圆弧的,圆弧所在正切矩形左上角坐标为(x, y)和右下角坐标为(x+4, y+4),圆弧起始角度为0,终止角度为90度
draw.arc((x, y, x + 4, y + 4), 0, 90, fill=rndColor())
# 画干扰线
for i in range(5):
x1 = random.randint(0, width)
y1 = random.randint(0, height)
x2 = random.randint(0, width)
y2 = random.randint(0, height)
# draw.line用来绘制直线,(x1, y1)是线起始点坐标,终止点坐标为(x2, y2)
draw.line((x1, y1, x2, y2), fill=rndColor())
img = img.filter(ImageFilter.EDGE_ENHANCE_MORE)
# img是图片,code是图片中元素的值,在web开发中可以用来校验用户输入的值是否等于验证码图片中的值
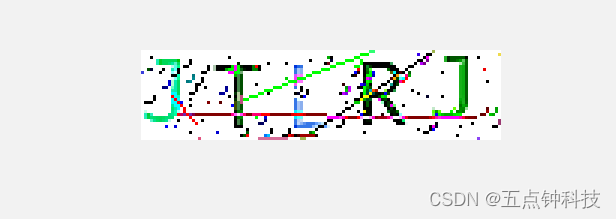
return img, ''.join(code)我们来验证一下:
if __name__ == '__main__':
    import os
    print(os.getcwd())
    img, _ = check_code()
    with open('test.png', 'wb') as f:
        img.save(f, format='png')
在当前路径下会生成一张图片,名为test.png:
大功告成!小伙伴们快来试一试吧~