Vue脚手架
3.1分析脚手架
- Vue脚手架是Vue官方提供的标准化开发工具(开发平台)
- 最新版本是4.X
- 文档
npm config set prefix "D:\evns\nodejs\node_modules\node_global"
npm config set cache "D:\evns\nodejs\node_modules\node_cache"
npm config set registry https://registry.npm.taobao.org
npm i -g yarn
yarn config set registry https://registry.npm.taobao.org
npm config get registry

npm install -g @vue/cli
vue create xxx
npm run serve
卸载
yarn global remove @vue/cli(可能不太行)

npm uninstall vue-cli -g

npm config ls -l
where vue
npm uninstall -g @vue/cli
目录
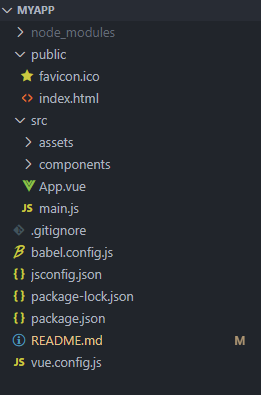
D:\vscode\myapp
├── public
|  ├── favicon.ico			页面标签
|  └── index.html			主页面
├── src
|  ├── assets				存放静态资源
|  |  └── logo.png
|  ├── components			存放组件
|  |  ├── SchoolVue.vue
|  |  └── StudentVue.vue
|  ├── App.vue				汇总所有组件
|  └── main.js				入口文件
├── babel.config.js			babel的配置文件
├── jsconfig.json
├── package-lock.json		包版本控制文件
├── package.json			应用包配置文件
├── README.md
└── vue.config.js
其中html结构分析
<!DOCTYPE html>
<html lang="">

<head>
    <meta charset="utf-8">
    <!-·针对IE浏览器的一个特殊配置,含义是让工E浏览器以最高的渲染级别渲染页面->
        <meta http-equiv="X-UA-Compatible" content="IE=edge">
        <!-开启移动端的理想视口->
            <meta name="viewport" content="width=device-width,initial-scale=1.0">
            <!-配置页签图标->
                <link rel="icon" href="<%=BASE URL %>favicon.ico">
                <!-配置网页标题->
                    <title>
                        <%=htmlWebpackPlugin.options.title %>
                    </title>
</head>

<body>I
    <noscript>
        <strong>We're sorry but <%=htmlWebpackPlugin.options.title %doesn't work </strong>
    </noscript>
    <div id="app"></div>
</body>

</html>
render
import Vue from 'Vue/Vue'
import App from './App.vue'

Vue.config.productionTip = false //生产提示符

new Vue({


    render: h => h(App),
}).$mount('#app')
这里引用的 vue 是残缺版的,缺少的了模板解析器,本质上了 vue 的文件夹下面的package里面的 module 所配置的 esm.js(默认引入的ES6模块化的 vue )
- 要么添加模板解析器
- 要么引用完整版的 vue
render简化
new Vue({


  	el:'#root',
  	render(createElement){


    	return createElement(App);
	}
   	--------------------------
    render:(createElement)=>{


    	return createElement(App);
	}
    --------------------------
     render:createElement=>{


    	return createElement(App);
	}
    --------------------------
     render:(createElement)=> hreateElement(App);
	--------------------------
     render: h=> h(App);
})
vm里面需要模板解析器,Vue的 标签在 package中有专门的库处理
总结
关于不同版本的Vue:
-
1,vue.js与vue,runtime,xxx,js的区别:
vue,js是完整版的Vue,包含:核心功能+模板解析器。
vue,runtime,xxx.js是运行版的Vue,只包含:核心功能:没有模板解析器。
-
因为vue.runtime.xxx.js没有模板解析器,所以不能使用template标签配置项,需要使用
-
render函数接收到的createElement函数去指定具体内容。
脚手架的配置
查看配置命令
vue inspect > output.js
如果要修改脚手架以 Vue-cli 为例(比如语法检查)
修改 vue.config.js,一定要重启
markdown的树结构创建
npm install -g tree-cli
//windows
treee -l 2, -o out.md --directoryFirst --ignore "node_modules/"
3.2ref属性
<template>
  <div>
    <h1>{

   { name }}快学Vue</h1>
    <button @click="showDom" ref="btn">点击展示DOM</button>
  </div>
</template>

<script>
export default {
  name: "School",
  data: {
    name: "yovvis",
  },
  methods: {
    showDom() {
      console.log("@@", this.$refs.btn);
    },
  },
};
</script>
总结
-
被用来给元素或子组件注册引用信息(id的替代者)
-
应用在htm1标签上获取的是真实D0M元素,应用在组件标签上是组件实例对象(vc)
-
使用方式:
打标识:<h1ref=“xxx”>,…或
获取:this.$refs.xxx
-
配合input框获取焦点使用
3.3props配置
<template>
  <div>
    <School :age="18" />
  </div>
</template>
<script>
export default {
  props: ["age"],//只接收
  props:{
      age:Number
  }// 限制类型
  props:{
    age:{
  		type:String,
    	defalut: 99
	}
  }
};
</script>
总结
配置项props
功能:让组件接收外部传过来的数据
(1).传递数据:
(2).接收数据:
第一种方式(只接收):
props:[‘name’]
第二种方式(限制类型):
props:{name:Number}
第三种方式(限制类型、限制必要性、指定默认值):
props:{name:{type:String,//类型 required:true,//必要性 default:‘老王’/默认值}
备注:props,是只读的,Vue底层会监测你对props的修改,如果进行了修改,就会发出警告,若业务需求确实需要修改,
那么请复制props的内容到data中一份,然后去修改data中的数据。
3.4mixin混合
局部混合
mixin.js
export const hunhe = {


    data() {


        return {


            x: 100
        }
    }
}
<script>
import { hunhe } from "../mixin";
export default {
  name: "School",
  data() {
    return {
      name: "yovvis",
    };
  },
  mixins: [hunhe],
  props:["age"]
};
</script>
全局混合
main.js
import { hunhe } from './mixin'
Vue.mixin(hunhe)
总结
功能:可以把说个组件共用的配置提取成一个混入对象
使用方式:
第一步定义混合,例如:
data()[…},
methods:{…}
第二步使用混入,例如:
(1).全局混入:Vue.mixin(xxx)
(2).局部混入:mixins:[‘xxx’]
3.5插件
plugin.js
export default {


    // Vue的构造方法
    install(Vue) {


        // 全局过滤器
        Vue.filter('myfilter', function (value) {


            return value.slice(0, 4);
        })
        // 原型方法
        // 自定义指令
        // 全局混入

    }
}
main.js
import Vue from 'Vue/Vue'
import App from './App'
import plugins from './plugin'

Vue.config.productionTip = false
Vue.use(plugins)
new Vue({


    render: h => h(App)

}).$mount("#app")
总结
功能:用于增强Vue
本质:包邻nsal1方法的一个对象,instal1的第一个参数是Vue,第二个以后的参数是插件使用者传递的数据。
定义插件:
对象.install=function(Vue,options){
//1.添加全局过滤器
Vue.filter(…)
//2.添加全局指令
Vue.directive(…)
//3.配置全局混入(合)
Vue.mixin(…)
//4.添加实例方法
Vue.prototype. m y M e t h o d f u n c t i o n ( ) . . . V u e . p r o t o t y p e . myMethod function (){...} Vue.prototype. myMethodfunction()...Vue.prototype.myProperty xxxx
}
使用插件 Vue.use
3.6Scoped样式
问题:谁import在后,会覆盖前者
<style lang="less">
</style>

<style scoped>
</style>
scoped只让样式在当前组件生效
**ps:**这里用less要安装less-loader
npm view webpack versions
npm view less-loader versions

npm i less-loader@7
3.7todo-list案例
组件化编码流程
- 实现静态页面:抽取组件,使用组件实现静态页面效果
- 展示动态数据:
- 数据类型、名称是什么
- 数据保存在哪个组件
- 交互—从绑定监听开始
生成NanoId
npm install nanoid
**ps:**通过prop传的时候如果是一个对象,那么用v-model修改obj的对象是不会被检测有问题
总结
-
组件化编码流程:
(1).拆分静态组件:组件要按照功能点拆分,命名不要与html元素冲突。
(2).实现动态组件:考虑好数据的存放位置,数据是一个组件在用,还是一些组件在用:
1).一个组件在用:放在组件自身即可。
2).一些组件在用:放在他们共同的父组件上(状态提升)。
(3),实现交互:从绑定事件开始。
-
propsi适用于:
(1),父组件=>子组件通信
(2).子组件=>父组件通信(要求父先给子一个函数)
-
使用v-model时要切记:v-model绑定的值不能是props传过来的值,因为props是不可以修改的!
-
props传过来的若是对象类型的值,修改对象中的属性时ue不会报错,但不推荐这样做。
3.8浏览器本地存储
<body>
    <button onclick="saveData()">点击保存一个数据</button>
    <button onclick="readData()">点击读取数据</button>
    <button onclick="removeData()">点击清除数据</button>
    <button onclick="clearData()">点击清空所有数据</button>
    <script type="text/javascript">
        function saveData() {


            let p = {

       id: '001', name: 'yovvis' };
            localStorage.setItem("msg", JSON.stringify(p))
        }

        function readData() {


            const p = localStorage.getItem("msg")
            console.log("", JSON.parse(p));
        }

        function removeData() {


            localStorage.removeItem("msg")
        }

        function clearData() {


            localStorage.clear()
        }
    </script>
</body>
localStorage和sessionStorage一样
总结
webStorage
-
存储内容大小一般支持5MB左右(不同浏览器可能还不一样)
-
浏览器端通过Window.sessionStorage和Window.localStorage属性来实现本地存储机制。
-
相关API:
-
xxxxxStorage.setItem(‘key’,‘value’);
该方法接受一个键和值作为参数,会把键值对添加到存储中,如果键名存在,则更新其对应的值。
-
xxxxxStorage.getItem(‘person’);
该方法接受一个键名作为参数,返回键名对应的值。
-
xxxxxStorage.removeItem(‘key’);
该方法接受一个键名作为参数,并把该键名从存储中删除。
-
xxxxxStorage.clear()
该方法会清空存储中的所有数据。
-
-
备注:
- SessionStorage存储的内容会随着浏览器窗口关闭而消失。
- LocalStorage存储的内容,需要手动清除才会消失。
- xxxxxStorage.getItem(xxx)如果XXx对应的value?获取不到,那么getltem的返回值是nul。
- JSoN.parse(nul1)的结果依然是null。
3.9todoList本地存储
todolist: Json.parse(localStorage.getItem(“todoList”)) || []
简略:这里要用深度监视
watch: {


    todoList: {


      deep: true,
      handler(todoList) {


        localStorage.setItem("todoList", JSON.stringify(todoList));
      },
    },
 },
3.10组件自定义事件
内置事件是给html用的
自定义事件是给组件用的
绑定事件
例如
App.vue
<Student @yovvis="showStuName" />
methods: {
    showStuName(name) {
      console.log("@", name);
    },
  },
Student.vue
<template>
  <div>
    <h1>快学Vue!!!</h1>
    <h1>学生姓名:{

   { name }}</h1>
    <h1>学生年龄:{

   { age }}</h1>
    <button @click="showName">点击展示学生姓名</button>
  </div>
</template>
 methods: {
    showName() {
      // console.log("##", this.name);
      this.$emit("yovvis", this.name);
    },
  },
除了使用@xxx(v-on:xxx)还可以在组件身上自定义ref属性然后再mounted方法中调用回调函数
mounted(){
	this.refs.(ref).$on("xxx",this.method);
}
解绑事件
  methods: {
    showName() {
      // console.log("##", this.name);
      this.$off("yovvis");
	  this.$off(["yovvis","demo"]);
      this.$off();
    },
  },
自杀原生的dom还是有用的,但是自定义事件都失效了
总结
-
一种组件间通信的方式,适用于:
子组件===>父组件 -
使用场景:A是父组件,B是子组件,B想给A传数据,那么就要在A中给B绑定自定义事件(
事件的回调在A中)。 -
绑定自定义事件:
-
第一种方式,在父组件中:
<Demo@yovvis="test"/>或<Demo v-on:yovvis="test"/> -
第二种方式,在父组件中:
<Demo ref="demo"/> mounted(){ this.$refs.xxx.$on('yovvis',this.test) } -
若想让自定义事件只能触发一次,可以使用once修饰符,或$once方法。
-
-
触发自定义事件:this.$emit(‘yovvis’,数据(参数))
-
解绑自定义事件this.$off(‘yovvis’)
-
组件上也可以绑定原生DOM事件,需要使用
native修饰符。 -
注意:通过this. r e f s . x x x . refs.xxx. refs.xxx.on(‘yovvis’,回调)绑定自定义事件时,回调要么配置在methods中,要么用箭头函数,否则this指向会出问题
@这里的native也是为什么vue组件只允许有一个外部div
3.11todoList事件
App.vue
<template>
  <div id="root">
    <div class="todo-container">
      <div class="todo-wrap">
        <UserHeader @addTodo="addTodo" :todoList="todoList" />
      </div>
    </div>
  </div>
</template>
Header.vue
methods: {
    add(e) {
      if (this.title != null && this.title != "") {
        // 包装obj
        const obj = { id: nanoid(), name: this.title, done: false };
        this.$emit("addTodo", obj);
        this.title = "";
      }
    },
  },
这里改造就很简单了
3.12全局事件总线
任意组件间通信
- 保证所有组件都能看到
- 可以调用到 o n 、 on、 on、off、$emit
在
beforeCreate生命周期钩子函数中将\$bus添加到Vue.prototype是因为此时组件实例已经创建,但是还没有初始化。在这个阶段,你可以确保在所有组件的created钩子函数中都能够访问到\$bus。如果你在
created生命周期钩子函数中添加\$bus,可能会导致某些组件无法正常访问它,因为某些组件的created钩子函数可能在其他组件之前执行。通过在beforeCreate中添加\$bus,可以确保所有组件的created钩子函数中都能够正确访问到\$bus对象。
接收方注册、发送方触发
示例
main.js
new Vue({


    render: h => h(App),
    beforeCreate() {


        Vue.prototype.$bus = this
    },
}).$mount("#app")
接收方注册,回调
 mounted() {
    this.$bus.$on("deleteTodo", this.deleteTodo);
  },
  beforeDestroy() {
    this.$bus.$off("deleteTodo");
  },
发送方触发,传参
 methods: {


    handleDelete(id) {


      // this.deleteTodo(id);
      this.$bus.$emit("deleteTodo", id);
    },
  },
总结
-
一种组件间通信的方式,适用于
任意组件间通信。 -
安装全局事件总线:
new Vue({ …… beforeCreate(){ Vue.prototype.$bus = this }, }) -
使用事件总线:
-
接收数据:A组件想接收数据,则在A组件中给$bus绑定自定义事件,事件的
回调留在A组件自身。B提供数据
methods(){ demo(data){ ……} } …… mounted(){ this.$bus.$emit("xxxx",this.demo); } -
提供数据:this. b u s . bus. bus.emit(‘xxxx’,数据)
-
-
最好在beforeDestroy钩子中,用$off去解绑
当前组件所用到的事件。
3.13todolist总线
参考3.12
3.14消息订阅与发布
需要第三方库pubsub-js
示例
订阅方订阅,回调
  mounted() {


    this.pubid = pubsub.subscribe("deleteTodo", this.deleteTodo);// deleteTodo第一次参数要_
  },
  beforeDestroy() {


    pubsub.unsubscribe("pubid");
  },
发布方发布,传参
  methods: {


    handleCheck(id) {


      this.checkeTodo(id);
    },
    handleDelete(id) {


      pubsub.publish("deleteTodo", id);
    },
  },
总结
-
一种组件间通信的方式,适用于
任意组件间通信。 -
使用步骤:
-
安装pubsub:npm i pubsub-js
-
引入:import pubsub from’pubsub-js’
-
接收数据:A组件想接收数据,则在A组件中订阅消息,订阅的回调留在A
组件自身。methods(){ demo(data){ ……} } …… mounted(){ // 这里如果是直接用function(){}回调,由于是用的第三方库所以this的话是undefined this.pid=pubsub.subscribe('xxx',this.demo) } -
提供数据:pubsub.pub1ish(‘xxx’,数据)
-
最好在beforeDestroy钩子中,用PubSub.unsubscribe(pid)去
取消订阅。
-
Vue的插件是看不到第三方库的事件的
3.15todolist订阅
参考3.14
3.16编辑nextick
<span v-show="!todo.isEdit">{

   { todo.name }}</span>
<button class="btn btn-edit" @click="handleEdit(todo)" v-show="!todo.isEdit">编辑</button>
methods: {
    handleEdit(todo) {
      if (todo.hasOwnProperty("isEdit")) {
        todo.isEdit = true;
      } else {
        this.$set(todo, "isEdit", true);
      }

      this.$nextTick(function () {
        this.$refs.inputTitle.focus();
      });
    },
    handleBlur(todo, e) {
      todo.isEdit = false;
      if (!e.target.value.trim()) {
        alert("不能为空");
      } else {
        this.$bus.$emit("updateTodo", todo.id, e.target.value);
      }
    },
}
这里$nextTick可以用定时器替换
作用是让下一次触发,实际上就是代码执行到这里先跳过,遇到等下一次解析dom完毕后触发
3.17过渡和动画
-
作用:在任插入、更新或移除DOM元素时,在台适的时候给元素添加样式类名。
-
图示:
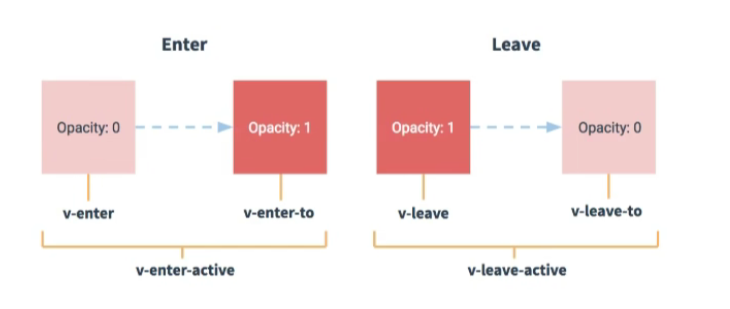
-
写法:
-
准备好样式:
-
元素进入的样式:
1.v-enter:进入的起点
2.V-enter.active:进入过程中
3.V-enter.to:进入的终点
-
元素离开的样式:
1.v-leave:离开的起点
2.v-leave-active:离开过程中
3.v-leave-to:离开的终点
-
-
使用包裹要过度的元素,并配置name属性:
<transition name="hello"> <h1 v-show="isShow">你好啊!</h1> </transition> -
备注:若有多个元素需要过度,则需要使用::,且每个元素都要指定key值。
-
.todo-enter-active{


    animation:yovvis 0.5s linear;
}
hello-leave-active{


    animation:yovvis 0.5s linear reverse;
}

@keyframes yovvis{


	from{


        transform:translatex(-100%);
    }
	to{


        transform:translatex(0px);}
}
3.18todolist动画
}
这里$nextTick可以用定时器替换

作用是让下一次触发,实际上就是代码执行到这里先跳过,遇到等下一次解析dom完毕后触发

## 3.17过渡和动画

1. 作用:在任插入、更新或移除DOM元素时,在台适的时候给元素添加样式类名。

2. 图示:

	[外链图片转存中...(img-hUpJlVNO-1688005277058)]

3. 写法:

	1. 准备好样式:

		- 元素进入的样式:

			1.v-enter:进入的起点

			2.V-enter.active:进入过程中

			3.V-enter.to:进入的终点

		- 元素离开的样式:

			1.v-leave:离开的起点

			2.v-leave-active:离开过程中

			3.v-leave-to:离开的终点

	2. 使用<transition>包裹要过度的元素,并配置name属性:

		~~~html
		<transition name="hello">
			<h1 v-show="isShow">你好啊!</h1>
		</transition>
		~~~

	3. 备注:若有多个元素需要过度,则需要使用:<transition-group>:,且每个元素都要指定key值。

~~~css
.todo-enter-active{
    animation:yovvis 0.5s linear;
}
hello-leave-active{
    animation:yovvis 0.5s linear reverse;
}

@keyframes yovvis{
	from{
        transform:translatex(-100%);
    }
	to{
        transform:translatex(0px);}
}
3.18todolist动画
参考3.17