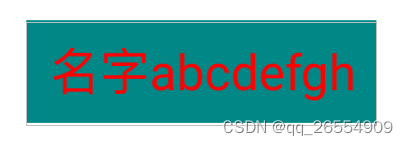
效果展示:
代码解析:
1、首先设置自定义属性(res/values下新建一个attrs.xml文件)
<?xml version="1.0" encoding="utf-8"?>
<resources>

    <!--    name 自定义view的名字  CustomTextView-->
    <declare-styleable name="CustomTextView">
        <!--        name 属性名称  format:格式

                    string:文字   color:颜色
                    dimension: 宽高,字体大小
                    integer:数字  reference:资源(drawable)

        自定义属性不能和系统有的属性重名(如:textview有text属性,自定义的name不能使用name)
        -->
        <attr name="iText" format="string" />
        <attr name="iTextColor" format="color" />
        <attr name="iTextSize" format="dimension" />
        <attr name="iMaxLength" format="integer" />
<!--        自定义view都是继承自view,背景由view管理,所以iBackground可以去掉-->
<!--        <attr name="iBackground" format="reference|color" />-->

        <!--枚举-->
        <attr name="iTnputType">
            <enum name="number" value="1" />
            <enum name="text" value="2" />
            <enum name="password" value="3" />
        </attr>
    </declare-styleable>

</resources>
2、需要创建一个类继承自view ,重写构造方法
public class CustomTextView extends View {


    private String mText;
//    字体默认大小(像素)
    private int mTextSize=18;
//    默认颜色
    private int mTextColor= Color.BLUE;

//   画笔
    private Paint mPaint;

//    在new的时候调用
    public CustomTextView(Context context) {


        this(context,null);
    }

//    在布局Layout中使用
    public CustomTextView(Context context, @Nullable AttributeSet attrs) {


        this(context, attrs,0);
    }

//    在style中使用
//    @style="style/default"
    public CustomTextView(Context context, @Nullable AttributeSet attrs, int defStyleAttr) {


        super(context, attrs, defStyleAttr);

        TypedArray array = context.obtainStyledAttributes(attrs, R.styleable.CustomTextView);

        mText=array.getString(R.styleable.CustomTextView_iText);
        mTextColor=array.getColor(R.styleable.CustomTextView_iTextColor,mTextColor);
        mTextSize=array.getDimensionPixelSize(R.styleable.CustomTextView_iTextSize,sp2px(mTextSize));
        array.recycle(); //回收TypedArray

        mPaint=new Paint();
        mPaint.setAntiAlias(true); //抗锯齿
        mPaint.setStyle(Paint.Style.FILL); //空心
        mPaint.setTextSize(mTextSize); // 画笔大小
        mPaint.setColor(mTextColor); //颜色
    }
3、onMeasure中测量尺寸
    @Override
    protected void onMeasure(int widthMeasureSpec, int heightMeasureSpec) {


        super.onMeasure(widthMeasureSpec, heightMeasureSpec);

//        获取宽高的模式
       int widthMode=MeasureSpec.getMode(widthMeasureSpec);
       int heightMode=MeasureSpec.getMode(heightMeasureSpec);

 //    1、 获取宽高的值 EXACTLY模式不需要计算直接测量,给多少就是多少

       int widthSize=MeasureSpec.getSize(widthMeasureSpec);
       int heightSize=MeasureSpec.getSize(heightMeasureSpec);

//     2、At_MOST模式是wrap_content 需要计算

       if (widthMode==MeasureSpec.AT_MOST){


//           计算的宽度与字体的长度和字体的大小有关  用画笔来测量
           Rect bounds=new Rect();
//           获取文本的Rect(矩形)
           mPaint.getTextBounds(mText,0,mText.length(),bounds);
           // getPaddingStart()+getPaddingEnd()不添加这个在页面布局中添加padding值是无效的
           widthSize=bounds.width()+getPaddingStart()+getPaddingEnd();
       }

        if (heightMode==MeasureSpec.AT_MOST){


//           计算的宽度与字体的长度和字体的大小有关  用画笔来测量
            Rect bounds=new Rect();
//           获取文本的Rect(矩形)
            mPaint.getTextBounds(mText,0,mText.length(),bounds);
            heightSize=bounds.height()+getPaddingTop()+getPaddingBottom();
        }
//        设置控件的宽高
       setMeasuredDimension(widthSize,heightSize);
    }
4、绘制
    @Override
    protected void onDraw(Canvas canvas) {


        super.onDraw(canvas);
        画弧
//        canvas.drawArc();
        画圆
//        canvas.drawCircle();
//        画文字  text,x,y,paint
//        x: 开始的位置
//        y:基线  baseLine
//        dy:代表高度的一半到baseLine的距离
        Paint.FontMetricsInt fontMetricsInt = mPaint.getFontMetricsInt();
//        top是一个负值,bottom是一个正值(可以打印看正负值)
//        bottom:是baseLine到文字底部的距离
//        top是baseLin到文字顶部的距离
         int dy=(fontMetricsInt.bottom-fontMetricsInt.top)/2-fontMetricsInt.bottom;
         int baseLine=getHeight()/2+dy;
        int x=getPaddingStart();
        canvas.drawText(mText,x,baseLine,mPaint);
        画线
//        canvas.drawLine();
    }
5、布局文件中使用
(要在父布局添加 xmlns:myApp=“http://schemas.android.com/apk/res-auto” )
<?xml version="1.0" encoding="utf-8"?>
<androidx.constraintlayout.widget.ConstraintLayout xmlns:android="http://schemas.android.com/apk/res/android"
    xmlns:app="http://schemas.android.com/apk/res-auto"
    xmlns:myApp="http://schemas.android.com/apk/res-auto"
    xmlns:tools="http://schemas.android.com/tools"
    android:layout_width="match_parent"
    android:layout_height="match_parent"
    tools:context=".MainActivity">

    <com.example.myviewstudy.CustomTextView
        android:layout_width="wrap_content"
        android:layout_height="wrap_content"
        myApp:iText="名字abcdefgh"
        myApp:iTextColor="#FF0000"
        myApp:iTextSize="20sp"
        android:padding="10dp"
        android:background="@color/teal_700"
        app:layout_constraintBottom_toBottomOf="parent"
        app:layout_constraintEnd_toEndOf="parent"
        app:layout_constraintStart_toStartOf="parent"
        app:layout_constraintTop_toTopOf="parent" />

</androidx.constraintlayout.widget.ConstraintLayout>