这是第一篇关于Panda3D的学习笔记,不求能给大家以帮助,只希望记录下自己学习的过程。
今天学习的是panda3D自带的第一个示例程序,小行星。相比起完整的把所有语法看一遍,我更喜欢从实践中学习。
“本示例程序显示如何使用任务。任务是在程序的每一帧期间运行的函数。Panda3D在任何程序中运行一些任务,但可能会添加其他任务。对于本教程,除了检查碰撞之外,还将使用任务来更新船舶,小行星和子弹的位置。要做到这一点,您需要知道的所有数据是已经过了多少时间以及每个对象的速度” 这是官方文档的说法。
1. dt = globalClock.getDt()
用于记录上一帧结束至今所经历的时间
2. 任务
这是示例程序的核心内容,也是我今天学习的重点,对照https://www.panda3d.org/manual/index.php/Tasks进行学习。
任务是在应用程序执行时每帧调用一次的特殊功能。
任务是用函数或类方法定义的; 此功能是该任务的主要入口点,在任务运行时将在每帧中调用一次。默认情况下,该函数接收一个参数,它是任务对象; 任务对象携带有关任务本身的信息,例如任务已运行的时间量。
from direct.task import Task 导入Task类

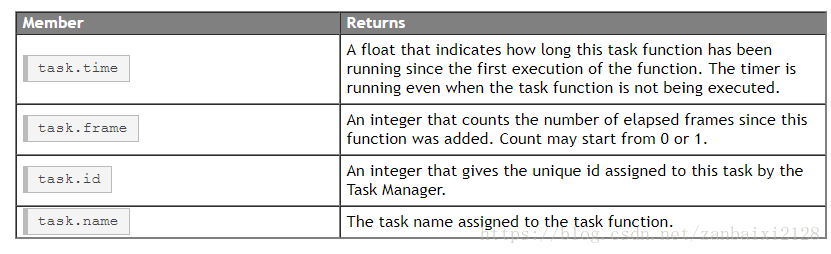
返回值:

task的一些相关属性
tskMgr 任务管理器
添加任务及延时任务
taskMgr.add(exampleTask, 'MyTaskName')
taskMgr.doMethodLater(delayTime, myFunction, 'Task Name')
例程实例:
taskMgr.add(self.gameLoop, "gameLoop")
def gameLoop(self, task):
return Task.cont
必须感叹一下panda3d的例程的注释还是非常充分的,可惜网上的相关资料确实太少,而且英文的学习效率也不如中文
3. 模型图片加载
这部分里的model的egg文件还不是太懂,希望以后能弄明白
def loadObject(tex=None, pos=LPoint3(0, 0), depth=SPRITE_POS, scale=1,
               transparency=True):
    # Every object uses the plane model and is parented to the camera
    # so that it faces the screen.
    obj = loader.loadModel("models/plane")
    obj.reparentTo(camera)

    # Set the initial position and scale.
    obj.setPos(pos.getX(), depth, pos.getY())
    obj.setScale(scale)

    # This tells Panda not to worry about the order that things are drawn in
    # (ie. disable Z-testing).  This prevents an effect known as Z-fighting.
    obj.setBin("unsorted", 0)
    obj.setDepthTest(False)

    if transparency:
        # Enable transparency blending.
        obj.setTransparency(TransparencyAttrib.MAlpha)

    if tex:
        # Load and set the requested texture.
        tex = loader.loadTexture("textures/" + tex)
        obj.setTexture(tex, 1)

    return obj
通过这个函数,可以load图片。
写到这里突然想到,这个LPoint3和LVector3可能分别是三维数组类(三维向量数组类),并拥有getX,getY等方法。
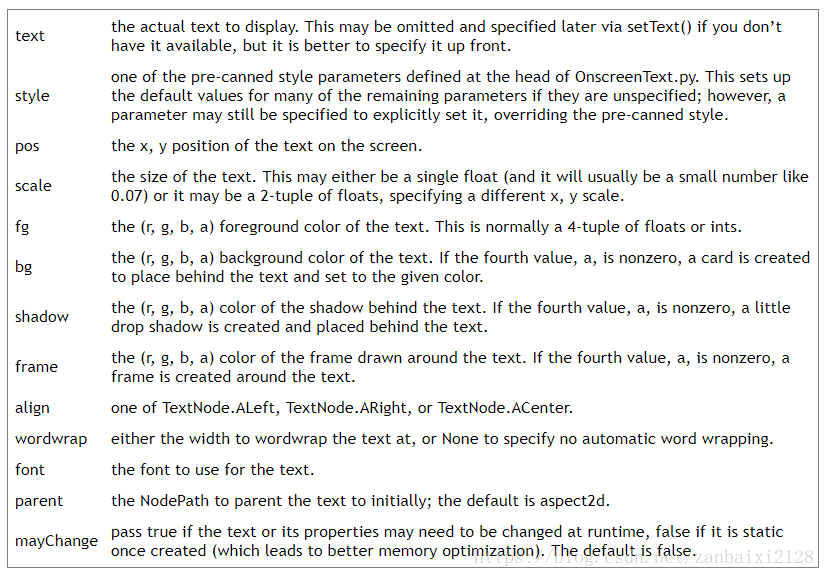
4. OnscreenText的使用
一个用来快速删改界面文字的函数的类
from direct.gui.OnscreenText import OnscreenText
textObject = OnscreenText(text = 'my text string', pos = (-0.5, 0.02), scale = 0.07)
5. setPythonTag
Also, by using the functions setTag() and getTag() you can store your own information in key value pairs. For example:
myNodePath.setTag("Key", "value")
You can also store Python objects as tags by using the setPythonTag function with the same arguments.
例程中的使用:
def setVelocity(self, obj, val):
    obj.setPythonTag("velocity", val)
和getPythonTag配合使用,记录数据
6. 事件处理程序
vents occur either when the user does something (such as clicking a mouse or pressing a key) or when sent by the script using messenger.send(). When an event occurs, Panda's "messenger" will check to see if you have written an "event handler" routine. If so, your event handler will be called. The messenger system is object-oriented, to create an event handler, you have to first create a class that inherits from DirectObject. Your event handler will be a method of your class.
myDirectObject.accept('Event Name',myDirectObjectMethod)
myDirectObject.acceptOnce('Event Name',myDirectObjectMethod)
例程中的
self.accept("escape", sys.exit)  # Escape quits
# Other keys events set the appropriate value in our key dictionary
self.accept("arrow_left",     self.setKey, ["turnLeft", 1])
self.ac cept("arrow_left-up",  self.setKey, ["turnLeft", 0])
self.accept("arrow_right",    self.setKey, ["turnRight", 1])
self.accept("arrow_right-up", self.setKey, ["turnRight", 0])
self.accept("arrow_up",       self.setKey, ["accel", 1])
self.accept("arrow_up-up",    self.setKey, ["accel", 0])
self.accept("space",          self.setKey, ["fire", 1])