大家好,我是邵奈一,一个不务正业的程序猿、正儿八经的斜杠青年。
1、世人称我为:被代码耽误的诗人、没天赋的书法家、五音不全的歌手、专业跑龙套演员、不合格的运动员…
2、这几年,我整理了很多IT技术相关的教程给大家,爱生活、爱分享。
3、如果您觉得文章有用,请收藏,转发,评论,并关注我,谢谢!
博客导航跳转(请收藏):邵奈一的技术博客导航
| 公众号 | 微信 | CSDN | 掘金 | 51CTO | 简书 | 微博 |
教程目录
0x00 教程内容
- 本教程配置
苹果电脑配置如下:
- M1 Max
- 系统版本13.0 (22A380)
但是我觉得问题不大,主要还是看我的教程。
- 安装Miniforge、Tensorflow、Jupyter Lab
我现在需要安装Anaconda,但是我这里直接使用了Miniforge替代,然后安装Tensorflow、Jupyter Lab等,除了我总结我的搭建过程,还会在文章最后附带上一些有意义的参考链接。
0x01 下载安装并配置Miniforge
1. 下载并安装Miniforge
从 https://github.com/conda-forge/miniforge下载 Miniforge3-MacOSX-arm64。如下图:

下载完后,直接在终端执行以下命令安装Miniforge:
bash Miniforge3-MacOSX-arm64.sh
其实还是比较顺利的,安装完后,Python的版本会被默认使用新安装Python版本,可以执行查看。
2. 配置Miniforge
(1)配置环境变量
接着,可以配置一下环境变量,我是配置在~/.bash_profile:
export MINIFORCE_HOME=/Users/shaonaiyi/app/miniforge3
export PATH=$MINIFORCE_HOME/bin:$PATH
(2)添加国内镜像源
配置命令如下:
conda config --add channels https://mirrors.tuna.tsinghua.edu.cn/anaconda/pkgs/free/
conda config --add channels https://mirrors.tuna.tsinghua.edu.cn/anaconda/pkgs/main/
查看镜像源:
conda config --show channels
如果配置正确,可以看得到刚刚配置上的镜像源。
说明:若在本文以后的配置中,有些地方网速还是慢,开启“全局模式”可解决。
conda config --set show_channel_urls yes
0x02 安装Tensorflow
1. 创建虚拟环境
# 创建名为“tf”的虚拟环境:
conda create -n tf python=3.9.7
# 激活虚拟环境:
conda activate tf
删除上述虚拟环境的命令为(此命令不需要执行):
conda remove -n tf --all
2. 安装Tensorflow
在虚拟机中执行如下命令安装:
python -m pip install tensorflow
python -m pip install tensorflow-metal
注意:新版本里第一行是 tensorflow ,不是 tensorflow-macos !
3. 测试Tensorflow
安装好后,运行如下代码:
import tensorflow as tf

cifar = tf.keras.datasets.cifar100
(x_train, y_train), (x_test, y_test) = cifar.load_data()
model = tf.keras.applications.ResNet50(
    include_top=True,
    weights=None,
    input_shape=(32, 32, 3),
    classes=100,)

loss_fn = tf.keras.losses.SparseCategoricalCrossentropy(from_logits=False)
model.compile(optimizer="adam", loss=loss_fn, metrics=["accuracy"])
model.fit(x_train, y_train, epochs=5, batch_size=64)
最好一行一行粘贴。
如果环境没有问题,结果如下:
Type "help", "copyright", "credits" or "license" for more information.
>>> import tensorflow as tf
>>> cifar = tf.keras.datasets.cifar100
>>> (x_train, y_train), (x_test, y_test) = cifar.load_data()
Downloading data from https://www.cs.toronto.edu/~kriz/cifar-100-python.tar.gz
169001437/169001437 [==============================] - 37s 0us/step
>>> model = tf.keras.applications.ResNet50(
...     include_top=True,
...     weights=None,
...     input_shape=(32, 32, 3),
...     classes=100,)
2024-01-10 14:54:28.725324: I metal_plugin/src/device/metal_device.cc:1154] Metal device set to: Apple M1 Max
2024-01-10 14:54:28.725346: I metal_plugin/src/device/metal_device.cc:296] systemMemory: 64.00 GB
2024-01-10 14:54:28.725351: I metal_plugin/src/device/metal_device.cc:313] maxCacheSize: 24.00 GB
2024-01-10 14:54:28.725396: I tensorflow/core/common_runtime/pluggable_device/pluggable_device_factory.cc:306] Could not identify NUMA node of platform GPU ID 0, defaulting to 0. Your kernel may not have been built with NUMA support.
2024-01-10 14:54:28.725429: I tensorflow/core/common_runtime/pluggable_device/pluggable_device_factory.cc:272] Created TensorFlow device (/job:localhost/replica:0/task:0/device:GPU:0 with 0 MB memory) -> physical PluggableDevice (device: 0, name: METAL, pci bus id: <undefined>)
>>>
>>> loss_fn = tf.keras.losses.SparseCategoricalCrossentropy(from_logits=False)
>>> model.compile(optimizer="adam", loss=loss_fn, metrics=["accuracy"])
>>> model.fit(x_train, y_train, epochs=5, batch_size=64)
Epoch 1/5
2024-01-10 14:54:31.761634: I tensorflow/core/grappler/optimizers/custom_graph_optimizer_registry.cc:117] Plugin optimizer for device_type GPU is enabled.
782/782 [==============================] - 55s 57ms/step - loss: 4.7738 - accuracy: 0.0716
Epoch 2/5
782/782 [==============================] - 41s 53ms/step - loss: 4.2306 - accuracy: 0.1250
Epoch 3/5
782/782 [==============================] - 43s 55ms/step - loss: 3.7030 - accuracy: 0.1791
Epoch 4/5
782/782 [==============================] - 42s 54ms/step - loss: 3.3660 - accuracy: 0.2270
Epoch 5/5
782/782 [==============================] - 43s 55ms/step - loss: 3.1421 - accuracy: 0.2694
<keras.src.callbacks.History object at 0x2944ad730>
0x03 安装Jupyter Lab
1. 安装依赖
安装必须的包(此处,我是在虚拟环境中执行):
conda install libjpeg
conda install -y matplotlib jupyterlab
注意: libjpeg 是 matplotlib 需要依赖的库。
执行以下命令:
pip install -U --force-reinstall charset-normalizer
使用 pip 强制重新安装charset-normalizer包,即使它已经是最新版本。
(1) --force-reinstall : 这个选项会强制重新安装包,即使该包已经是最新的。这有时在某些情况下是有用的,例如当包的安装有问题或损坏时。
(2) -charset-normalizer 是一个用于字符编码归一化的Python库,它可以将文本转换为UTF-8格式,确保在不同编码之间的一致性。
conda install ipykernel //安装ipykernel
sudo python -m ipykernel install --name tf //在ipykernel中安装当前环境
2. 测试Jupyter Lab
装好后,就可以直接执行:
jupyter lab
就可以进入notebook目录了,记得选择刚刚Kernel=> tf ,然后执行下面代码:
from tensorflow.keras import layers
from tensorflow.keras import models
import tensorflow as tf
import time

begin_time = time.time()

print(f"Running TensorFlow {

      tf.__version__} with {

      len(tf.config.list_physical_devices('GPU'))} GPUs recognized")

model = models.Sequential()
model.add(layers.Conv2D(32, (3, 3), activation='relu', input_shape=(28, 28, 1)))
model.add(layers.MaxPooling2D((2, 2)))
model.add(layers.Conv2D(64, (3, 3), activation='relu'))
model.add(layers.MaxPooling2D((2, 2)))
model.add(layers.Conv2D(64, (3, 3), activation='relu'))
model.add(layers.Flatten())
model.add(layers.Dense(64, activation='relu'))
model.add(layers.Dense(10, activation='softmax'))
model.summary()

from tensorflow.keras.datasets import mnist
from tensorflow.keras.utils import to_categorical
(train_images, train_labels), (test_images, test_labels) = mnist.load_data()
train_images = train_images.reshape((60000, 28, 28, 1))
train_images = train_images.astype('float32') / 255
test_images = test_images.reshape((10000, 28, 28, 1))
test_images = test_images.astype('float32') / 255
train_labels = to_categorical(train_labels)
test_labels = to_categorical(test_labels)
model.compile(optimizer='rmsprop',
              loss='categorical_crossentropy',
              metrics=['accuracy'])
model.fit(train_images, train_labels, epochs=5, batch_size=64)
test_loss, test_acc = model.evaluate(test_images, test_labels)
test_acc
end_time = time.time()

print('Total time: {} s'.format(int(end_time-begin_time)))
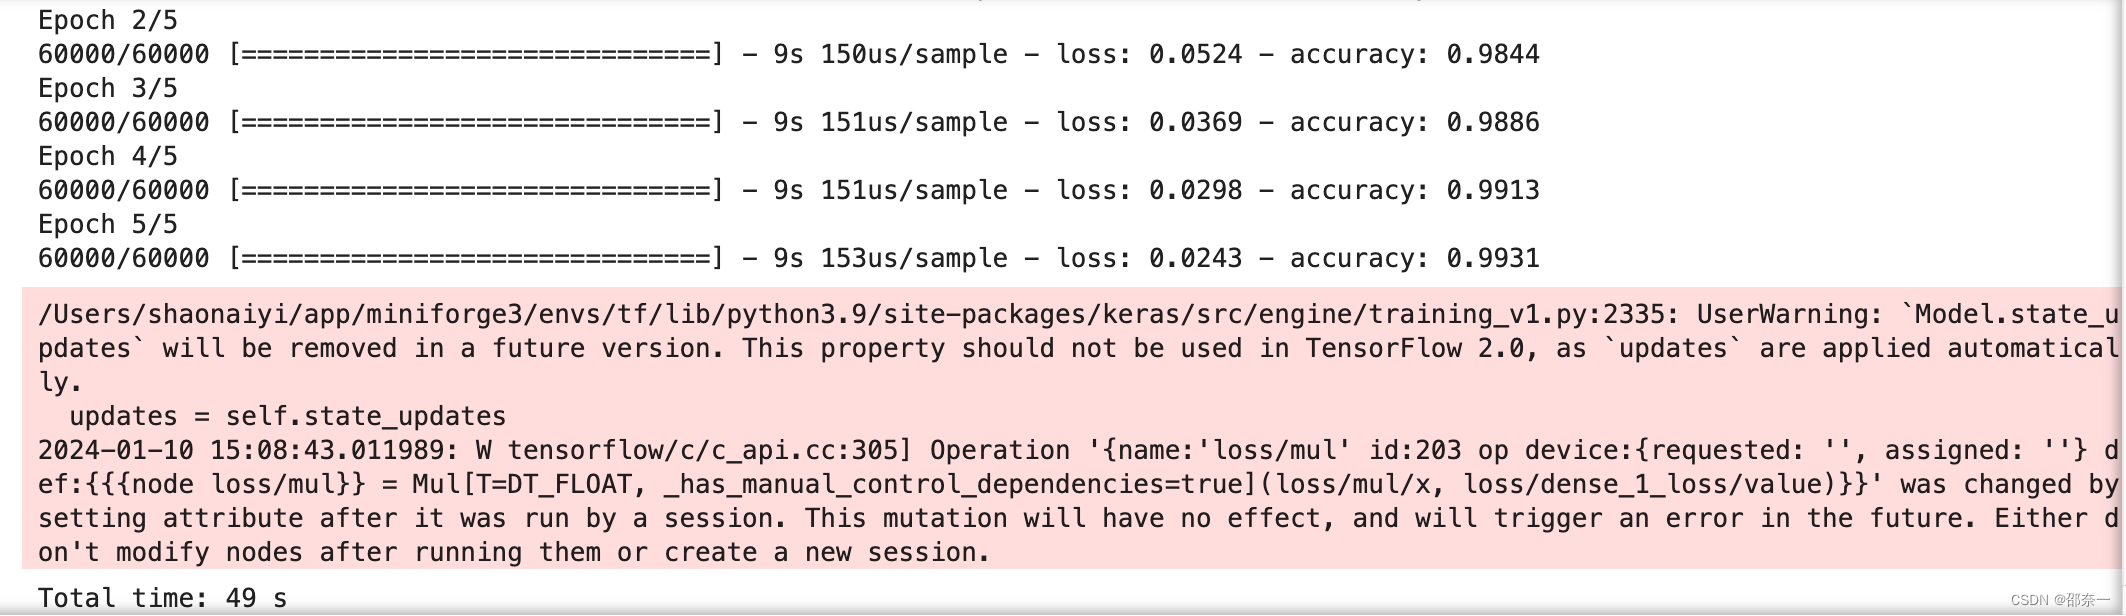
执行后,如果没有报错,则应该是这样:
如果弹窗报错,可能是哪一步错误了,建议重新检查或者重装。
3. 一个尝试
安装好后,发现在哪各路径执行jupyter lab,新建的项目文件就会是在哪个路径。我尝试了以下步骤,发现还是无法修改(请不要根据下面教程操作):
修改/Users/shaonaiyi/app/miniforge3/envs/tf/lib/python3.9/site-packages/notebook_shim/tests/confs/jupyter_notebook_config.py文件,实际上是你的envs/tf/路径下的文件。
然后将c.ServerApp.notebook_dir 路径进行修改即可,我的如下:
c.ServerApp.notebook_dir = '/Users/shaonaiyi/my-workspace/jupyter'
注意:我的用户名为 shaonaiyi :
发现不生效,说明虚拟环境是不支持这样改的,你可以直接去修改不是虚拟环境下的 jupyter_notebook_config.py 试试。会不会有惊喜呢?!
参考链接:
- Mac M1芯片安装miniAnaconda、Jupyter、TensorFlow环境
- MacBook M1配置Pytorch
- 可能遇到的错误:报错:Kernel Restarting The kernel for Untitled.ipynb appears to have died. It will restart automatical
0xFF 总结
- 我尝试过去限定TensorFlow的版本,比如设置成2.10,但是发现在装metal的时候报错了,因为找不到…所以,我最后干脆不加上版本,直接全部默认装就可以了。
- 关注我,学习更多大数据与人工智能知识。
邵奈一 原创不易,如转载请标明出处,教育是一生的事业。