前提
工作环境:JDK 1.8、Mysql 5.7.18、Intellij IDEA 2018.1、Tomcat 8.5、Maven
框架版本:Spring 4.2.0.RELEASE、SpringMVC 4.2.0.RELEASE、MyBatis 3.3.0
一、项目目录结构
目录结构如下:
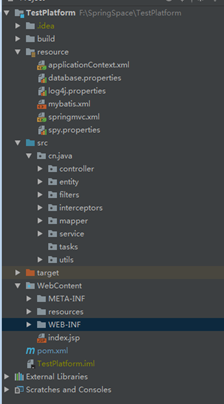
接口实现代码 cn.java
cn.java.controller 请求接口 cn.java.entity 实体对象 cn.java.service 业务接口层 cn.java.service.impl业务实现层 cn.java.mapper数据库相关 cn.java.controller.exception 捕获异常
cn.java.filters 过滤器(针对JSP) cn.java.interceptors 拦截器(针对controller) cn.java.tasks 任务
cn.java.utils 工具集
resource配置文件(db/springmvc/log4j等)
applicationContext.xml database.properties log4j.porperties springmvc.xml
前端文件(WebContent)
WebContent/pages/front 存放前端页面(jsp文件) /WebContent/resources/css 存放css文件
/WebContent/resources/images 存放图片 /WebContent/resources/js 存放js
/WebContent/resources/upload 上传 /WebContent/lib/ 存放工程中lib包
/WebContent/WEB-INF/web.xml工程配置文件 /WebContent/index.jsp工程默认首页jsp
二、项目入口web.xml
JavaEE框架,入口基本都是在web.xml,这一点要记住 ;
那么Web.xml 文件的作用是什么呢?
web.xml文件是用来初始化配置信息:比如index页面、servlet、servlet-mapping、filter、listener、启动加载级别等。
当然web.xml 也不是必须要有的,当你的web工程没用到上述配置信息时,你可以不用web.xml文件来配置你的Application。
web.xml 内容很多,SSM关键部分是
1.加载Spring配置文件applicationContext.xml
2.将SpringMVC核心调度器DispatcherServlet注册为servlet(配置文件为springmvc.xml)
web.xml代码
<?xml version="1.0" encoding="UTF-8"?>
<web-app xmlns:xsi="http://www.w3.org/2001/XMLSchema-instance" xmlns="http://xmlns.jcp.org/xml/ns/javaee" xsi:schemaLocation="http://xmlns.jcp.org/xml/ns/javaee http://xmlns.jcp.org/xml/ns/javaee/web-app_3_1.xsd" id="WebApp_ID" version="3.1">

<!—定义了web应用的名称-->
  <display-name>TestPlatform</display-name>

<!—指定服务器在收到一个引用目录名而不是文件名的url时使用哪个文件-->
  <welcome-file-list>
    <welcome-file>index.jsp</welcome-file>
  </welcome-file-list>
  <!-- 配置过滤器,解决post的乱码问题 -->
  <filter>
    <filter-name>characterEncodingFilter</filter-name>
    <filter-class>org.springframework.web.filter.CharacterEncodingFilter</filter-class>
    <init-param>
      <param-name>encoding</param-name>
      <param-value>utf-8</param-value>
    </init-param>
  </filter>
  <filter-mapping>
    <filter-name>characterEncodingFilter</filter-name>
    <url-pattern>/*</url-pattern>
  </filter-mapping>
<!—配置spring监听器,可以在容器启动时加载contextConfigLocation的context-param节点的配置文件-->
  <context-param>
    <param-name>contextConfigLocation</param-name>
    <param-value>classpath:applicationContext.xml</param-value>
  </context-param>

  <listener>
    <listener-class>org.springframework.web.context.ContextLoaderListener</listener-class>
  </listener>

    <!--=============配置SpringMVC核心调度器================ -->

  <servlet>
    <servlet-name>dispatcherServlet</servlet-name>
    <servlet-class>org.springframework.web.servlet.DispatcherServlet</servlet-class>
    <init-param>
      <param-name>contextConfigLocation</param-name>
      <param-value>classpath:springmvc.xml</param-value>
    </init-param>
    <load-on-startup>1</load-on-startup>#代表启动顺序,设置为>0表示容器在应用启动时加载并初始化这个servlet
  </servlet>


  <servlet-mapping>
    <servlet-name>dispatcherServlet</servlet-name>
    <url-pattern>*.shtml</url-pattern>
  </servlet-mapping>

<!—指定错误404的处理页面-->
  <error-page>
    <error-code>404</error-code>
    <location>/WEB-INF/pages/error/404.jsp</location>
  </error-page>
</web-app>
三、Spring 框架配置(applicationContext.xml)
主要完成spring与mybatis的整合
<?xml version="1.0" encoding="UTF-8" ?>
<beans xmlns="http://www.springframework.org/schema/beans"
   xmlns:xsi="http://www.w3.org/2001/XMLSchema-instance"
   xmlns:p="http://www.springframework.org/schema/p"
   xmlns:context="http://www.springframework.org/schema/context"
   xmlns:tx="http://www.springframework.org/schema/tx"
   xsi:schemaLocation="http://www.springframework.org/schema/beans
       http://www.springframework.org/schema/beans/spring-beans-4.2.xsd
       http://www.springframework.org/schema/context
       http://www.springframework.org/schema/context/spring-context-4.2.xsd
       http://www.springframework.org/schema/tx
       http://www.springframework.org/schema/tx/spring-tx-4.2.xsd">
       <context:component-scan base-package="cn.java.service.impl" />#注:主容器中不扫描@Controller注解,因为@Controller将会在SpringMVC扫描
        <!-- 读取database.properties文件 -->
       <bean id="propertyPlaceholderConfigurer" class="org.springframework.beans.factory.config.PropertyPlaceholderConfigurer">
           <!-- 指定properties文件所在路径 -->
           <property name="location" value="classpath:database.properties"></property>
       </bean>
       <!-- 配置数据源 -->
       <bean id="basicDataSource" class="org.apache.commons.dbcp.BasicDataSource">
           <!-- 配置driverClassName、url、username、password -->
           <property name="driverClassName" value="${driver}"></property>
           <property name="url" value="${url}"></property>
           <property name="username" value="${username}"></property>
           <property name="password" value="${password}"></property>
           <property name="maxActive" value="${maxActive}" />
           <property name="minIdle" value="${minIdle}" />
       </bean>
        <!-- 配置扫描保存sql语句的局部xml文件 -->
       <bean id="sqlSessionFactoryBean" class="org.mybatis.spring.SqlSessionFactoryBean">
              <!-- 指定数据源 -->
              <property name="dataSource" ref="basicDataSource"></property>
              <!-- 指定局部xml文件的位置 -->
              <property name="mapperLocations" value="classpath*:cn/java/mapper/*.xml"></property>
       </bean>

       <!-- 扫描mapper接口类,并且将接口类与xml文件关联 -->
       <bean id="mapperScannerConfigurer" class="org.mybatis.spring.mapper.MapperScannerConfigurer">
              <!-- 指定mapper接口类存放的位置 -->
              <property name="basePackage" value="cn.java.mapper"></property>
       </bean>
              <!-- 配置事务 -->
      <!--  <bean id="transactionManager" class="org.springframework.jdbc.datasource.DataSourceTransactionManager">
         <property name="dataSource" ref="basicDataSource" />
      </bean>
      事务注解驱动
      <tx:annotation-driven transaction-manager="transactionManager" proxy-target-class="true"/> -->
     </beans>
请注意:
1、多文件配置(通常有以下两种做法)
(1)在 web.xml配置中的contextConfigLocation节点配置多个值。
(2)在一个application.xml中配置多个import标签引入其他文件。
2、mybatis相关配置,主要的就是自动扫描,自动注入,配置数据库。(引用)
<!-- 1. 数据源配置 -->

    <context:property-placeholder ignore-unresolvable="true" location="classpath:jdbc.properties" />

    <!-- Druid方式配置数据源 -->

    <bean id="dataSource" class="com.alibaba.druid.pool.DruidDataSource" init-method="init" destroy-method="close">

        <!-- 基本属性 url、user、password -->

        <property name="driverClassName" value="${jdbc.driverClassName}" />

        <property name="url" value="${jdbc.url}" />

        <property name="username" value="${jdbc.username}" />

        <property name="password" value="${jdbc.password}" />

        <!-- 配置初始化大小、最小、最大 -->

        <property name="initialSize" value="10" />

        <property name="minIdle" value="20" />

        <property name="maxActive" value="100" />

        <!-- 配置获取连接等待超时的时间 -->

        <property name="maxWait" value="60000" />

        <!-- 配置间隔多久才进行一次检测,检测需要关闭的空闲连接,单位是毫秒 -->

        <property name="timeBetweenEvictionRunsMillis" value="6000" />

        <!-- 配置一个连接在池中最小生存的时间,单位是毫秒 -->

        <property name="minEvictableIdleTimeMillis" value="300000" />

            <!-- 验证是否回收 -->

        <property name="validationQuery" value="SELECT 'x' FROM DUAL" />

        <property name="testWhileIdle" value="true" />

        <property name="testOnBorrow" value="false" />

        <property name="testOnReturn" value="false" />

            <!-- 开启Druid的监控统计功能 -->

        <property name="filters" value="stat" />

    </bean>

        <!-- 2. 创建SqlSession的工厂 -->

    <!-- dataSource:引用数据源,统一加载配置-->

    <bean id="sqlSessionFactory" class="org.mybatis.spring.SqlSessionFactoryBean">

        <property name="dataSource" ref="dataSource" ></property>

        <!-- 自动配置别名-作用类似mybatis-config.xml的别名 -->

        <property name="typeAliasesPackage" value="com.demo.model" />

        <!-- 设置别名的类加上父类限定 -->

        <property name="typeAliasesSuperType" value="com.demo.common.base.BaseEntity"/>

        <!-- 当mybatis的xml文件和mapper接口不在相同包下时,需要用mapperLocations属性指定xml文件的路径 -->

        <!-- *是个通配符,代表所有的文件,**代表所有目录下 -->

        <property name="mapperLocations" value="classpath*:mappings/**/*.xml"/>

         <!-- 指定mybatis核心配置文件 -->

        <property name="configLocation" value="classpath:mybatis-config.xml"></property>

    </bean>

    <!-- 3. 自动扫描加载Sql映射文件/接口 -->

    <bean id="mapperScannerConfigurer"  class="org.mybatis.spring.mapper.MapperScannerConfigurer">

        <!-- sqlSessionFactoryBeanName:代表延迟加载-->

        <!-- 这个配置的前提条件是:映射接口类文件(.java)和映射XML文件(.xml)需要放在相同的包下(com.demo.mapper)-->

        <!-- <property name="sqlSessionFactory" ref="sqlSessionFactory"></property> -->

        <property name="sqlSessionFactoryBeanName" value="sqlSessionFactory" />

        <!-- basePackage:指定sql映射文件/接口所在的包(自动扫描)-->

        <property name="basePackage" value="com.demo.mapper"></property>

           <!-- 扫描basePackage下所有以@MyBatisDao注解的接口 -->

        <property name="annotationClass" value="com.demo.common.persistence.annotation.MyBatisDao"/>

    </bean>

        <!-- 4. 事务管理 -->

    <!-- dataSource:引用上面定义的数据源 -->

    <bean id="transactionManager" class="org.springframework.jdbc.datasource.DataSourceTransactionManager">

        <property name="dataSource" ref="dataSource"/>

    </bean>

    <!-- 5. 使用声明式事务 -->

    <!-- transaction-manager:引用上面定义的事务管理器 -->

    <!-- 配置 Annotation 驱动,扫描@Transactional注解的类定义事务  -->

    <tx:annotation-driven transaction-manager="transactionManager" proxy-target-class="true"/>

    <!-- 定义JdbcTemplate的Bean -->

    <bean id="jdbcTemplate" class="org.springframework.jdbc.core.JdbcTemplate" p:dataSource-ref="dataSource"></bean>
四、SpringMVC 框架配置
这块配置主要是自动扫描控制器,视图模式,注解的启动
Springmvc.xml
<?xml version="1.0" encoding="UTF-8"?>
<beans xmlns="http://www.springframework.org/schema/beans"
   xmlns:xsi="http://www.w3.org/2001/XMLSchema-instance"
   xmlns:mvc="http://www.springframework.org/schema/mvc"
   xmlns:context="http://www.springframework.org/schema/context"
   xmlns:task="http://www.springframework.org/schema/task"
   xsi:schemaLocation="http://www.springframework.org/schema/beans
         http://www.springframework.org/schema/beans/spring-beans-4.2.xsd
         http://www.springframework.org/schema/mvc
         http://www.springframework.org/schema/mvc/spring-mvc-4.2.xsd
         http://www.springframework.org/schema/context
         http://www.springframework.org/schema/context/spring-context-4.2.xsd
         http://www.springframework.org/schema/task
             http://www.springframework.org/schema/task/spring-task-4.2.xsd">
              <!-- 配置包扫描 -->
             <context:component-scan base-package="cn.java.controller.*" />
             <!-- mvc注解驱动 -->
             <mvc:annotation-driven />
   <!-- 定义Spring MVC的拦截器 -->
   <mvc:interceptors>
      <mvc:interceptor>
         <!-- 拦截所有请求 -->
         <mvc:mapping path="/**"/>
         <mvc:exclude-mapping path="/go2Login.shtml" />
         <mvc:exclude-mapping path="/login.shtml" />
         <mvc:exclude-mapping path="/loginForm.shtml"/>
         <!-- 自定义判断用户权限的拦截类 -->
         <bean class="cn.java.interceptors.OneInterceptor"/>
      </mvc:interceptor>
   </mvc:interceptors>
   <!-- 视图解析器 -->
             <bean id="internalResourceViewResolver" class="org.springframework.web.servlet.view.InternalResourceViewResolver">
                <!-- 配置前缀 -->
                <property name="prefix" value="/WEB-INF/pages/"></property>
                <!-- 配置后缀 -->
                <property name="suffix" value=".jsp"></property>
             </bean>
             <!-- 文件上传 -->
             <bean id="multipartResolver" class="org.springframework.web.multipart.commons.CommonsMultipartResolver">
                <!-- 配置默认编码 -->
                <property name="defaultEncoding" value="utf-8"></property>
                <!-- 配置文件上传的大小 -->
                <property name="maxUploadSize" value="1048576"></property>
             </bean>
                          <!-- 数据校验(hibernate-validator) -->
                          <!-- 定时器 -->
</beans>