有时已经知道机械臂目标位姿的各关节信息,对于这种情况,我们用moveit可以很简单的将机械臂移动到目标位姿。
本篇主要是参考《ROS by example (volume 2)》里的实例,在pi_robot代码的基础上修改。
还有一些资料:http://www.360doc.com/content/16/0825/16/7821691_585865831.shtml
一、配置moveit关节控制器
ArbotiX的包提供了一个JTAC(Joint Trajectory Action Controller),它一方面直接控制伺服电机,另一方面使用Ros中的FollowJointTrajectoryAction去接收程序发过来的joint轨迹目标。
所以:需要做的有2点:
(1)配置一个底层硬件实际用到的JTAC。 这个JTAC会负责接收FollowJointTrajectoryAction内容。
(2)配置一个moveit!插件,这个插件负责将JTAC与moveit!之间的通信抽象化。 这个插件叫moveit_simple_controller_manager,它可以配合FollowJointTrajectoryAction工作。
需要我们自己做的事情就是配置参数将它们联系起来(topic和actions的名字)
1、创建controllers.yaml文件
这个文件放置在moveit配置文件的config目录下,我们用来测试的机械臂没有抓取的手爪,只用到了right_arm_controller这个控制器。
2、创建控制器管理器启动文件robot_arm_moveit_controller_manager.launch.xml
二、关节空间的正运动学规划
1、用arbotix关节控制器启动虚拟机械臂模型
文件代码内容如下:(我是在教材例子中进行修改的,与机械臂控制无关的部分,比如right_gripper_controller,已经被注释掉了)
大致内容是;
(1)加载urdf模型
(2)启动arbotix,包括上面我们提到的配置的一些控制器
(3)启动tf节点,这里是我参考其他的文件时加上的。我在调试时,没有这个tf节点,规划过程中可以plan()出规划结果,但是excute()失败,加上之后就可以了,具体原因还不清楚,找到后,我会再补充。目前猜测可能是odom坐标系与机械臂的base_link之间缺少tf关系。
(4)启动robot_state_publisher
2、启动move_group
这个move_group.launch在moveit配置文件的launch目录下,文件启动的节点和服务都是moveit用来和机械臂交互的
3、启动rviz
my_moveit.rivz文件我保存在百度网盘链接:https://pan.baidu.com/s/1qY0vwZE 密码:astj
执行结果

4、运行运动学求解的脚本
moveit_fk_demo_my.py脚本内容如下,同样,我是在教材实例的脚本文件修改的,其中注释掉了与机械臂控制无关的内容,加了一些输出调试状态的信息代码(如rospy.loginfo("1111 execute traj_1 completed 1111 ") )
1、观察topic之间的联系信息
效果如下

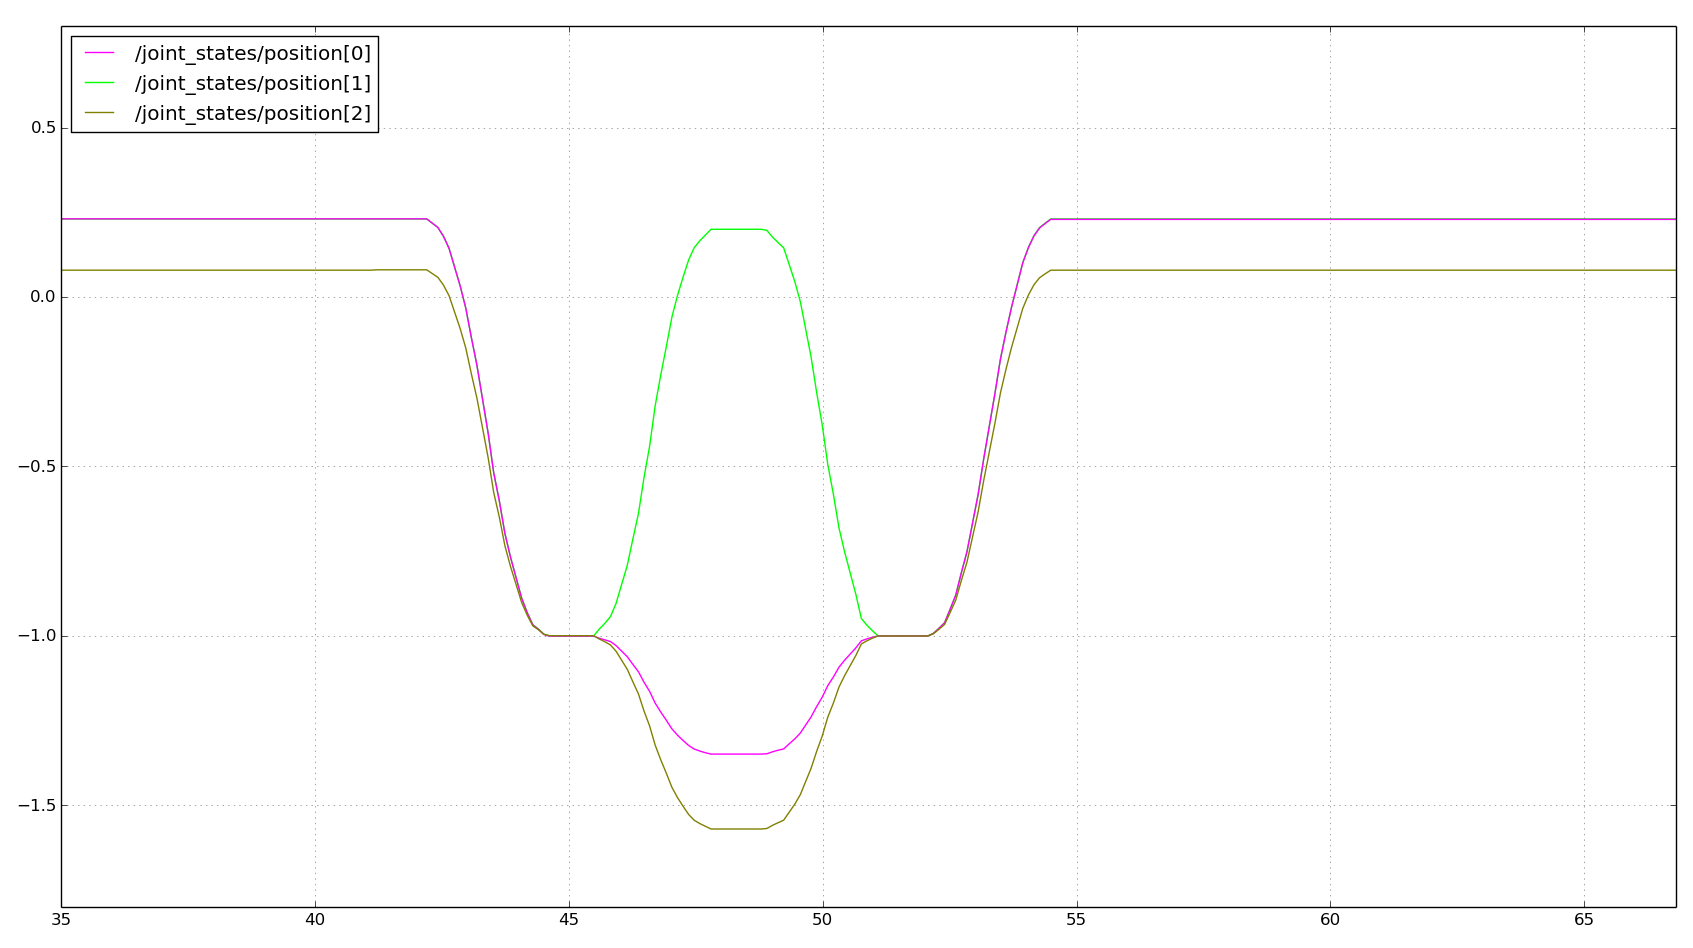
2、观察joint_states话题中包含的position和velocity信息
xs@xs-PC:~$ rosrun rqt_plot rqt_plot
将postion【0】、postion【1】、postion【2】,velocity【0】、velocity【1】、velocity【2】加载上去,
效果如下

我们启动(做机械臂导航时遇到的问题5:如何使用ROS内嵌serial功能包实现串口通信)中的my_serial_node节点,来像串口助手发送状态信息
串口助手接收到信息如下:完成数据接收。

本篇主要是参考《ROS by example (volume 2)》里的实例,在pi_robot代码的基础上修改。
还有一些资料:http://www.360doc.com/content/16/0825/16/7821691_585865831.shtml
一、配置moveit关节控制器
ArbotiX的包提供了一个JTAC(Joint Trajectory Action Controller),它一方面直接控制伺服电机,另一方面使用Ros中的FollowJointTrajectoryAction去接收程序发过来的joint轨迹目标。
所以:需要做的有2点:
(1)配置一个底层硬件实际用到的JTAC。 这个JTAC会负责接收FollowJointTrajectoryAction内容。
(2)配置一个moveit!插件,这个插件负责将JTAC与moveit!之间的通信抽象化。 这个插件叫moveit_simple_controller_manager,它可以配合FollowJointTrajectoryAction工作。
需要我们自己做的事情就是配置参数将它们联系起来(topic和actions的名字)
1、创建controllers.yaml文件
controller_list:
  - name: right_arm_controller
    action_ns: follow_joint_trajectory
    type: FollowJointTrajectory
    default: true
    joints:
      - joint_1
      - joint_2
      - joint_3
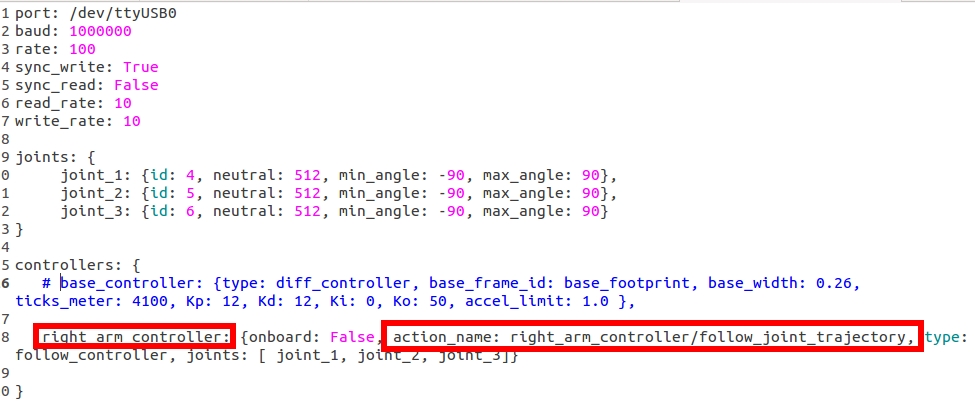
这个文件放置在moveit配置文件的config目录下,我们用来测试的机械臂没有抓取的手爪,只用到了right_arm_controller这个控制器。
注意:这个right_arm_controller控制器命名可以修改,但是与当初我们测试arbotix时的配置文件有关。我们当初学习arbotix节点控制伺服电机时,为arbotix配置了文件,名为:my_robot_arbotix.yaml,在里面我们命名了一些控制器controller,这里的controller命名、action_name必须要与moveit配置里的controllers.yaml文件中设置的action_ns相匹配。
2、创建控制器管理器启动文件robot_arm_moveit_controller_manager.launch.xml
这个文件放置在moveit配置文件的launch目录下,他会读取我们的controllers.yaml中设置好的控制器参数。
<launch>

  <!-- Set the param that trajectory_execution_manager needs to find the controller plugin -->
  <arg name="moveit_controller_manager" default="moveit_simple_controller_manager/MoveItSimpleControllerManager" />
  <param name="moveit_controller_manager" value="$(arg moveit_controller_manager)"/>


  <!-- load controller_list -->


<arg name="use_controller_manager" default="true" />


<!-- Load joint controller configurations from YAML file to parameter server -->


  <rosparam file="$(find arm_moveit_config)/config/controllers.yaml"/>


</launch>
二、关节空间的正运动学规划
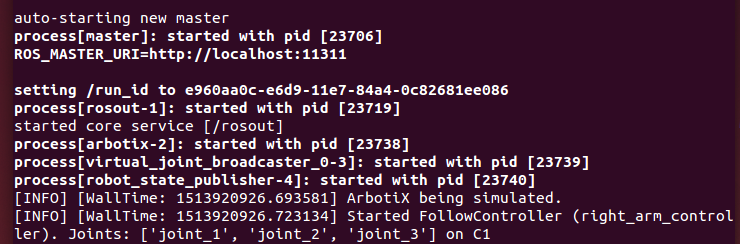
1、用arbotix关节控制器启动虚拟机械臂模型
xs@xs-PC:~/catkin_ws2/src/mybot_description/launch$ roslaunch my_robot_arbotix_ok.launch
文件代码内容如下:(我是在教材例子中进行修改的,与机械臂控制无关的部分,比如right_gripper_controller,已经被注释掉了)
大致内容是;
(1)加载urdf模型
(2)启动arbotix,包括上面我们提到的配置的一些控制器
(3)启动tf节点,这里是我参考其他的文件时加上的。我在调试时,没有这个tf节点,规划过程中可以plan()出规划结果,但是excute()失败,加上之后就可以了,具体原因还不清楚,找到后,我会再补充。目前猜测可能是odom坐标系与机械臂的base_link之间缺少tf关系。
(4)启动robot_state_publisher
<launch>
   <!-- Make sure we are not using simulated time -->
   <param name="/use_sim_time" value="false" />

   <!-- Launch the arbotix driver in fake mode by default -->
   <arg name="sim" default="true" />

   <!-- If using a real controller, look on /dev/ttyUSB0 by default -->
   <arg name="port" default="/dev/ttyUSB0" />

   <!-- Load the URDF/Xacro model of our robot -->
   <param name="robot_description" textfile="/home/xs/catkin_ws2/src/mybot_description/urdf/robot_arm.urdf" />

   <!-- Bring up the arbotix driver with a configuration file appropriate to the robot -->
   <node name="arbotix" pkg="arbotix_python" type="arbotix_driver" clear_params="true" output="screen">
      <rosparam file="/home/xs/catkin_ws2/src/mybot_description/my_robot_arbotix.yaml" command="load" />
      <param name="sim" value="$(arg sim)" />
      <param name="port" value="$(arg port)" />
   </node>

<!--
   Run a separate controller for the one sided gripper
   <node name="right_gripper_controller" pkg="arbotix_controllers" type="gripper_controller" output="screen">
      <rosparam>
         model: singlesided
         invert: true
         center: 0.0
         pad_width: 0.004
         finger_length: 0.065
         min_opening: -0.8
         max_opening: 0.5
         joint: right_gripper_finger_joint
      </rosparam>
   </node>
-->

  <!-- Load the URDF, SRDF and other .yaml configuration files on the param server -->
  <include file="$(find arm_moveit_config)/launch/planning_context.launch">
    <arg name="load_robot_description" value="true"/>
  </include>


  <!-- If needed, broadcast static tf for robot root -->
    <node pkg="tf" type="static_transform_publisher" name="virtual_joint_broadcaster_0" args="0 0 0 0 0 0 odom base_link 100" />


  <!-- We do not have a robot connected, so publish fake joint states >
  <node name="joint_state_publisher" pkg="joint_state_publisher" type="joint_state_publisher">
    <param name="/use_gui" value="false"/>
    <rosparam param="/source_list">[/move_group/fake_controller_joint_states]</rosparam>
  </node-->


   <!-- Publish the robot state -->
   <node name="robot_state_publisher" pkg="robot_state_publisher" type="state_publisher">
       <param name="publish_frequency" type="double" value="20.0" />
   </node>

<!--
<node
    name="rviz"
    pkg="rviz"
    type="rviz"
    args="-d /home/xs/catkin_ws2/src/robot_arm/my_moveit.rviz"
/>
-->
<!--
args="-d /home/xs/catkin_ws2/src/robot_arm/urdf.rviz"
args="-d /home/xs/catkin_ws2/src/robot_arm/arm_nav_my.rviz"


-->


   <!-- Start all servos in a relaxed state -->
   <node pkg="rbx2_dynamixels" type="arbotix_relax_all_servos.py" name="relax_all_servos" unless="$(arg sim)" />

   <!-- Load diagnostics -->
   <node pkg="diagnostic_aggregator" type="aggregator_node" name="diagnostic_aggregator" clear_params="true" unless="$(arg sim)">
      <rosparam command="load" file="$(find rbx2_dynamixels)/config/dynamixel_diagnostics.yaml" />
   </node>


   <node pkg="rqt_robot_monitor" type="rqt_robot_monitor" name="rqt_robot_monitor" unless="$(arg sim)" />

</launch>
启动这个launch文件后,终端显示状态如下,可以看到高亮显示arbotix 、virtual_joint_broadcaster_0、 robot_state_publisher、 right_arm_controller已被启动。
2、启动move_group
xs@xs-PC:~/catkin_ws2/src/arm_moveit_config/launch$ roslaunch move_group.launch
这个move_group.launch在moveit配置文件的launch目录下,文件启动的节点和服务都是moveit用来和机械臂交互的
<launch>

  <include file="$(find arm_moveit_config)/launch/planning_context.launch" />

  <!-- GDB Debug Option -->
  <arg name="debug" default="false" />
  <arg unless="$(arg debug)" name="launch_prefix" value="" />
  <arg     if="$(arg debug)" name="launch_prefix"
	   value="gdb -x $(find arm_moveit_config)/launch/gdb_settings.gdb --ex run --args" />

  <!-- Verbose Mode Option -->
  <arg name="info" default="$(arg debug)" />
  <arg unless="$(arg info)" name="command_args" value="" />
  <arg     if="$(arg info)" name="command_args" value="--debug" />


  <!-- move_group settings -->
  <arg name="allow_trajectory_execution" default="true"/>
  <arg name="fake_execution" default="false"/>
  <arg name="max_safe_path_cost" default="1"/>
  <arg name="jiggle_fraction" default="0.05" />
  <arg name="publish_monitored_planning_scene" default="true"/>


  <!-- Planning Functionality -->
  <include ns="move_group" file="$(find arm_moveit_config)/launch/planning_pipeline.launch.xml">
    <arg name="pipeline" value="ompl" />
  </include>


  <!-- Trajectory Execution Functionality -->
  <include ns="move_group" file="$(find arm_moveit_config)/launch/trajectory_execution.launch.xml" if="$(arg allow_trajectory_execution)">
    <arg name="moveit_manage_controllers" value="true" />
    <arg name="moveit_controller_manager" value="robot_arm" unless="$(arg fake_execution)"/>
    <arg name="moveit_controller_manager" value="fake" if="$(arg fake_execution)"/>
  </include>

  <!-- Sensors Functionality -->
  <include ns="move_group" file="$(find arm_moveit_config)/launch/sensor_manager.launch.xml" if="$(arg allow_trajectory_execution)">
    <arg name="moveit_sensor_manager" value="robot_arm" />
  </include>

  <!-- Start the actual move_group node/action server -->
  <node name="move_group" launch-prefix="$(arg launch_prefix)" pkg="moveit_ros_move_group" type="move_group" respawn="false" output="screen" args="$(arg command_args)">
    <!-- Set the display variable, in case OpenGL code is used internally -->
    <env name="DISPLAY" value="$(optenv DISPLAY :0)" />

    <param name="allow_trajectory_execution" value="$(arg allow_trajectory_execution)"/>
    <param name="max_safe_path_cost" value="$(arg max_safe_path_cost)"/>
    <param name="jiggle_fraction" value="$(arg jiggle_fraction)" />

    <!-- load these non-default MoveGroup capabilities -->
    <!--
    <param name="capabilities" value="
                  a_package/AwsomeMotionPlanningCapability
                  another_package/GraspPlanningPipeline
                  " />
    -->
	<!-- MoveGroup capabilities to load -->
    <param name="capabilities" value="move_group/MoveGroupCartesianPathService
				      move_group/MoveGroupExecuteService
				      move_group/MoveGroupKinematicsService
				      move_group/MoveGroupMoveAction
				      move_group/MoveGroupPickPlaceAction
				      move_group/MoveGroupPlanService
				      move_group/MoveGroupQueryPlannersService
				      move_group/MoveGroupStateValidationService
				      move_group/MoveGroupGetPlanningSceneService
				      move_group/ClearOctomapService
				      " />
    <!-- inhibit these default MoveGroup capabilities -->
    <!--
    <param name="disable_capabilities" value="
                  move_group/MoveGroupKinematicsService
                  move_group/ClearOctomapService
                  " />
    -->

    <!-- Publish the planning scene of the physical robot so that rviz plugin can know actual robot -->
    <param name="planning_scene_monitor/publish_planning_scene" value="$(arg publish_monitored_planning_scene)" />
    <param name="planning_scene_monitor/publish_geometry_updates" value="$(arg publish_monitored_planning_scene)" />
    <param name="planning_scene_monitor/publish_state_updates" value="$(arg publish_monitored_planning_scene)" />
    <param name="planning_scene_monitor/publish_transforms_updates" value="$(arg publish_monitored_planning_scene)" />
  </node>


</launch>
3、启动rviz
xs@xs-PC:~$ rosrun rviz rviz -d'rospack find robot_arm'/my_moveit.rivz
my_moveit.rivz文件我保存在百度网盘链接:https://pan.baidu.com/s/1qY0vwZE 密码:astj
执行结果
4、运行运动学求解的脚本
xs@xs-PC:~$ rosrun rbx2_arm_nav moveit_fk_demo_my.py
moveit_fk_demo_my.py脚本内容如下,同样,我是在教材实例的脚本文件修改的,其中注释掉了与机械臂控制无关的内容,加了一些输出调试状态的信息代码(如rospy.loginfo("1111 execute traj_1 completed 1111 ") )
#!/usr/bin/env python

"""
    moveit_fk_demo.py - Version 0.1 2014-01-14

    Use forward kinemtatics to move the arm to a specified set of joint angles

    Created for the Pi Robot Project: http://www.pirobot.org
    Copyright (c) 2014 Patrick Goebel.  All rights reserved.


    This program is free software; you can redistribute it and/or modify
    it under the terms of the GNU General Public License as published by
    the Free Software Foundation; either version 2 of the License, or
    (at your option) any later version.5

    This program is distributed in the hope that it will be useful,
    but WITHOUT ANY WARRANTY; without even the implied warranty of
    MERCHANTABILITY or FITNESS FOR A PARTICULAR PURPOSE.  See the
    GNU General Public License for more details at:

    http://www.gnu.org/licenses/gpl.html
"""


import rospy, sys
import moveit_commander
from control_msgs.msg import GripperCommand


class MoveItDemo:
    def __init__(self):
        # Initialize the move_group API
        moveit_commander.roscpp_initialize(sys.argv)


        # Initialize the ROS node
        rospy.init_node('moveit_demo', anonymous=True)

        #GRIPPER_OPEN = [0.05]
        #GRIPPER_CLOSED = [-0.03]
        #GRIPPER_NEUTRAL = [0.01]

        # Connect to the right_arm move group
        robot_arm = moveit_commander.MoveGroupCommander('arm')

        # Connect to the right_gripper move group
        # right_gripper = moveit_commander.MoveGroupCommander('right_gripper')

        # Get the name of the end-effector link
        end_effector_link = robot_arm.get_end_effector_link()

        # Display the name of the end_effector link
        rospy.loginfo("The end effector link is: " + str(end_effector_link))

        # Set a small tolerance on joint angles
        robot_arm.set_goal_joint_tolerance(0.001)
        # right_gripper.set_goal_joint_tolerance(0.001)

        # Start the arm target in "resting" pose stored in the SRDF file
        robot_arm.set_named_target('resting')

        # Plan a trajectory to the goal configuration
        traj = robot_arm.plan()

        # Execute the planned trajectory
        robot_arm.execute(traj)

        # Pause for a moment
        rospy.sleep(1)

        # Set the gripper target to neutal position using a joint value target
        # right_gripper.set_joint_value_target(GRIPPER_NEUTRAL)

        # Plan and execute the gripper motion
        # right_gripper.go()
        # rospy.sleep(1)

        # Set target joint values for the arm: joints are in the order they appear in
        # the kinematic tree.
	robot_arm_active_joints = robot_arm.get_active_joints()
	rospy.loginfo("The robot_arm_active_joints is: " + str(robot_arm_active_joints))

	joint_positions = [-1.0, -1.0, -1.0]

        # Set the arm's goal configuration to the be the joint positions
        robot_arm.set_joint_value_target(joint_positions)
        rospy.loginfo("0000  set_joint_target_completed  0000 ")
        # Plan and execute the motion
        ######robot_arm.go()
	traj1 = robot_arm.plan()
        #rospy.loginfo("11111111111111111111111111 "+ str(traj1))
        # Execute the planned trajectory
        robot_arm.execute(traj1)

        rospy.loginfo("1111   execute traj_1 completed  1111 ")

        rospy.sleep(1)

        # Save this configuration for later
        robot_arm.remember_joint_values('saved_config', joint_positions)

        # Close the gripper as if picking something up
        # right_gripper.set_joint_value_target(GRIPPER_CLOSED)
        # right_gripper.go()
        # rospy.sleep(1)

        # Set the arm target to the named "straight_out" pose stored in the SRDF file
        robot_arm.set_named_target('forward')

        # Plan and execute the motion
        ########robot_arm.go()
	traj2 = robot_arm.plan()

        # Execute the planned trajectory
        robot_arm.execute(traj2)
	#rospy.loginfo("22222222222222222222222222223 "+ str(traj2))
	rospy.loginfo("2222   execute traj_2 completed  2222 ")
        rospy.sleep(1)

        # Set the goal configuration to the named configuration saved earlier
        robot_arm.set_named_target('saved_config')

        # Plan and execute the motion
        #######robot_arm.go()
	traj3 = robot_arm.plan()

        # Execute the planned trajectory
        robot_arm.execute(traj3)
	#rospy.loginfo("333333333333333333333333333333333333 "+ str(traj3))
	rospy.loginfo("3333   execute traj_3 completed  3333")
        rospy.sleep(1)

        # Open the gripper as if letting something go
        # right_gripper.set_joint_value_target(GRIPPER_OPEN)
        # right_gripper.go()
        # rospy.sleep(1)

        # Return the arm to the named "resting" pose stored in the SRDF file
        robot_arm.set_named_target('resting')
        #######robot_arm.go()
	traj4 = robot_arm.plan()

        # Execute the planned trajectory
        robot_arm.execute(traj4)
	#rospy.loginfo("44444444444444444444444444444444 "+ str(traj4))
	rospy.loginfo("4444   execute traj_4 completed  4444")
        rospy.sleep(1)

        # Return the gripper target to neutral position
        # right_gripper.set_joint_value_target(GRIPPER_NEUTRAL)
        # right_gripper.go()
        # rospy.sleep(1)

        # Cleanly shut down MoveIt
        moveit_commander.roscpp_shutdown()

        # Exit the script
        moveit_commander.os._exit(0)

if __name__ == "__main__":
    try:
        MoveItDemo()
    except rospy.ROSInterruptException:
        pass
运行结果是机械臂执到达了脚本中所设定的几个位姿


1、观察topic之间的联系信息
xs@xs-PC:~$ rosrun rqt_graph rqt_graph
效果如下
2、观察joint_states话题中包含的position和velocity信息
xs@xs-PC:~$ rosrun rqt_plot rqt_plot
将postion【0】、postion【1】、postion【2】,velocity【0】、velocity【1】、velocity【2】加载上去,
效果如下
我们启动(做机械臂导航时遇到的问题5:如何使用ROS内嵌serial功能包实现串口通信)中的my_serial_node节点,来像串口助手发送状态信息
xs@xs-PC:~$ rosrun my_serial_node my_serial_node
串口助手接收到信息如下:完成数据接收。