布局其实说的通俗一点,在我的理解中就是你使用App的时候直接看到的东西,安卓里面有很多控件。但是呢,控件在App中肯定不可能胡乱摆放。肯定有自己的位置。那么问题来了。我们开发APP肯定想让我们的App里控件放在我们想要的位置。那么问题就来了。怎么让控件放到我们自己想要的位置呢?这里我们就需要布局了。
由于是小白,刚开始学习布局很迷很迷。在现在使用Android Studio时,打开.xml布局文件之后。最上面会有这么两行代码。
<?xml version="1.0" encoding="utf-8"?>
<android.support.constraint.ConstraintLayout xmlns:android="http://schemas.android.com/apk/res/android"
而我们在学习Android时,各大网站的教程及各种书籍上都写的是
<?xml version="1.0" encoding="utf-8"?>
<LinearLayout xmlns:android="http://schemas.android.com/apk/res/android"
或者
<?xml version="1.0" encoding="utf-8"?>
<RelativeLayout xmlns:android="http://schemas.android.com/apk/res/android"
之类的,反正不是第一个。但是不改,下面按照他们的教程敲代码,肯定会错。我当时学习,停留在这里好久(可能是我太笨了吧!)。后来研究了蛮久才明白为什么。其实上面的都对。后两者是原始开发,那时候人们都只是传统的通过敲代码来设计布局。但是到了Android2.2之后,出现了ConstraintLayout布局,是布局开发变得简单方便容易,强烈推荐大家使用。但是两种方法都是要学习的。
一、传统方法
传统方法有四种最基本的布局。
1、线性布局
线性布局简言之就是最后出来的东西是线状排列的,看代码和效果。
<?xml version="1.0" encoding="utf-8"?>
<LinearLayout xmlns:android="http://schemas.android.com/apk/res/android"
    xmlns:tools="http://schemas.android.com/tools"
    android:layout_width="match_parent"
    android:layout_height="match_parent"
    tools:context=".MainActivity">

    <Button
        android:layout_width="wrap_content"
        android:layout_height="wrap_content"
        android:text="button1"/>

    <Button
        android:layout_width="wrap_content"
        android:layout_height="wrap_content"
        android:text="button2"/>

    <Button
        android:layout_width="wrap_content"
        android:layout_height="wrap_content"
        android:text="button3"/>

</LinearLayout>
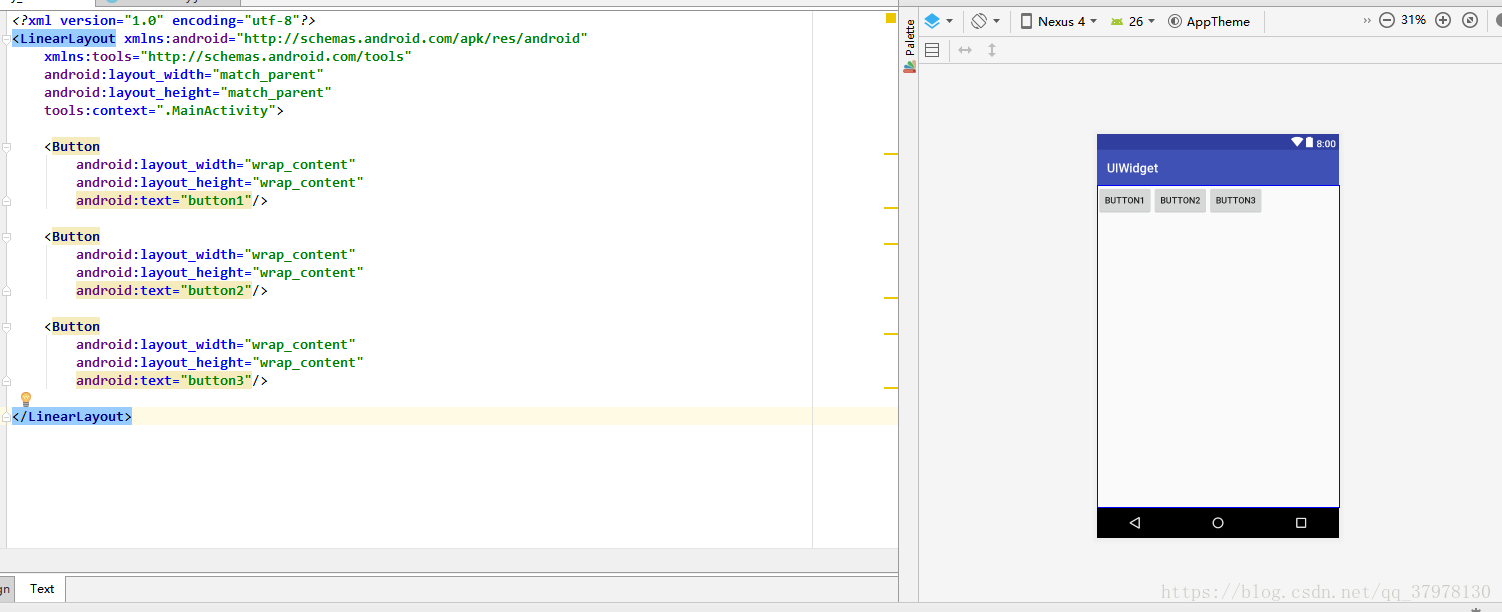
这里默认是水平分布的,如果想让他垂直下来分布呢这个很简单在第一个button之前加一句代码就可以了。
android:orientation="vertical"//这里默认是android:orientation="horizonal",如果不写的话默认就是这个
效果如下:

这里有个东西需要理解一下,就是有个layout_width和layout_height,后面的赋值呢,wrap_content就是默认大小,match_parent是指和母布局相等,如果没有母布局,就是屏幕的长或者宽。还有一个属性layout_gravity值得是水平上的位置,有top,center_vertical,bottom等值。解释无用,直接上代码,一看就懂。
跟上上个代码相比,只有各个按钮上多了一个layout_gravity的属性。
<?xml version="1.0" encoding="utf-8"?>
<LinearLayout xmlns:android="http://schemas.android.com/apk/res/android"
    xmlns:tools="http://schemas.android.com/tools"
    android:layout_width="match_parent"
    android:layout_height="match_parent"
    android:orientation="horizontal"
    tools:context=".MainActivity">

    <Button
        android:layout_width="wrap_content"
        android:layout_height="wrap_content"
        android:layout_gravity="top"
        android:text="button1"/>

    <Button
        android:layout_width="wrap_content"
        android:layout_height="wrap_content"
        android:layout_gravity="center_vertical"
        android:text="button2"/>

    <Button
        android:layout_width="wrap_content"
        android:layout_height="wrap_content"
        android:layout_gravity="bottom"
        android:text="button3"/>

</LinearLayout>

接下来,我们在分析一组代码:
<?xml version="1.0" encoding="utf-8"?>
<LinearLayout xmlns:android="http://schemas.android.com/apk/res/android"
    xmlns:tools="http://schemas.android.com/tools"
    android:layout_width="match_parent"
    android:layout_height="match_parent"
    android:orientation="horizontal"
    tools:context=".MainActivity">

    <Button
        android:layout_width="0dp"
        android:layout_weight="1"
        android:layout_height="wrap_content"
        android:layout_gravity="top"
        android:text="button1"/>

    <Button
        android:layout_width="0dp"
        android:layout_weight="1"
        android:layout_height="wrap_content"
        android:layout_gravity="center_vertical"
        android:text="button2"/>

    <Button
        android:layout_width="0dp"
        android:layout_weight="1"
        android:layout_height="wrap_content"
        android:layout_gravity="bottom"
        android:text="button3"/>

</LinearLayout>
分析这个代码,发现layout_width的值变成了0,但是多了一个layout_weight变量,都赋值的1,其实啊这个意思是水平方向上分成三份,每个一份。所以layout_width就没用了。运行结果如下:

2、绝对布局
相对布局呢,跟线性来说就随意多了,属性也多。但是有规律可循。看代码:
<?xml version="1.0" encoding="utf-8"?>
<RelativeLayout xmlns:android="http://schemas.android.com/apk/res/android"
    xmlns:tools="http://schemas.android.com/tools"
    android:layout_width="match_parent"
    android:layout_height="match_parent"
    android:orientation="horizontal"
    tools:context=".MainActivity">

    <Button
        android:layout_width="wrap_content"
        android:layout_height="wrap_content"
        android:layout_alignParentLeft="true"
        android:layout_alignParentTop="true"
        android:text="1"/>

    <Button
        android:layout_width="wrap_content"
        android:layout_height="wrap_content"
        android:layout_alignParentRight="true"
        android:layout_alignParentTop="true"
        android:text="2"/>

    <Button
        android:layout_width="wrap_content"
        android:layout_height="wrap_content"
        android:layout_centerInParent="true"
        android:text="3"/>

    <Button
        android:layout_width="wrap_content"
        android:layout_height="wrap_content"
        android:layout_alignParentBottom="true"
        android:layout_alignParentLeft="true"
        android:text="4"/>

    <Button
        android:layout_width="wrap_content"
        android:layout_height="wrap_content"
        android:layout_alignParentRight="true"
        android:layout_alignParentBottom="true"
        android:text="5"/>

</RelativeLayout>
直接看效果,会点英语的肯定能懂。
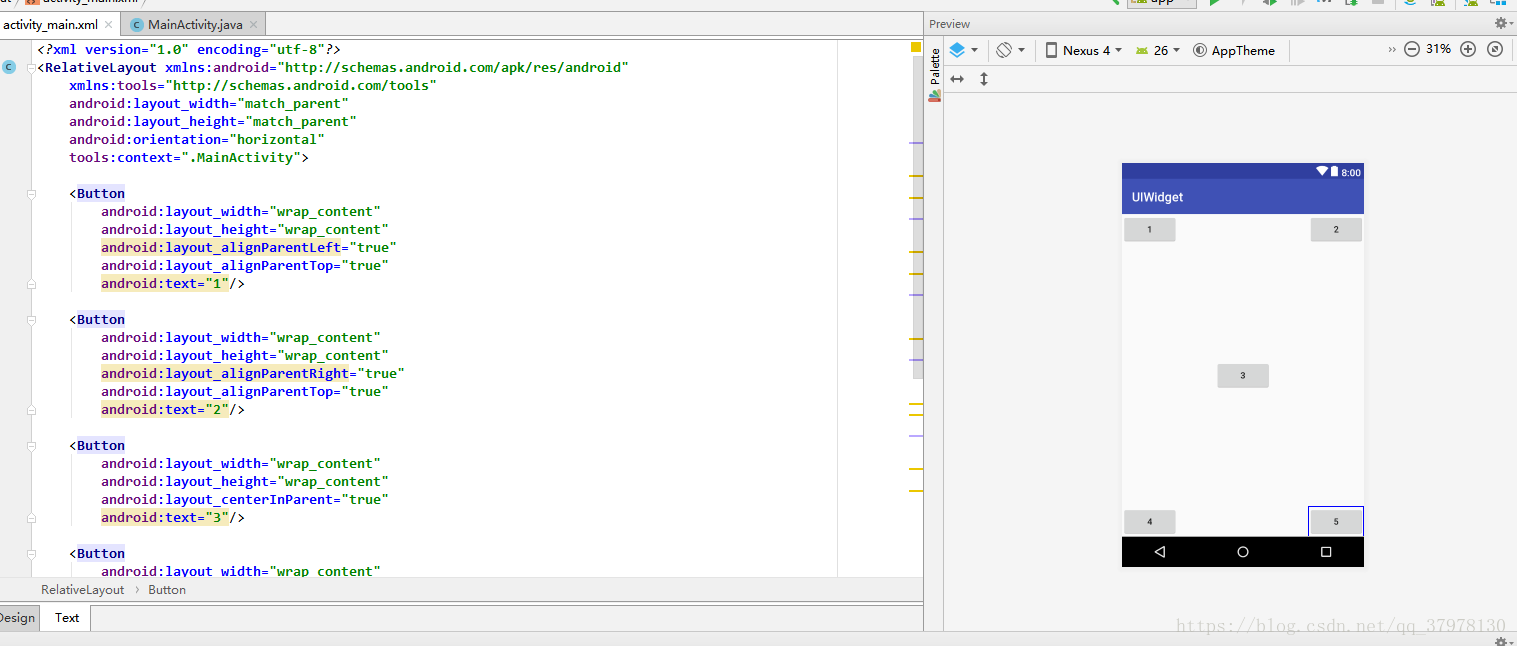
这个是在是太简单了。不做过多解释,更多的变量请百度。
3、帧布局
帧布局简单而且容易。就是所有的控件一个叠加一个。默认就是左上角,先添加的那个控件,那个就在下面。
4、百分比布局
就是百分比布局,用的不多,不想复习了。。。
二、新加入的ConstraintLayout布局,这个我实在是不会做动图,学习的时候也全部是看的郭老师的博客:https://blog.csdn.net/sinyu890807/article/details/53122387