在Linux驱动(三)字符设备驱动框架中,我们简要介绍了如何编写一个简单的驱动框架,并总结了步骤
1、生成设备号
2、向内核注册该设备号
3、初始化设备对象,完成操作方法集
4、向内核注册该设备对象
5、生成设备文件,供用户层调用。
我们之前的步骤都是静态的,
1、静态生成设备号,这样必须确保要申请的设备号是没有被占用的。我们可以让内核帮我们动态申请设备号,可以确保生成的设备号是没有被占用的。
2、设备对象空间也可以由内核来分配。
3、设备文件我们之前通过mknod来手动创建,我们现在在驱动程序中直接完成设备文件的创建。
我们来看看相关的函数
1、自动生成设备号并向内核注册alloc_chrdev_region
函数原型:int alloc_chrdev_region(dev_t *dev, unsigned baseminor, unsigned count,
const char *name)
const char *name)
参数:
dev: 要生成的设备号
baseminor:次设备号
count:生成的设备号数量
name:设备号名称
返回值:成功返回0,错误返回错误码
举例:生成10个设备号。
dev_t devno;
int minor = 0;
int count = 10;
alloc_chrdev_region(&devno,minor,count, "xxx");
2、分配设备对象空间cdev_alloc
函数原型:struct cdev *cdev_alloc(void)
参数: 无
返回值:成功返回创建的设备对象地址,错误返回NULL
3、自动生成设备节点
(1)device_create创建设备节点
函数原型:struct device *device_create(struct class *class, struct device *parent,
dev_t devt, void *drvdata, const char *fmt, ...)
dev_t devt, void *drvdata, const char *fmt, ...)
函数功能:生成一个设备节点
参数: class 设备类(看下一个函数)
parent:父类,没有的话就用NULL
devt:设备号
drvdata:私有数据
fmt:设备节点名称
.....:类似printf的格式
返回值:成功返回一个设备节点地址
创建会对应销毁设备节点函数
(2)销毁一个设备节点
函数原型:void device_destroy(struct class *class, dev_t devt)
函数功能:销毁一个设备节点
参数: classs:设备类 devt:设备号
(3)创建设备类
函数原型:class_create(owner, name)
函数功能:创建一个设备类
参数:
owner 直接赋值为THIS_MODULE
name 类名称
返回值:成功返回一个类的地址
创建设备类对应是销毁一个设备类
(4)销毁设备类
函数原型:void class_destroy(struct class *cls)
函数功能:销毁一个设备类
参数:cls 设备类
创建设备类和创建设备的返回值得错误判断需要用到专门的函数IS_ERR
IS_ERR的原型 static inline long __must_check IS_ERR(const void *ptr) 参数是一个地址,将创建设备类或创建设备节点的返回值作为IS_ERR参数,为真表示错误。
#include <linux/init.h>
#include <linux/module.h>
#include <linux/kernel.h>
#include <linux/cdev.h>
#include <linux/fs.h>
#include <linux/slab.h>
#include <linux/device.h>


MODULE_LICENSE("GPL");

dev_t devno;
int major = 0;
int minor = 0;
int count = 1;

struct cdev *pdev;

struct class * pclass;
struct device * pdevice;

int demo_open(struct inode * inodep, struct file * filep)
{
	printk("%s,%d\n", __func__, __LINE__);

	return 0;
}

int demo_release(struct inode *inodep, struct file *filep)
{
	printk("%s,%d\n", __func__, __LINE__);

	return 0;
}

struct file_operations  fops = {
	.owner =THIS_MODULE,
	.open = demo_open,
	.release = demo_release,
};

static int __init demo_init(void)
{
	int ret = 0;

	printk("%s,%d\n", __func__, __LINE__);

	ret = alloc_chrdev_region(&devno,minor,count, "xxx");
	if(ret)
	{
		printk("Failed to alloc_chrdev_region.\n");
		return ret;
	}
	printk("devno:%d , major:%d  minor:%d\n", devno, MAJOR(devno), MINOR(devno));

	pdev = cdev_alloc();
	if(pdev == NULL)
	{
		printk("Failed to cdev_alloc.\n");
		goto err1;
	}

	cdev_init(pdev, &fops);

	ret = cdev_add(pdev, devno, count);
	if(ret < 0)
	{
	    printk("Failed to cdev_add.");
		goto err2;
	}

	pclass = class_create(THIS_MODULE, "myclass");
	if(IS_ERR(pclass))
	{
		printk("Failed to class_create.\n");
		ret = PTR_ERR(pclass);
		goto err3;
	}

	pdevice = device_create(pclass, NULL, devno, NULL, "hello");
	if(IS_ERR(pdevice))
	{
		printk("Failed to device_create.\n");
		ret = PTR_ERR(pdevice);
		goto err4;
	}


	return 0;
err4:
	class_destroy(pclass);
err3:
	cdev_del(pdev);
err2:
	kfree(pdev);
err1:
	unregister_chrdev_region(devno, count);
	return ret;
}

static void __exit demo_exit(void)
{
	printk("%s,%d\n", __func__, __LINE__);

	device_destroy(pclass, devno);
	class_destroy(pclass);
	cdev_del(pdev);
	kfree(pdev);
	unregister_chrdev_region(devno, count);

}


module_init(demo_init);
module_exit(demo_exit);
利用之前的makefile,make之后生成demo.ko文件。insmod demo.ko后就能生成设备

我们还可以查看一下/sys/class下

在class下生成了“myclass”类名,进入myclass文件夹下,在myclass下也有hello这个设备节点

这里我们来介绍一下/sys这个文件夹
Linux2.6以后的内核所支持的sysfs文件系统被映射到此目录上。linux设备驱动模型中的总线、设备、驱动都可以在sysfs文件系统中找到对应的节点。
sysfs把连接在系统上的设备和总线组织成为一个分级的文件。sysfs的一个目的就是展示设备驱动模型中各组件的层次关系。目录下包括如下部分

blcok:所有的块设备
bus:所有的总线
class:系统的设备类
devices:设备
Linux2.6以后的设备模型是总线、设备、驱动模式。在sys目录下也有体现

类中的设备和总线下的设备实际上都是设备文件夹具体文件的链接
下图是平台总线下的设备,都是链接于devices/platform下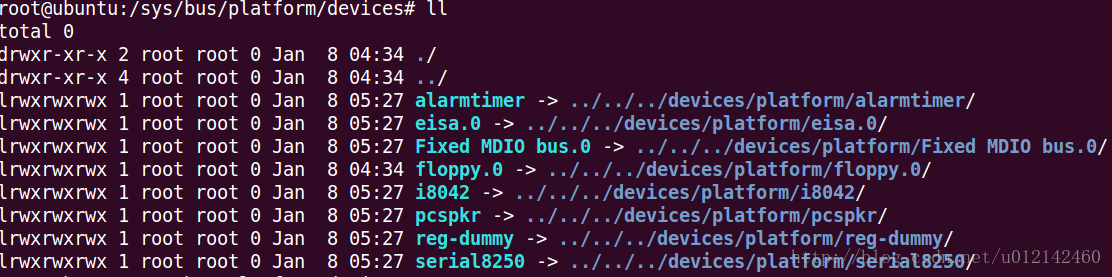

上图是在我们创建的myclass类中的设备文件,链接于devices/virtual/myclass目录下
我们可以看到在/dev中有很多tty设备,我们也可以一下子生成多个设备,在上个程序的基础上稍加修改即可。
#include <linux/init.h>
#include <linux/module.h>
#include <linux/kernel.h>
#include <linux/cdev.h>
#include <linux/fs.h>
#include <linux/slab.h>
#include <linux/device.h>


MODULE_LICENSE("GPL");

dev_t devno;
int major = 0;
int minor = 0;
int count = 10;

struct cdev *pdev;

struct class * pclass;
struct device * pdevice;

int demo_open(struct inode * inodep, struct file * filep)
{
	printk("%s,%d\n", __func__, __LINE__);

	return 0;
}

int demo_release(struct inode *inodep, struct file *filep)
{
	printk("%s,%d\n", __func__, __LINE__);

	return 0;
}

struct file_operations  fops = {
	.owner =THIS_MODULE,
	.open = demo_open,
	.release = demo_release,
};

static int __init demo_init(void)
{
	int ret = 0;
	int i = 0;
	int j = 0;

	printk("%s,%d\n", __func__, __LINE__);

	ret = alloc_chrdev_region(&devno,minor,count, "xxx");
	if(ret)
	{
		printk("Failed to alloc_chrdev_region.\n");
		return ret;
	}
	printk("devno:%d , major:%d  minor:%d\n", devno, MAJOR(devno), MINOR(devno));

	pdev = cdev_alloc();
	if(pdev == NULL)
	{
		printk("Failed to cdev_alloc.\n");
		goto err1;
	}

	cdev_init(pdev, &fops);

	ret = cdev_add(pdev, devno, count);
	if(ret < 0)
	{
	    printk("Failed to cdev_add.");
		goto err2;
	}

	pclass = class_create(THIS_MODULE, "myclass");
	if(IS_ERR(pclass))
	{
		printk("Failed to class_create.\n");
		ret = PTR_ERR(pclass);
		goto err3;
	}

	for(i = 0; i < count; i++)
	{
		pdevice = device_create(pclass, NULL, MKDEV(MAJOR(devno), MINOR(devno)+i), NULL, "hello%d", i);
		if(IS_ERR(pdevice))
		{
			printk("Failed to device_create.\n");
			ret = PTR_ERR(pdevice);
			goto err4;
		}
	}


	return 0;
err4:
	for(j = 0; j < i; j++)
	{
		device_destroy(pclass, MKDEV(MAJOR(devno), MINOR(devno)+j));
	}
	class_destroy(pclass);
err3:
	cdev_del(pdev);
err2:
	kfree(pdev);
err1:
	unregister_chrdev_region(devno, count);
	return ret;
}

static void __exit demo_exit(void)
{
	int i = 0;

	printk("%s,%d\n", __func__, __LINE__);

	for(i = 0; i < count; i++)
	{
		device_destroy(pclass, MKDEV(MAJOR(devno), MINOR(devno)+i));
	}
	class_destroy(pclass);
	cdev_del(pdev);
	kfree(pdev);
	unregister_chrdev_region(devno, count);

}


module_init(demo_init);
module_exit(demo_exit);
把count值修改为10,我们要创建10个设备,创建设备时,连续创建10次,注意次设备号要不同,并起不同的名字。另外注意出错处理时,要不之前创建的设备都要销毁掉。加载之后我们看一下生成了几个设备

我们看到生成了hello0--hello9 十个设备。这十个设备是在一个类“myclass”下,我们可以查看/sys/class/myclass下
