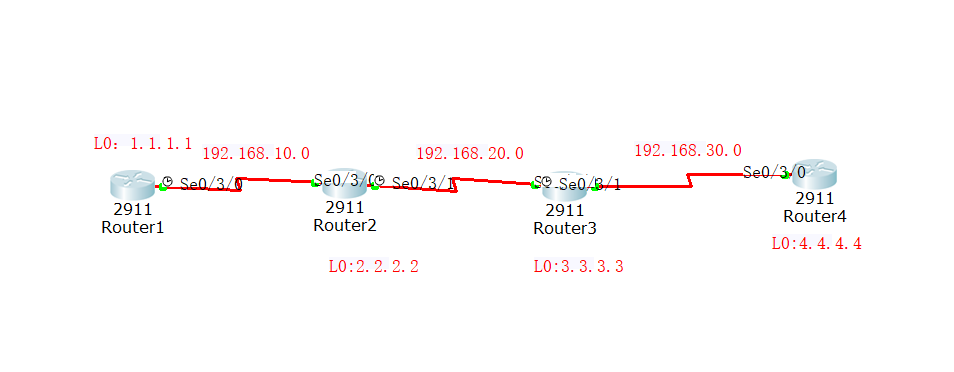
我们将以上面的拓扑图来进行实验,要用ospf的协议达到全网互通的效果
router1:
enable 进入特权模式
config t 进入全局配置模式
interface L0
ip address 1.1.1.1 255.255.255.0 配置回环的ip地址
exit
interface s0/3/0 进入接口模式
ip address 192.168.10.1 255.255.255.0
no shu 激活接口
exit
router2:
enable
config t
interface L0 回环接口无需激活
ip address 2.2.2.2 255.255.255.0
exit
interface s0/3/0
ip address 192.168.10.2 255.255.255.0
clock rate 6400 同步时间
no shu
exit
interface s0/3/1
ip address 192.168.20.1 255.255.255.0
clock rate 6400
no shu
exit
router3:
enable
config t
interface L0 回环接口无需激活
ip address 3.3.3.3 255.255.255.0
exit
interface s0/3/0
ip address 192.168.20.2 255.255.255.0
clock rate 6400 同步时间
no shu
exit
interface s0/3/1
ip address 192.168.30.1 255.255.255.0
clock rate 6400
no shu
exit
router4:
enable
config t
interface L0
ip address 4.4.4.4 255.255.255.0
exit
interface s0/3/0
ip address 192.168.30.2 255.255.255.0
no shu
ip地址配置完毕,开始配置ospf
router1:
在全局配置模式下
router ospf 1
router-id 1.1.1.1
network 192.168.10.0 0.0.0.255 area 0
network 1.1.1.0 0.0.0.255 area 0
router2:
在全局配置模式下
router ospf 1
router-id 2.2.2.2
network 192.168.20.0 0.0.0.255 area 0
network 192.168.10.0 0.0.0.255 area 0
network 2.2.2.0 0.0.0.255 area 0
router3:
在全局配置模式下
router ospf 1
router-id 3.3.3.3
network 192.168.20.0 0.0.0.255 area 0
network 192.168.30.0 0.0.0.255 area 0
network 3.3.3.0 0.0.0.255 area 0
router4:
在全局配置模式下
router ospf 1
router-id 4.4.4.4
network 192.168.30.0 0.0.0.255 area 0
network 4.4.4.0 0.0.0.255 area 0
ospf的配置就完成了,注意这个ospf是靠泛洪来传播信息的,每个路由器都会以自己为起点,向邻居发送自己的路由表,同时学习邻居的路由表,并且会重复发送自己的和自己已经学习到的路由表,也就说泛洪是多次的,并不会马上学习到所有的所有的路由表,配置完后可以在特权模式下使用show ip router来查看自己的路由表是否已经全部学习到