一. 忘记密码
思维导图:
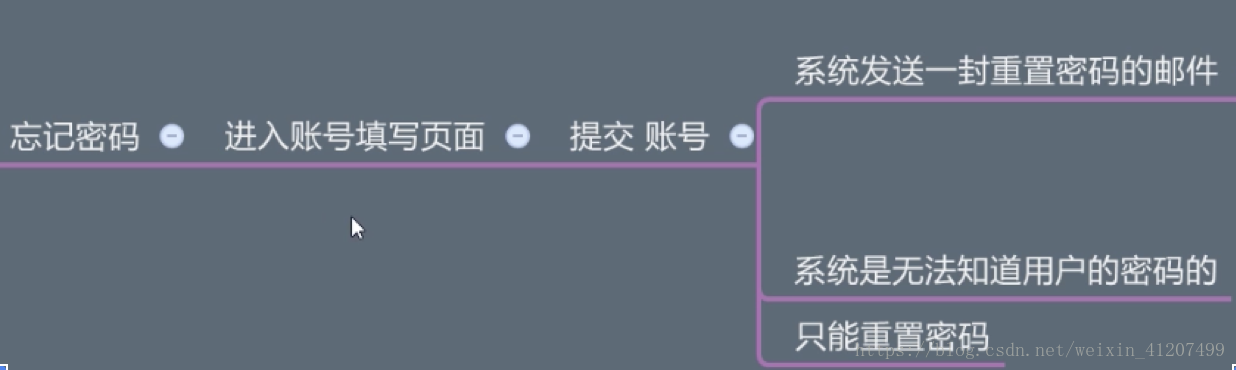

系统识别用户的方案,选用第二种或第三种, 第一种不安全。我们这里选择第二种方法
二.first_or_404
在app/forms/auth.py增加EmailForm:
class EmailForm(Form):
    email = StringField(validators=[DataRequired(), Length(min=8, max=64), Email(message='电子邮件格式错误')])
编写app/web/auth.py的forget_password_request视图函数:
@web.route('/reset/password', methods=['GET', 'POST'])
def forget_password_request():
    form = EmailForm(request.form)
    if request.method == 'POST':
        if form.validate():
            account_email = form.email.fata
            user = User.query.filter_by(email=account_email).first_or_404()  # 如果不存在,会抛异常, 即后面的代码不会再执行了
            #
            # user = User.query.filter_by(email = account_email).first()
            # if user:
            #     pass
            # else:
            #     flash('账号不存在')

    return render_template('auth/forget_password_request.html', form=form)
first_or_404查询出来的是None的话, 会自动抛出异常。并且后面的代码不会继续执行。
三. callable可调用对象的意义 ( __ call __ )
我们来看一下first_or_404的源码:
class BaseQuery(orm.Query):
    """SQLAlchemy :class:`~sqlalchemy.orm.query.Query` subclass with convenience methods for querying in a web application.

    This is the default :attr:`~Model.query` object used for models, and exposed as :attr:`~SQLAlchemy.Query`.
    Override the query class for an individual model by subclassing this and setting :attr:`~Model.query_class`.
    """

    def get_or_404(self, ident):
        """Like :meth:`get` but aborts with 404 if not found instead of returning ``None``."""

        rv = self.get(ident)
        if rv is None:
            abort(404)
        return rv

    def first_or_404(self):
        """Like :meth:`first` but aborts with 404 if not found instead of returning ``None``."""

        rv = self.first()
        if rv is None:
            abort(404)
        return rv
    ···
first_or_404是flask_sqlalchemy的BaseQuery的方法, 我们继续看一下first_or_404中abort方法:
def abort(status, *args, **kwargs):
    '''
    Raises an :py:exc:`HTTPException` for the given status code or WSGI
    application::

        abort(404)  # 404 Not Found
        abort(Response('Hello World'))

    Can be passed a WSGI application or a status code.  If a status code is
    given it's looked up in the list of exceptions and will raise that
    exception, if passed a WSGI application it will wrap it in a proxy WSGI
    exception and raise that::

       abort(404)
       abort(Response('Hello World'))

    '''
    return _aborter(status, *args, **kwargs)    #_aborter是一个对象, 为什么对象可以像函数一样传入参数?

_aborter = Aborter()
发现一个奇怪的现象, _aborter是一个对象, 为什么对象可以像函数一样传入参数?
其实是Aborter内部使用了__call__魔法方法:
class Aborter(object):

    """
    When passed a dict of code -> exception items it can be used as
    callable that raises exceptions.  If the first argument to the
    callable is an integer it will be looked up in the mapping, if it's
    a WSGI application it will be raised in a proxy exception.

    The rest of the arguments are forwarded to the exception constructor.
    """

    def __init__(self, mapping=None, extra=None):
        if mapping is None:
            mapping = default_exceptions
        self.mapping = dict(mapping)
        if extra is not None:
            self.mapping.update(extra)

    def __call__(self, code, *args, **kwargs):
        if not args and not kwargs and not isinstance(code, integer_types):
            raise HTTPException(response=code)
        if code not in self.mapping:
            raise LookupError('no exception for %r' % code)
        raise self.mapping[code](*args, **kwargs)
有了__call__魔法方法, 就可以称为可调用对象,
你也许会问:
上面的源码,我不使用__call__,而用一般的方法也可以实现啊, 那__call__有什么用呢?可调用对象的作用:
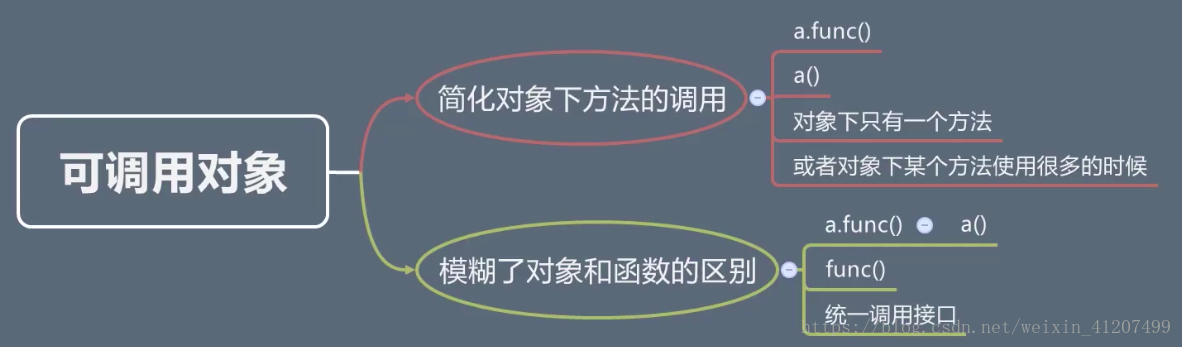
针对统一调用接口, 我们代码举例:
class A:
    def go(self):
        return 1

def func():
    return 1


def main(callable):  # 传入可调用对象
    # 我想调用传入参数, 得到数字1
我像在main函数中, 既能传入A来得到1, 也能传入func来得到1. 这时候唯一的办法就是__call__:
class A:
    def __call__(self):
        return 1

def func():
    return 1


def main(callable):
    # 我想调用传入参数, 得到数字1
    print(callable())


if __name__ == '__main__':
    main(A())
    main(func)
四. 装饰器app_errorhandler:AOP的应用
当first_or_404的时候,我们想自定义404页面, 可以这样修改forget_password_request:
@web.route('/reset/password', methods=['GET', 'POST'])
def forget_password_request():
    form = EmailForm(request.form)
    if request.method == 'POST':
        if form.validate():
            account_email = form.email.fata
            try:
                user = User.query.filter_by(email=account_email).first_or_404()  # 如果不存在,会抛异常, 即后面的代码不会再执行了
            except Exception as e:
                return render_template('404.html')  # 自定义404页面

    return render_template('auth/forget_password_request.html', form=form)
但每次都try,except太麻烦, 有没有比较好的解决方案呢?
我们可以使用app_errorhandler
修改app/web/init.py
from flask import Blueprint, render_template  # 蓝图

web = Blueprint('web', __name__, url_prefix='/web')  # 蓝图初始化


@web.app_errorhandler(404)  # 使用app_errorhandler, 除了404以外的其他错误也可以处理
def not_found(e):
    return render_template('404.html'), 404


from app.web import book, auth, drift, gift, main, wish
flask实现app_errorhandler是基于AOP思想(面向切片编程):
我们不要零散的在每一个需要处理404的地方都写处理代码,
而是集中到一个地方统一处理。
五. 发送邮件
安装插件flask-mail, 在配置文件secure.py中填写配置信息:
# Email配置
MAIL_SERVER = 'smtp.qq.com'
MAIL_PORT = 465
MAIL_USE_SSL = True
MAIL_USE_TSL = False
MAIL_USERNAME = '[email protected]'
MAIL_PASSWORD = 'password'
MAIL_SUBJECT_PREFIX = '[鱼书]'
MAIL_SENDER = '鱼书<[email protected]>'
其中MAIL_PASSWORD需要去qq邮箱获取配置码, 不是qq邮箱的密码。
新建文件app/lib/email.py:
from app import mail
from flask_mail import Message
from flask import current_app, render_template


def send_email(to, subject, template, **kwargs):
    msg = Message(
        '[鱼书]' + '' + subject,
        sender=current_app.config['MAIL_USERNAME'],
        recipients=[to])
    msg.html = render_template(template, **kwargs)
    mail.send()
新建app/templates/email/reset_password.html:
<p>亲爱的 {{ user.nickname }},</p>
<p>点击<a
        href="{{ url_for('web.forget_password', token=token, _external=True) }}">这里</a>可以重置你的密码
</p>
<p>如果无法点击,你也可以将下面的地址复制到浏览器中打开:</p>
<p>{{ url_for('web.forget_password', token=token, _external=True) }}</p>
<p>你的,</p>
<p>鱼书</p>
<p>
    <small>注意,请不要回复此邮件哦</small>
</p>
修改对应的视图函数 app/web/auth.py的forget_password_request:
@web.route('/reset/password', methods=['GET', 'POST'])
def forget_password_request():
    form = EmailForm(request.form)
    if request.method == 'POST':
        if form.validate():
            account_email = form.email.fata
            user = User.query.filter_by(email=account_email).first_or_404()

            from app.libs.email import send_email
            send_email(account_email, '重置你的密码', 'email/reset_password.html', user=user, token='123') # token先随便定义一下,方便调试成功
    return render_template('auth/forget_password_request.html', form=form)
六. 忘记密码(使用itsdangerous生成令牌)
在app/forms/auth.py中增加ResetPasswordForm:
class ResetPasswordForm(Form):
    passowrd1 = PasswordField(validators=[DataRequired(),Length(6,32,message='密码长度在6-32个字符之间'),])
    password2 = PasswordField(validators=[DataRequired(), Length(6, 32), EqualTo('password1', message='两次输入的密码不同')])
修改forget_password视图函数
@web.route('/reset/password/<token>', methods=['GET', 'POST'])
def forget_password(token):
    form = ResetPasswordForm(request.form)
    if request.method == 'POST' and form.validate():
        pass
    return render_template('auth/forget_password.html')
可以重新翻看第一节中的流程, 我们要生成加密的ID(使用itsdangerous模块)。
把业务逻辑加入app/models/user.py的user模型中:
from itsdangerous import TimedJSONWebSignatureSerializer as Serializer
class user(UserMixin, Base):
    ···

    def genrate_token(self, expiration=600):
        '''
        生成token
        :param expiration: 单位为秒, 过期时间
        :return:
        '''
        s = Serializer(current_app.config['SECRET_KEY'], expiration)
        return s.dumps({'id': self.id}).decode('utf-8')

    @staticmethod
    def reset_password(new_password):
        pass
把forget_password_request视图函数中的token完善
send_email(account_email, '重置你的密码', 'email/reset_password.html', user=user, token=user.genrate_token())
运行flask, 点击重制密码,发的邮件内容如下:
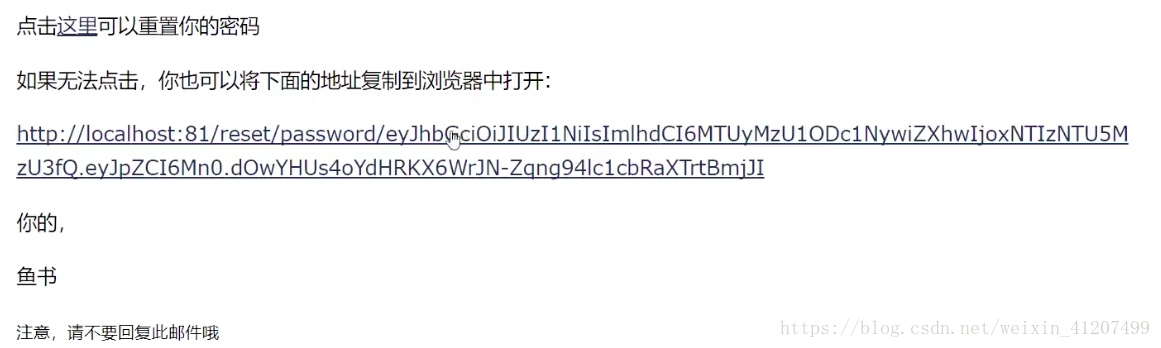
url中一长串的字符就是token
七. 重制密码
完善user模型中的reset_password:
from itsdangerous import TimedJSONWebSignatureSerializer as Serializer
class user(UserMixin, Base):
    ···

    def genrate_token(self, expiration=600):
        '''
        生成token
        :param expiration: 单位为秒, 过期时间
        :return:
        '''
        s = Serializer(current_app.config['SECRET_KEY'], expiration)
        return s.dumps({'id': self.id}).decode('utf-8')

    @staticmethod
    def reset_password(token, new_password):
        s = Serializer(current_app.config['SECRET_KEY'])      # 解token
        data = s.loads(token.encode('utf-8'))
        uid = data.get('id')
        with db.auto_commit():
            user = User.query.get(uid)
            user.password = new_password
        return True
完善app/web/auth.py的forget_password视图函数:
@web.route('/reset/password/<token>', methods=['GET', 'POST'])
def forget_password(token):
    form = ResetPasswordForm(request.form)
    if request.method == 'POST' and form.validate():
        success = User.reset_password(token, form.password1.data)
        if success:
            flash('您的密码已更新,请使用新密码登录')
            return redirect(url_for('web.login'))
        else:
            flash('密码重制失败')
    return render_template('auth/forget_password.html')
八. 异步发送电子邮件
运行flask,测试发送邮件时, 发现速度很慢。我们需要把发送邮件做成线程。
修改app/libs/email.py:
from app import mail
from flask_mail import Message
from flask import current_app, render_template
from threading import Thread


def send_async_email(app, msg):
    with app.app_context():
        try:
            mail.send(msg)
        except Exception as e:
            raise e


def send_email(to, subject, template, **kwargs):
    msg = Message(
        '[鱼书]' + '' + subject,
        sender=current_app.config['MAIL_USERNAME'],
        recipients=[to])
    msg.html = render_template(template, **kwargs)
    thr = Thread(target=send_async_email, args=[current_app, msg])
    thr.start()
将发送邮件改造成多线程的send_async_email, 运行后发现send_email中current_app正常, 但是在send_async_email中app会是notfound。导致的原因就是在之前flask核心机制的博文中说的, current_app是代理的核心对象,线程隔离的。我们需要拿到真正的核心对象并传入send_async_email:
def send_email(to, subject, template, **kwargs):
    msg = Message(
        '[鱼书]' + '' + subject,
        sender=current_app.config['MAIL_USERNAME'],
        recipients=[to])
    msg.html = render_template(template, **kwargs)
    app = current_app._get_current_object()   # 获取真正的flask核心对象
    thr = Thread(target=send_async_email, args=[app, msg])
    thr.start()