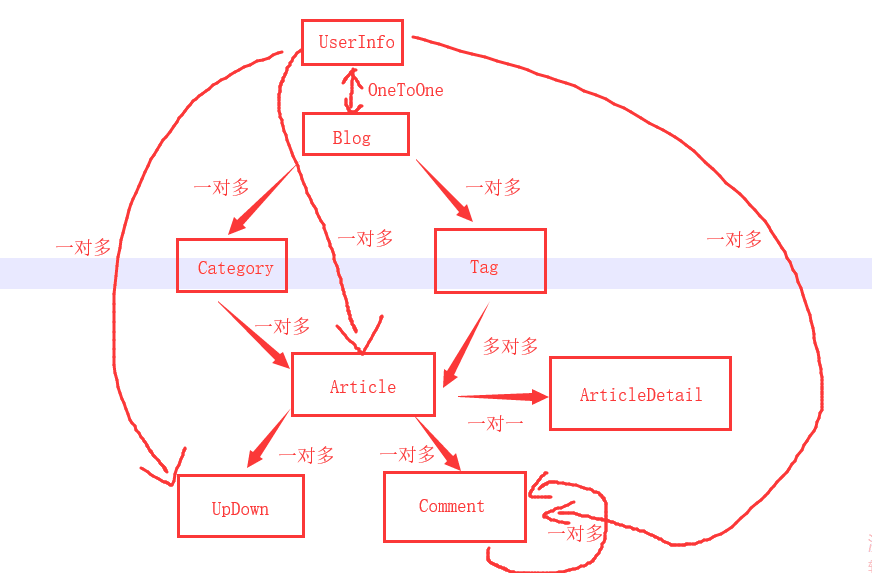
在写之前我们需要构思一些,有哪些表需要被建立和关联关系。下面是我的构思:
构思完成之后:首先我们需要创建我们的Django项目,下面是我建立的Django项目,

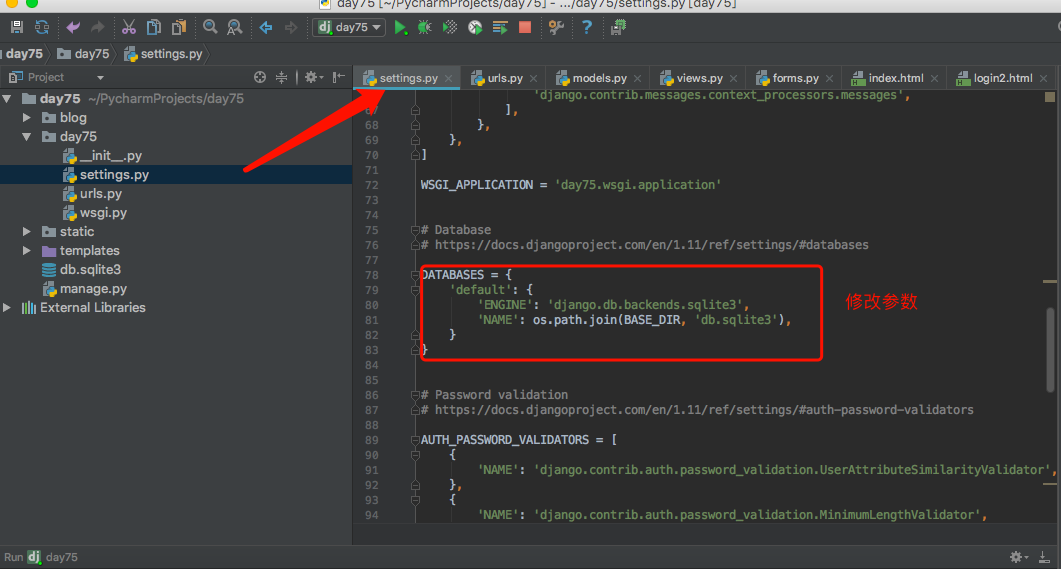
首先,第一步我们先要配置文件。如果,你是创建MySQL数据库的,要在setting中
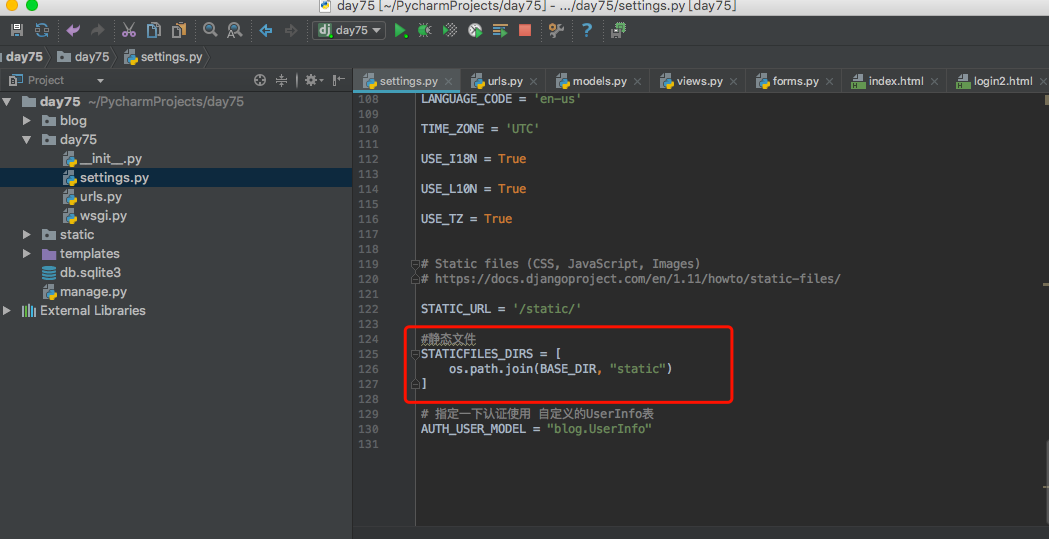
第二步,我们需要用到js,css啊,我们存放在Django中static文件中,所以需要配置静态文件
配置完成之后,要开始写我们之前构思的models中的表的创建了


from django.db import models

# Create your models here.

from django.contrib.auth.models import AbstractUser


class UserInfo(AbstractUser):
    """
    用户信息表
    """
    nid = models.AutoField(primary_key=True)
    phone = models.CharField(max_length=11, null=True, unique=True)
    avatar = models.FileField(upload_to="avatars/", default="avatars/default.png")

    blog = models.OneToOneField(to="Blog", to_field="nid", null=True)

    def __str__(self):
        return self.username

    class Meta:
        verbose_name = "用户信息"
        verbose_name_plural = verbose_name


class Blog(models.Model):
    """
    博客信息
    """
    nid = models.AutoField(primary_key=True)
    title = models.CharField(max_length=64)  # 个人博客标题
    theme = models.CharField(max_length=32)  # 博客主题

    def __str__(self):
        return self.title

    class Meta:
        verbose_name = "博客"
        verbose_name_plural = verbose_name


class Category(models.Model):
    """
    个人博客文章分类
    """
    nid = models.AutoField(primary_key=True)
    title = models.CharField(max_length=32)  # 分类标题
    blog = models.ForeignKey(to="Blog", to_field="nid")  # 外键关联博客,一个博客站点可以有多个分类

    def __str__(self):
        return "{}-{}".format(self.blog.title, self.title)

    class Meta:
        verbose_name = "文章分类"
        verbose_name_plural = verbose_name


class Tag(models.Model):
    """
    标签
    """
    nid = models.AutoField(primary_key=True)
    title = models.CharField(max_length=32)  # 标签名
    blog = models.ForeignKey(to="Blog", to_field="nid")  # 所属博客

    def __str__(self):
        return self.title

    class Meta:
        verbose_name = "标签"
        verbose_name_plural = verbose_name


class Article(models.Model):
    """
    文章
    """
    nid = models.AutoField(primary_key=True)
    title = models.CharField(max_length=50)  # 文章标题
    desc = models.CharField(max_length=255)  # 文章描述
    create_time = models.DateTimeField(auto_now_add=True)  # 创建时间
    category = models.ForeignKey(to="Category", to_field="nid", null=True)

    user = models.ForeignKey(to="UserInfo", to_field="nid")

    tags = models.ManyToManyField(
        to="Tag",
        through="Article2Tag",
        through_fields=("article", "tag"),
    )

    def __str__(self):
        return self.title

    class Meta:
        verbose_name = "文章"
        verbose_name_plural = verbose_name


class ArticleDetail(models.Model):
    """
    文章详情表
    """
    nid = models.AutoField(primary_key=True)
    content = models.TextField()
    article = models.OneToOneField(to="Article", to_field="nid")

    class Meta:
        verbose_name = "文章详情"
        verbose_name_plural = verbose_name


class Article2Tag(models.Model):
    """
    文章和标签的多对多关系表
    """
    nid = models.AutoField(primary_key=True)
    article = models.ForeignKey(to="Article", to_field="nid")
    tag = models.ForeignKey(to="Tag", to_field="nid")

    def __str__(self):
        return "{}-{}".format(self.article, self.tag)

    class Meta:
        unique_together = (("article", "tag"),)
        verbose_name = "文章-标签"
        verbose_name_plural = verbose_name


class ArticleUpDown(models.Model):
    """
    点赞表
    """
    nid = models.AutoField(primary_key=True)
    user = models.ForeignKey(to="UserInfo", null=True)
    article = models.ForeignKey(to="Article", null=True)
    is_up = models.BooleanField(default=True)

    class Meta:
        unique_together = (("article", "user"),)
        verbose_name = "点赞"
        verbose_name_plural = verbose_name


class Comment(models.Model):
    """
    评论表
    """
    nid = models.AutoField(primary_key=True)
    article = models.ForeignKey(to="Article", to_field="nid")
    user = models.ForeignKey(to="UserInfo", to_field="nid")
    content = models.CharField(max_length=255)  # 评论内容
    create_time = models.DateTimeField(auto_now_add=True)
    parent_comment = models.ForeignKey("self", null=True)

    def __str__(self):
        return self.content

    class Meta:
        verbose_name = "评论"
        verbose_name_plural = verbose_name
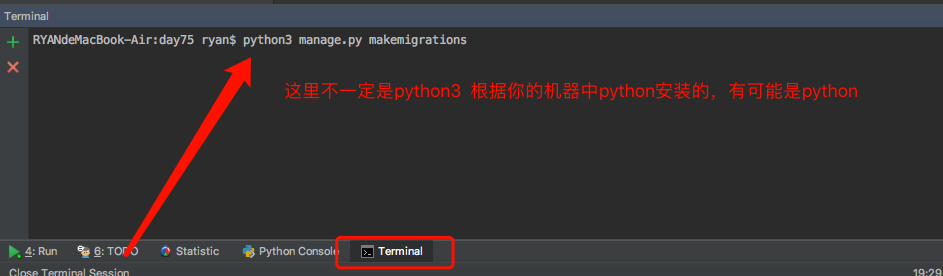
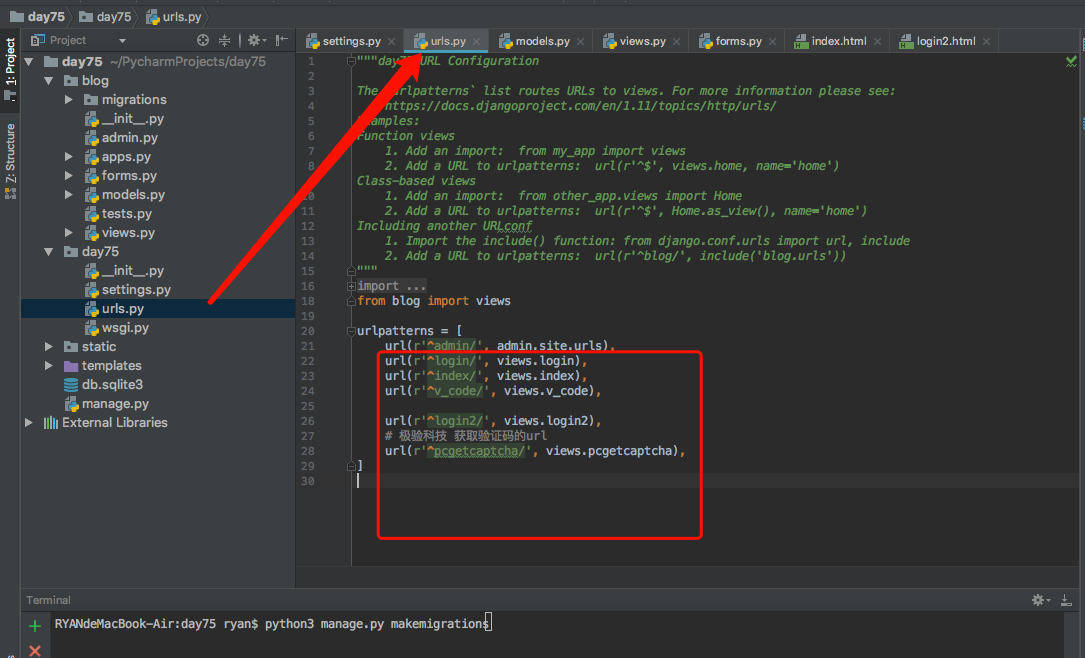
创建之后,我们需要在terminal中输入 python3 manage.py makemigrations
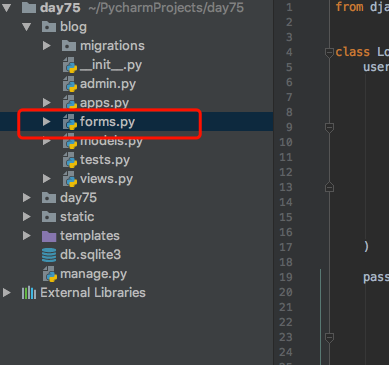
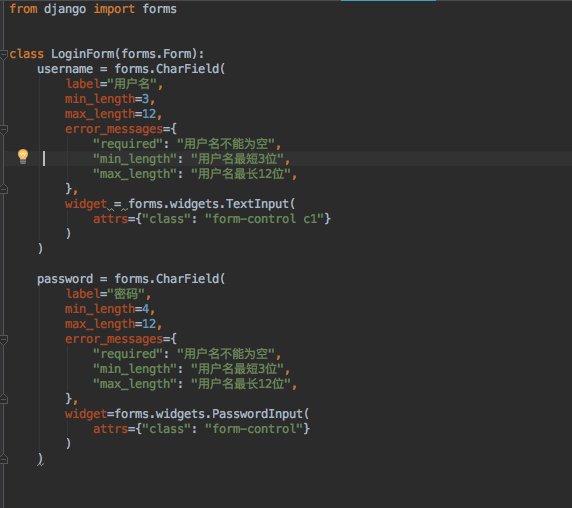
接下来,我是用forms表单的形式来创建页面的,所以在blog文件下创建一个forms.py文件。当然,你可以不用forms表单来写,随你!
在forms.py中自定义类,已经内容。我们这里先写的是登录。当然要写,username,password
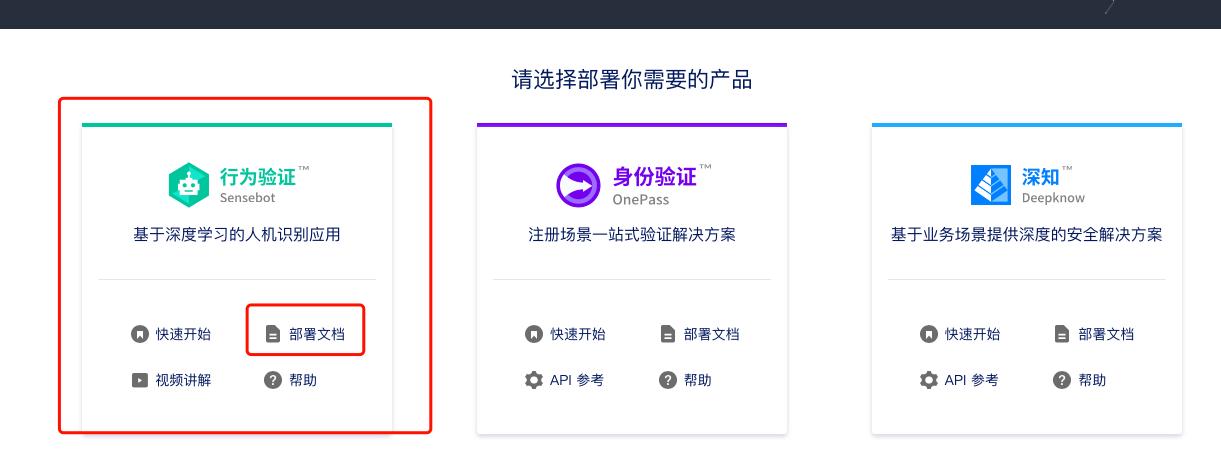
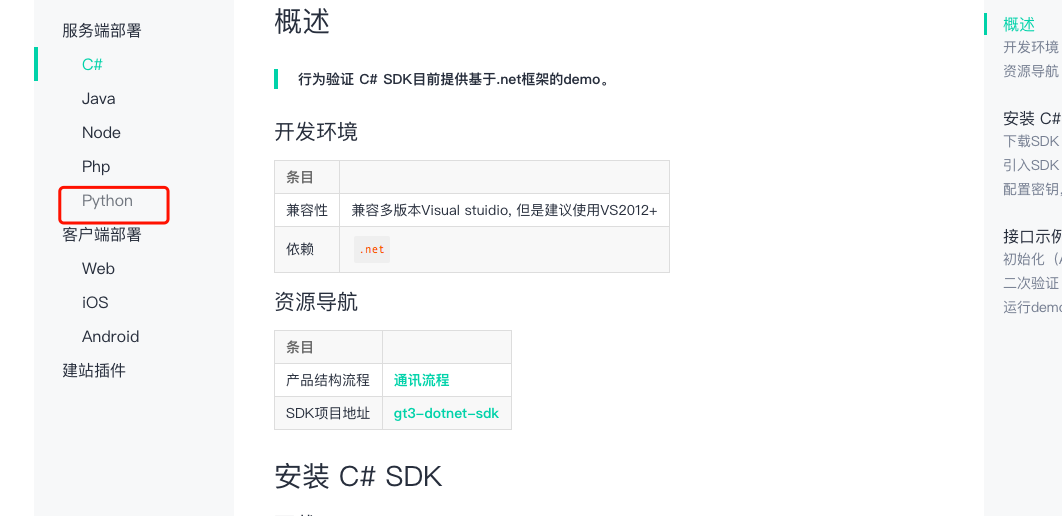
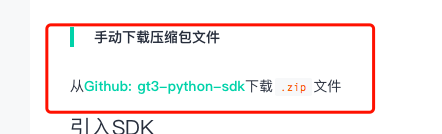
然后,上网页 http://www.geetest.com

下完之后我们开始写URL--->views--->templates这样的顺序写
from django.shortcuts import render, HttpResponse
from blog import forms
from django.contrib import auth
from django.http import JsonResponse
# 极验科技依赖
from geetest import GeetestLib
# Create your views here.

pc_geetest_id = "b46d1900d0a894591916ea94ea91bd2c"
pc_geetest_key = "36fc3fe98530eea08dfc6ce76e3d24c4"


# 滑动验证码加载需要的视图函数
def pcgetcaptcha(request):
    user_id = 'test'
    gt = GeetestLib(pc_geetest_id, pc_geetest_key)
    status = gt.pre_process(user_id)
    request.session[gt.GT_STATUS_SESSION_KEY] = status
    request.session["user_id"] = user_id
    response_str = gt.get_response_str()
    return HttpResponse(response_str)

def login(request):
    form_obj = forms.LoginForm()
    if request.method == "POST":
        ret = {"code": 0}
        username = request.POST.get("username")
        password = request.POST.get("password")
        v_code = request.POST.get("v_code", "")

        if v_code.upper() == request.session.get("v_code", ""):
            # 验证码正确

            user = auth.authenticate(username=username, password=password)
            if user:
                # 用户名密码正确
                ret["data"] = "/index/"
            else:
                # 用户名或密码错误
                ret["code"] = 1
                ret["data"] = "用户名或密码错误"
        else:
            # 验证码错误
            ret["code"] = 1
            ret["data"] = "验证码错误"
        return JsonResponse(ret)

    return render(request, "login.html", {"form_obj": form_obj})


# 用滑动验证码版登陆
def login2(request):
    form_obj = forms.LoginForm()
    if request.method == "POST":
        gt = GeetestLib(pc_geetest_id, pc_geetest_key)
        challenge = request.POST.get(gt.FN_CHALLENGE, '')
        validate = request.POST.get(gt.FN_VALIDATE, '')
        seccode = request.POST.get(gt.FN_SECCODE, '')
        status = request.session[gt.GT_STATUS_SESSION_KEY]
        user_id = request.session["user_id"]
        if status:
            result = gt.success_validate(challenge, validate, seccode, user_id)
        else:
            result = gt.failback_validate(challenge, validate, seccode)
        # 如果验证码正确
        if result:
            ret = {"code": 0}
            username = request.POST.get("username")
            password = request.POST.get("password")
            user = auth.authenticate(username=username, password=password)
            if user:
                # 用户名密码正确
                ret["data"] = "/index/"
            else:
                # 用户名或密码错误
                ret["code"] = 1
                ret["data"] = "用户名或密码错误"
            return JsonResponse(ret)
    return render(request, "login2.html", {"form_obj": form_obj})


def v_code(request):

    from PIL import Image, ImageDraw, ImageFont
    import random

    # 定义一个生成随机颜色代码的内部函数
    def get_color():
        return random.randint(0,255), random.randint(0,255), random.randint(0,255)

    # 生成一个图片对象
    img_obj = Image.new(
        "RGB",
        (250, 35),
        color=get_color()
    )

    # 在图片中加文字
    # 生成一个画笔对象
    draw_obj = ImageDraw.Draw(img_obj)
    # 加载字体文件
    font_obj = ImageFont.truetype("static/font/kumo.ttf", size=28)
    # 写字
    # draw_obj.text(
    #     (0, 0),  # 位置
    #     "A",  # 内容
    #     (0,0,0),  # 颜色
    #     font=font_obj
    # )

    # for循环5次,每次写一个随机的字符
    tmp_list = []
    for i in range(5):
        n = str(random.randint(0, 9))  # 随机生成一个数字
        l = chr(random.randint(97, 122))  # 随机生成一个小写的
        u = chr(random.randint(65, 90))  # 随机生成一个大写的
        r = random.choice([n, l, u])  # 从上面三个随机选一个
        tmp_list.append(r)
        draw_obj.text(
            (i*48+20, 0),  # 位置
            r,  # 内容
            get_color(),  # 颜色
            font=font_obj
        )
    # 得到生成的随机验证码
    v_code_str = "".join(tmp_list)
    # 不能使用全局变量保存验证码,会被覆盖!
    # 每一个请求应该对应自己的验证码
    # global VCODE
    # VCODE = v_code_str

    request.session["v_code"] = v_code_str.upper()

        # 加干扰线
        # width = 250  # 图片宽度(防止越界)
        # height = 35
        # for i in range(2):
        #     x1 = random.randint(0, width)
        #     x2 = random.randint(0, width)
        #     y1 = random.randint(0, height)
        #     y2 = random.randint(0, height)
        #     draw_obj.line((x1, y1, x2, y2), fill=get_color())
        #
        # # 加干扰点
        # for i in range(2):
        #     draw_obj.point([random.randint(0, width), random.randint(0, height)], fill=get_color())
        #     x = random.randint(0, width)
        #     y = random.randint(0, height)
        #     draw_obj.arc((x, y, x+4, y+4), 0, 90, fill=get_color())


    # 第一版: 将生成的图片保存到文件中
    # with open("xx.png", "wb") as f:
    #     img_obj.save(f, "png")
    # print("图片已经生成!")
    # with open("xx.png", "rb") as f:
    #     return HttpResponse(data, content_type="image/png")

    # 第二版:直接将图片在内存中保存
    from io import BytesIO
    tmp = BytesIO()  # 生成一个io对象
    img_obj.save(tmp, "png")

    data = tmp.getvalue()
    return HttpResponse(data, content_type="image/png")

def index(request):
    return render(request, "index.html")
templates
<!DOCTYPE html>
<html lang="en">
<head>
    <meta charset="UTF-8">
    <title>Title</title>
    <meta name="viewport" content="width=device-width, initial-scale=1">
</head>
<body>
<h1>O98K</h1>

</body>
</html>
<!DOCTYPE html>
<html lang="en">
<head>
    <meta charset="UTF-8">
    <title>欢迎登陆</title>
    <meta name="viewport" content="width=device-width, initial-scale=1">
    <link rel="stylesheet" href="/static/bootstrap-3.3.7/css/bootstrap.min.css">
    <link rel="stylesheet" href="/static/mystyle.css">
</head>
<body>

<div class="container">
    <div class="row">
        <div class="col-md-4 col-md-offset-4" id="login-form">
            <form autocomplete="off" novalidate>
                <div class="form-group">
                    <label for="{{ form_obj.username.id_for_label }}">{{ form_obj.username.label }}</label>
                    {{ form_obj.username }}
                </div>

                <div class="form-group">
                    <label for="{{ form_obj.password.id_for_label }}">{{ form_obj.password.label }}</label>
                    {{ form_obj.password }}
                </div>


                <div class="form-group" id="v-code-wrapper">
                    <label for="{{ form_obj.password.id_for_label }}">验证码</label>
                    <input type="text" class="form-control" id="v-code-input">
                    <img src="/v_code/" alt="" id="v-code" >
                </div>

                <button type="button" class="btn btn-success" id="login-button">登录</button>
                <span class="error" id="login-error"></span>
            </form>
        </div>
    </div>
</div>

<script src="/static/jquery-3.3.1.min.js"></script>
<script src="/static/setupAjax.js"></script>
<script>
    $(document).ready(function () {
        // 文档加载完之后自动执行的
        $("#login-button").click(function () {
            // 登录按钮点击之后要做的事儿
            $.ajax({
                url: "/login/",
                type: "POST",
                data: {
                    username: $("#id_username").val(),
                    password: $("#id_password").val(),
                    v_code: $("#v-code-input").val()
                },
                success: function (data) {
                    if (!data.code) {
                        location.href = data.data;
                    } else {
                        // 有错误
                        $("#login-error").text(data.data);
                    }
                },
                error: function (err) {
                    console.log(err)
                }
            })
        });
        // 当form中的input标签获取光标之后,就清空之前的错误信息
        $("form input").focus(function () {
            $("#login-error").text("");
        });
        // 点击图片刷新验证码
        $("#v-code").click(function () {
            this.src += "?";
        });

    })
</script>

</body>
</html>
<!DOCTYPE html>
<html lang="en">
<head>
    <meta charset="UTF-8">
    <title>欢迎登陆</title>
    <meta name="viewport" content="width=device-width, initial-scale=1">
    <link rel="stylesheet" href="/static/bootstrap-3.3.7/css/bootstrap.min.css">
    <link rel="stylesheet" href="/static/mystyle.css">
</head>
<body>

<div class="container">
    <div class="row">
        <div class="col-md-4 col-md-offset-4" id="login-form">
            <form autocomplete="off" novalidate>
                <div class="form-group">
                    <label for="{{ form_obj.username.id_for_label }}">{{ form_obj.username.label }}</label>
                    {{ form_obj.username }}
                </div>

                <div class="form-group">
                    <label for="{{ form_obj.password.id_for_label }}">{{ form_obj.password.label }}</label>
                    {{ form_obj.password }}
                </div>

                <button type="button" class="btn btn-success" id="login-button">登录</button>
                <span class="error" id="login-error"></span>
                <div id="popup-captcha"></div>
            </form>
        </div>
    </div>
</div>

<script src="/static/jquery-3.3.1.min.js"></script>
<script src="/static/setupAjax.js"></script>
<!-- 引入封装了failback的接口--initGeetest -->
<script src="http://static.geetest.com/static/tools/gt.js"></script>


<script>

    var handlerPopup = function (captchaObj) {
        // 成功的回调
        captchaObj.onSuccess(function () {
            var validate = captchaObj.getValidate();
            $.ajax({
                url: "/login2/", // 进行二次验证
                type: "post",
                data: {
                    username: $("#id_username").val(),
                    password: $("#id_password").val(),
                    geetest_challenge: validate.geetest_challenge,
                    geetest_validate: validate.geetest_validate,
                    geetest_seccode: validate.geetest_seccode
                },
                success: function (data) {
                    if (!data.code) {
                        location.href = data.data;
                    } else {
                        // 有错误
                        $("#login-error").text(data.data);
                    }
                },
                error: function (err) {
                    console.log(err)
                }
            });
        });
         $("#login-button").click(function () {
            captchaObj.show();
        });
        // 将验证码加到id为captcha的元素里
        captchaObj.appendTo("#popup-captcha");
        // 更多接口参考:http://www.geetest.com/install/sections/idx-client-sdk.html
    };

    // 验证开始需要向网站主后台获取id,challenge,success(是否启用failback)
    $.ajax({
        url: "/pcgetcaptcha?t=" + (new Date()).getTime(), // 加随机数防止缓存
        type: "get",
        dataType: "json",
        success: function (data) {
            // 使用initGeetest接口
            // 参数1:配置参数
            // 参数2:回调,回调的第一个参数验证码对象,之后可以使用它做appendTo之类的事件
            initGeetest({
                gt: data.gt,
                challenge: data.challenge,
                product: "popup", // 产品形式,包括:float,embed,popup。注意只对PC版验证码有效
                offline: !data.success // 表示用户后台检测极验服务器是否宕机,一般不需要关注
                // 更多配置参数请参见:http://www.geetest.com/install/sections/idx-client-sdk.html#config
            }, handlerPopup);
        }
    });


    $(document).ready(function () {
        // 文档加载完之后自动执行的
        // 当form中的input标签获取光标之后,就清空之前的错误信息
        $("form input").focus(function () {
            $("#login-error").text("");
        });
        // 点击图片刷新验证码
        $("#v-code").click(function () {
            this.src += "?";
        });

    })
</script>

</body>
</html>