总结来说,自定义控件的实现有三种方式,分别是:组合控件、自绘控件和 继承控件。下面将分别对这三种方式进行介绍
(一)组合控件
组合控件,顾名思义就是将一些小的控件组合起来形成一个新的控件,这些小的控件多是系统自带的控件。比如很多应用中普遍使用的标题栏控件,其实用的就是组合控件,那么下面将通过实现一个简单的标题栏自定义控件来说说组合控件的用法。
1、新建一个Android项目,创建自定义标题栏的布局文件title.xml:<?xml version="1.0" encoding="utf-8"?>
<RelativeLayout
xmlns:android="http://schemas.android.com/apk/res/android"
xmlns:tools="http://schemas.android.com/tools" android:layout_width="match_parent"
android:layout_height="50dp"
tools:context="test.bwie.com.wzq_20170929day4.MainActivity"
android:background="#ff0">
<Button
android:id="@+id/button_left"
android:layout_width="60dp"
android:layout_height="40dp"
android:layout_centerVertical="true"
android:layout_marginLeft="5dp"
android:background="#f0f"
android:text="Back"
android:textColor="#fff" />
<TextView
android:id="@+id/title_text"
android:layout_width="wrap_content"
android:layout_height="wrap_content"
android:layout_centerInParent="true"
android:text="This is Title"
android:textColor="#f0f"
android:textSize="25sp" />
</RelativeLayout>
可见这个标题栏控件还是比较简单的,其中在左边有一个返回按钮,标题栏中间是标题文字。
2、创建一个类Myview,继承自frameLayout:
import android.content.Context;
import android.graphics.Paint;
import android.support.annotation.NonNull;
import android.support.annotation.Nullable;
import android.util.AttributeSet;
import android.view.LayoutInflater;
import android.widget.Button;
import android.widget.FrameLayout;
import android.widget.TextView;


public class Myview extends FrameLayout {

    Paint paint ;
    private Button leftButton;

    private TextView titleText;

    //构造器二个参数
    public Myview(@NonNull final Context context, @Nullable AttributeSet attrs) {
        super(context, attrs);
        //加载布局
        LayoutInflater.from(context).inflate(R.layout.title, this);
        //获得布局中的控件
        titleText = (TextView) findViewById(R.id.title_text);
        leftButton = (Button) findViewById(R.id.button_left);

    }

    //为button添加自定义点击事件
    public void setLeftButtonlisetener(OnClickListener listener){
        leftButton.setOnClickListener(listener);
    }

    //设置标题的方法
    public void setTitleText(String title){
        titleText.setText(title);
    }


}
在TitleView中主要是为自定义的标题栏加载了布局,为返回按钮添加事件监听方法,并提供了设置标题文本的方法。
3、在activity_main.xml中引入自定义的标题栏:
   <test.bwie.com.wzq_20170929day4.Myview
       android:id="@+id/mv"
       android:layout_width="match_parent"
       android:layout_height="wrap_content"></test.bwie.com.wzq_20170929day4.Myview>
4、在MainActivity中获取自定义的标题栏,并且为返回按钮添加自定义点击事件:
 Myview mv;
        //控件Id
        mv = (Myview) findViewById(R.id.mv);

        //给布局中Back控件调用 点击事件
        mv.setLeftButtonlisetener(new View.OnClickListener() {
            @Override
            public void onClick(View v) {
                Toast.makeText(MainActivity.this, "你点击了返回", Toast.LENGTH_SHORT).show();
                //关闭的
//                finish();
            }
        });

        //给标题添加命名
        mv.setTitleText("信息文化博爱");
    }
5 .效果图展示
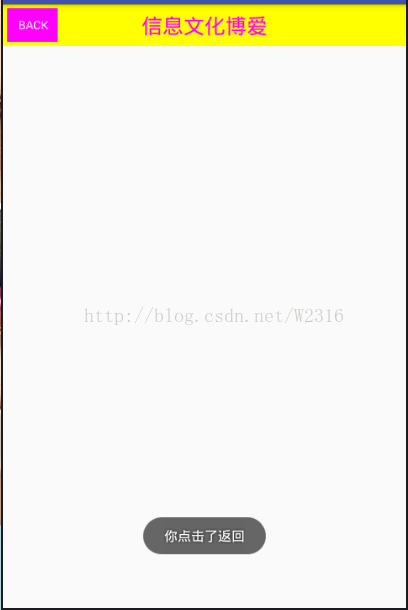
这样就用组合的方式实现了自定义标题栏,其实经过更多的组合还可以创建出功能更为复杂的自定义控件,比如自定义搜索栏等。
(二)自绘控件
1、创建CounterView类,继承自View,实现OnClickListener接口:
import android.content.Context;
import android.graphics.Canvas;
import android.graphics.Color;
import android.graphics.Paint;
import android.graphics.Rect;
import android.support.annotation.Nullable;
import android.util.AttributeSet;
import android.view.View;


public class CounterView extends View implements View.OnClickListener{
    // 定义画笔
    private Paint mPaint;
   // 用于获取文字的宽和高
    private Rect mBounds;
    // 计数值,每点击一次本控件,其值增加1
    private  int mcount;


    public void init(){
        // 初始化画笔、Rect
        mPaint = new Paint(Paint.ANTI_ALIAS_FLAG);
        mBounds = new Rect();
        // 本控件的点击事件
        setOnClickListener(this);
    }

    public CounterView(Context context, @Nullable AttributeSet attrs) {
        super(context, attrs);
        //在构造其中调用init()画笔
        init();
    }

    @Override
    protected void onDraw(Canvas canvas) {
        super.onDraw(canvas);

        mPaint.setColor(Color.BLACK);
        //绘制一个填充为蓝色的矩形
        canvas.drawRect(0,0,getWidth(),getHeight(),mPaint);

        mPaint.setColor(Color.YELLOW);
        mPaint.setTextSize(50);
        String text = String.valueOf(mcount);
        //获取文字的宽度个高度
        mPaint.getTextBounds(text,0,text.length(),mBounds);
        float textwigth=mBounds.width();
        float textheight=mBounds.height();

        //绘制字符串
        canvas.drawText(text,getWidth()/2 - textwigth/2,getHeight()/2
                    +textheight /2,mPaint);

    }

    @Override
    public void onClick(View v) {
        mcount ++;
        //重汇
        invalidate();
    }
}
<?xml version="1.0" encoding="utf-8"?>
<LinearLayout
xmlns:android="http://schemas.android.com/apk/res/android"
xmlns:app="http://schemas.android.com/apk/res-auto"
xmlns:tools="http://schemas.android.com/tools" android:layout_width="match_parent"
android:layout_height="match_parent"
tools:context="test.bwie.com.wzq_20170929day4.MainActivity">
<test.bwie.com.wzq_20170929day4.CounterView
android:layout_width="100dp"
android:layout_height="100dp"
android:layout_gravity="center"
android:layout_margin="130dp"/>
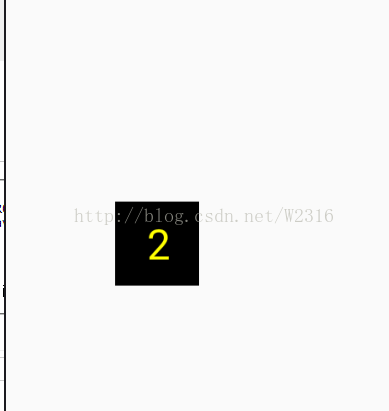
</LinearLayout>3 .效果图片
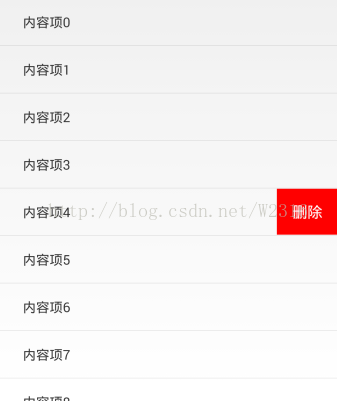
(三)继承控件
就是继承已有的控件,创建新控件,保留继承的父控件的特性,并且还可以引入新特性。下面就以支持横向滑动删除列表项的自定义ListView的实现来介绍。
1、创建删除按钮布局delete_btn.xml,这个布局是在横向滑动列表项后显示的:
<?xml version="1.0" encoding="utf-8"?>
<Button xmlns:android="http://schemas.android.com/apk/res/android"
    android:layout_width="wrap_content"
    android:layout_height="wrap_content"
    android:background="#FF0000"
    android:padding="5dp"
    android:text="删除"
    android:textColor="#FFFFFF"
    android:textSize="16sp" >

</Button>public class CustomListView extends ListView implements OnTouchListener,
OnGestureListener {
// 手势动作探测器
private GestureDetector mGestureDetector;
// 删除事件监听器
public interface OnDeleteListener {
void onDelete(int index);
}
private OnDeleteListener mOnDeleteListener;
// 删除按钮
private View mDeleteBtn;
// 列表项布局
private ViewGroup mItemLayout;
// 选择的列表项
private int mSelectedItem;
// 当前删除按钮是否显示出来了
private boolean isDeleteShown;
public CustomListView(Context context, AttributeSet attrs) {
super(context, attrs);
// 创建手势监听器对象
mGestureDetector = new GestureDetector(getContext(), this);
// 监听onTouch事件
setOnTouchListener(this);
}
// 设置删除监听事件
public void setOnDeleteListener(OnDeleteListener listener) {
mOnDeleteListener = listener;
}
// 触摸监听事件
@Override
public boolean onTouch(View v, MotionEvent event) {
if (isDeleteShown) {
hideDelete();
return false;
} else {
return mGestureDetector.onTouchEvent(event);
}
}
@Override
public boolean onDown(MotionEvent e) {
if (!isDeleteShown) {
mSelectedItem = pointToPosition((int) e.getX(), (int) e.getY());
}
return false;
}
@Override
public boolean onFling(MotionEvent e1, MotionEvent e2, float velocityX,
float velocityY) {
// 如果当前删除按钮没有显示出来,并且x方向滑动的速度大于y方向的滑动速度
if (!isDeleteShown && Math.abs(velocityX) > Math.abs(velocityY)) {
mDeleteBtn = LayoutInflater.from(getContext()).inflate(
R.layout.delete_btn, null);
mDeleteBtn.setOnClickListener(new OnClickListener() {
@Override
public void onClick(View v) {
mItemLayout.removeView(mDeleteBtn);
mDeleteBtn = null;
isDeleteShown = false;
mOnDeleteListener.onDelete(mSelectedItem);
}
});
mItemLayout = (ViewGroup) getChildAt(mSelectedItem
- getFirstVisiblePosition());
RelativeLayout.LayoutParams params = new RelativeLayout.LayoutParams(
LayoutParams.WRAP_CONTENT, LayoutParams.WRAP_CONTENT);
params.addRule(RelativeLayout.ALIGN_PARENT_RIGHT);
params.addRule(RelativeLayout.CENTER_VERTICAL);
mItemLayout.addView(mDeleteBtn, params);
isDeleteShown = true;
}
return false;
}
// 隐藏删除按钮
public void hideDelete() {
mItemLayout.removeView(mDeleteBtn);
mDeleteBtn = null;
isDeleteShown = false;
}
public boolean isDeleteShown() {
return isDeleteShown;
}
/**
* 后面几个方法本例中没有用到
*/
@Override
public void onShowPress(MotionEvent e) {
}
@Override
public boolean onSingleTapUp(MotionEvent e) {
return false;
}
@Override
public boolean onScroll(MotionEvent e1, MotionEvent e2, float distanceX,
float distanceY) {
return false;
}
@Override
public void onLongPress(MotionEvent e) {
}
}3、定义列表项布局custom_listview_item.xml,它的结构很简单,只包含了一个TextView:
<?xml version="1.0" encoding="utf-8"?>
<RelativeLayout xmlns:android="http://schemas.android.com/apk/res/android"
    android:layout_width="match_parent"
    android:layout_height="match_parent"
    android:descendantFocusability="blocksDescendants" >

    <TextView
        android:id="@+id/content_tv"
        android:layout_width="wrap_content"
        android:layout_height="wrap_content"
        android:layout_centerVertical="true"
        android:layout_margin="30dp"
        android:gravity="center_vertical|left" />

</RelativeLayout>
4、定义适配器类CustomListViewAdapter,继承自ArrayAdapter<String>:
public class CustomListViewAdapter extends ArrayAdapter<String> {

    public CustomListViewAdapter(Context context, int textViewResourceId,
            List<String> objects) {
        super(context, textViewResourceId, objects);
    }

    @Override
    public View getView(int position, View convertView, ViewGroup parent) {
        View view;

        if (convertView == null) {
            view = LayoutInflater.from(getContext()).inflate(
                    R.layout.custom_listview_item, null);
        } else {
            view = convertView;
        }

        TextView contentTv = (TextView) view.findViewById(R.id.content_tv);
        contentTv.setText(getItem(position));

        return view;
    }

}
5、在activity_main.xml中引入自定义的ListView:
<LinearLayout xmlns:android="http://schemas.android.com/apk/res/android"
    android:id="@+id/main_layout"
    android:layout_width="match_parent"
    android:layout_height="match_parent"
    android:orientation="vertical" >

    <com.example.test.CustomListView
        android:id="@+id/custom_lv"
        android:layout_width="match_parent"
        android:layout_height="wrap_content" />

</LinearLayout>
6、在MainActivity中对列表做初始化、设置列表项删除按钮点击事件等处理:
public class MainActivity extends Activity {

    // 自定义Lv
    private CustomListView mCustomLv;
    // 自定义适配器
    private CustomListViewAdapter mAdapter;
    // 内容列表
    private List<String> contentList = new ArrayList<String>();

    @Override
    protected void onCreate(Bundle savedInstanceState) {
        super.onCreate(savedInstanceState);
        requestWindowFeature(Window.FEATURE_NO_TITLE);
        setContentView(R.layout.activity_main);

        initContentList();

        mCustomLv = (CustomListView) findViewById(R.id.custom_lv);
        mCustomLv.setOnDeleteListener(new OnDeleteListener() {

            @Override
            public void onDelete(int index) {
                contentList.remove(index);
                mAdapter.notifyDataSetChanged();
            }
        });

        mAdapter = new CustomListViewAdapter(this, 0, contentList);
        mCustomLv.setAdapter(mAdapter);
    }

    // 初始化内容列表
    private void initContentList() {
        for (int i = 0; i < 20; i++) {
            contentList.add("内容项" + i);
        }
    }

    @Override
    public void onBackPressed() {
        if (mCustomLv.isDeleteShown()) {
            mCustomLv.hideDelete();
            return;
        }
        super.onBackPressed();
    }

}
7、运行效果如下: