画线 cv::line (LINE_4\LINE_8\LINE_AA)
画椭圆cv::ellipse
画矩形cv::rectangle
画圆cv::circle
画填充cv::fillPoly
画文字cv::putText
vs代码
    #include "../common/common.hpp"

    static Mat bgImage;
    static void drawLines();
    static void drawRectangle();
    static void drawEllipse();
    static void drawCircle();
    static void drawPolygon();
    static void drawRandomLine();

    void main1_8(int argc, char** argv)
    {
        bgImage = imread(getCVImagesPath("images/test1.png"), IMREAD_COLOR);
        drawLines();
        drawRectangle();
        drawEllipse();
        drawCircle();
        drawPolygon();
        //参数:Mat,文字(不识别中文?),文字的位置(锚点?),字体,缩放,颜色,线宽,线类型
        putText(bgImage, "Hello OpenCV", Point(0, 200), CV_FONT_HERSHEY_COMPLEX, 1.0, Scalar(0), 3, LINE_8);//绘制文字
        imshow("src", bgImage);

        drawRandomLine();

        waitKey(0);
    }

    void drawLines()//绘制线条
    {
        Point p1 = Point(20, 30);//Point表示平面上的点,OpenCV中的这些坐标值都是相对于图像本身像素值的
        Point p2;
        p2.x = 400;
        p2.y = 400;
        Scalar color = Scalar(0, 0, 255);
        line(bgImage, p1, p2, color, 10, LINE_AA);//绘制线条到Mat,10是线宽、LINE_4或LINE_8是带锯齿的,LINE_AA是抗锯齿的
    }

    void drawRectangle()//绘制矩形
    {
        //OpenCV的坐标系,原点在屏幕左上角,x朝右正,y朝下正
        Rect rect = Rect(200, 100, 300, 300);//起始位置x、y,宽,高
        Scalar color = Scalar(255, 0, 0);
        rectangle(bgImage, rect, color, LINE_8);//绘制矩形到Mat,自带圆角。。
    }

    void drawEllipse()//绘制椭圆
    {
        int width = bgImage.cols;
        int height = bgImage.rows;
        Scalar color = Scalar(0, 255, 0);
        //绘制椭圆,参数:Mat,中心点,椭圆的长短轴半径,椭圆的朝向(0表示水平),起始角度,终点角度
        ellipse(bgImage, Point(width / 2, height / 2), Size(width / 4, height / 8), 0, 0, 270, color, 2, LINE_8);
    }

    void drawCircle()//绘制圆
    {
        Scalar color = Scalar(0, 255, 255);
        circle(bgImage, Point(bgImage.cols / 2, bgImage.rows / 2), 150, color, 2, LINE_8);
    }

    void drawPolygon()//绘制多边形,绘制的多边形是填充的
    {
        Point pts[1][5];
        pts[0][0] = Point(100, 100);
        pts[0][1] = Point(100, 200);
        pts[0][2] = Point(200, 200);
        pts[0][3] = Point(200, 100);
        pts[0][4] = Point(100, 100);

        const Point * ppts[] = { pts[0] };
        int npt[] = { 5 };
        Scalar color = Scalar(255, 0, 255);
        //参数:Mat,顶点数据指针,顶点个数,1表示只绘制一个contour(轮廓)
        fillPoly(bgImage, ppts, npt, 1, color, LINE_8);
    }

    void drawRandomLine()//循环绘制随机位置随机颜色的线段
    {
        Mat randomLineMat = Mat::zeros(bgImage.size(), bgImage.type());
        RNG rng(12345);//生成高斯随机数,参数种子
        Point p1, p2;
        for (int i = 0; i < 100000; i++)
        {
            p1.x = rng.uniform(0, randomLineMat.cols);//生成正态分布 0-bgImage.cols 范围内的随机数
            p1.y = rng.uniform(0, randomLineMat.rows);
            p2.x = rng.uniform(0, randomLineMat.cols);
            p2.y = rng.uniform(0, randomLineMat.rows);
            Scalar color = Scalar(rng.uniform(0, 255), rng.uniform(0, 255), rng.uniform(0, 255));
            if (waitKey(50) > 0)//参数delay如果传0表示阻塞等待键盘事件,传大于0表示只阻塞等待delay毫秒,键盘无响应返回-1
            {
                break;
            }
            line(randomLineMat, p1, p2, color, 1, LINE_8);
            imshow("randomLine", randomLineMat);
        }
    }
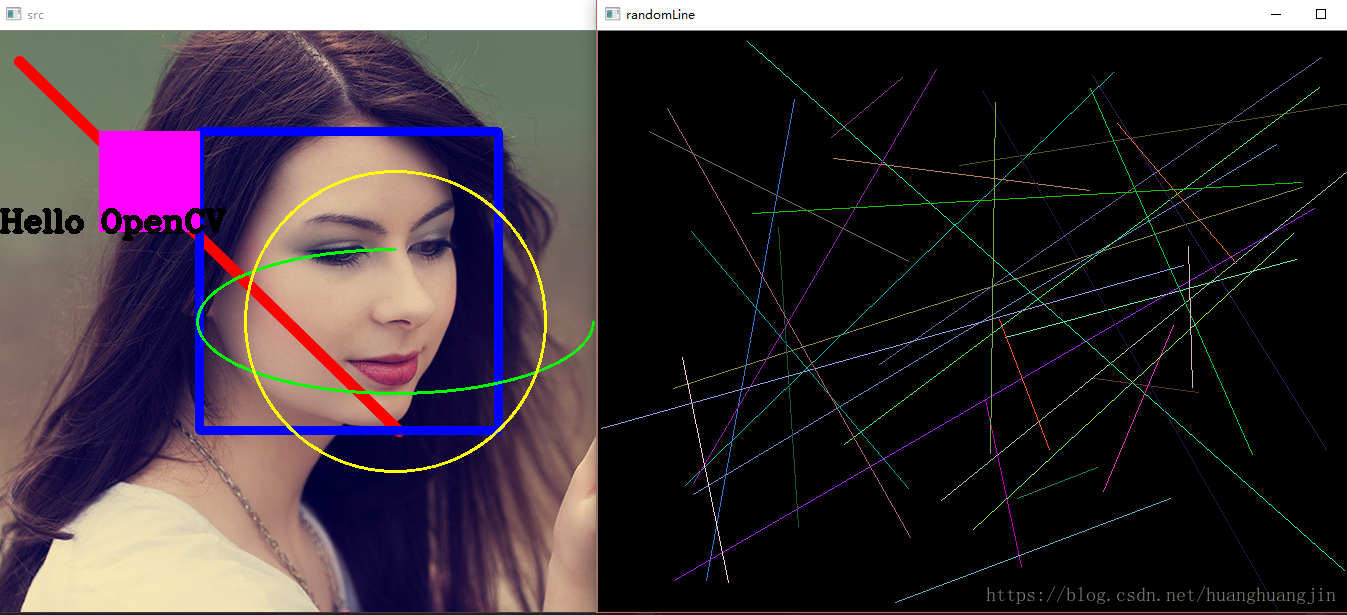
效果图
android代码
@BindView(R.id.iv_cv1_8_input) ImageView mSrcIv;
@BindView(R.id.iv_cv1_8_output1) ImageView mRandomLineIv;
private Bitmap mSrcBmp;
private Bitmap mRandomLineBmp;
private Mat mSrcMat = new Mat();
private Mat mRandomLineMat;
private volatile boolean isStop;

@Override
protected void onCreate(Bundle savedInstanceState) {
    super.onCreate(savedInstanceState);
    setContentView(R.layout.activity_cv1_8);
    mUnbinder = ButterKnife.bind(this);

    //src
    mSrcBmp = CV310Utils.getBitmapFromAssets(this, "opencv/test1.png");
    Utils.bitmapToMat(mSrcBmp, mSrcMat);
    drawLine();
    drawRectangle();
    drawEllipse();
    drawCircle();
    drawPolygon();
    //参数:Mat,文字(不识别中文?),文字的位置(锚点?),字体,缩放,颜色,线宽,线类型,固定false
    Imgproc.putText(mSrcMat, "Hello OpenCV", new Point(0, 100), Core.FONT_HERSHEY_COMPLEX, 1.0, new Scalar(0), 3, Imgproc.LINE_8, false);//绘制文字
    Imgproc.putText(mSrcMat, "中文", new Point(0, 200), Core.FONT_HERSHEY_COMPLEX, 1.0, new Scalar(0), 3, Imgproc.LINE_8, false);
    CV310Utils.mat2bitmapAndShowInIv(mSrcMat, mSrcBmp, mSrcIv);

    //random line
    mRandomLineIv.post(new Runnable() {
        @Override
        public void run() {
            new Thread(){
                @Override
                public void run() {
                    drawRandomLine(mRandomLineIv.getWidth(), mRandomLineIv.getHeight());
                }
            }.start();
        }
    });
}

/*画线*/
private void drawLine() {
    Point p1 = new Point(20, 30);//Point表示平面上的点,OpenCV中的这些坐标值都是相对于图像本身像素值的
    Point p2 = new Point(400, 400);
    Scalar color = new Scalar(255, 0, 0, 255);//因为bitmap是ARGB_8888的,所以Scalar要传alpha
    Imgproc.line(mSrcMat, p1, p2, color, 10, Imgproc.LINE_AA, 0);//绘制线条到Mat,10是线宽、LINE_4或LINE_8是带锯齿的,LINE_AA是抗锯齿的,参数shift固定传0
}

/*画矩形*/
private void drawRectangle() {
    //Rect rect = new Rect(200, 100, 300, 300);//起始位置x、y,宽,高
    Scalar color = new Scalar(0, 0, 255, 255);
    //OpenCV的坐标系,原点在屏幕左上角,x朝右正,y朝下正,参数:Mat,矩形坐上点 右下点
    Imgproc.rectangle(mSrcMat, new Point(200, 100), new Point(500, 400), color, Imgproc.LINE_8);//绘制矩形到Mat,自带圆角。。
}

/*绘制椭圆*/
private void drawEllipse() {
    int width = mSrcMat.cols();
    int height = mSrcMat.rows();
    Scalar color = new Scalar(0, 255, 0, 255);
    //绘制椭圆,参数:Mat,中心点,椭圆的长短轴半径,椭圆的朝向(0表示水平),起始角度,终点角度
    Imgproc.ellipse(mSrcMat, new Point(width / 2, height / 2), new Size(width / 4, height / 8), 0, 0, 270, color, 2, Imgproc.LINE_8, 0);
}

/*绘制圆*/
private void drawCircle() {
    Scalar color = new Scalar(255, 255, 0, 255);
    Imgproc.circle(mSrcMat, new Point(mSrcMat.cols()/2, mSrcMat.rows()/2), 150, color, 2, Imgproc.LINE_8, 0);
}

/*绘制多边形,绘制的多边形是填充的*/
private void drawPolygon() {
    List<MatOfPoint> pts = new ArrayList<>();
    //需要这样组织顶点数据,否则绘制不出来
    pts.add(new MatOfPoint(new Point(100, 100), new Point(100, 200), new Point(200, 200), new Point(200, 100), new Point(100, 100)));
    //同样的顶点,与c++绘制出来的地方偏差了100。。
    pts.add(new MatOfPoint(new Point(100, 300), new Point(100, 400), new Point(200, 400), new Point(200, 300), new Point(100, 300)));
    Scalar color = new Scalar(255, 0, 255, 255);
    Imgproc.fillPoly(mSrcMat, pts, color, Imgproc.LINE_8, 0, new Point(100, 100));//pts.size()多少就绘制几个多边形
}

/*循环绘制随机位置随机颜色的线段*/
private void drawRandomLine(int width, int height) {
    mRandomLineBmp = Bitmap.createBitmap(width, height, Bitmap.Config.RGB_565);
    mRandomLineMat = Mat.zeros(new Size(width, height), mSrcMat.type());
    Random random = new Random();
    Point p1 = new Point();
    Point p2 = new Point();
    for (int i = 0; i < 100000; i++) {
        p1.x = random.nextInt(width);
        p1.y = random.nextInt(height);
        p2.x = random.nextInt(width);
        p2.y = random.nextInt(height);
        Scalar color = new Scalar(random.nextInt(255), random.nextInt(255), random.nextInt(255), 255);//线段与颜色都随机
        if (isStop) {
            break;
        } else {
            try {
                Thread.sleep(50);
            } catch (InterruptedException e) {
                e.printStackTrace();
            }
        }
        Imgproc.line(mRandomLineMat, p1, p2, color, 1, Imgproc.LINE_8, 0);
        runOnUiThread(new Runnable() {
            @Override
            public void run() {
                CV310Utils.mat2bitmapAndShowInIv(mRandomLineMat, mRandomLineBmp, mRandomLineIv);
            }
        });
    }
}

@OnClick({R.id.btn_cv1_8_stop})
void click(View view) {
    switch (view.getId()) {
        case R.id.btn_cv1_8_stop:
            isStop = true;
            break;
    }
}

@Override
protected void onDestroy() {
    super.onDestroy();
    isStop = true;
}
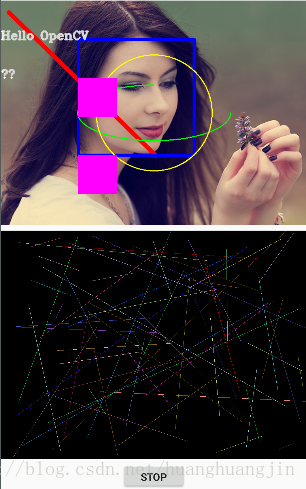
效果图