摘要
本文将总结SpringBoot环境搭建,以及SpringMVC结合html5实现web上传文件夹,注意是整个文件夹所有文件的上传。
SpringBoot环境搭建
SpringBoot基于约定优于配置的原则,为我们准备好了构建Spring Web项目所需的依赖。
所以我们只需搭建普通的eclipse maven项目,引入合适的pom.xml即可构建一个完整的Web项目。
1.获取maven依赖
Spring提供了工具为我们生成相应的pom.xml
<?xml version="1.0" encoding="UTF-8"?>
<project xmlns="http://maven.apache.org/POM/4.0.0" xmlns:xsi="http://www.w3.org/2001/XMLSchema-instance"
	xsi:schemaLocation="http://maven.apache.org/POM/4.0.0 http://maven.apache.org/xsd/maven-4.0.0.xsd">
	<modelVersion>4.0.0</modelVersion>

	<groupId>org.lin</groupId>
	<artifactId>folderUpload</artifactId>
	<version>0.0.1-SNAPSHOT</version>
	<packaging>jar</packaging>

	<name>folderUpload</name>
	<description>Demo project for Spring Boot</description>

	<parent>
		<groupId>org.springframework.boot</groupId>
		<artifactId>spring-boot-starter-parent</artifactId>
		<version>2.0.1.RELEASE</version>
		<relativePath/> <!-- lookup parent from repository -->
	</parent>

	<properties>
		<project.build.sourceEncoding>UTF-8</project.build.sourceEncoding>
		<project.reporting.outputEncoding>UTF-8</project.reporting.outputEncoding>
		<java.version>1.8</java.version>
	</properties>

	<dependencies>
		<dependency>
			<groupId>org.springframework.boot</groupId>
			<artifactId>spring-boot-starter-web</artifactId>
		</dependency>

		<dependency>
			<groupId>org.springframework.boot</groupId>
			<artifactId>spring-boot-starter-test</artifactId>
			<scope>test</scope>
		</dependency>
	</dependencies>

	<build>
		<plugins>
			<plugin>
				<groupId>org.springframework.boot</groupId>
				<artifactId>spring-boot-maven-plugin</artifactId>
			</plugin>
		</plugins>
	</build>


</project>
2.SpringApplication启动web项目
package org.lin.folderUpload;

import javax.servlet.MultipartConfigElement;

import org.springframework.beans.factory.annotation.Configurable;
import org.springframework.boot.SpringApplication;
import org.springframework.boot.autoconfigure.SpringBootApplication;
import org.springframework.boot.web.servlet.MultipartConfigFactory;
import org.springframework.context.annotation.Bean;

/**
 * 默认扫描启动类所在包的所有子包,这里是App类所在包及其子包
 * @author ljf
 *
 */
@SpringBootApplication
@Configurable //允许基于注解的配置
public class App {

	/**
	 * 配置文件上传大小
	 */
	@Bean
	public MultipartConfigElement getMultiConfig() {
		MultipartConfigFactory factory = new MultipartConfigFactory();
		factory.setMaxFileSize("4000MB");
		factory.setMaxRequestSize("4000MB");
		return factory.createMultipartConfig();
	}

	public static void main(String[] args) {
		//启动web项目
		SpringApplication.run(App.class, args);
	}
}
3.SpringBoot的默认配置
SpringBoot之所以如此简洁,是因为运用了约定优于配置的原则。
这些约定有:
1.默认使用embed-tomcat作为中间件,端口8080
2.默认使用Thymeleaf作为模板引擎,并且约定资源路径:

static:静态资源存放路径
约定还有很多,要更改配置,有三种方式:
1.基于Java代码的配置,如上述启动代码示例
2.classPath下的application.properties配置
3.classPath下的application.yml配置
关于配置这里不做详细介绍,因为本人最讨厌配置
SpringMVC + html5 实现文件夹上传
1.在static/下编写file.html:
<!DOCTYPE html>
<html>
<head>
<meta charset="UTF-8">
<title>文件夹上传</title>
</head>
<body>
	<form action="/uploadFolder" method="post" enctype="multipart/form-data">
		<!-- html5支持选择文件夹上传 -->
		<input type="file" name="folder" multiple webkitdirectory>
		<button type="submit">上传</button>
	</form>
</body>
</html>
2.SpringMVC文件上传
Controller:
package org.lin.folderUpload.controller;

import org.lin.folderUpload.util.FileUtil;
import org.springframework.web.bind.annotation.RequestMapping;
import org.springframework.web.bind.annotation.RequestMethod;
import org.springframework.web.bind.annotation.RestController;
import org.springframework.web.multipart.MultipartFile;

@RestController
public class FileController {

	@RequestMapping(value = "/uploadFolder", method = RequestMethod.POST)
	public String uploadFolder(MultipartFile[] folder) {
		FileUtil.saveMultiFile("D:/upload", folder);
		return "ok";
	}
}
FileUtil:
package org.lin.folderUpload.util;
import java.io.File;
import java.io.IOException;
import org.springframework.web.multipart.MultipartFile;
public class FileUtil {
/**
* 在basePath下保存上传的文件夹
* @param basePath
* @param files
*/
public static void saveMultiFile(String basePath, MultipartFile[] files) {
if (files == null || files.length == 0) {
return;
}
if (basePath.endsWith("/")) {
basePath = basePath.substring(0, basePath.length() - 1);
}
for (MultipartFile file : files) {
String filePath = basePath + "/" + file.getOriginalFilename();
makeDir(filePath);
File dest = new File(filePath);
try {
file.transferTo(dest);
} catch (IllegalStateException | IOException e) {
e.printStackTrace();
}
}
}
/**
* 确保目录存在,不存在则创建
* @param filePath
*/
private static void makeDir(String filePath) {
if (filePath.lastIndexOf('/') > 0) {
String dirPath = filePath.substring(0, filePath.lastIndexOf('/'));
File dir = new File(dirPath);
if (!dir.exists()) {
dir.mkdirs();
}
}
}
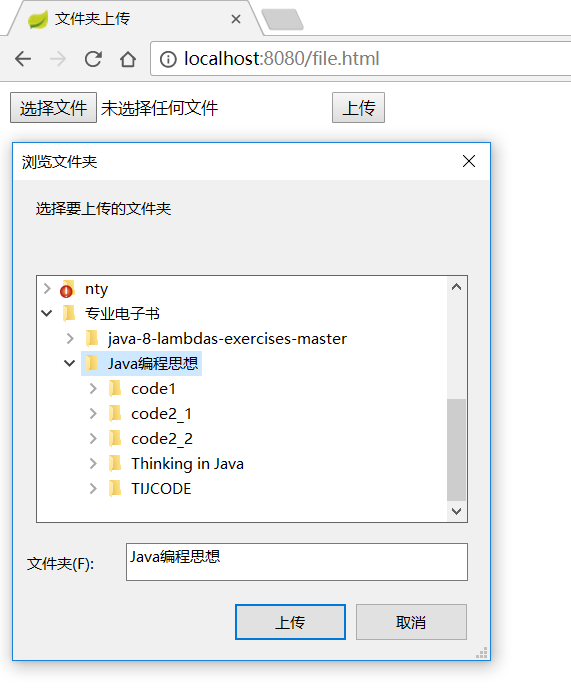
}效果展示
选择文件夹:
完美上传成功:

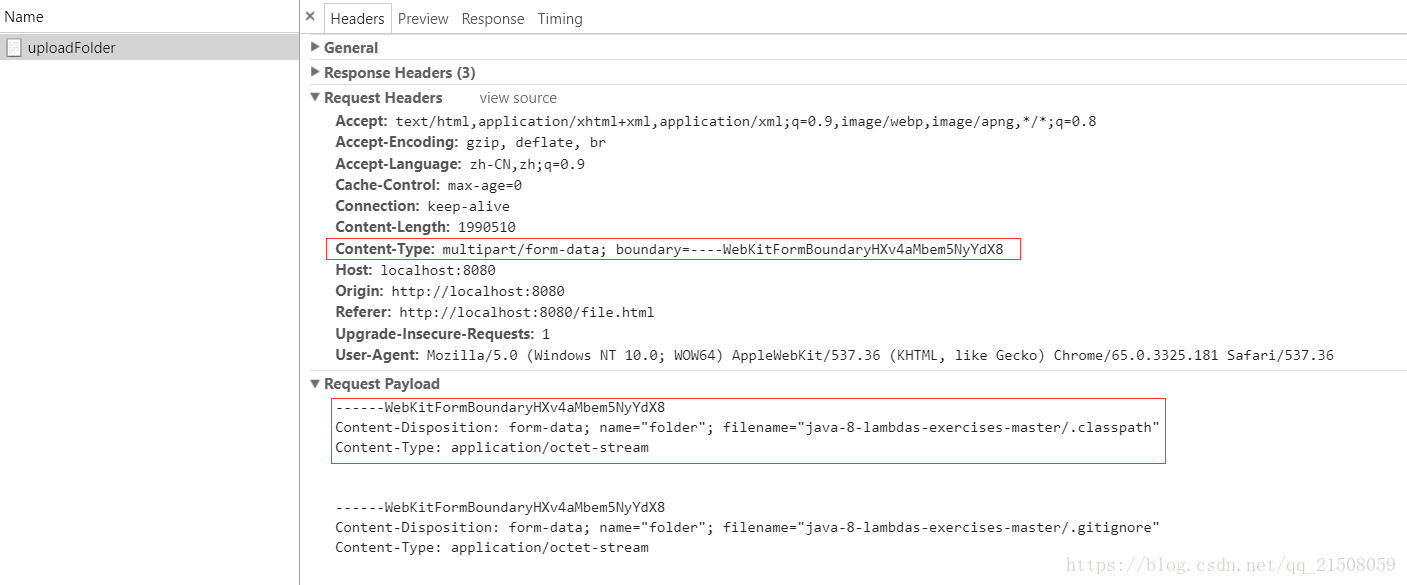
最后来看下文件上传时,http的请求协议长什么样:
没什么特别的,也就是:
Content-Type:multipart/form-data
request body中带上每个文件的内容,Content-Type是 application/octet-stream,字节流在chrome调试工具中并没有打印出来。