一、什么是OpenGL ES
OpenGL ES (OpenGL for Embedded Systems) 是 OpenGL 三维图形 API 的子集,针对手机、PDA和游戏主机等嵌入式设备而设计。OpenGL ES 是从 OpenGL 裁剪的定制而来的,去除了glBegin/glEnd,四边形(GL_QUADS)、多边形(GL_POLYGONS)等复杂图元等许多非绝对必要的特性。经过多年发展,现在主要有两个版本,OpenGL ES 1.x 针对固定管线硬件的,OpenGL ES 2.x 针对可编程管线硬件。
二、OpenGL ES基础知识
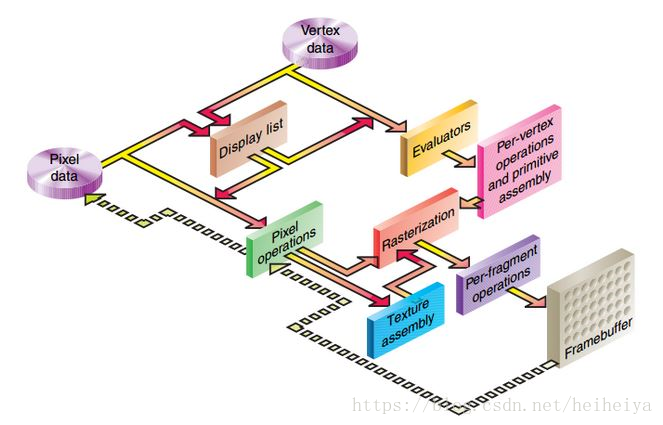
2.1 CPU与GPU之间的桥梁
先看下面这幅图,

如果用CPU来做计算,那流程是这样的(图中绿色箭头):
1. CPU从内存读取数据,
2. CPU计算,
3. CPU将计算结果写回内存,
4. CPU将该内存的内容拷贝到LCD取数据渲染的专用buffer中。
如果用GPU来做计算,那流程是这样的(图中红色箭头):
1. CPU从内存读取数据,
2. CPU给GPU指令,
3. GPU计算,
4. GPU将计算结果放到LCD取数据渲染的专用buffer中或者传回给CPU。
这个联系起CPU和GPU之间的桥梁就是OpenGL (ES)。
与CPU相比,GPU的优势在于:
1. 减少了内存拷贝,
2. CPU是串行计算,而GPU是并行计算。
2.2 OpenGL的输入与输出

把顶点和顶点的颜色传给OpenGL,它就能在屏幕上绘制出图像。

现在假设要在屏幕上绘制简单的一个三角形,三角形三个顶点的颜色分别是R,G,B。将这三个顶点的坐标以及它们的颜色传递给OpenGL,但是,仅仅有三个顶点的颜色值,OpenGL如何绘制出三角形内部的填充色呢?其实,OpenGL会非常智能的使用三个顶点的颜色值进行插值,平滑过渡填充三角形的内部。这一步并不需要我们做任何操作,是由GPU自动完成的。
2.3 OpenGL ES流程
OpenGL ES 1.0时代,使用的是固定管线,我们使用一系列API告诉GPU怎样处理,无法对顶点着色器和片段着色器进行处理,里面的一切对我们来说都是一个黑盒子。
OpenGL ES 2.0时代,使用的是可编程管线,依然会调用一些列API,但是可以对顶点着色器和片段着色器进行编程了,使用GL Shading Language,简称GLSL的编程语言对shader进行编程。
以下内容参考:
http://developer.android.com/training/graphics/opengl/index.html
2.3.1 构建环境
在android application中要使用OpenGL ES,必需在manifest中添加如下声明,
<uses-feature android:glEsVersion="0x00020000" android:required="true" />
然后在activity中new 一个 GLSurfaceView。
public class OpenGLES20Activity extends Activity {
private GLSurfaceView mGLView;
@Override
public void onCreate(Bundle savedInstanceState) {
super.onCreate(savedInstanceState);
// Create a GLSurfaceView instance and set it
 // as the ContentView for this Activity.
mGLView = new MyGLSurfaceView(this);
setContentView(mGLView);
}}
在GLSurfaceView中真正控制绘制的是GLSurfaceView.Renderer,你可以设置render mode是每隔一段时间自动绘制,还是仅在数据改变时才绘制。// Render the view only when there is a change in the drawing data
setRenderMode(GLSurfaceView.RENDERMODE_WHEN_DIRTY);
你可以实现自己的renderer类,以满足需求。public class MyGLRenderer implements GLSurfaceView.Renderer { public void onSurfaceCreated(GL10 unused, EGLConfig config) { // Set the background frame color GLES20.glClearColor(0.0f, 0.0f, 0.0f, 1.0f); } public void onDrawFrame(GL10 unused) { // Redraw background color GLES20.glClear(GLES20.GL_COLOR_BUFFER_BIT); } public void onSurfaceChanged(GL10 unused, int width, int height) { GLES20.glViewport(0, 0, width, height); }}
2.3.2 定义形状
在OpenGL中,所有的图形都是由一些列三角形组成的,三角形是OpenGL绘制的基本单元。
假设现在需要绘制一个矩形,有四个顶点,但是把这个矩形分解成两个三角形之后,就有六个顶点了,其中有两个顶点是重复的。
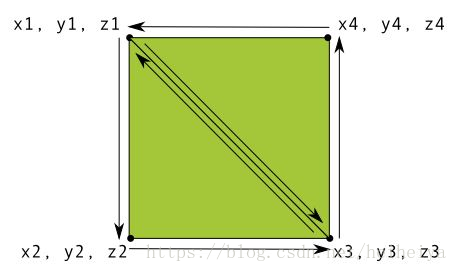
为了节约内存空间,我们还是只记录四个顶点的坐标,然后告诉OpenGL一个绘制顺序。
public class Square {
private FloatBuffer vertexBuffer;
private ShortBuffer drawListBuffer;

// number of coordinates per vertex in this array
static final int COORDS_PER_VERTEX = 3;
static float squareCoords[] = {
-0.5f,  0.5f, 0.0f,   // top left
-0.5f, -0.5f, 0.0f,   // bottom left
0.5f, -0.5f, 0.0f,   // bottom right
0.5f,  0.5f, 0.0f }; // top right

private short drawOrder[] = { 0, 1, 2, 0, 2, 3 };
// order to draw vertices
public Square() {
 // initialize vertex byte buffer for shape coordinates
ByteBuffer bb = ByteBuffer.allocateDirect(
// (# of coordinate values * 4 bytes per float)
                squareCoords.length * 4);

bb.order(ByteOrder.nativeOrder());
vertexBuffer = bb.asFloatBuffer();
vertexBuffer.put(squareCoords);
vertexBuffer.position(0);

// initialize byte buffer for the draw list
ByteBuffer dlb = ByteBuffer.allocateDirect(
// (# of coordinate values * 2 bytes per short)
                drawOrder.length * 2);

dlb.order(ByteOrder.nativeOrder());
drawListBuffer = dlb.asShortBuffer();
drawListBuffer.put(drawOrder);
drawListBuffer.position(0);
}}
2.3.3 绘制
OpenGL ES 2.0,需要对vertex shader和fragment shader进行编程。
public class Triangle {
    private final String vertexShaderCode =
                          "attribute vec4 vPosition;" +
                          "void main() {" +
                         "  gl_Position = vPosition;" +
"}";

private final String fragmentShaderCode =
                             "precision mediump float;" +
                             "uniform vec4 vColor;" +
                             "void main() {" +
                             "  gl_FragColor = vColor;" +
"}";

     ...
}
但是,这仅仅是一些字符串,还需要执行编译和链接,把它们变成OpenGL可识别的代码。
public static int loadShader(int type, String shaderCode){
// create a vertex shader type (GLES20.GL_VERTEX_SHADER)
// or a fragment shader type (GLES20.GL_FRAGMENT_SHADER)
int shader = GLES20.glCreateShader(type);

// add the source code to the shader and compile it
GLES20.glShaderSource(shader, shaderCode);
GLES20.glCompileShader(shader);

return shader;
}
public class Triangle() {
 ...
private final int mProgram;
public Triangle() {
...
int vertexShader = MyGLRenderer.loadShader(GLES20.GL_VERTEX_SHADER, vertexShaderCode);
int fragmentShader = MyGLRenderer.loadShader(GLES20.GL_FRAGMENT_SHADER,  fragmentShaderCode);
// create empty OpenGL ES Program
mProgram = GLES20.glCreateProgram();
// add the vertex shader to program
GLES20.glAttachShader(mProgram, vertexShader);
// add the fragment shader to program
GLES20.glAttachShader(mProgram, fragmentShader);
// creates OpenGL ES program executables
GLES20.glLinkProgram(mProgram);
}}
你可以定义自己的draw函数,在draw函数中首先要调用GLES20.glUseProgram(mProgram)将你的program加到OpenGL ES的环境中。
然后,调用一系列 GLES20.glGetAttribLocation获得shader变量的handle,
private int mPositionHandle;
private int mColorHandle;
private final int vertexCount = triangleCoords.length / COORDS_PER_VERTEX;
private final int vertexStride = COORDS_PER_VERTEX * 4;
// 4 bytes per vertex
public void draw() {
// Add program to OpenGL ES environment
GLES20.glUseProgram(mProgram);
// get handle to vertex shader's vPosition member
mPositionHandle = GLES20.glGetAttribLocation(mProgram, "vPosition");
// Enable a handle to the triangle
vertices    GLES20.glEnableVertexAttribArray(mPositionHandle);
 // Prepare the triangle coordinate data
GLES20.glVertexAttribPointer(mPositionHandle, COORDS_PER_VERTEX, GLES20.GL_FLOAT, false,  vertexStride, vertexBuffer);
// get handle to fragment shader's vColor member
mColorHandle = GLES20.glGetUniformLocation(mProgram, "vColor");
// Set color for drawing the triangle
GLES20.glUniform4fv(mColorHandle, 1, color, 0);
// Draw the triangle
GLES20.glDrawArrays(GLES20.GL_TRIANGLES, 0, vertexCount);
// Disable vertex array
GLES20.glDisableVertexAttribArray(mPositionHandle);
}
最后,在renderer类中的onDrawFrame中调用你自定义的draw函数就可以绘制出图像了。public void onDrawFrame(GL10 unused) {
...
mTriangle.draw();
}
2.3.4 进行坐标变换
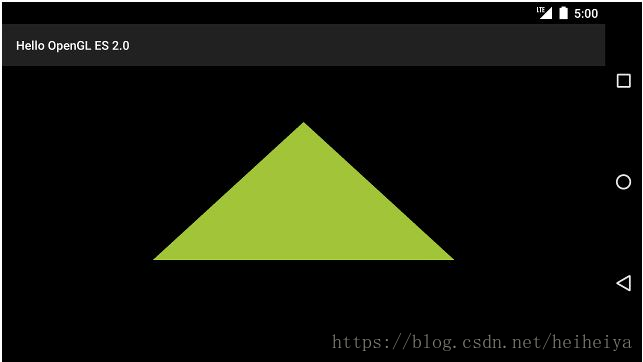
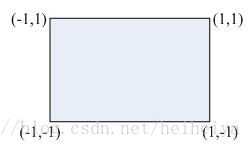
本来你定义了一个正三角形,但是最终绘制在手机屏幕上会是这样的,
是因为屏幕坐标系是以屏幕中心为原点(0,0),左下角是(-1,-1),右上角是(1,1)。
我们就需要做一些坐标变换,让绘制的物体看起来和真实世界看起来一样。
首先,获得透视投影矩阵,
// mMVPMatrix is an abbreviation for "Model View Projection Matrix"
private final float[] mMVPMatrix = new float[16];
private final float[] mProjectionMatrix = new float[16];
private final float[] mViewMatrix = new float[16];

@Override
public void onSurfaceChanged(GL10 unused, int width, int height) {
    GLES20.glViewport(0, 0, width, height);
    float ratio = (float) width / height;

    // this projection matrix is applied to object coordinates
    // in the onDrawFrame() method
    Matrix.frustumM(mProjectionMatrix, 0, -ratio, ratio, -1, 1, 3, 7);
}
然后,获得摄像机矩阵,将这两个矩阵相乘得到MVP矩阵,@Override
public void onDrawFrame(GL10 unused) {
...
// Set the camera position (View matrix)
Matrix.setLookAtM(mViewMatrix, 0, 0, 0, -3, 0f, 0f, 0f, 0f, 1.0f, 0.0f);
// Calculate the projection and view transformation
Matrix.multiplyMM(mMVPMatrix, 0, mProjectionMatrix, 0, mViewMatrix, 0);
// Draw shape
mTriangle.draw(mMVPMatrix);
}
将之前的vertex shader更新为,public class Triangle {
private final String vertexShaderCode =
// This matrix member variable provides a hook to manipulate
// the coordinates of the objects that use this vertex shader
"uniform mat4 uMVPMatrix;" +
"attribute vec4 vPosition;" +
"void main() {" +
// the matrix must be included as a modifier of gl_Position
// Note that the uMVPMatrix factor *must be first* in order
// for the matrix multiplication product to be correct.
" gl_Position = uMVPMatrix * vPosition;" +
"}";
// Use to access and set the view transformation
private int mMVPMatrixHandle;
...
}
更新draw函数, 获得MVP矩阵的handle,public void draw(float[] mvpMatrix) {
// pass in the calculated transformation matrix
...
// get handle to shape's transformation matrix
mMVPMatrixHandle = GLES20.glGetUniformLocation(mProgram, "uMVPMatrix");
// Pass the projection and view transformation to the shader
GLES20.glUniformMatrix4fv(mMVPMatrixHandle, 1, false, mvpMatrix, 0);
// Draw the triangle
GLES20.glDrawArrays(GLES20.GL_TRIANGLES, 0, vertexCount);
// Disable vertex array
GLES20.glDisableVertexAttribArray(mPositionHandle);
}
重新绘制,屏幕上显示的就是一个正三角形了。
