v一、前言
项目中用到的SSO,使用开源框架cas做的。简单的了解了一下cas,并学习了一下 单点登录的原理,有兴趣的同学也可以学习一下,写个demo玩一玩。
v二、工程结构
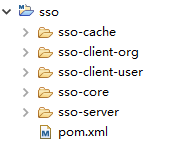
我模拟了 sso的客户端和sso的服务端, sso-core中主要是一些sso需要的过滤器和工具类,缓存和session共享的一些XML配置文件,还有springmvc需要的一下jar包的管理。sso-cache中配置了redis缓存策略。
v三、单点登录原理图
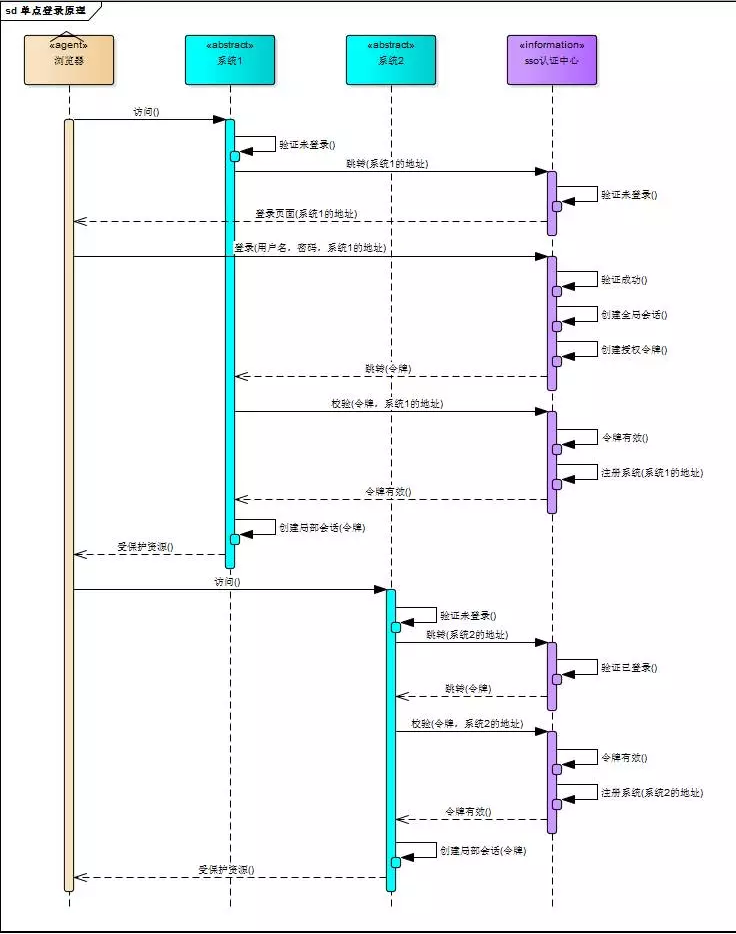
简单描述:
用户访问系统1的受保护资源,系统1发现用户未登录,跳转至sso认证中心,并将自己的地址作为参数
sso认证中心发现用户未登录,将用户引导至登录页面
用户输入用户名密码提交登录申请
sso认证中心校验用户信息,创建用户与sso认证中心之间的会话,称为全局会话,同时创建授权令牌
sso认证中心带着令牌跳转会最初的请求地址(系统1)
系统1拿到令牌,去sso认证中心校验令牌是否有效

sso认证中心校验令牌,返回有效,注册系统1
系统1使用该令牌创建与用户的会话,称为局部会话,返回受保护资源
用户访问系统2的受保护资源
系统2发现用户未登录,跳转至sso认证中心,并将自己的地址作为参数
sso认证中心发现用户已登录,跳转回系统2的地址,并附上令牌
系统2拿到令牌,去sso认证中心校验令牌是否有效
sso认证中心校验令牌,返回有效,注册系统2
系统2使用该令牌创建与用户的局部会话,返回受保护资源
v 四、单点登录实现
1.SSOFilter.java(sso client filter实现)
 View Code
2.LoginController.java(sso server登录controller)
View Code
3.ValidateController.java(sso server验证token controller)
View Code
4.在sso client工程中加上SSOFilter(web.xml部分配置)
View Code
基本模型已经出来了,启动sso-client 和 sso-server(本人都部署到了同一个tomcat下),试图去验证单点登录。测试的时候,从浏览器中的cookie中查看,可以看到 localhost域下有多个JSESSIONID。这也难怪, Tomcat中的每一个application都会创建自己的session会话。那接下来的事情就是解决 session 共享的问题,这样我们就可以完成我们的单点登陆了。
为完成 session共享,这里推荐两种方案。一个是 tomcat+redis实现session共享,一个是 spring session+redis实现session共享。我这里采用了第二种方案,详情请接着看下面的步骤。
5.为每个工程的web.xml中增加spring session代理filter的配置

<!-- session 代理 -->
<filter>
    <filter-name>springSessionRepositoryFilter</filter-name>
    <filter-class>org.springframework.web.filter.DelegatingFilterProxy</filter-class>
</filter>

<filter-mapping>
    <filter-name>springSessionRepositoryFilter</filter-name>
    <url-pattern>/*</url-pattern>
</filter-mapping>
6.在sso-core中加入 缓存和spring session的xml配置(cache-config.xml)
<?xml version="1.0" encoding="UTF-8"?>
<beans xmlns="http://www.springframework.org/schema/beans"
       xmlns:xsi="http://www.w3.org/2001/XMLSchema-instance"
       xmlns:context="http://www.springframework.org/schema/context"
       xsi:schemaLocation="http://www.springframework.org/schema/beans http://www.springframework.org/schema/beans/spring-beans-4.0.xsd
        http://www.springframework.org/schema/context http://www.springframework.org/schema/context/spring-context-4.0.xsd"
       default-lazy-init="false">

    <description>Cache公共配置</description>
    <bean id="cookieSerializer" class="org.springframework.session.web.http.DefaultCookieSerializer">
        <property name="cookiePath" value="/"></property>
    </bean>

    <bean class="com.sso.cache.config.CacheConfig"/>

    <bean class="org.springframework.session.data.redis.config.annotation.web.http.RedisHttpSessionConfiguration">
        <property name="maxInactiveIntervalInSeconds" value="1800"></property>
    </bean>
</beans>
这里说一下为什么有定义一个 cookieSerializer 这个bean。参看RedisHttpSessionConfiguration的源码,发现它继承了SpringHttpSessionConfiguration,继续查看源码,发现SpringHttpSessionConfiguration中实现了我们配置的spring session代理filter,如下所示。
SpringHttpSessionConfiguration.java

@Bean
public <S extends ExpiringSession> SessionRepositoryFilter<? extends ExpiringSession> springSessionRepositoryFilter(
        SessionRepository<S> sessionRepository) {
    SessionRepositoryFilter sessionRepositoryFilter = new SessionRepositoryFilter(sessionRepository);

    sessionRepositoryFilter.setServletContext(this.servletContext);
    if (this.httpSessionStrategy instanceof MultiHttpSessionStrategy) {
        sessionRepositoryFilter.setHttpSessionStrategy((MultiHttpSessionStrategy) this.httpSessionStrategy);
    } else {
        sessionRepositoryFilter.setHttpSessionStrategy(this.httpSessionStrategy);
    }
    return sessionRepositoryFilter;
}
查看源码,可以发现 SpringHttpSessionConfiguration使用的默认会话策略(httpSessionStrategy)是CookieHttpSessionStrategy。继续查看CookieHttpSessionStrategy的源码,如新建session写入cookie。
public void onNewSession(Session session, HttpServletRequest request, HttpServletResponse response) {
    Set sessionIdsWritten = getSessionIdsWritten(request);
    if (sessionIdsWritten.contains(session.getId())) {
        return;
    }
    sessionIdsWritten.add(session.getId());

    Map sessionIds = getSessionIds(request);
    String sessionAlias = getCurrentSessionAlias(request);
    sessionIds.put(sessionAlias, session.getId());

    String cookieValue = createSessionCookieValue(sessionIds);
    this.cookieSerializer.writeCookieValue(new CookieSerializer.CookieValue(request, response, cookieValue));
}
cookieSerializer 默认是 DefaultCookieSerializer。查看DefaultCookieSerializer 的 writeCookieValue方法如下。
public void writeCookieValue(CookieSerializer.CookieValue cookieValue) {
    HttpServletRequest request = cookieValue.getRequest();
    HttpServletResponse response = cookieValue.getResponse();

    String requestedCookieValue = cookieValue.getCookieValue();
    String actualCookieValue = requestedCookieValue + this.jvmRoute;

    Cookie sessionCookie = new Cookie(this.cookieName, actualCookieValue);
    sessionCookie.setSecure(isSecureCookie(request));
    sessionCookie.setPath(getCookiePath(request));
    String domainName = getDomainName(request);
    if (domainName != null) {
        sessionCookie.setDomain(domainName);
    }

    if (this.useHttpOnlyCookie) {
        sessionCookie.setHttpOnly(true);
    }

    if ("".equals(requestedCookieValue)) {
        sessionCookie.setMaxAge(0);
    } else {
        sessionCookie.setMaxAge(this.cookieMaxAge);
    }
    response.addCookie(sessionCookie);
}
sessionCookie.setPath(getCookiePath(request));这块有一个问题,看一下getCookiePath方法的实现,如下。
private String getCookiePath(HttpServletRequest request) {
    if (this.cookiePath == null) {
        return request.getContextPath() + "/";
    }
    return this.cookiePath;
}
如果要实现单点登录,就不要使用默认的 cookiePath 的值。所以,我定义了一个 cookieSerializer 的bean,并指定了 cookiePath 的值。 SpringHttpSessionConfiguration中如下方法可以自动装配 我们配置的cookieSerializer,而不是使用默认的。
@Autowired(required = false)
public void setCookieSerializer(CookieSerializer cookieSerializer) {
    this.defaultHttpSessionStrategy.setCookieSerializer(cookieSerializer);
}
7.在每个工程中的spring公共配置文件中增加如下配置。
<import resource="classpath*:cache-config.xml"/>
8.后端之间rest请求传递 session ID。
private static ResponseEntity<String> request(ServletRequest req, String url, HttpMethod method, Map<String, ?> params) {
    HttpServletRequest request = (HttpServletRequest) req;
    //获取header信息
    HttpHeaders requestHeaders = new HttpHeaders();
    Enumeration<String> headerNames = request.getHeaderNames();
    while (headerNames.hasMoreElements()) {
      String key = (String) headerNames.nextElement();
      String value = request.getHeader(key);
      requestHeaders.add(key, value);
    }
    HttpEntity<String> requestEntity = new HttpEntity<String>(params != null ? JSONObject.toJSONString(params) : null, requestHeaders);
    ResponseEntity<String> rss = restTemplate.exchange(url, method, requestEntity, String.class);
    return rss;
}
使用RestTemplate发送rest请求,发送之前复制request中的header信息,保证session ID可以传递。
9.最后,启动工程,测试结果如下。
http://study.hujunzheng.cn:8000/sso-client-user/ 和 http://study.hujunzheng.cn:8000/sso-client-org/ 切换访问工程。
v五、完整项目地址
https://download.csdn.net/download/vipyhd/10325258