在开发过程中经常遇到自定义控件,打算自己一边写着博客一边总结一下自定义View 的过程,以便能更好的提高。
新建一个自定义View,继承View,实现父类的构造方法.
public class MyFirstView extends View {

    public MyFirstView(Context context) {
        this(context,null);
    }

    public MyFirstView(Context context, AttributeSet attrs) {
        this(context,attrs,0);
    }

    public MyFirstView(Context context, AttributeSet attrs, int defStyleAttr) {
        super(context, attrs, defStyleAttr);
    }

}
注意更改直接引用的构造方法,以下是三个构造函数使用时机。
①.在代码中直接new一个MyFirstView实例的时候,会调用第一个构造函数.这个没有任何争议.
②.在xml布局文件中调用MyFirstView的时候,会调用第二个构造函数.这个也没有争议.
③.在xml布局文件中调用MyFirstView,并且MyFirstView标签中还有自定义属性时,这里调用的还是第二个构造函数.
也就是说,系统默认只会调用Custom View的前两个构造函数,至于第三个构造函数的调用,通常是我们自己在构造函数中主动调用的(例如,在第二个构造函数中调用第三个构造函数).
自定义View的属性,首先在res/values/ 下找到attrs.xml (如果没有可以创建一个), 在里面定义我们的属性和声明我们的整个样式。
<?xml version="1.0" encoding="utf-8"?>
<resources>
    <declare-styleable name="MyFirstView">
        <attr name="text" format="string" />
        <attr name="textSize" format="dimension"/>
        <attr name="textColor" format="color"/>
    </declare-styleable>

</resources>
然后就是定义属性值了,通过<attr name="textColor" format="color" /> 方式定义属性值,属性名字同样也要起的见名知意,format表示这个属性的值的类型,类型有以下几种:
reference:引用资源 string:字符串 Color:颜色 boolean:布尔值 dimension:尺寸值 float:浮点型 integer:整型 fraction:百分数 enum:枚举类型 flag:位或运算
然后在布局中声明我们的自定义View
<?xml version="1.0" encoding="utf-8"?>
<LinearLayout xmlns:android="http://schemas.android.com/apk/res/android"
              xmlns:first="http://schemas.android.com/apk/res-auto"
              android:orientation="vertical"
              android:layout_width="match_parent"
              android:gravity="center"
              android:layout_height="match_parent">
    <com.shsany.practice.MyFirstView
        android:layout_width="wrap_content"
        android:layout_height="wrap_content"
        first:text="2048"
        first:textSize="20sp"
        android:padding="10dp"
        first:textColor="#000000"/>

</LinearLayout>
其中 xmlns:first="http://schemas.android.com/apk/res-auto" 是引入自己的命名空间,也可以写成xmlns:first="http://schemas.android.com/apk/res/com.shsany.practice"的命名空间,后面的包路径指的是项目的package。
在上面的第三个构造方法里获取MyFirstView 的属性。
public MyFirstView(Context context, AttributeSet attrs, int defStyleAttr) {
    super(context, attrs, defStyleAttr);
    TypedArray typedArray = context.getTheme().obtainStyledAttributes(attrs, R.styleable.MyFirstView, defStyleAttr, 0);
    if (typedArray != null) {
        mText = typedArray.getString(R.styleable.MyFirstView_text);
        mTextColor = typedArray.getColor(R.styleable.MyFirstView_textColor, Color.RED);
        // 默认设置为16sp,
        int x = typedArray.getDimensionPixelSize(R.styleable.MyFirstView_textSize, 16);
        mTextSize = DisplayUtil.sptopx(context, (float) x);
    }
    typedArray.recycle();
    /**  绘制文本的宽长  */
    mPaint = new Paint();
    mPaint.setTextSize(mTextSize);
    mBound = new Rect();
    mPaint.getTextBounds(mText, 0, mText.length(), mBound);
}
然后再重写onDraw()方法绘制控件。
@Override
protected void onDraw(Canvas canvas) {
    super.onDraw(canvas);
    if (mPaint != null) {
        /**   设置圆形的颜色为红色  */
        mPaint.setColor(Color.RED);
        canvas.drawCircle(getWidth()/2f, getWidth()/2f, getWidth()/2f, mPaint);
        /**   设置文本的颜色 及 位置   这里的x y值是文本左下角点的x y 值 */
        mPaint.setColor(mTextColor);
        canvas.drawText(mText, getWidth() / 2 - mBound.width() / 2, getHeight() / 2 + mBound.height() / 2, mPaint);
    }

}
此时的效果是

系统帮我们测量的高度和宽度都是MATCH_PARNET,当我们设置明确的宽度和高度时,系统帮我们测量的结果就是我们设置的结果,当我们设置为WRAP_CONTENT,或者MATCH_PARENT系统帮我们测量的结果就是MATCH_PARENT的长度。所以,当设置了WRAP_CONTENT时,我们需要自己进行测量,即重写onMesure()方法,
重写之前先了解MeasureSpec的specMode,一共三种类型:
EXACTLY:一般是设置了明确的值或者是MATCH_PARENT
AT_MOST:表示子布局限制在一个最大值内,一般为WARP_CONTENT
UNSPECIFIED:表示子布局想要多大就多大,很少使用
下面是我们重写onMeasure代码:
@Override
protected void onMeasure(int widthMeasureSpec, int heightMeasureSpec) {

    int widthMode = MeasureSpec.getMode(widthMeasureSpec);
    int widthSize = MeasureSpec.getSize(widthMeasureSpec);
    int heightMode = MeasureSpec.getMode(heightMeasureSpec);
    int heightSize = MeasureSpec.getSize(heightMeasureSpec);
    int width;
    int height;
    if (widthMode == MeasureSpec.EXACTLY) {
        /**   如果规定了具体的数值直接等于 */
        width = widthSize;
    } else {
        /**    如果没规定具体的数值,就根据当前文字的宽度加上内边距 就是这个控件的宽度 */
        float textWidth = mBound.width();
        int desired = (int) (getPaddingLeft() + textWidth + getPaddingRight());
        width = desired;
    }

    if (heightMode == MeasureSpec.EXACTLY) {
        /**   如果规定了具体的数值直接等于 */
        height = heightSize;
    } else {
        /**    如果没规定具体的数值,就根据当前文字的高度加上内边距 就是这个控件的高度 */
        float textHeight = mBound.height();
        int desired = (int) (getPaddingTop() + textHeight + getPaddingBottom());
        height = desired;
    }
    /**   判断宽高那个大   那个大听那个  */
    if(width>height){
        height=width;
    }else {
        width=height;
    }

    /**
     * 最后调用父类方法,把View的大小告诉父布局。
     */
    setMeasuredDimension(width, height);
}
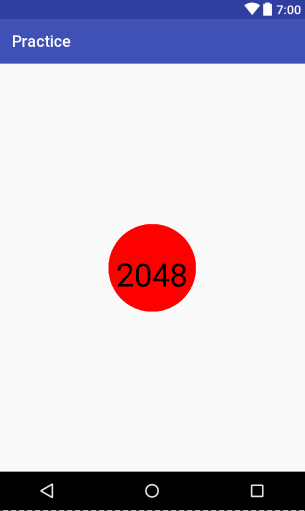
此时运行的结果是
这样,我们的第一个控件已经实现了,下面我们来总结一下自定义View 的步骤:
1.先自定义一个view,重写其构造方法。
2.自定义view 的属性,在垢找方法
3.重写onMeasure(int,int)方法。(该方法可重写可不重写,具体看需求)
4.重写onDraw(Canvas canvas)方法。
