1. 概述
本章节主要介绍JarsLinkd动态加载和卸载的实现机制,了解其设计思想和原理,会从以下几点入手:
1.模块加载/卸载的主要时序图
2.关键代码分析说明
3.问题分析
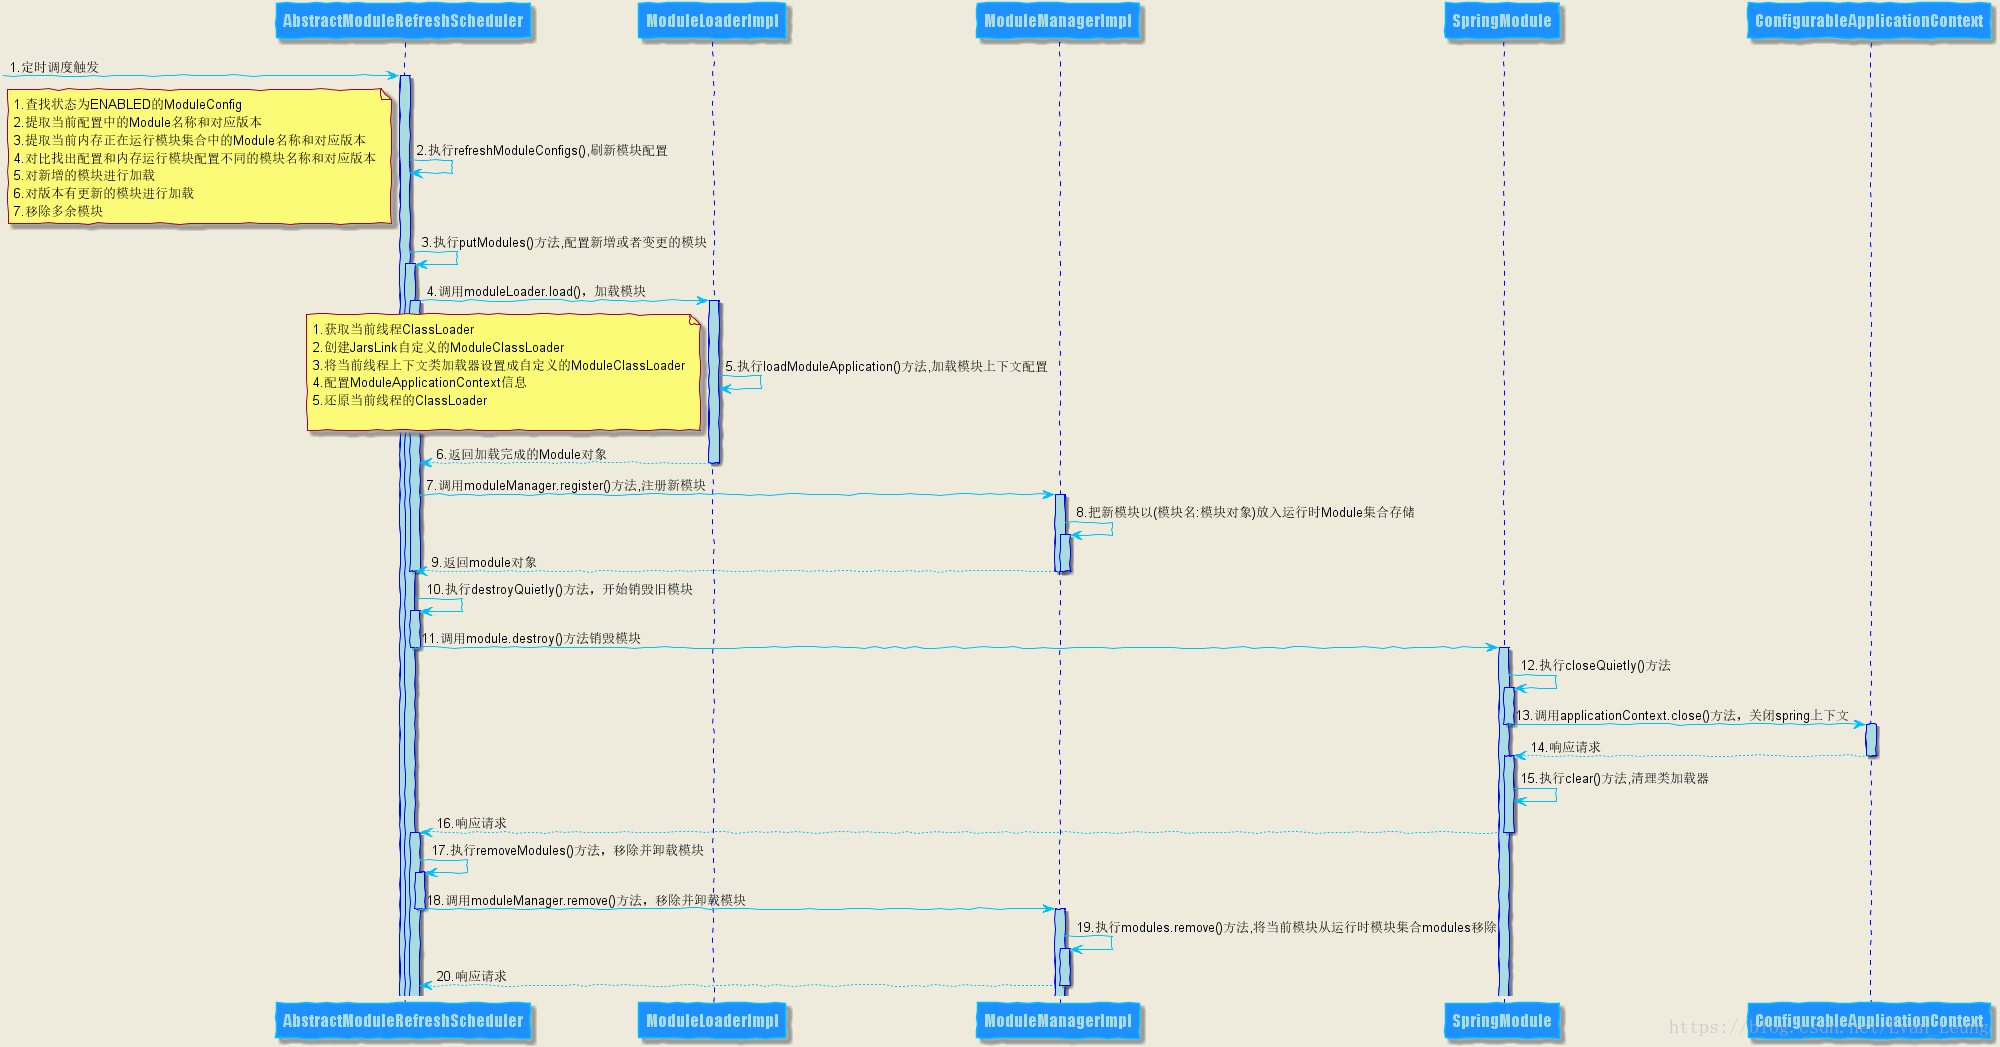
1.1 模块动态加载卸载主流程
AbstractModuleRefreshScheduler:模块管理,包含获取模块,执行模块里的方法
ModuleLoaderImpl:模块加载器
ModuleManagerImpl:模块管理者, 提供注册,移除和查找模块能力
SpringModule:集成Spring上下文的模块,从Spring上下中找Action
ConfigurableApplicationContext:Spring上下文
2. 模块动态加载
2.1 模块加载源码分析
从上节模块加载主流程,我们可以大概了解到JarsLink加载的一个调用关系,接下来我们可以通过以上方法入口一步步进行分析
AbstractModuleRefreshScheduler:#refreshModuleConfigs()
2.1.1 AbstractModuleRefreshScheduler
从上文我们可以知道JarsLink模块加载是通过调度触发的,我们先看看AbstractModuleRefreshScheduler初始化时做了什么
  @Override
    public void afterPropertiesSet() throws Exception {
        //先刷新一次
        refreshModuleConfigs();
        scheduledExecutor = new ScheduledThreadPoolExecutor(1,
                new BasicThreadFactory.Builder().namingPattern("module_refresh-schedule-pool-%d").daemon(true).build());
        scheduledExecutor
                .scheduleWithFixedDelay(this, initialDelay, refreshDelay, TimeUnit.SECONDS);
        if (LOGGER.isInfoEnabled()) {
            LOGGER.info("AbstractModuleRefreshScheduler start");
        }
}- 第4行:可以看到,调度器在启动的时候已经执行了一次refreshModuleConfigs(),也就是说模块Jar第一次加载的时候是在调度器bean初始化的时候,之后它会通过定时调度去触发
- 第5-8行:调度器的初始化过程,配置了初始化的延迟时间、刷新间隔时间,这里的单位是秒
接下来我们看看调度器的默认时间配置了多少
  /**
     * 默认延迟执行,单位秒
     */
    private static final int DEFAULT_INITIAL_DELAY = 5;

    /**
     * 模块刷新默认间隔,单位秒
     */
    private static final int DEFAULT_REFRESH_DELAY = 60;

    /** 初始化的延迟时间 */
    private int initialDelay = DEFAULT_INITIAL_DELAY;

    /** 刷新间隔时间 */
private int refreshDelay = DEFAULT_REFRESH_DELAY;- 第4-9行:可以看到,调度器延迟执行时间是5秒,每60秒会刷新一次
以下run()方法是真正调度器的入口
  /**
     * ScheduledExecutor 定时运行的方法
     * @see Runnable#run()
     */
    @Override
    public void run() {
        try {
            if (LOGGER.isInfoEnabled()) {
                LOGGER.info("Start module configs refresh");
            }
            refreshModuleConfigs();
            if (LOGGER.isInfoEnabled()) {
                LOGGER.info("Stop module configs refresh");
            }
        } catch (Throwable e) {
            LOGGER.error("Failed to refresh module configs", e);
        }
}- 第11行:调度触发执行refreshModuleConfigs()
我们看看refreshModuleConfigs()到底做了些什么
  /**
     * 刷新ModuleConfig
     */
    private void refreshModuleConfigs() {
        // 查找状态为ENABLED的ModuleConfig,并以模块名作为Key,放到Map中
        Map<String, ModuleConfig> moduleConfigs = indexModuleConfigByModuleName(filterEnabledModule());

        // 转换Map的Value,提取Module的Version,Map的Key为DataProvider,Value为Version
        Map<String, String> configVersions = transformToConfigVersions(moduleConfigs);
        // 获取当前内存中,也就是ModuleManager已经加载的模板版本,同样Map的Key为name,Value为Version
        Map<String, String> moduleVersions = transformToModuleVersions(moduleManager.getModules());
        if (LOGGER.isInfoEnabled()) {
            LOGGER.info("Config size: {}", configVersions.size());
            LOGGER.info("Module size: {}", moduleVersions.size());
            LOGGER.info("now in map {}", moduleVersions);
        }
        if (LOGGER.isDebugEnabled()) {
            LOGGER.debug("Config versions: {}", configVersions);
            LOGGER.debug("Module versions: {}", moduleVersions);
        }
        // 找出配置与当前内存里配置的不同
        MapDifference<String, String> difference = Maps.difference(configVersions, moduleVersions);
        if (LOGGER.isInfoEnabled()) {
            LOGGER.info("Version difference: {}", difference);
        }
        // 配置新增的
        putModules(moduleConfigs, configAdds(difference));
        // 配置版本与模块不同的
        putModules(moduleConfigs, configDifference(difference));
        // 模块多余的
        removeModules(modulesRedundant(difference));
}- 第6行:查找状态是启动的模块配置,主要是用于后面加载需要
- 第9行:提取当前模块配置中的Module名称和对应版本,用于后面对比是否模块发生变化使用
- 第11行:提取当前内存正在运行模块集合中的Module名称和对应版本,用于后面对比是否Jar发生变化使用
- 第22行:通过对比Jar配置和内存中的配置,找出配置和内存运行模块配置不同的模块名称和对应版本,用于是否有新增Jar或者Jar发生版本更新
- 第27行:对新增的模块进行加载
- 第29行:对有更新的模块进行加载
- 第31行:移除多余的模块
我们看看#putModules(moduleConfigs, configAdds(difference))这个方法怎样处理新增和发生变化的Jar
/**
     * 根据dataProviders指定的ModuleConfig初始化模块,并放入ModuleManager中
     *
     * @param moduleConfigs
     * @param moduleNames
     */
    private void putModules(Map<String, ModuleConfig> moduleConfigs, Set<String> moduleNames) {
        for (String name : moduleNames) {
            ModuleConfig moduleConfig = moduleConfigs.get(name);
            try {
                if (isFailedVersion(moduleConfig)) {
                    if (LOGGER.isInfoEnabled()) {
                        LOGGER.info("this version is failed, ignore.{}", moduleConfig);
                    }
                    continue;
                }
                if (LOGGER.isDebugEnabled()) {
                    LOGGER.debug("Load module config: {}", moduleConfig);
                }
                Module module = moduleLoader.load(moduleConfig);
                Module removed = moduleManager.register(module);
                destroyQuietly(removed);
                moduleManager.getErrorModuleContext().remove(name.toUpperCase(Locale.CHINESE));
                moduleManager.getErrorModuleContext().remove(name.toUpperCase(Locale.CHINESE) + "_ERROR");
            } catch (Exception e) {
                moduleManager.getErrorModuleContext().put(name.toUpperCase(Locale.CHINESE) + "_ERROR",
                        ToStringBuilder.reflectionToString(e));
                moduleManager.getErrorModuleContext().put(name.toUpperCase(Locale.CHINESE),
                        moduleConfig.getVersion());
                LOGGER.error("Failed to load module config: " + moduleConfig, e);
            } catch (Error e) {
                LOGGER.error("Failed to load module config: " + moduleConfig, e);
            }
        }
}- 第8行:当没有新增的Jar或者Jar没有任何更新的时候moduleNames为Null,这时候不会做任何处理,否则会遍历所有的变化模块进行处理
- 第9行:拿当前模块的配置信息
- 第11行:当前模块是不是之前加载失败的Jar,如果是就直接跳过不处理
- 第20行:对模块进行加载
- 第21行:对模块进行注册,当模块已存在会返回一个旧模块,用于后面移除;当模块不存在,则返回null
- 第22行:销毁模块
- 第23-24行:从模块异常上下文中移除对应的成功加载的模块信息
- 第25-33行:对加载异常的模块信息存放到ErrorModuleContext,主要存放模块版本和异常信息
2.1.2 ModuleLoaderImpl
ModuleLoaderImpl是模块加载器的实现,主要负责模块加载,接下来我们看看上文moduleLoader.load(moduleConfig)方法做了什么
  @Override
    public Module load(ModuleConfig moduleConfig) {
        if (LOGGER.isInfoEnabled()) {
            LOGGER.info("Loading module: {}", moduleConfig);
        }
        List<String> tempFileJarURLs = moduleConfig.getModuleUrlPath();
        if (LOGGER.isInfoEnabled()) {
            LOGGER.info("Local jars: {}", tempFileJarURLs);
        }

        ConfigurableApplicationContext moduleApplicationContext = loadModuleApplication(moduleConfig, tempFileJarURLs);

        if (LOGGER.isInfoEnabled()) {
            LOGGER.info("Loading module  complete:{}", moduleConfig);
        }
        return new SpringModule(moduleConfig, moduleConfig.getVersion(), moduleConfig.getName(), moduleApplicationContext);
}- 第6行:获取模块存放的路径列表,就是Jar包存放的地址
- 第11行:真正加载模块的方法,包括了类加载处理和上下文信息处理,返回模块应用上下文
- 第16行:创建了一个SpringModule,主要是集成了Spring上下文,可以通过Spring容器获取加载模块所有Action对象
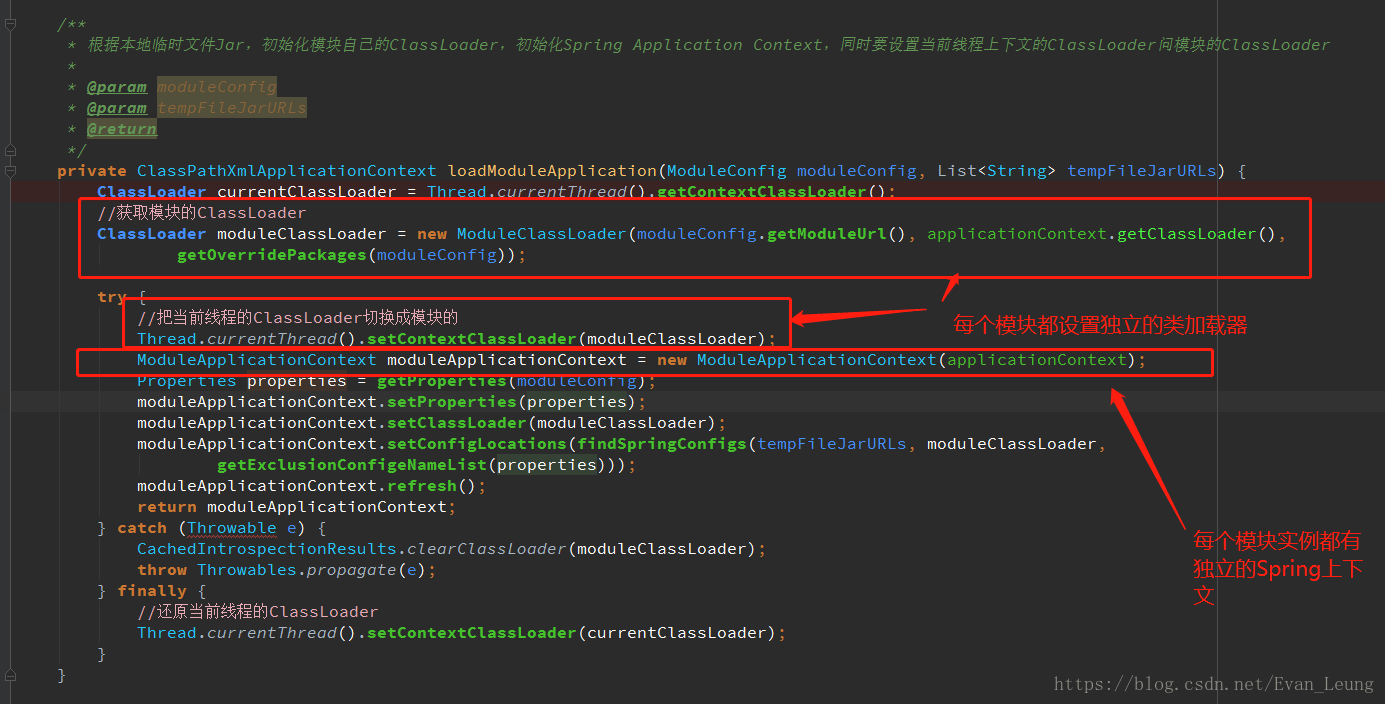
接下来我们看看loadModuleApplication方法主要做了什么,这个方法是实现动态加载的核心
/**
     * 根据本地临时文件Jar,初始化模块自己的ClassLoader,初始化Spring Application Context,同时要设置当前线程上下文的ClassLoader问模块的ClassLoader
     *
     * @param moduleConfig
     * @param tempFileJarURLs
     * @return
     */
    private ClassPathXmlApplicationContext loadModuleApplication(ModuleConfig moduleConfig, List<String> tempFileJarURLs) {
        ClassLoader currentClassLoader = Thread.currentThread().getContextClassLoader();
        //获取模块的ClassLoader
        ClassLoader moduleClassLoader = new ModuleClassLoader(moduleConfig.getModuleUrl(), applicationContext.getClassLoader(),
                getOverridePackages(moduleConfig));

        try {
            //把当前线程的ClassLoader切换成模块的
            Thread.currentThread().setContextClassLoader(moduleClassLoader);
            ModuleApplicationContext moduleApplicationContext = new ModuleApplicationContext(applicationContext);
            Properties properties = getProperties(moduleConfig);
            moduleApplicationContext.setProperties(properties);
            moduleApplicationContext.setClassLoader(moduleClassLoader);
            moduleApplicationContext.setConfigLocations(findSpringConfigs(tempFileJarURLs, moduleClassLoader,
                    getExclusionConfigeNameList(properties)));
            moduleApplicationContext.refresh();
            return moduleApplicationContext;
        } catch (Throwable e) {
            CachedIntrospectionResults.clearClassLoader(moduleClassLoader);
            throw Throwables.propagate(e);
        } finally {
            //还原当前线程的ClassLoader
            Thread.currentThread().setContextClassLoader(currentClassLoader);
        }
}- 第9行:从当前线程获取上下文类加载器
- 第11行:创建了一个JarsLink自定义的类加载器moduleClassLoader,主要是为了覆盖原有类加载器的方法,做一些特殊处理,如:排除一些加载的包、对一个类实现重复加载等,getOverridePackages这个方法就是用来获取一些不遵循双亲委派的包
- 第16行:这里先把当前线程类加载器切换成JarsLink自定义的类加载器moduleClassLoader,确保后面初始化模块上下文使用moduleClassLoader进行类加载,这步比较重要
- 第17行:创建模块上下文moduleApplicationContex,初始化Spring上下文,这时候Spring上下文进行类加载都是通过ModuleApplicationContext,而不是默认的类加载器,保证了模块的类可以重复被加载,不受双亲委托限制
- 第18-24行:主要是对模块上下文做了一些配置,findSpringConfig这方法对配置文件做了过滤,确保Spring只加载Jar里面的配置文件,getExclusionConfigeNameList这方法时让我们可以对一些不需要加载的spring配置进行过滤
- 第25-27行:当发生异常时,需要清理module类加载器
- 第30行:还原当前线程的classLoader,除了模块的类需要特殊处理外,其他类都默认走jvm默认类加载器

2.2.3 ModuleManagerImpl
ModuleManagerImpl主要用于模块管理,本文只关注模块注册
上文提到过模块加载时,如果模块有发生变化,新增Jar或者版本发生变化,都会用到register
  public Module register(Module module) {
        checkNotNull(module, "module is null");
        String name = module.getName();
        if (LOGGER.isInfoEnabled()) {
            LOGGER.info("Put Module: {}-{}", name, module.getVersion());
        }

        return modules.put(name.toUpperCase(Locale.CHINESE), module);
}- 第8行:这方法比较简单,主要是把注册的模块放入运行时modules集合里,存储的格式是模块名:模块对象,modules是一个ConcurrentHashMap,当存储的key相同,则该方法会返回一个已存在的module,如果key不存在,则返回Null,方法返回的模块对象主要是用来对旧模块销毁用
3. 模块动态卸载
卸载模块需要满足三个条件
模块里的实例对象没有被引用
模块里的Class没有被引用
类加载器没有被引用
所以需要做到三点卸载实例,卸载类和卸载类加载器,整个模块的卸载顺序如下:

- 关闭资源:关闭HTTP连接池或线程池。
关闭IOC容器:调用applicationContext.close()方法关闭IOC容器。
移除类加载器:去掉模块的引用。
卸载JVM租户(开发中):卸载该模块使用的JVM租户,释放资源。
3.1 模块动态卸载
JarsLink动态卸载Jar跟动态加载一样,都是通过定时调度来检测是否存在旧Jar包,然后通过就是关闭spring上下文、清理类加载器、通过moduleManager从内存移除等操作实现。
因为上文动态加载部分已经把大部分模块已经讲解了,接下来主要是重点讲解涉及到卸载部分。
3.2 SpringModule
JarsLink卸载Jar主要通过调用SpringModule类中的destroy()方法处理
  @Override
    public void destroy() {
        if (LOGGER.isInfoEnabled()) {
            LOGGER.info("Close application context: {}", applicationContext);
        }
        //close spring context
        closeQuietly(applicationContext);
        //clean classloader
        clear(applicationContext.getClassLoader());
}- 第7行:关闭Spring上下文
- 第9行:清理类加载器
接下来我们看看closeQuietly()方法里是如何处理
  /**
     * 关闭Spring上下文
     * @param applicationContext
     */
    private static void closeQuietly(ConfigurableApplicationContext applicationContext) {
        checkNotNull(applicationContext, "applicationContext is null");
        try {
            applicationContext.close();
        } catch (Exception e) {
            LOGGER.error("Failed to close application context", e);
        }
}- 第8行:可以看出,这里逻辑比较简单,就是通过调用Spring上下文的close()方法,关闭Spring上下文,释放资源
接下来再看下clear(applicationContext.getClassLoader())方法如何清除类加载器
   /**
     * 清除类加载器
     *
     * @param classLoader
     */
    public static void clear(ClassLoader classLoader) {
        checkNotNull(classLoader, "classLoader is null");
        //Introspector缓存BeanInfo类来获得更好的性能。卸载时刷新所有Introspector的内部缓存。
        Introspector.flushCaches();
        //从已经使用给定类加载器加载的缓存中移除所有资源包
        ResourceBundle.clearCache(classLoader);
        //Clear the introspection cache for the given ClassLoader
        CachedIntrospectionResults.clearClassLoader(classLoader);
        LogFactory.release(classLoader);
}- 第9行:卸载时刷新所有Introspector的内部缓存,释放资源
- 第11行:从已经使用给定类加载器加载的缓存中移除所有资源包
- 第13行:清除当前类加载器的内省缓存,清除当前类加载器下所有类的自省结果,从acceptedClassLoaders中移除
4. 彩蛋
4.1 JarsLink如何打破双亲委托机制去动态加载类
双亲委托机制
某个特定的类加载器在接到加载类的请求时,首先将加载任务委托给父类加载器,依次递归,如果父类加载器可以完成类加载任务,就成功返回;只有父类加载器无法完成此加载任务时,才自己去加载
在JVM中,默认的类加载器都是遵循双亲委托机制,这样可以防止内存中出现多份同样的字节码 ,但是对于JarsLink来说,在运行时加载父加载器已经加载过的类,实现模块升级依赖包不需要系统发布,是怎么实现的呢?
JarsLink是通过重写ClassLoader的loadClass方法,从而实现对模块特定的类突破双亲委托加载,可以动态加载和覆盖
    /**
     * 覆盖双亲委派机制
     *
     * @see ClassLoader#loadClass(String, boolean)
     */
    @Override
    protected Class<?> loadClass(String name, boolean resolve) throws ClassNotFoundException {
        Class<?> result = null;
        synchronized (ModuleClassLoader.class) {
            if (isEligibleForOverriding(name)) {
                if (LOGGER.isInfoEnabled()) {
                    LOGGER.info("Load class for overriding: {}", name);
                }
                result = loadClassForOverriding(name);
            }
            if (result != null) {
                //链接类
                if (resolve) {
                    resolveClass(result);
                }
                return result;
            }
        }
        //使用默认类加载方式
        return super.loadClass(name, resolve);

}- 第10-25行:isEligibleForOverriding()方法判断该名字是否模块需要覆盖的 class,如果是允许不遵循双亲机制的类,则调用loadClassForOverriding()方法对已加载的类重新加载,对于其他非特殊的类,则调用默认的类加载器去加载字节码
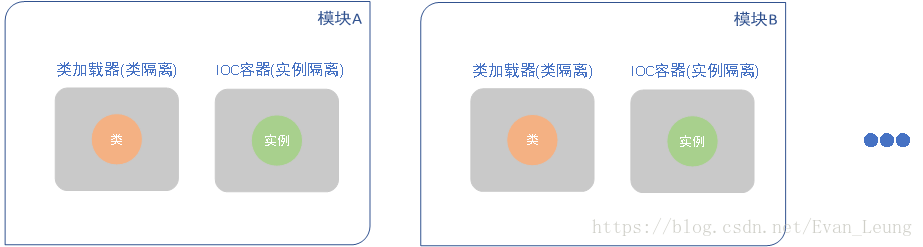
4.2 JarsLink如何实现类隔离和实例隔离
JarsLink通过独立的类加载器和Spring上下文实现
类隔离:框架为每个模块的Class使用单独的ClassLoader来加载,每个模块可以依赖同一种框架的不同的版本。
实例隔离:框架为每个模块创建了一个独立的Spring上下文,来加载模块中的BEAN,实例化失败不会影响其他模块。
上面章节也提到过,JarsLink是通过ModuleLoaderImpl的load(ModuleConfig moduleConfig) 方法进行模块加载,而在ModuleLoaderImpl中loadModuleApplication(ModuleConfig moduleConfig, List tempFileJarURLs)方法是真正实现类隔离和实例隔离的核心,为每个模块的Class都有自己的类加载器和类实例有独立的IOC容器
4.3 动态加载新版本的Jar会对正在运行的Jar有影响吗
加载新版本的JarsLink默认会对旧版本模块进行卸载,如果有一些业务依赖旧版本模块的话,可能会受到影响,这时可以通过设置isNeedUnloadOldVersion=false,这样会对当前模块版本保留,相当于做了版本兼容,如果业务上还需要用旧版本的话,可以通过module和version来指定调用的模块。
localhost:8080/demo/{module/{version}