一、otter介绍
部分说明引用阿里otter项目的wiki 。阿里otter工具地址:https://github.com/alibaba/otter/wiki
otter为阿里的一款增量数据同步工具,基于数据库增量日志解析,准实时同步到本机房或异地机房的mysql/oracle数据库. 一个分布式数据库同步系统。
公司最近需要把线下的数据同步到云仓,选用了otter这款工具做mysql的增量数据同步,所以花了几周的时间来趟坑。当然otter也可以做全量数据同步,不过太过于麻烦,可以考虑其他方式先做全量后,再做增量。
otter工作原理
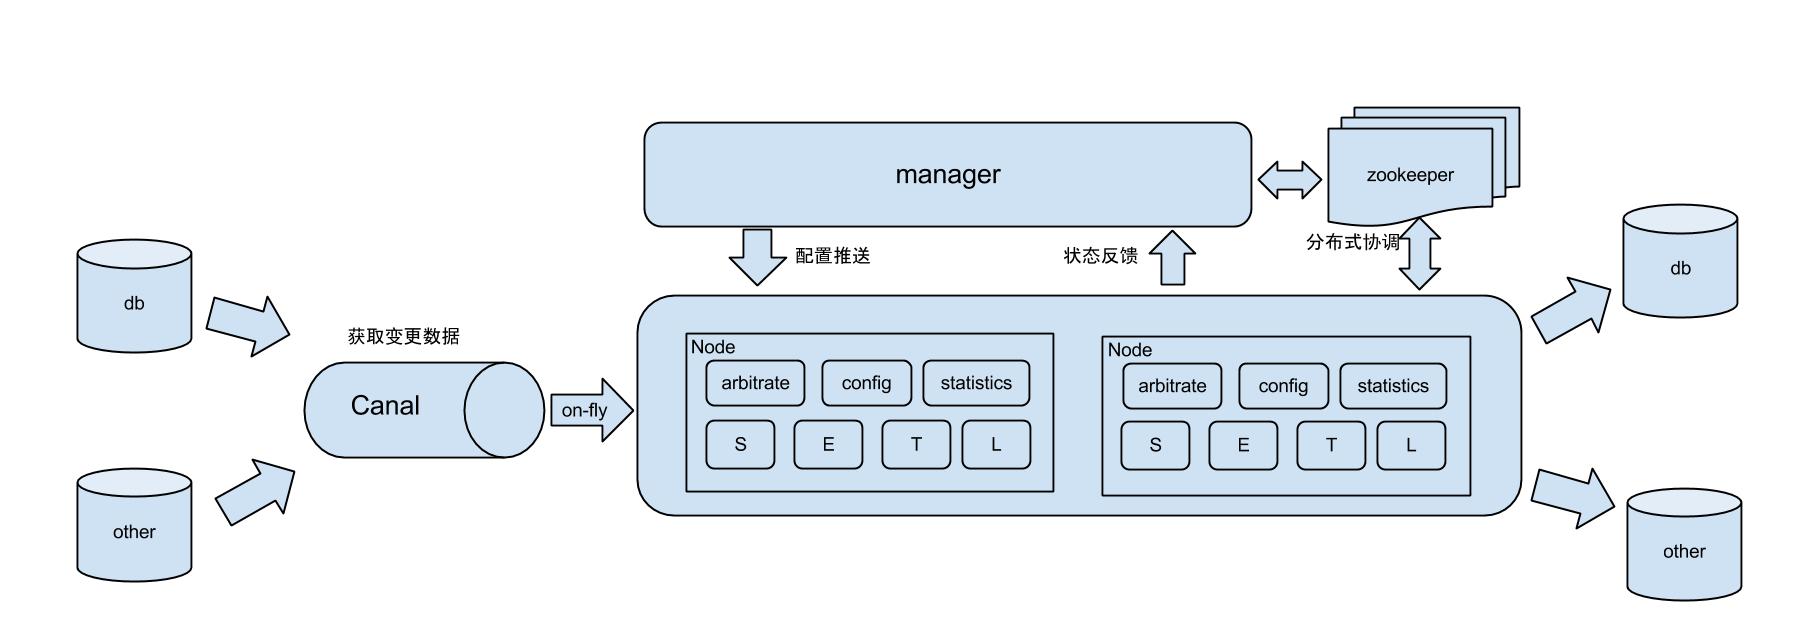
其他的不做介绍了,阿里wiki中有更详细的介绍,这里主要些搭建步骤和躺过的坑。
二、环境搭建
1、mysql
源库mysql需要开启binlog,因为otter是基于canal的,而canal是基于binlog的,so,第一步需要MySQL开启binlog。
开启binlog的方法:Linux修改my.cnf文件,Windows修改MySQL的my.ini文件。具体先百度吧
2、zookeeper搭建
zk可以单击版也可以搭建集群,我搭建的是伪分布式,没那么多机子。具体步骤见我的另一篇博文。
3、otter配置
a)执行SQL文件:为otter新建一个名称为otter库(可以取其他名字),在下载包中(地址:https://github.com/alibaba/otter/releases)找到otter-manager-schema.sql,执行,然后otter中就有数据了。这个库主要是又来存储配置ottermanager的信息和otter运行时的一些数据。
b) 修改otter的配置文件:conf/manager.properties
## otter manager domain name
otter.domainName = 127.0.0.1 # otter提供对外访问的IP
## otter manager http port
otter.port = 8080   # otter提供的web界面访问的端口
## jetty web config xml
otter.jetty = jetty.xml

## otter manager database config
otter.database.driver.class.name = com.mysql.jdbc.Driver
otter.database.driver.url = jdbc:mysql://127.0.0.1:3306/otter   #数据库连接
otter.database.driver.username = root  # 用户名
otter.database.driver.password = Geekplus@2017  密码

## otter communication port
otter.communication.manager.port = 1099   #管理节点端口

## otter communication pool size
otter.communication.pool.size = 10

## default zookeeper address
otter.zookeeper.cluster.default = 127.0.0.1:2181  # zk地址
## default zookeeper sesstion timeout = 60s
otter.zookeeper.sessionTimeout = 60000

## otter arbitrate connect manager config
otter.manager.address = ${otter.domainName}:${otter.communication.manager.port}

## should run in product mode , true/false
otter.manager.productionMode = true

## self-monitor enable or disable
otter.manager.monitor.self.enable = true
## self-montir interval , default 120s
otter.manager.monitor.self.interval = 120
## auto-recovery paused enable or disable
otter.manager.monitor.recovery.paused = true
# manager email user config 执行中报警信息发送地址的一些配置
otter.manager.monitor.email.host = xxx
otter.manager.monitor.email.username = xxxx
otter.manager.monitor.email.password = xxx
otter.manager.monitor.email.stmp.port = 465
配置完成后,等10来秒就可以在htt://127.0.0.1:8080访问了,如果要做具体操作需要在右上角登录
默认用户名/秘密:admin/admin
4、node管理
node管理在使用管理中进行配置,应为node的启动需要manager配置后才能进行启动。
三、使用管理
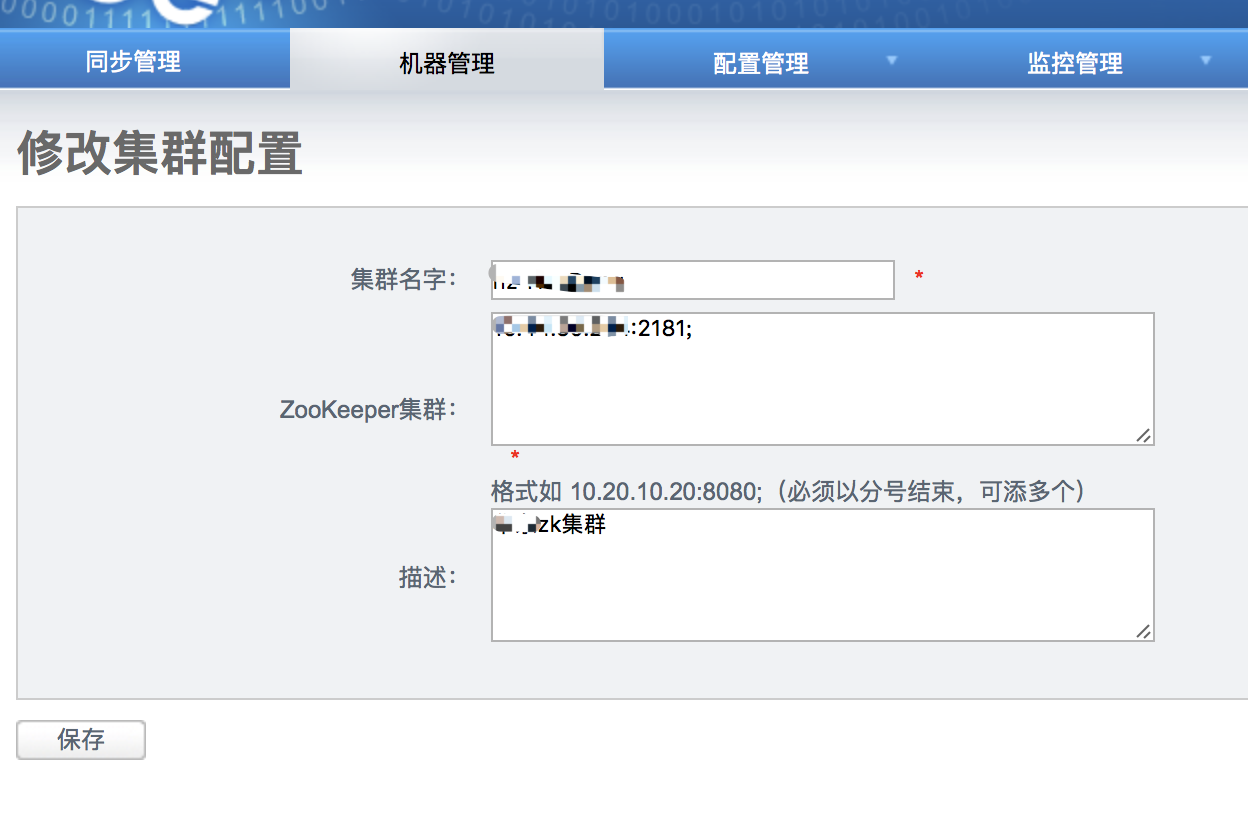
1、机器管理
首先在【机器管理】选项中配置【zookeeper管理】

然后添加一个zk集群
在【node管理】中添加node信息
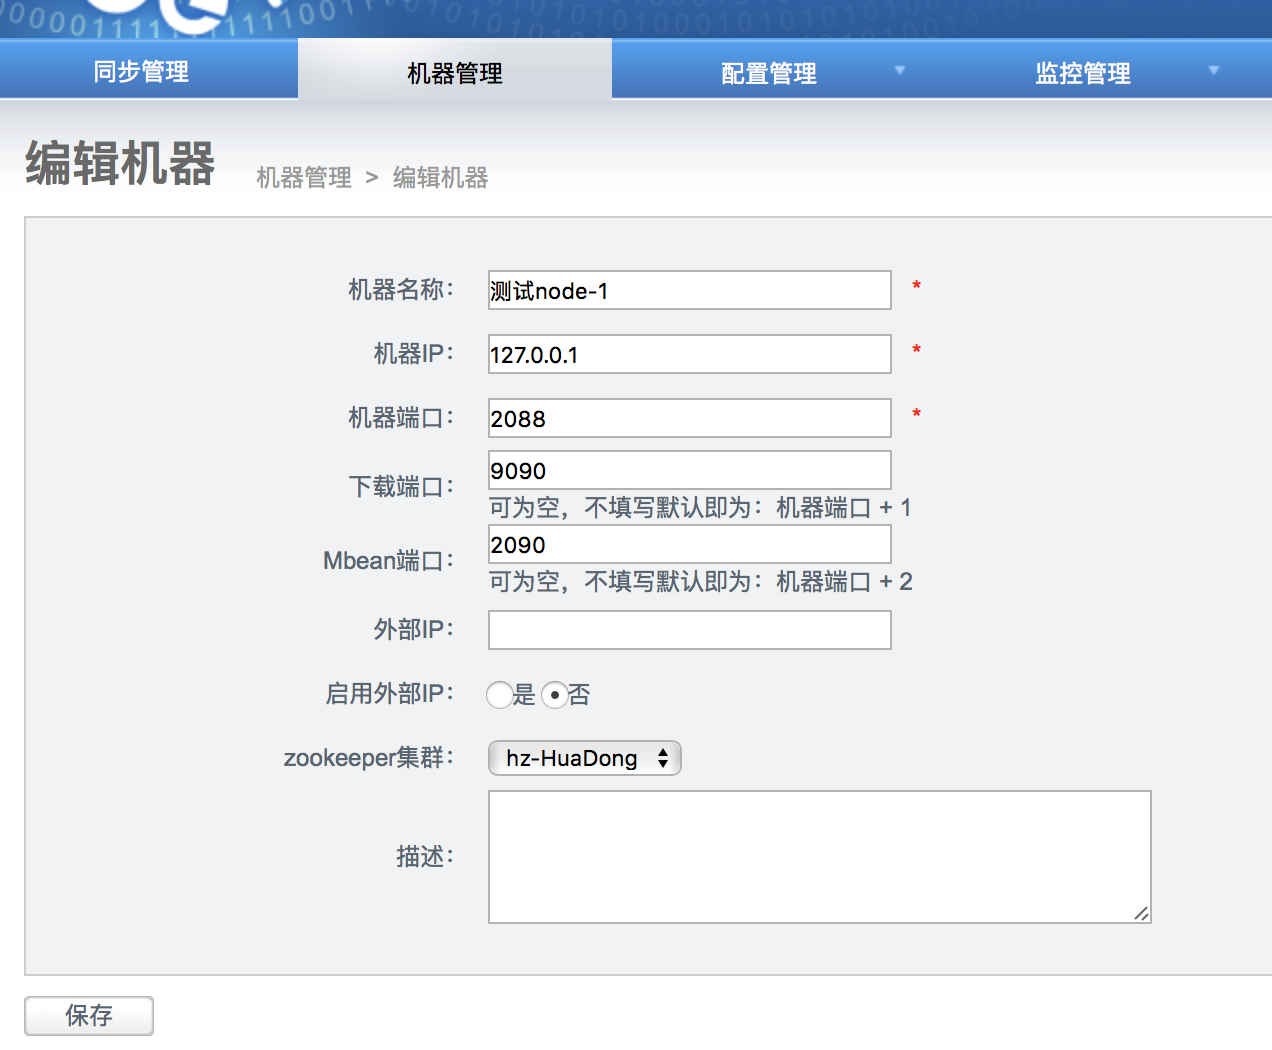
保存后刚刚配置的node节点就会出现在【node】管理页面

列表中的序号就是manager给node节点分配的序号,在配置node节点需要用到。
node节点配置:
1》配置文件在node包的/conf/otter.properties
# otter node root dir
otter.nodeHome = ${user.dir}/../

## otter node dir
otter.htdocs.dir = ${otter.nodeHome}/htdocs
otter.download.dir = ${otter.nodeHome}/download
otter.extend.dir= ${otter.nodeHome}/extend

## default zookeeper sesstion timeout = 60s
otter.zookeeper.sessionTimeout = 60000

## otter communication pool size
otter.communication.pool.size = 10

## otter arbitrate & node connect manager config
otter.manager.address = 127.0.0.1:1099  #node节点连接到manager的地址 IP地址为manner地址,
# 端口为在manager配置文件中的otter.communication.manager.port = 1099配置
2》在conf目录中增加一个文件 nid,在文件中写入刚刚manager分配的序号,比如 3。
做完 步骤一二后node就可以进行启动了。
2、配置管理
在配置管理中进行【数据源配置】【数据表配置】【canal配置】
【数据源配置】和【数据表配置】比较简单
【canal配置】一个canal对应一个数据库实例
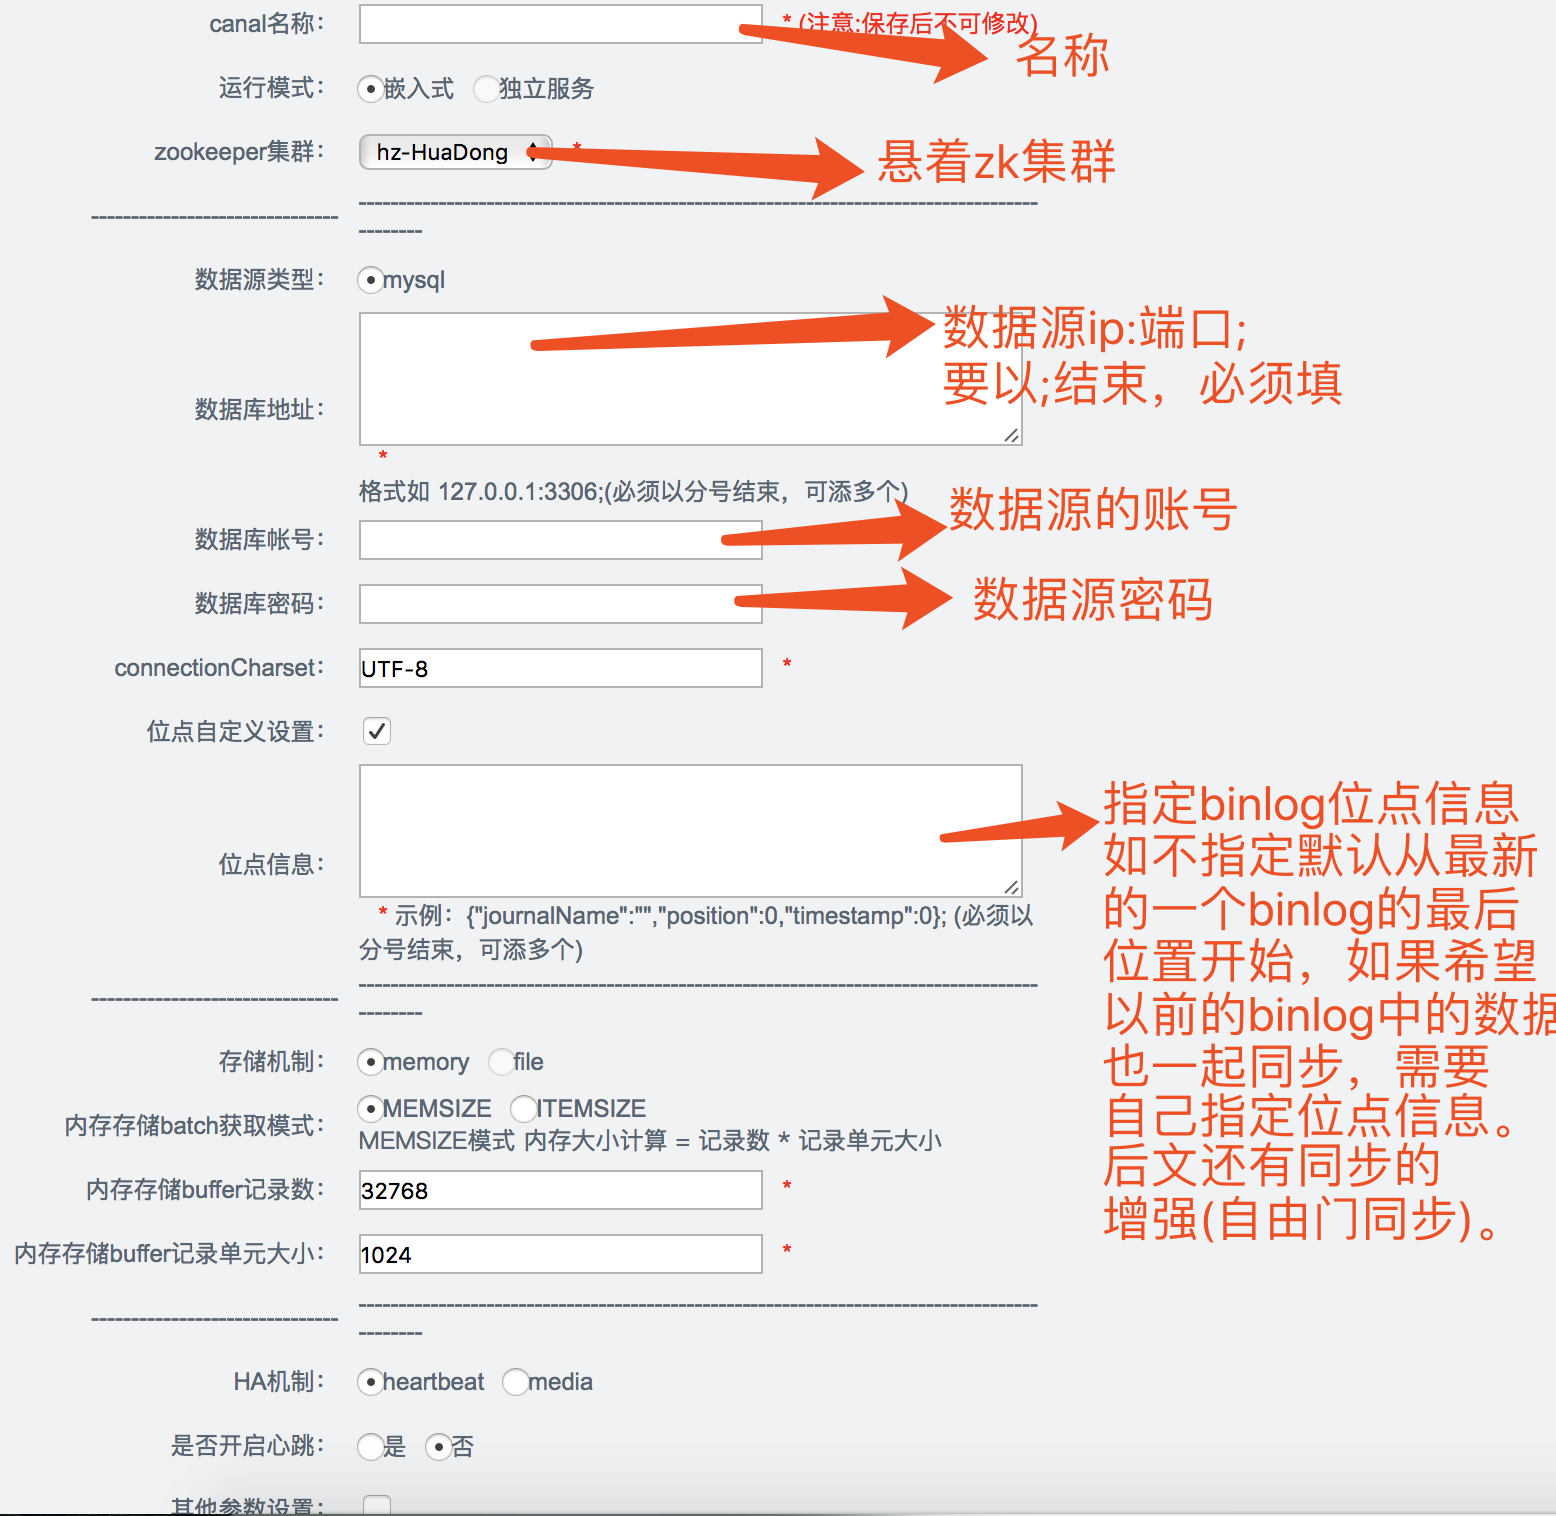
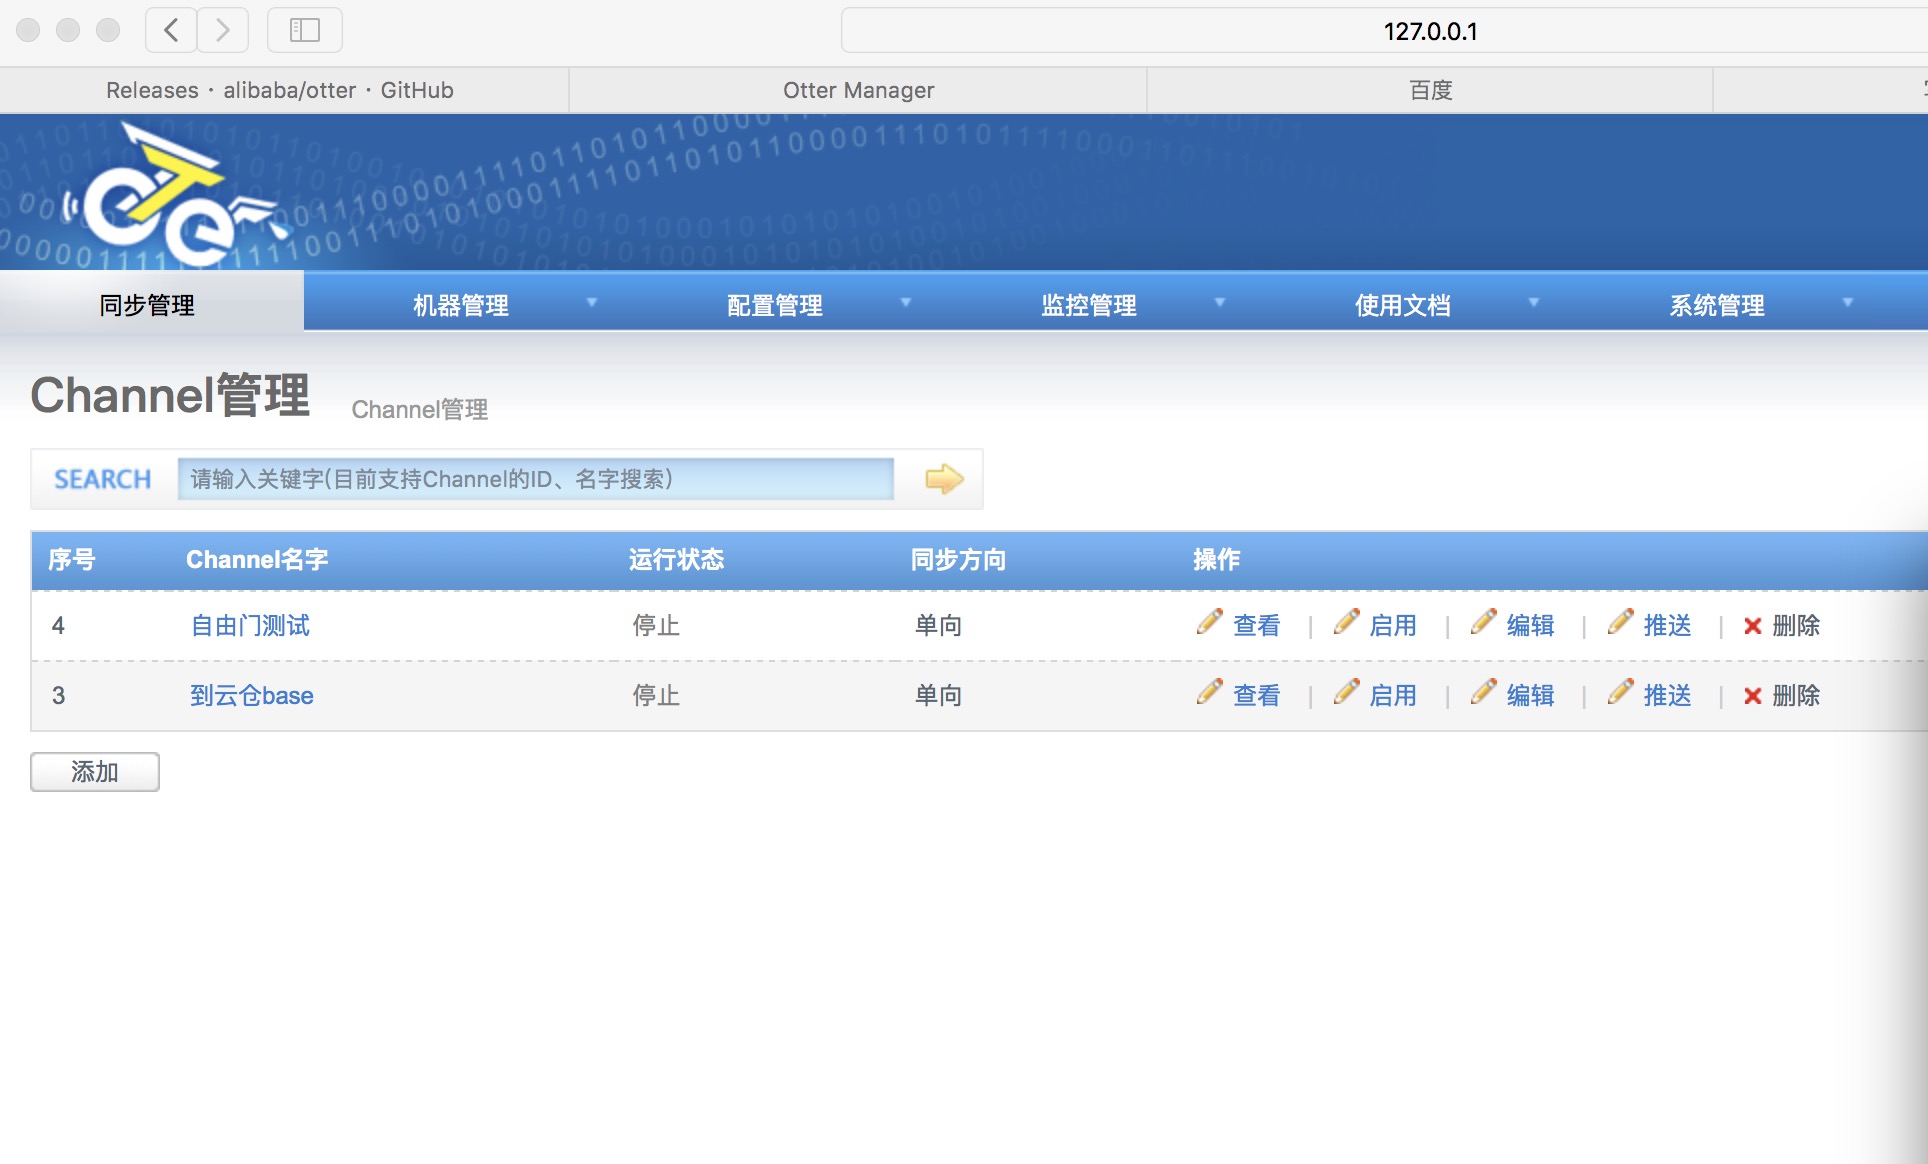
3、同步管理
1)添加一个channel
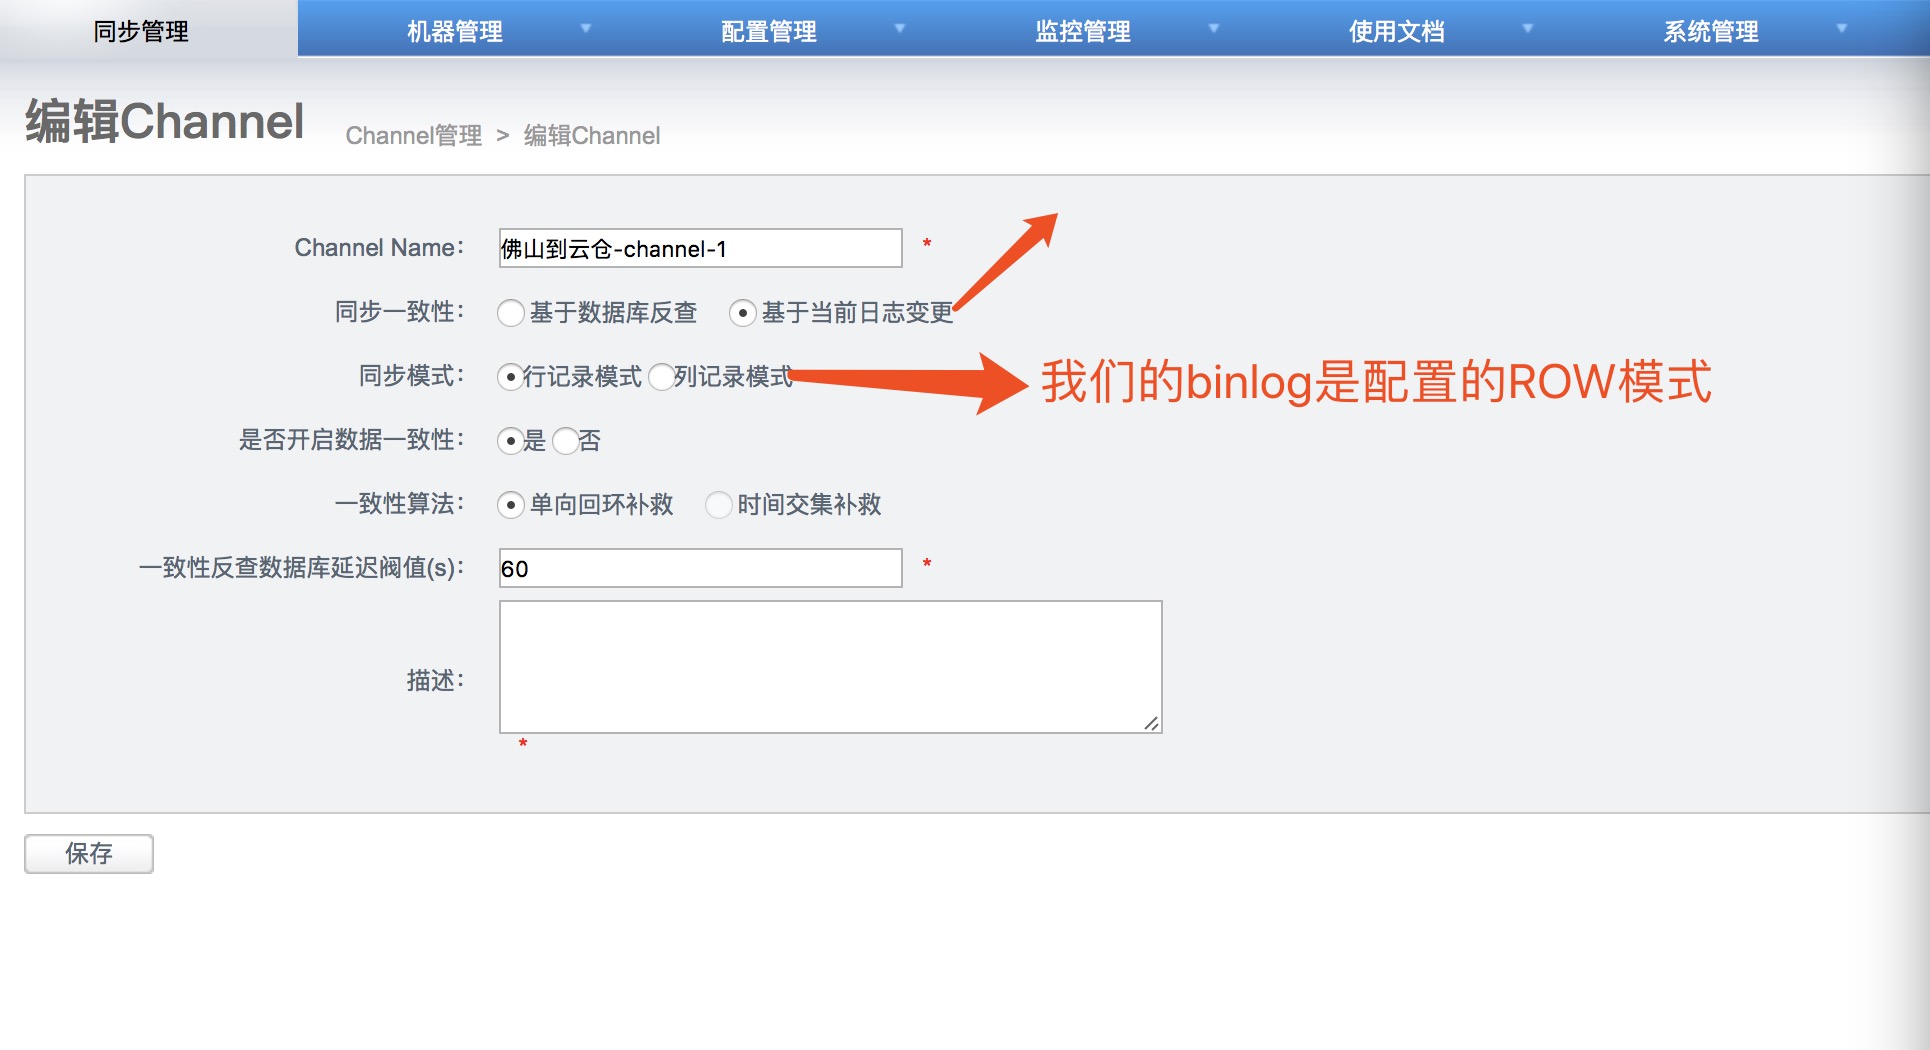
说明:
a. 同步一致性
- 基于数据库反查 (简单点说,就是强制反查数据库,从binlog中拿到pk,直接反查对应数据库记录进行同步,回退到几天前binlog进行消费时避免同步老版本的数据时可采用)
- 基于当前日志变更 (基于binlog/redolog解析出来的字段变更值进行同步,不做数据库反查,推荐使用)
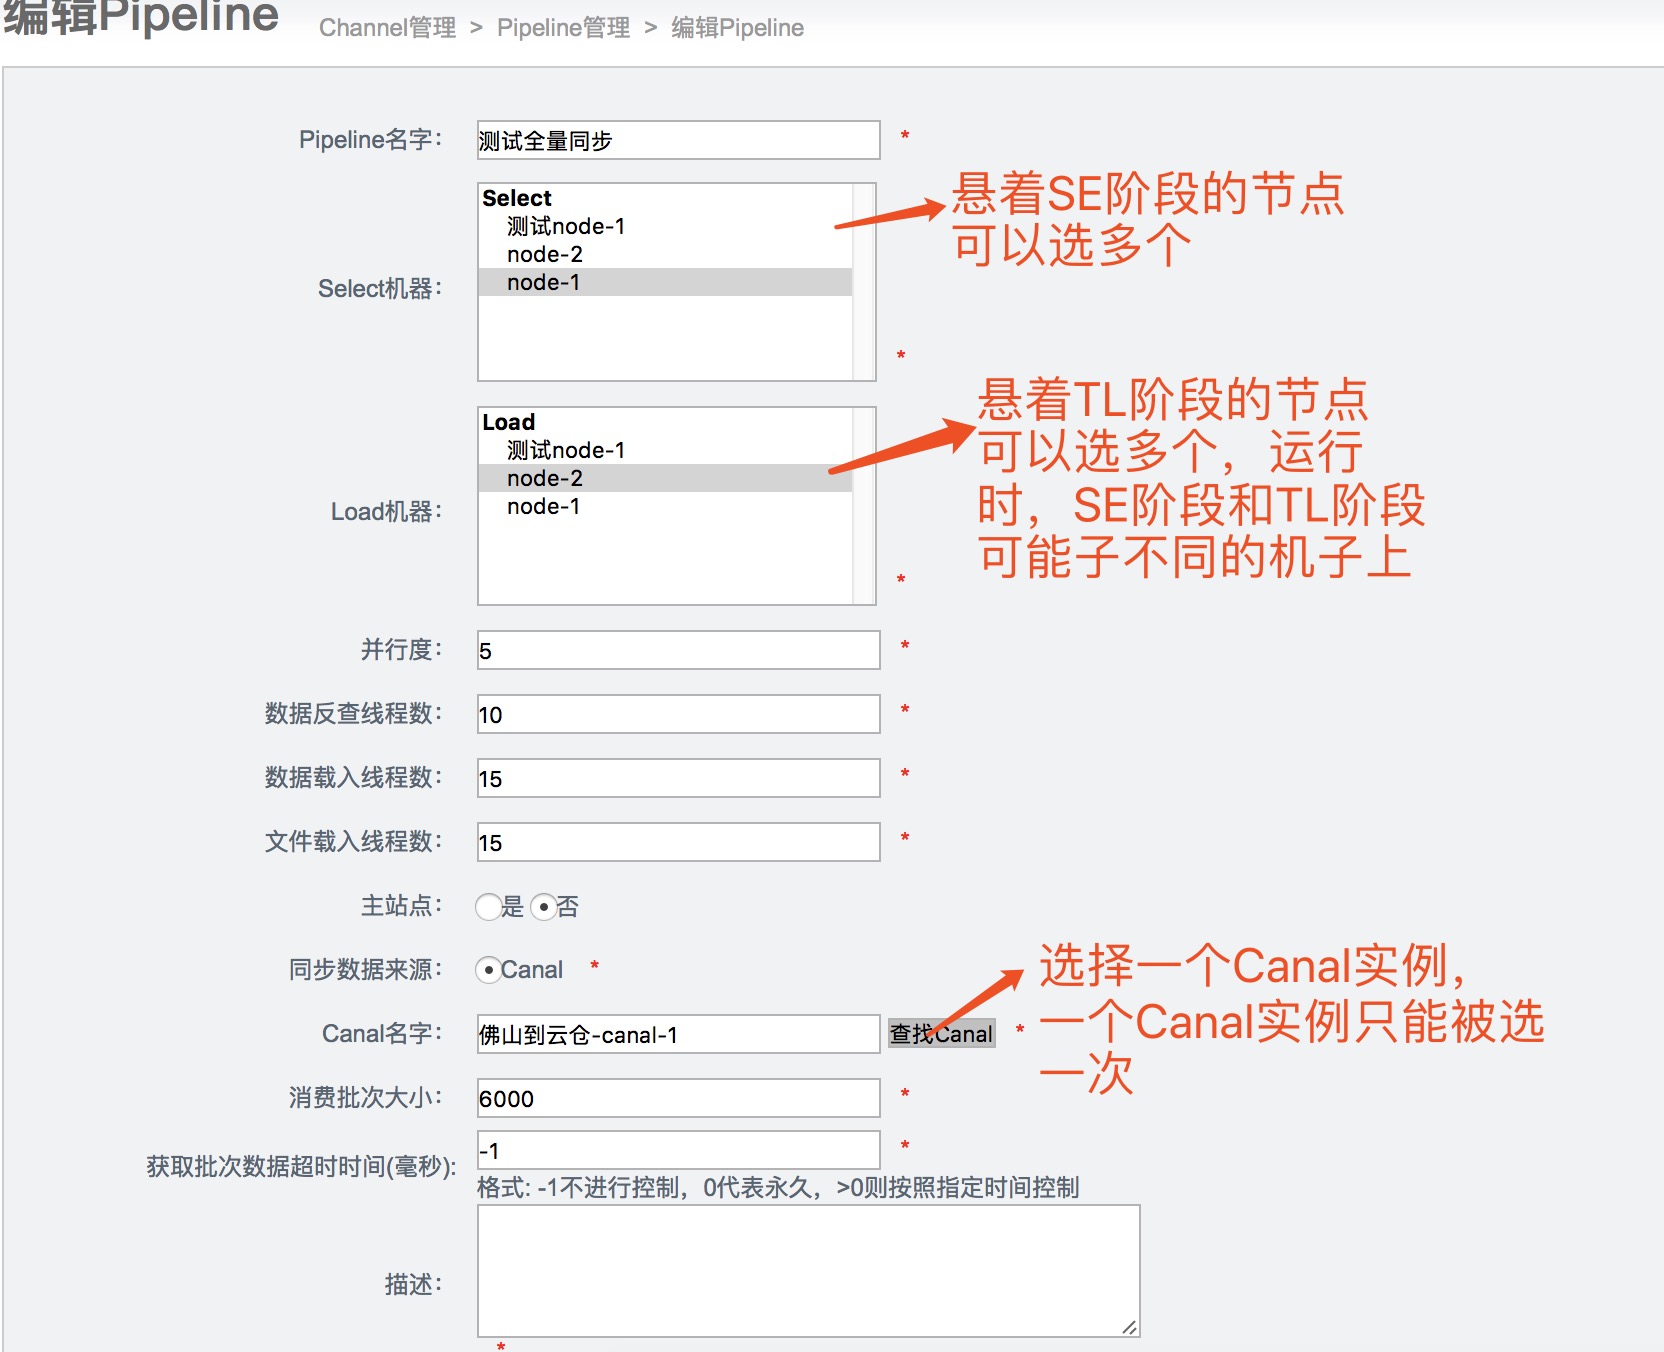
2)为channel添加pipeline

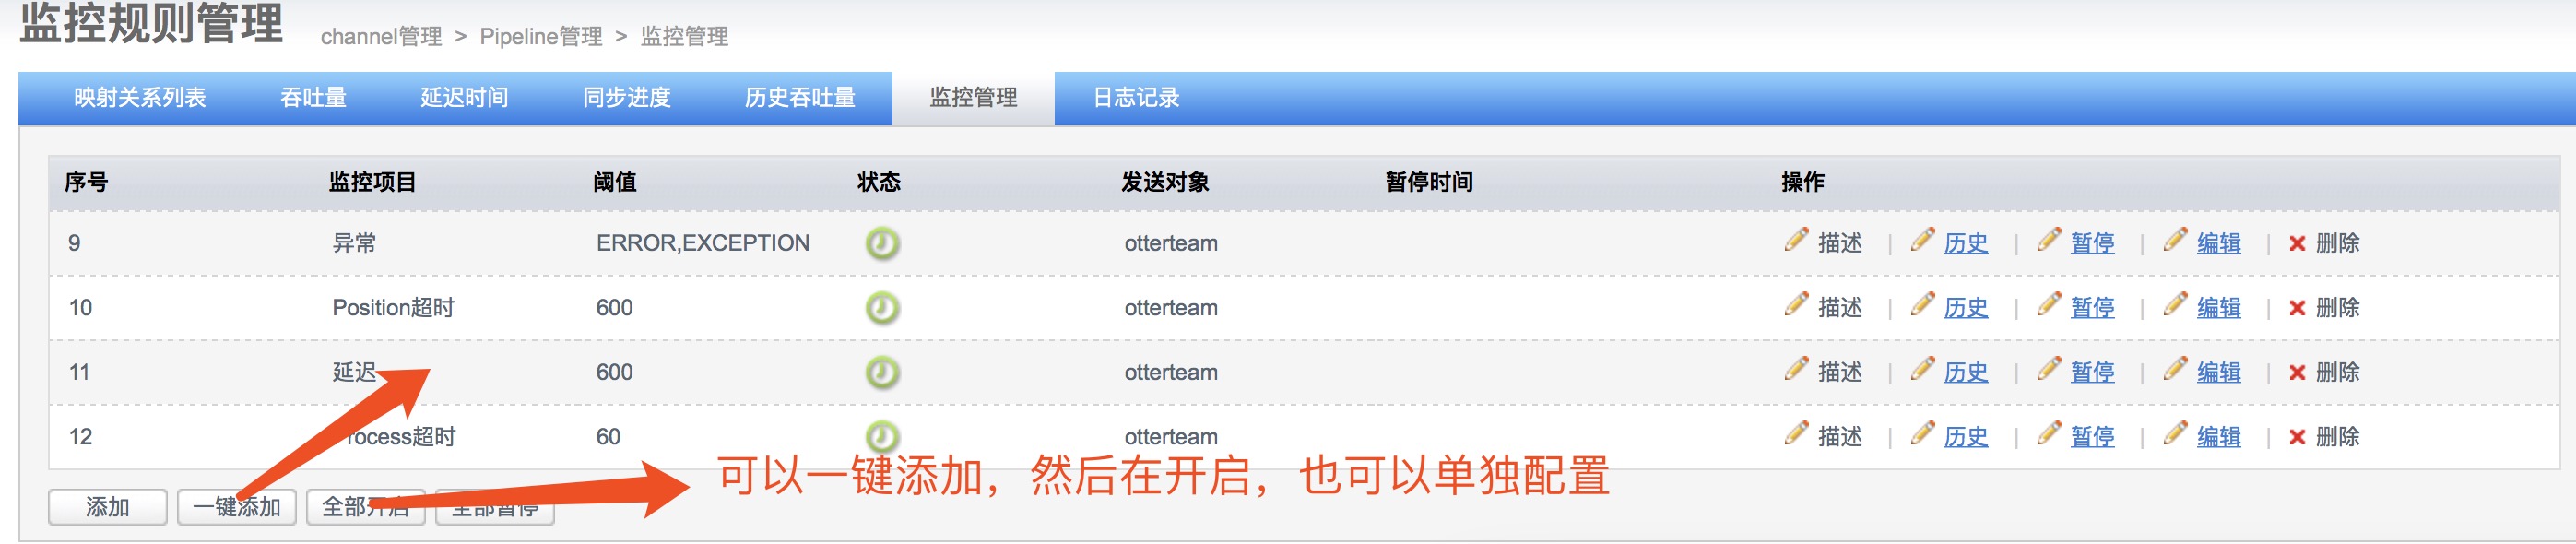
为pipeline添加监控

说明:
- 延迟时间 = 数据库同步到目标库成功时间 - 数据库源库产生变更时间, 单位秒. (由对应node节点定时推送配置)
- 最后同步时间 = 数据库同步到目标库最近一次的成功时间 (当前同步关注的相关表,同步到目标库的最后一次成功时间)
- 最后位点时间 = 数据binlog消费最后一次更新位点的时间 (和同步时间区别:一个数据库可能存在别的表的变更,不会触发同步时间变更,但会触发位点时间变更)
3)配置映射关系
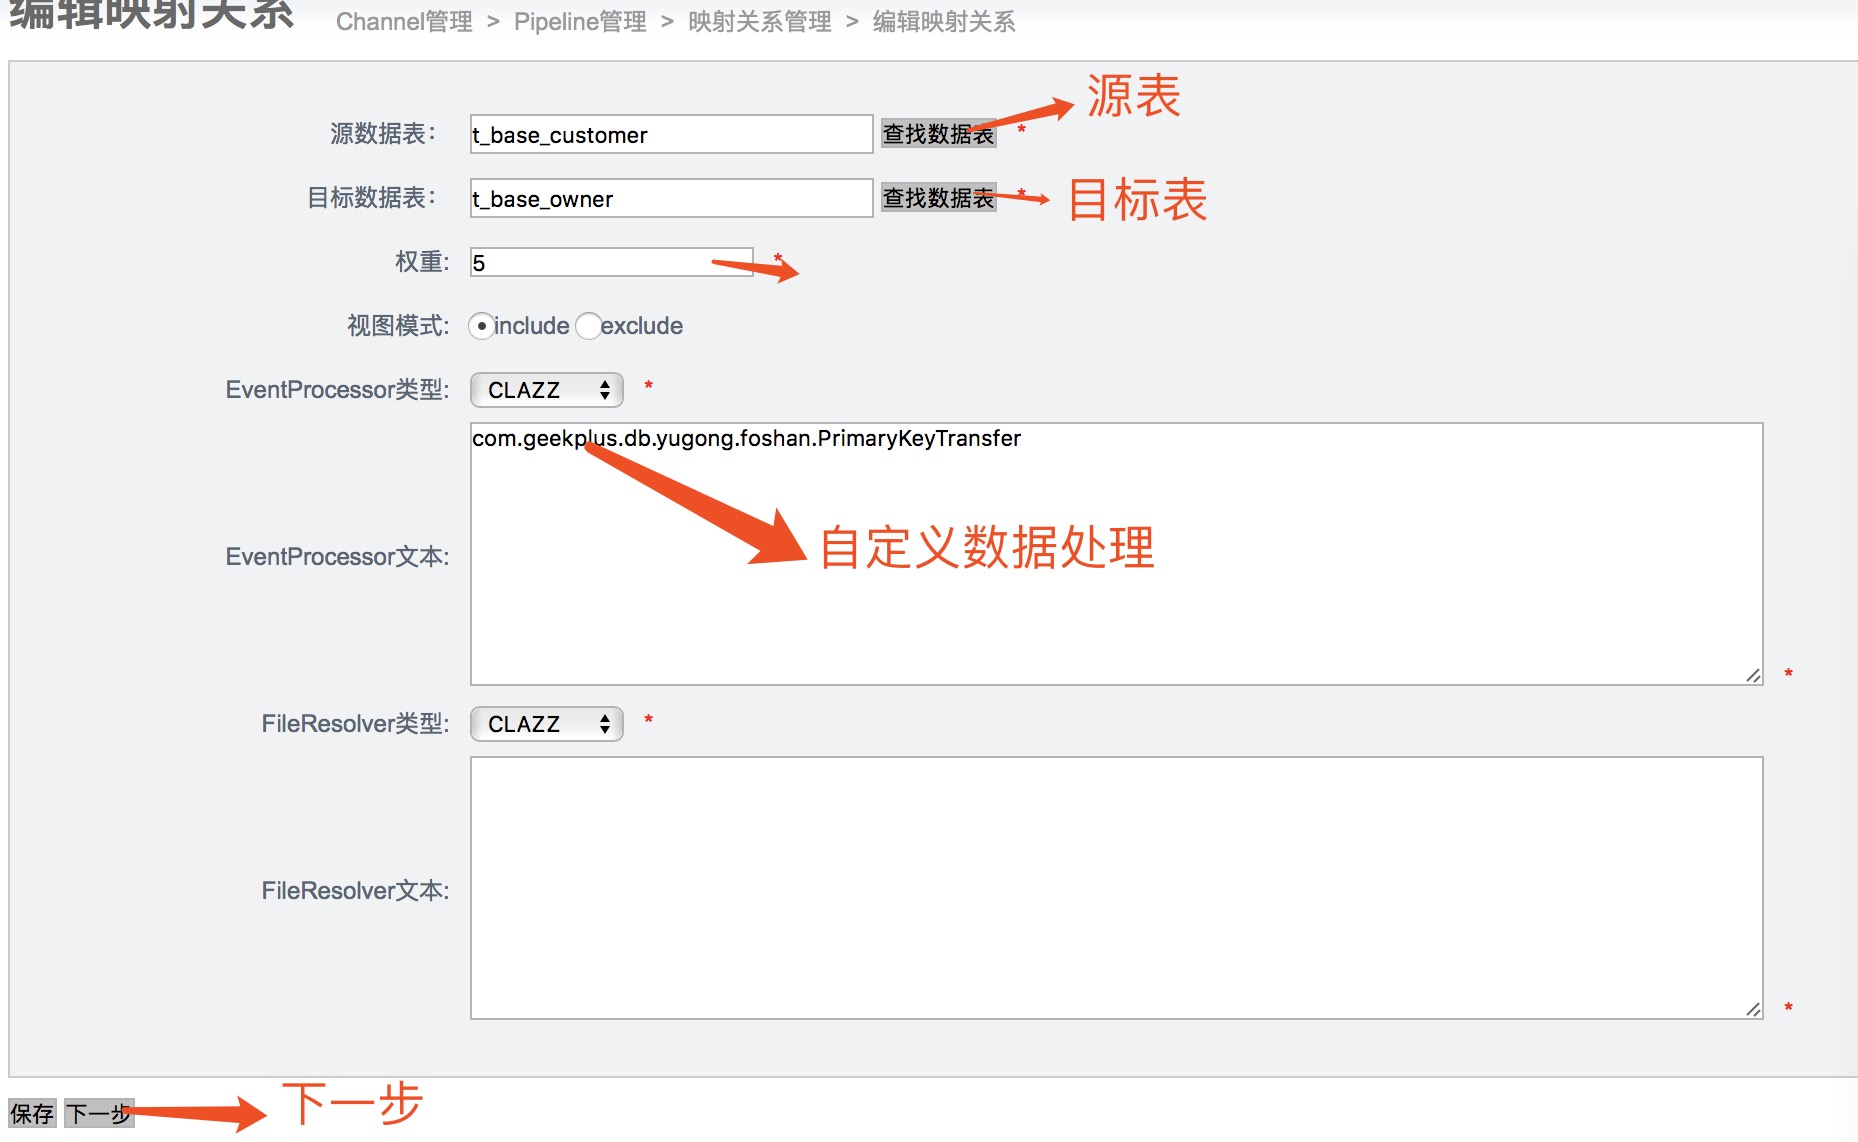
自定义数据处理在后面讲
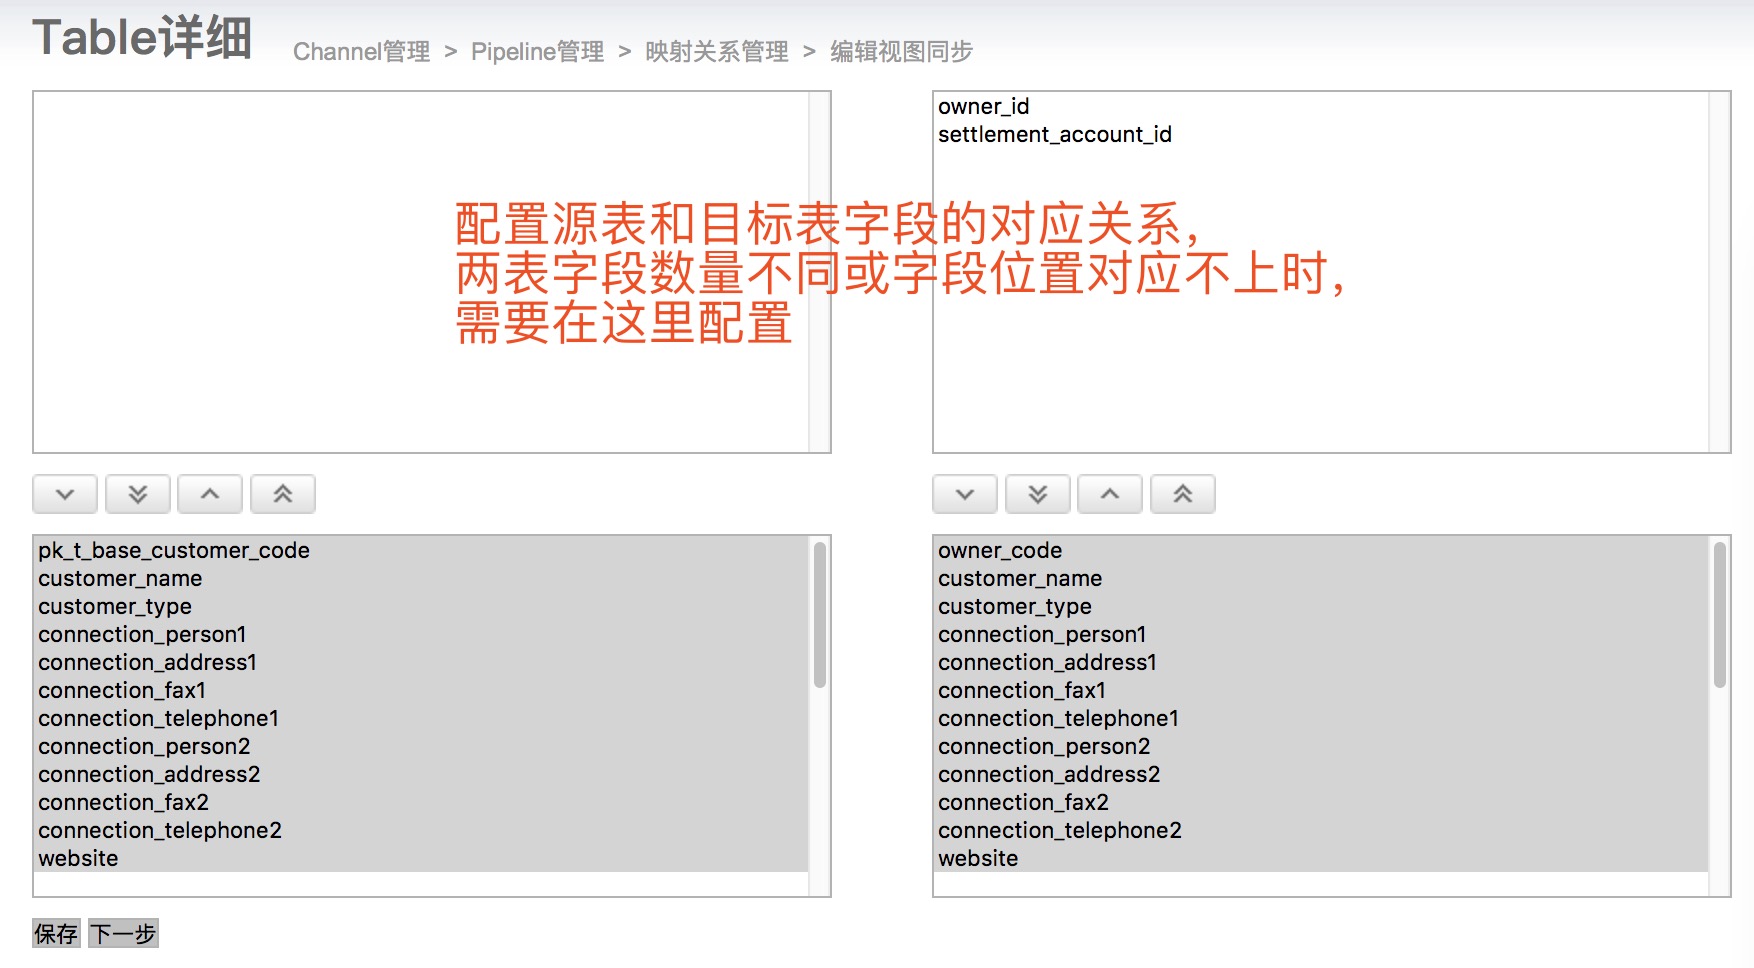
3)字段映射配置

四、自定义数据处理
Extract模块:
- EventProcessor : 自定义数据处理,可以改变一条变更数据的任意内容
- FileResolver : 解决数据和文件的关联关系
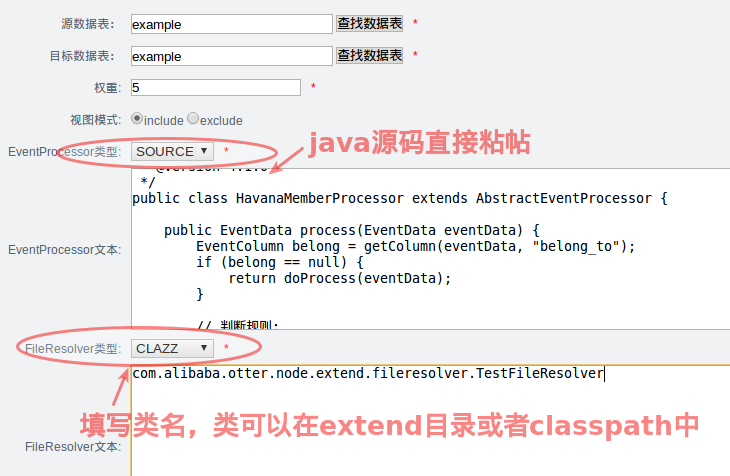
目前两者都只支持java语言编写,但都支持运行时动态编译&lib包载入的功能。
- 通过Otter Manager直接发布source文件代码,然后推送到node节点上即时生效,不需要重启任何java进程,有点动态语言的味道
- 可以将class文件放置到extend目录或者打成jar包,放置在node启动classpath中,也可以通过Otter Manager指定类名的方式进行加载,这样允许业务完全自定义。(但有个缺点,如果使用了一些外部包加入到node classpath中,比如远程接口调用,目前EventProcessor的调用是串行处理,针对串行进行远程调用执行,效率会比较差. )
1.基于EventProcessor实现原理
目前我使用的是EventProcessor,源码连接:https://github.com/alibaba/otter。
该模块位于源码包的的extract模块下,全路径:com.alibaba.otter.node.etl.extract。在项目的配置文件/spring/otter-node-extract.xml中可以看到如下配置:
<?xml version="1.0" encoding="UTF-8"?>
<beans xmlns="http://www.springframework.org/schema/beans"
	xmlns:xsi="http://www.w3.org/2001/XMLSchema-instance"
	xmlns:aop="http://www.springframework.org/schema/aop"
	xmlns:tx="http://www.springframework.org/schema/tx"
	xsi:schemaLocation="http://www.springframework.org/schema/beans http://www.springframework.org/schema/beans/spring-beans-2.0.xsd	   http://www.springframework.org/schema/tx http://www.springframework.org/schema/tx/spring-tx-2.0.xsd	   http://www.springframework.org/schema/aop http://www.springframework.org/schema/aop/spring-aop-2.0.xsd"
	default-autowire="byName" default-dependency-check="none">

	<bean id="otterExtractorFactory" class="com.alibaba.otter.node.etl.extract.extractor.OtterExtractorFactory" scope="singleton">
		<property name="dbBatchExtractor">
			<list>
				<value>freedomExtractor</value>
				<value>groupExtractor</value>
				<value>databaseExtractor</value>
				<value>processorExtractor</value>
				<value>fileExtractor</value>
				<value>viewExtractor</value>
			</list>
		</property>
	</bean>

	<!-- 池化配置 -->
	<bean id="databaseExtractor" class="org.springframework.aop.framework.ProxyFactoryBean">
		<property name="optimize" value="false"/>
   		<property name="proxyTargetClass" value="true" />
		<property name="targetSource" ref="databaseExtractorTargetSource" />
	</bean>
	<bean id="databaseExtractorTargetSource" class="org.springframework.aop.target.CommonsPoolTargetSource" >
		<property name="minIdle" value="1" />
		<property name="maxSize" value="-1" />
		<property name="timeBetweenEvictionRunsMillis" value="60000" /><!-- 1分钟进行一次回收 -->
		<property name="minEvictableIdleTimeMillis" value="600000" /><!-- 10分钟回收空闲的 -->
		<property name="targetBeanName" value="databaseExtractorTarget" />
	</bean>
	<bean id="databaseExtractorTarget" class="com.alibaba.otter.node.etl.extract.extractor.DatabaseExtractor" scope="prototype" >
		<property name="poolSize" value="5" />
	</bean>

	<bean id="fileExtractor" class="com.alibaba.otter.node.etl.extract.extractor.FileExtractor" scope="singleton" >
	</bean>

	<bean id="freedomExtractor" class="com.alibaba.otter.node.etl.extract.extractor.FreedomExtractor" scope="singleton" >
	</bean>

	<bean id="viewExtractor" class="com.alibaba.otter.node.etl.extract.extractor.ViewExtractor" scope="singleton" >
	</bean>

	<bean id="groupExtractor" class="com.alibaba.otter.node.etl.extract.extractor.GroupExtractor" scope="singleton" >
	</bean>

	<bean id="processorExtractor" class="com.alibaba.otter.node.etl.extract.extractor.ProcessorExtractor" scope="singleton" >
	</bean>
</beans>
然后转到OtterExtractorFactory工厂类中,我们可以看到工厂类遍历了dbBatchExtractor,然后移除执行otterExtractor.extract(dbBatch)方法来处理一批数据
 public void extract(DbBatch dbBatch) {
        Assert.notNull(dbBatch);
        for (Object extractor : dbBatchExtractor) {
            OtterExtractor otterExtractor = null;
            if (extractor instanceof java.lang.String) {
                // 每次从容器中取一次,有做池化处理
                otterExtractor = (OtterExtractor) beanFactory.getBean((String) extractor, OtterExtractor.class);
            } else {
                otterExtractor = (OtterExtractor) extractor;
            }

            otterExtractor.extract(dbBatch);
        }
    }
转到XML的配置中
<bean id="otterExtractorFactory" class="com.alibaba.otter.node.etl.extract.extractor.OtterExtractorFactory" scope="singleton">
		<property name="dbBatchExtractor">
			<list>
				<value>freedomExtractor</value>  <!--自由门提取器-->
				<value>groupExtractor</value>    <!--这个不知道是什么,感觉是数据表配置中的那个group-->
				<value>databaseExtractor</value>    <!--执行数据反查,包括了自由门数据和配置了基于表反查的数据需要走这里-->
				<value>processorExtractor</value>    <!--自定义提取器,这是我们自定义数据处理的入口-->
				<value>fileExtractor</value>    <!--文件提取器,这个我永不着-->
				<value>viewExtractor</value>    <!--这个不知道是干嘛的-->
			</list>
		</property>
	</bean>
这里定义了所有的Extractor,我们的自定义数据处理在processorExtractor中执行。
2.数据自定义的实现
步骤:添加依赖包-》继承类AbstractEventProcessor-》编写业务代码-》部署(我是)
列举一个实现:
导入添加maven依赖的两个包:
<!-- https://mvnrepository.com/artifact/com.alibaba.otter/shared.etl -->
		<dependency>
			<groupId>com.alibaba.otter</groupId>
			<artifactId>shared.etl</artifactId>
			<version>4.2.15</version>
		</dependency>
		<!-- https://mvnrepository.com/artifact/com.alibaba.otter/node.extend -->
		<dependency>
			<groupId>com.alibaba.otter</groupId>
			<artifactId>node.extend</artifactId>
			<version>4.2.15</version>
		</dependency>
实现:
package com.geekplus.db.yugong.foshan;

import java.util.List;
import org.apache.commons.collections.CollectionUtils;
import org.apache.commons.lang.StringUtils;
import org.slf4j.Logger;
import org.slf4j.LoggerFactory;
import com.alibaba.otter.node.extend.processor.AbstractEventProcessor;
import com.alibaba.otter.shared.etl.model.EventColumn;
import com.alibaba.otter.shared.etl.model.EventData;
import com.alibaba.otter.shared.etl.model.EventType;

public class PrimaryKeyTransfer extends AbstractEventProcessor {
    private final static Logger logger = LoggerFactory.getLogger(PrimaryKeyTransfer.class);

    /***
     * 描述:每次处理一行数据
     */
    public boolean process(EventData eventData) {
        boolean isHandle = true;
        if (eventData == null)
            return isHandle;
        logger.info("eventdata ,tableName:{},tableID:{},db:{},ddlTable:{}", eventData.getTableId(),
                eventData.getTableName(), eventData.getSchemaName(), eventData.getDdlSchemaName());
        if (StringUtils.equals("out_order_back", eventData.getTableName())
                || StringUtils.equals("out_order_back", eventData.getTableName())) {
            return parseOrder(eventData);
        } else if (StringUtils.equals("out_order_pkg", eventData.getTableName())
                || StringUtils.equals("out_order_pkg", eventData.getTableName())) {
            return parsePkg(eventData);
        } else if (StringUtils.equals("t_base_warehouse", eventData.getTableName())
                || StringUtils.equals("t_base_warehouse", eventData.getTableName())) {
            return parseWarehouse(eventData);
        } else if (StringUtils.equals("t_base_customer", eventData.getTableName())
                || StringUtils.equals("t_base_owner", eventData.getTableName())) {
            return parseCustomer(eventData);
        } else if (StringUtils.equals("t_base_carrier_info", eventData.getTableName())
                || StringUtils.equals("t_base_carrier_info", eventData.getTableName())) {
            return parseCarrier(eventData);
        }
        return isHandle;
    }

    private EventColumn findColumn(List<EventColumn> columns, String columnName) {
        for (EventColumn column : columns) {
            if (StringUtils.equals(columnName, column.getColumnName())) {
                return column;
            }
        }
        return null;
    }

    private boolean parseOrder(EventData eventData) {
        EventColumn normalWarehouseCl = findColumn(eventData.getColumns(), "warehouse_code");
        if (normalWarehouseCl == null)
            return false;
        eventData.getKeys().add(normalWarehouseCl);
        eventData.getColumns().remove(normalWarehouseCl);
        //处理Insert
        if (EventType.INSERT.equals(eventData.getEventType())) {

        }
        //处理update
        if (EventType.UPDATE.equals(eventData.getEventType())) {
            // 如果存在主键的变更
            if (CollectionUtils.isNotEmpty(eventData.getOldKeys())) {
                eventData.getOldKeys().add(normalWarehouseCl.clone());
            }
        }
        //处理delete
        if (EventType.DELETE.equals(eventData.getEventType())) {

        }
        return true;
    }

    private boolean parsePkg(EventData eventData) {
        if (EventType.INSERT.equals(eventData.getEventType())) {
            return true;
        }
        if (EventType.UPDATE.equals(eventData.getEventType())) {
            EventColumn normalOrderCodeCl = findColumn(eventData.getKeys(), "out_order_code");
            EventColumn normalWarehouseCl = findColumn(eventData.getKeys(), "warehouse_code");
            if (normalOrderCodeCl == null || normalWarehouseCl == null)
                return false;
            eventData.getColumns().clear();
            moveDate(eventData.getKeys(), eventData.getColumns());
            eventData.getKeys().clear();
            eventData.getOldKeys().clear();
            // keys 和 oldkeys必须有顺序
            eventData.getKeys().add(normalOrderCodeCl);
            eventData.getKeys().add(normalWarehouseCl);
            eventData.getOldKeys().add(normalOrderCodeCl);
            eventData.getOldKeys().add(normalWarehouseCl);
            return true;
        }
        if (EventType.DELETE.equals(eventData.getEventType())) {
            return true;
        }
        return false;
    }

    private void moveDate(List<EventColumn> source, List<EventColumn> dest) {
        for (EventColumn srcC : source) {
            boolean exist = false;
            for (EventColumn destC : dest) {
                if (StringUtils.equals(destC.getColumnName(), srcC.getColumnName())) {
                    exist = true;
                    break;
                }
            }
            if (!exist) {
                dest.add(srcC);
            }
        }
    }

    private boolean parseWarehouse(EventData eventData) {
        EventColumn normalWarehouseCl = findColumn(eventData.getColumns(), "warehouse_code");
        if (normalWarehouseCl == null)
            return false;
        eventData.getColumns().remove(normalWarehouseCl);
        eventData.getKeys().add(normalWarehouseCl);
        if (EventType.INSERT.equals(eventData.getEventType())) {

        }
        if (EventType.UPDATE.equals(eventData.getEventType())) {
            if (CollectionUtils.isNotEmpty(eventData.getOldKeys())) {
                eventData.getOldKeys().add(normalWarehouseCl.clone());
            }
        }
        if (EventType.DELETE.equals(eventData.getEventType())) {

        }
        return true;
    }

    private boolean parseCustomer(EventData eventData) {
        if (EventType.INSERT.equals(eventData.getEventType())) {

        }
        if (EventType.UPDATE.equals(eventData.getEventType())) {
            EventColumn pk = findColumn(eventData.getKeys(), "pk_t_base_customer_code");
            eventData.getOldKeys().add(pk);
        }
        if (EventType.DELETE.equals(eventData.getEventType())) {

        }
        return true;
    }

    private boolean parseCarrier(EventData eventData) {
        EventColumn carrierCodeCl = findColumn(eventData.getColumns(), "carrier_code");
        if (carrierCodeCl == null)
            return false;
        eventData.getColumns().remove(carrierCodeCl);
        eventData.getKeys().add(carrierCodeCl);
        if (EventType.INSERT.equals(eventData.getEventType())) {

        }
        if (EventType.UPDATE.equals(eventData.getEventType())) {
            if (CollectionUtils.isNotEmpty(eventData.getOldKeys())) {
                eventData.getOldKeys().add(carrierCodeCl.clone());
            }
        }
        if (EventType.DELETE.equals(eventData.getEventType())) {

        }
        return true;
    }
}
之后将打好的jar包放到每个节点的lib目录下,然后重启节点时更改生效。
重点类了
五、自定义数据同步(自 由 门)
主要功能是在不修改原始表数据的前提下,触发一下数据表中的数据同步。
可用于:
- 同步数据订正
- 全量数据同步. (自 由 门触发全量,同时otter增量同步,需要配置为行记录模式,避免update时因目标库不存在记录而丢失update操作)
1.原理
主要原理:
a. 基于otter系统表retl_buffer,插入特定的数据,包含需要同步的表名,pk信息。
b. otter系统感知后会根据表名和pk提取对应的数据(整行记录),和正常的增量同步一起同步到目标库。
目前otter系统感知的自 由 门数据方式为:
- 日志记录. (插入表数据的每次变更,需要开启binlog,otter获取binlog数据,提取同步的表名,pk信息,然后回表查询整行记录)
需要注意的是otter的自由门是对源库有侵入性的,需要增加一个retl库和一个密码为retl的retl用户,执行的SQL为:
/*
供 otter 使用, otter 需要对 retl.* 的读写权限,以及对业务表的读写权限
1. 创建database retl
*/
CREATE DATABASE retl;

/* 2. 用户授权 给同步用户授权 */
CREATE USER retl@'%' IDENTIFIED BY 'retl';
GRANT USAGE ON *.* TO `retl`@'%';
GRANT SELECT, REPLICATION SLAVE, REPLICATION CLIENT ON *.* TO `retl`@'%';
GRANT SELECT, INSERT, UPDATE, DELETE, EXECUTE ON `retl`.* TO `retl`@'%';
/* 业务表授权,这里可以限定只授权同步业务的表 */
GRANT SELECT, INSERT, UPDATE, DELETE ON *.* TO `retl`@'%';

/* 3. 创建系统表 */
USE retl;
DROP TABLE IF EXISTS retl.retl_buffer;
DROP TABLE IF EXISTS retl.retl_mark;
DROP TABLE IF EXISTS retl.xdual;

CREATE TABLE retl_buffer
(
	ID BIGINT(20) AUTO_INCREMENT,
	TABLE_ID INT(11) NOT NULL,
	FULL_NAME varchar(512),
	TYPE CHAR(1) NOT NULL,
	PK_DATA VARCHAR(256) NOT NULL,
	GMT_CREATE TIMESTAMP NOT NULL,
	GMT_MODIFIED TIMESTAMP NOT NULL,
	CONSTRAINT RETL_BUFFER_ID PRIMARY KEY (ID)
)  ENGINE=InnoDB DEFAULT CHARSET=utf8;

CREATE TABLE retl_mark
(
	ID BIGINT AUTO_INCREMENT,
	CHANNEL_ID INT(11),
	CHANNEL_INFO varchar(128),
	CONSTRAINT RETL_MARK_ID PRIMARY KEY (ID)
) ENGINE=InnoDB AUTO_INCREMENT=1 DEFAULT CHARSET=utf8;

CREATE TABLE xdual (
  ID BIGINT(20) NOT NULL AUTO_INCREMENT,
  X timestamp NOT NULL DEFAULT CURRENT_TIMESTAMP,
  PRIMARY KEY (ID)
) ENGINE=InnoDB AUTO_INCREMENT=1 DEFAULT CHARSET=utf8;

/* 4. 插入初始化数据 */
INSERT INTO retl.xdual(id, x) VALUES (1,now()) ON DUPLICATE KEY UPDATE x = now();
retl_buffer表结构:
CREATE TABLE retl_buffer
   (
    ID BIGINT AUTO_INCREMENT,   ## 无意义,自增即可
    TABLE_ID INT(11) NOT NULL,   ## tableId, 可通过该链接查询:http://otter.alibaba-inc.com/data_media_list.htm,即序号这一列,如果配置的是正则,需要指定full_name,当前table_id设置为0.
    FULL_NAME varchar(512),  ## schemaName + '.' +  tableName  (如果明确指定了table_id,可以不用指定full_name)
    TYPE CHAR(1) NOT NULL,   ## I/U/D ,分别对应于insert/update/delete
    PK_DATA VARCHAR(256) NOT NULL, ## 多个pk之间使用char(1)进行分隔
    GMT_CREATE TIMESTAMP NOT NULL, ## 无意义,系统时间即可
    GMT_MODIFIED TIMESTAMP NOT NULL,  ## 无意义,系统时间即可
    CONSTRAINT RETL_BUFFER_ID PRIMARY KEY (ID)
   )  ENGINE=InnoDB DEFAULT CHARSET=utf8;
2.操作
全量同步操作示例:
insert into retl.retl_buffer(ID,TABLE_ID, FULL_NAME,TYPE,PK_DATA,GMT_CREATE,GMT_MODIFIED) (select null,0,'$schema.table$','I',id,now(),now() from $schema.table$);
如果针对多主键时,对应的PK_DATA需要将需要同步表几个主键按照(char)1进行拼接,比如
insert into `retl`.`retl_buffer` ( `TABLE_ID`, `FULL_NAME`, `TYPE`, `PK_DATA`, `GMT_CREATE`, `GMT_MODIFIED`) values ( '0', 'test.t_base_warehouse', 'I', '20', '2018-01-19 15:00:57', '2018-01-19 10:34:00');下面举个实际的列子:
insert into `retl`.`retl_buffer` ( `TABLE_ID`, `FULL_NAME`, `TYPE`, `PK_DATA`, `GMT_CREATE`, `GMT_MODIFIED`) values ( '0', 'test.t_base_warehouse', 'I', '20', '2018-01-19 15:00:57', '2018-01-19 10:34:00');
| TABLE_ID | FULL_NAME | TYPE | PK_DATA | GMT_CREATE | GMT_MODIFIED |
| 自增不用填 | 源库名.表名 | I/U/D ,分别对应于insert/update/delete | 主键的值,注意是值而不是主键名称,需要同步几条数据就需要增加几条记录 | 使用列子就可 | 使用列子就可 |
完结,后面抽时间在解读下L阶段,otter是如何在目标库拼装SQL的。