/*文章中用到的代码只是一部分,需要源码的可通过邮箱联系我 [email protected]*/
这段时间在学JAVA的swing界面开发,试着做了个画图板。实现了直线、曲线、喷枪、矩形、圆形、文字、橡皮等操作,感觉收获很大。
既然要做画图板,那最好的参考当然是windows系统自带的画图啦!虽然技术有限不能做的一模一样,但感觉还是能看(手动滑稽)。下面就讲讲如何实现了。
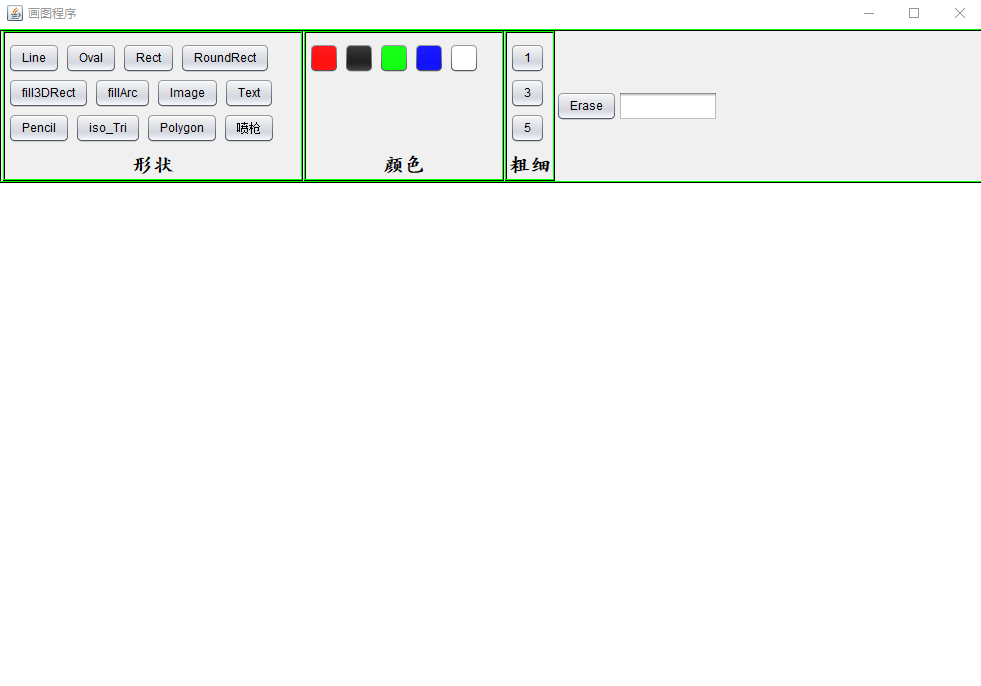
首先不用想,肯定是先把界面做好了(这是我做的界面,emmmmmm。。。。功能和界面都还有待完善)
仔细看一看大概就能想到怎么实现了,首先创建一个DrawMain类继承(extends)JFrame类
public class DrawMain extends JFrame {

	public static void main(String[] args) {
		DrawMain dm = new DrawMain();
		dm.setLookAndFeel();
		dm.initUI();
	}

	/**
	 * 为主面板设置皮肤,这个是我随便找的一个,具体可以自己去研究
	 */

	public void setLookAndFeel() {

		try {

			UIManager.setLookAndFeel("com.sun.java.swing.plaf.nimbus.NimbusLookAndFeel");

		} catch (Exception e) {

			e.printStackTrace();

		}

	}

	public void initUI() {
		this.setTitle("画图程序");
		this.setSize(1000, 700);
		this.setDefaultCloseOperation(3);
		this.setLocationRelativeTo(null);
		this.setLayout(new BorderLayout());
	     this.setVisible(true);

}
这当然只是主界面啦,那后面该怎么弄呢?上面可以有那么多个分区当然需要再放几个容器类型的组件啦。就是组件里放组件了,那么此时布局的选择很重要,首先利用主界面是BroderLayout,就在北方向上放上一个JPanel上去咯
		JPanel NorthJPanel = new JPanel();
		NorthJPanel.setLayout(new FlowLayout(FlowLayout.LEFT, 1, 0));
		NorthJPanel.setBackground(new Color(240, 240, 240));//设置背景色
          //NorthJPanel.setBorder(BorderFactory.createEtchedBorder(new Color(0, 0, 0), new Color(0, 255, 0)));设置边框,可以看看有什么区别
		this.add(NorthJPanel, BorderLayout.NORTH);
运行一下,再拉拉边框,有什么发现没有?这个刚贴上去的组件大小会随着你拉边框而改变,所以我们应该再贴一个JPanel到这个JPanel里,然后再设置好大小防止改变
		JPanel InNorthJPanel = new JPanel();
		InNorthJPanel.setLayout(new FlowLayout(FlowLayout.LEFT, 1, 0));
		InNorthJPanel.setPreferredSize(new Dimension(900, 150));
		InNorthJPanel.setBackground(new Color(240, 240, 240));
		NorthJPanel.add(InNorthJPanel);
然后该怎么做呢?设置分区,自然,每个分区就是一个JPanel组件
/*
		 * 形状区域
		 *
		 * @param ShapeJPanel 形状区域的面板,界面布局
		 *
		 * @param InShapeJPanel 形状区域中放置形状选项的面板,放在ShapeJPanel中,流式布局
		 *
		 * @param InShapeLabel 形状区域中标识区域的标签,放在ShapeJPanel中
		 */
		JPanel ShapeJPanel = null;
		ShapeJPanel = createJPanel(InNorthJPanel);
		ShapeJPanel.setPreferredSize(new Dimension(300, 150));
		JPanel InShapeJPanel = new JPanel();
		InShapeJPanel.setLayout(new FlowLayout(FlowLayout.LEFT, 5, 5));
		InShapeJPanel.setBackground(null);// 设置背景色透明
		InShapeJPanel.setOpaque(false);
		InShapeJPanel.setPreferredSize(new Dimension(300, 110));
		ShapeJPanel.add(InShapeJPanel, BorderLayout.NORTH);
		JLabel InShapeLabel = null;
		InShapeLabel = createJLabel("形状", ShapeJPanel);

		/*
		 * 颜色区域
		 *
		 * @param ColorJPanel 颜色区域面板,界面布局
		 *
		 * @param InColorJPanel 颜色区域中放置颜色选项的面板,放在ColorJPanel中,流式布局
		 *
		 * @param InColorLabel 颜色区域中标识区域的标签,放在ColorJPanel中
		 */
		JPanel ColorJPanel = null;
		ColorJPanel = createJPanel(InNorthJPanel);
		JPanel IncolorJPanel = new JPanel();
		IncolorJPanel.setPreferredSize(new Dimension(200, 110));
		IncolorJPanel.setBackground(null);// 设置背景色透明
		IncolorJPanel.setOpaque(false);
		IncolorJPanel.setLayout(new FlowLayout(FlowLayout.LEFT, 5, 5));
		ColorJPanel.add(IncolorJPanel, BorderLayout.NORTH);
		JLabel InColorLabel = null;
		InColorLabel = createJLabel("颜色", ColorJPanel);

		/*
		 * 粗细设置区域
		 *
		 * @param StrokeJPanel 粗细设置区域面板,界面布局
		 *
		 * @param InStrokeJPanel 粗细设置区域中放置粗细选项的面板,放在StrokeJPanel中,流式布局
		 *
		 * @param InStrokeLabel 粗细设置区域的标签,放在StrokeJPanel中
		 */
		JPanel StrokeJPanel = null;
		StrokeJPanel = createJPanel(InNorthJPanel);
		StrokeJPanel.setPreferredSize(new Dimension(50, 150));
		JPanel InStrokeJPanel = new JPanel();
		InStrokeJPanel.setPreferredSize(new Dimension(50, 110));
		InStrokeJPanel.setBackground(null);
		InStrokeJPanel.setOpaque(false);
		InStrokeJPanel.setLayout(new FlowLayout(FlowLayout.LEFT, 5, 5));
		StrokeJPanel.add(InStrokeJPanel, BorderLayout.NORTH);
		JLabel InStrokeLabel = null;
		InStrokeLabel = createJLabel("粗细", StrokeJPanel);
可能你会发现,我在里面用了createJLabel()和createJPanel(),这是我写的方法,因为在创建过程中很多代码是重复的,自己写两个方法用在里面代码看上去会舒服很多,而且也能少写很多代码。两个方法的具体实现
     private JPanel createJPanel(JPanel InNorthJPanel) {
		JPanel jp = new JPanel();
		jp.setBorder(BorderFactory.createEtchedBorder(new Color(0, 0, 0), new Color(0, 255, 0)));
		jp.setPreferredSize(new Dimension(200, 150));
		jp.setBackground(new Color(240, 240, 240));
		InNorthJPanel.add(jp);
		return jp;
	}

	private JLabel createJLabel(String s, JPanel jp) {
		JLabel jl = new JLabel(s);
		jl.setHorizontalAlignment(JLabel.CENTER);// 设置对其格式剧中
		jl.setFont(new Font("楷体", Font.BOLD, 20));// 设置字体 样式 大小
		jp.add(jl, BorderLayout.SOUTH);
		return jl;
	}
这样上面的边框就做好了,接下来就是贴按钮和文本框之类的了
          /*
		 * 放置按钮
		 */
		String[] typeArray = { "Line", "Oval", "Rect", "RoundRect", "fill3DRect", "fillArc", "Image", "Text", "Pencil",
				"iso_Tri", "Polygon","喷枪", "Erase" };
		Color[] colorArray = { Color.red, Color.black, Color.green, Color.BLUE, new Color(255, 255, 255) };
		String[] widthArray = { "1", "3", "5" };
		JTextField text = new JTextField();
		text.setPreferredSize(new Dimension(100, 30));

		DrawListener dl = new DrawListener(this, text, list);

		for (int i = 0; i < typeArray.length; i++) {
			JButton button = new JButton(typeArray[i]);
			InShapeJPanel.add(button);
			button.addActionListener(dl);
			if(i>=12)
			{
				JButton button1 = new JButton(typeArray[i]);
				InNorthJPanel.add(button);
				button1.addActionListener(dl);
			}
		}
		for (int i = 0; i < colorArray.length; i++) {
			JButton button = new JButton();
			button.setBackground(colorArray[i]);
			button.setPreferredSize(new Dimension(30, 30));
			IncolorJPanel.add(button);
			button.addActionListener(dl);
		}
		for (int i = 0; i < widthArray.length; i++) {
			JButton button = new JButton(widthArray[i]);
			InStrokeJPanel.add(button);
			button.addActionListener(dl);
		}
		InNorthJPanel.add(text);
这样,我们的界面就做好了。