应用场景:
有如下4台主机:
cpy01.dev.xjh.com
cpy02.dev.xjh.com
cpy03.dev.xjh.com
cpy04.dev.xjh.com
cpy01 供开发环境使用,密码为:passwddev
cpy02 供测试环境使用,密码为:passwdpre
cpy03 cpy04 供生产环境使用,密码为:passwdprd
把开发环境和测试环境分到test组,生产环境分到public组;最后将所有主机放在一个ALL组中。
要求对各个分组都能做到统一执行指令
------------------------------------------------------------------------------------------------------------------------
下文将介绍密码和秘钥两种方式对上述场景进行权限认证
公共配置(不管哪种方式需配置如下内容):
vim /etc/ansible/ansible.cfg
inventory = /etc/ansible/hosts #指定主机组的配置文件位置
host_key_checking = False    #关闭主机认证检查,不关闭这个会导致密码变更后,原远程信息保存在known_hosts 中的信息改变,提示认证错误。
                     #需要清除know_hosts 文件的该条访问信息后才能远程。
一、用户名密码认证:
1.1 修改主机组配置文件如下(分组使用"[]",组名使用x_x或x-x ):
vim /etc/ansible/hosts
[dev-hosts]
cpy01.dev.xjh.com
[pre-hosts]
cpy02.dev.xjh.com
[prd-hosts]
cpy03.dev.xjh.com
cpy04.dev.xjh.com
#还可以写成这种方式 cpy[03:04].dev.xjh.com
[test:children]
dev-hosts
pre-hosts
[public:children]
prd-hosts
[all:children]
test
public
1.2 配置用户名密码(一般配置ssh端口、ssh用户名、ssh密码三项):
在分组目录中创建用户名密码认证文件,按自己所需要的分组进行配置,认证文件名要和分组名一致,这里我们按最小分组来做(最小分组有个好处是,大分组包含了小分组,所以密码认证是可行的。但如果按大分组来,若小分组中密码不一致则使用小分组名执行指令部分密码认证不一致的会失效)
vim /etc/ansible/group_vars/dev-hosts
ansible_ssh_port: 22       //分组主机远程端口
ansible_ssh_user: root    //分组主机用户名
ansible_ssh_pass: passwddev                  //分组主机密码

vim /etc/ansible/group_vars/pre-hosts
ansible_ssh_port: 22
ansible_ssh_user: root
ansible_ssh_pass: passwdpre

vim /etc/ansible/group_vars/prd-hosts
ansible_ssh_port: 22
ansible_ssh_user: root
ansible_ssh_pass: passwdprd
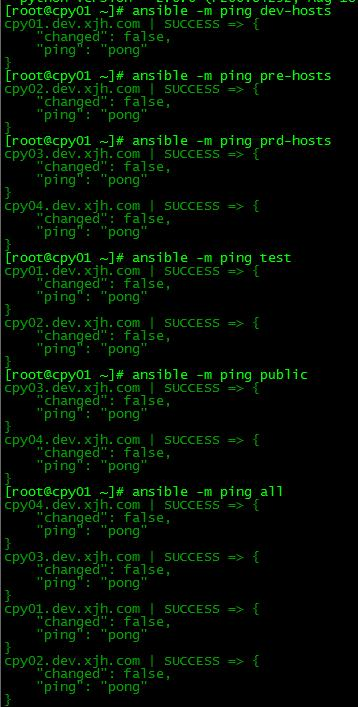
1.3 测试权限配置是否正确:
测试命令:
ansible –m ping <group_name>
二、 秘钥认证:
2.1 四台服务器全开启秘钥认证服务
vim /etc/ssh/sshd_config #将如下内容取消注释
RSAAuthentication yes
PubkeyAuthentication yes
AuthorizedKeysFile      .ssh/authorized_keys
2.2 生成三组秘钥(秘钥默认声称在/root/.ssh/目录中):
ssh-keygen –t rsa –f dev_rsa
ssh-keygen –t rsa –f pre_rsa
ssh-keygen –t rsa -f prd_rsa
2.3 将对应的公钥(.pub 结尾的文件)内容,拷贝到对应组服务器/root/.ssh/authorized_keys 中,每行代表一个公钥认证(没有该文件使用ssh-keygen –t rsa 生成一个,然后将rsa文件删除,创建authorized_keys文件)。
2.4 将所有的私钥文件(dev_rsa|pre_rsa|prd_rsa) 拷贝到ansible服务器的/root/.ssh/ 目录中
2.5 在ansible /root/.ssh/目录下 创建config文件并写入以下内容:
touch /root/.ssh/config
vim /root/.ssh/config
Host cpy01.dev.xjh.com
User root
IdentityFile /root/.ssh/dev_rsa


Host cpy02.dev.xjh.com
User root
IdentityFile /root/.ssh/pre_rsa

Host cpy03.dev.xjh.com
User root
IdentityFile /root/.ssh/prd_rsa

Host cpy04.dev.xjh.com
User root
IdentityFile /root/.ssh/pre_rsa
2.6 重启sshd 服务:
service sshd restart
测试命令:
ansible –m ping <group_name>
