目录
用SQLite语句执行:
利用SQLiteDatabase中自带的增删改查操作:
SQLite数据库的事务介绍:
目录一二的增删改查源码地址:https://github.com/liuchenyang0515/CreateDB3
目录三事务介绍的源码地址:https://github.com/liuchenyang0515/BankTransfer
用SQLite语句执行:
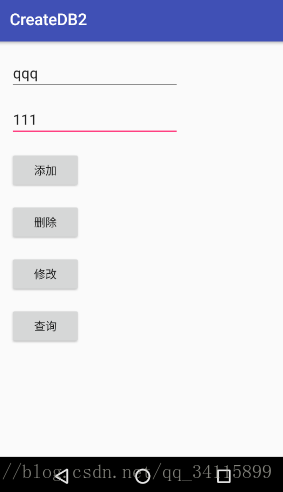
首先看到界面:
代码如下:
MainActivity.java
ContactInfoDao.java
笔记批注:
SQLiteOpenHelper是个抽象类,里面有2个抽象方法onCreate()和onUpdate(),我们必须在自己的帮助类里面重写这2个方法,然后分别在这两个方法中实现创建、升级数据库逻辑。
SQLiteOpenHelper还有2个非常重要的实例方法getReadableDatabase()和getWritableDatabase()。这两个方法都可以创建或者打开一个现有的数据库(如果数据库已存在则直接打开,否则创建一个新的数据库),并返回一个客队数据库进行读写的对象。
不同的是,当数据库不可写入的时候(如磁盘空间已满),getReadableDatabase()方法返回的对象将以只读的方式去打开数据库,而getWritableDatabase()方法将抛出异常。
构建出SQLiteOpenHelper的实例之后,在调用它的getReadableDatabase()和getWritableDatabase()就能够创建数据库了。数据库文件在/data/data/<package name>/databases目录下。
sqlite中是不支持删除列操作的,所以网上 alter table [table_name] drop column [col_name] 这个语句在sqlite中是无效的(这不是MySQL),而替代的方法可以如下:
1.根据原表创建一张新表
2.删除原表
3.将新表重名为旧表的名称
慎用create table as select,比如想删除一列phone
create table aa(id integer primary key autoincrement, name char(20), phone varchar(20));
create table temp as select id, name from aa;
新表中没有旧表中的primary key,Extra,auto_increment等属性,需要自己手动加,具体参看后面的修改表即字段属性.
那么新表temp就没了主键,不会自动增长,查看建表语句integer变成了int, char变成text。
只能创建类似于这样给出明确约束的
CREATE TABLE temp(id INTEGER PRIMARY KEY AUTOINCREMENT, NAME CHAR(20));
MyDBOpenHelper.java
笔记批注:
当我们重新运行程序时,数据库因为已经存在,不会再次创建,所以这个onCreate方法不会再次调用,怎么办呢?当然卸载程序再次运行也可以,这样的做法比较极端。这里就可以用到SQLiteOpenHelper的升级功能了。
db.execSQL("drop table if exists contactinfo");
onCreate(db);
如果存在contactinfo表就删除掉,然后再次调用onCreate方法,如果没有删除直接onCreate,那么系统会发现这张表存在,直接报错。
那么如何让onUpdate()方法能够执行呢?我们这里的MyDBOpenHelper构造器第四个参数是当前数据库的版本号,之前传入的是1,现在只要传入一个比1大的数字即可运行onUpdate方法。
activity_main.xml
当输入数据然后点击添加的时候数据库会被创建(如果数据库还没被创建),数据会添加成功
我们可以把数据库导出到SQLite Expert去查看表内容,也可以直接在控制台查看一个大概,查看数据库和表有没有被创建。
这里只演示在控制台操作。
在Terminal或者在系统控制台输入adb shell
然后进行如下操作:

用cd命令进入到/data/data/com.example.createdb2/databases 目录
注意:7.0及以上的模拟器无法进入com.xxxxxx.xxxxx,没有权限,示例只能在6.0及以下,当然,我们是可以直接找到mydb.db导出,然后用SQLite Expert去查看就更好了。在这里只是演示以下控制台该怎么做。
这个目录中,mydb.db是我们创建的
另一个是mydb.db-journal,这是为了让数据库能够支持事务而产生的临时日志文件,通常情况下这个文件的大小是0字节
接下来输入sqlite3 mydb.db 打开mydb.db数据库
输入.table命令查看数据库中有哪些表,这个android_metadata是每个数据库中都会自动生成的,不用管。
另一张contactinfo是我们在MyDBOpenHelper中创建的。
接着可以用.schema命令查看它们的建表语句。
最后可以输入.exit或.quit命令退出数据库的编辑,再键入exit就可以退出设备控制台了。


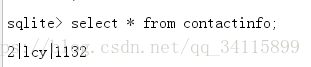
也可以直接写sql语句查询,如图
这里数据库版本是2
补充知识点:改变dos编码方式:chcp 936 //变成GBK编码
chcp 65001 //变成UTF-8编码
利用SQLiteDatabase中自带的增删改查操作:
ContactInfoDao.java
import android.content.ContentValues;
import android.content.Context;
import android.database.Cursor;
import android.database.sqlite.SQLiteDatabase;

import com.example.createdb3.MyDBOpenHelper;

public class ContactInfoDao {

    private final MyDBOpenHelper helper;
    private String TAG = "ContactInfoDao";

    public ContactInfoDao(Context context, String name, SQLiteDatabase.CursorFactory factory, int version) {
        helper = new MyDBOpenHelper(context, name, factory, version);
    }

    /**
     * create table aa(id integer primary key autoincrement, name char(20), phone varchar(20));
     * create table temp as select id, name from aa; //
     * temp表没有了PRIMARY KEY AUTOINCREMENT,查看建表语句CREATE TABLE "temp"(id INT,NAME TEXT);
     * integer变成了int
     * char变成text
     * 新表中没有旧表中的primary key,Extra,auto_increment等属性,需要自己手动加,具体参看后面的修改表即字段属性.
     * 添加一条记录
     *
     * @param name  联系人姓名
     * @param phone 联系人电话
     * @return 返回的是添加在数据库的行号,-1代表失败
     */
    public long add(String name, String phone) {
        SQLiteDatabase db = helper.getWritableDatabase(); // 如果数据库已存在就打开,否则创建一个新数据库
        // db.execSQL("insert into contactinfo (name, phone) values(?, ?)", new Object[]{name, phone});
        ContentValues values = new ContentValues();
        values.put("name", name);
        values.put("phone", phone);
        long rowId = db.insert("contactinfo", null, values);

        // 记得关闭数据库,释放资源
        db.close();
        return rowId;
    }

    /**
     * 根据姓名删除一条记录
     *
     * @param name 联系人姓名
     * @return 返回0代表的是没有做任何记录,返回的整数int值代表删除了几条数据
     */

    public int delete(String name) {
        SQLiteDatabase db = helper.getWritableDatabase();
        // db.execSQL("delete from contactinfo where name = ?", new Object[]{name});
        int rowId = db.delete("contactinfo", "name=?", new String[]{name});
        // 记得关闭数据库,释放资源
        db.close();
        return rowId;
    }

    /**
     * 修改联系人电话号码
     *
     * @param name  联系人姓名
     * @param phone 联系人新电话
     * @return rowId代表更新了多少行记录
     */

    public int update(String phone, String name) {
        SQLiteDatabase db = helper.getWritableDatabase();
        // db.execSQL("update contactinfo set phone = ? where name = ?;", new Object[]{phone, name});
        ContentValues values = new ContentValues();
        values.put("phone", phone);
        int rowId = db.update("contactinfo", values, "name = ?", new String[]{name});
        // 记得关闭数据库,释放资源
        db.close();
        return rowId;
    }

    /**
     * 查询联系人的电话号码
     *
     * @param name 联系人姓名
     * @return 电话号码
     */
    public Cursor query(String name) {
        SQLiteDatabase db = helper.getReadableDatabase();
        // Cursor cursor = db.rawQuery("select phone from contactinfo where name = ?", new String[]{name});
        /*Cursor cursor = db.query("contactinfo", new String[]{"phone"}, "name = ?", new String[]{name}, null, null, null);
        String phone = null;
        if (cursor.moveToNext()) {
            phone = cursor.getString(0);
        }*/
        Cursor cursor = db.query("contactinfo", null, "name = ?", new String[]{name}, null, null, null);
        // 记得关闭数据库,释放资源
        // db.close();// 当用ContentProvider返回一个Cursor时,db是不能关闭的
        // 否则抛出java.lang.IllegalStateException: Cannot perform this operation because the connection pool has been closed.
        return cursor;
    }
}
再把MainActivity.java里面的query()方法改掉就行了

添加同一个人多次时可以一次查出来。
注意:当用ContentProvider返回一个Cursor时,db是不能关闭的,否则抛出异常java.lang.IllegalStateException: Cannot perform this operation because the connection pool has been closed.
笔记批注:
public long insert (String table, String nullColumnHack, ContentValues values)
table:要插入行的表
nullColumnHack:任意性;可能是null。SQL不允许插入一个完全空的行,而不至少命名一个列名。如果你提供values为空,不知道列名,也无法插入空行。如果未将其设置为空,则nullColumnHack参数提供可空列名的名称,以便在values是空的。
values:此映射包含行的初始列值。键应该是列名,值应该是列值。
public int delete (String table, String whereClause, String[] whereArgs)
删除数据库中行的方便方法。
table:要从其中删除的表
whereClause:删除时要应用的可选WHERE子句。传递NULL将删除所有行。
whereArgs:您可以在WHERE子句中包括?s,该子句将由WHERE Args的值替换。这些值将被绑定为String。
public int update (String table, ContentValues values, String whereClause, String[] whereArgs)
更新数据库中行的方便方法。
table:要更新的表
values:从列名到新列值的映射。NULL是将被转换为NULL的有效值。
whereClause:更新时要应用的可选WHERE子句。传递NULL将更新所有行。
whereArgs: 您可以在WHERE子句中包括?s,该子句将由WHERE Args的值替换。这些值将被绑定为String。
public Cursor query (String table, String[] columns, String selection, String[] selectionArgs, String groupBy,
String having, String orderBy)
查询给定的URL,返回Cursor结果集。
table:要编译查询的表名。
columns:返回哪些列的列表。传递NULL将返回所有列,这是不鼓励的,以防止从存储区读取不被使用的数据。
selection:一个过滤器,声明要返回的行,格式化为SQLWHERE子句(不包括WHERE本身)。传递NULL将返回给定表的所有行。
selectionArgs:您可以在选择中包括?s,它将被selectionArgs的值替换,以便它们出现在所选内容中。这些值将被绑定为String。
groupBy:一个过滤器,声明如何分组行,格式化为SQL GROUP BY子句(本身不包括组)。传递NULL将导致行不被分组。
having:如果正在使用行分组,则筛选器将声明要在游标中包含哪些行组,格式为SQL HARING子句(不包括HAVING本身)。传递NULL将导致包括所有行组,并且在不使用行分组时是必需的。
orderBy:如何对行进行排序,格式化为SQLOrderBy子句(不包括Order本身)。传递NULL将使用默认排序顺序,排序顺序可能是无序的。
query有4个重载方法,建议查官方api。
SQLite数据库的事务介绍:
MainActivity.java
import android.content.ContentValues;
import android.database.Cursor;
import android.database.sqlite.SQLiteDatabase;
import android.os.Bundle;
import android.support.v7.app.AppCompatActivity;
import android.util.Log;
import android.view.View;
import android.widget.EditText;
import android.widget.Toast;

public class MainActivity extends AppCompatActivity {
    private String TAG = "MainActivity";
    private MyOpenHelper helper;
    private EditText editText1, editText2, editText3;
    private String table = "info";

    @Override
    protected void onCreate(Bundle savedInstanceState) {
        super.onCreate(savedInstanceState);
        setContentView(R.layout.activity_main);
        helper = new MyOpenHelper(this, table, null, 1);
        editText1 = (EditText) findViewById(R.id.editText1);
        editText2 = (EditText) findViewById(R.id.editText2);
        editText3 = (EditText) findViewById(R.id.editText3);
    }

    public String queryColumn(Cursor cursor, String s) {
        String ss = null;
        if (cursor.moveToFirst()) { // 必须moveToFirst()否则异常
            ss = cursor.getString(cursor.getColumnIndex(s));
        }
        return ss;
    }

    public void onclick(View view) {
        SQLiteDatabase db = helper.getReadableDatabase();
        String name1 = editText1.getText().toString().trim();
        String name2 = editText2.getText().toString().trim();
        String str = editText3.getText().toString().trim();
        // 使用事务进行转账
        db.beginTransaction(); // 开启事务
        try {
            Cursor cursor = db.query(table, new String[]{"money"}, "name = ?",
                    new String[]{name1}, null, null, null);
            int money = Integer.valueOf(queryColumn(cursor, "money"));
            // 实现转账的逻辑,实际就是写sql语句
            //db.execSQL("update info set money = money - ? where name = ?", new Object[]{str, name1});
            ContentValues values = new ContentValues();
            int remain = money - Integer.valueOf(str);
            if (remain < 0) {
                Toast.makeText(this, "您的余额不足,转账失败", Toast.LENGTH_SHORT).show();
                return;
            }
            values.put("money", remain + "");
            db.update(table, values, "name = ?", new String[]{name1});

            // int i = 9 / 0; // 让事务回滚示例

            // db.execSQL("update info set money = money + ? where name = ?", new Object[]{str, name2});
            cursor = db.query(table, new String[]{"money"}, "name = ?",
                    new String[]{name2}, null, null, null);
            int money1 = Integer.valueOf(queryColumn(cursor, "money"));
            ContentValues values1 = new ContentValues();
            int remain1 = money1 + Integer.valueOf(str);
            if (remain1 < 0) {
                return;
            }
            values1.put("money", remain1 + "");
            db.update(table, values1, "name = ?", new String[]{name2});

            // 转账之后的cursor
            cursor = db.query(table, new String[]{"money"}, "name = ?",
                    new String[]{name1}, null, null, null);
            String query1 = queryColumn(cursor, "money");
            cursor = db.query(table, new String[]{"money"}, "name = ?",
                    new String[]{name2}, null, null, null);
            String query2 = queryColumn(cursor, "money");
            cursor.close();
            Log.d(TAG, name1 + "账户余额:" + query1 + "\n");
            Log.d(TAG, name2 + "账户余额:" + query2 + "\n");
            Toast.makeText(this, name1 + "账户余额:" + query1 + "\n" + name2 + "账户余额:" + query2, Toast.LENGTH_LONG).show();
            // 给当前事务设置一个成功的标记
            db.setTransactionSuccessful();
        } catch (Exception e) { // 有catch不至于程序崩溃
            Toast.makeText(this, "服务器忙,请稍后再试", Toast.LENGTH_SHORT).show();
        } finally {
            db.endTransaction(); // 关闭事务,如果未执行setTransactionSuccessful,则回滚
        }
    }
}
MyOpenHelper.java
activity_mainxml

========================================Talk is cheap, show me the code=======================================