从网上虽然能找到很多关于appium iOS自动化的资料,但许多已经过时了。有用的信息也较为分散。鉴于自己摸索了这么长时间,踩过了许多坑,所以写篇文章整理下appium iOS从入门到会基本的使用的经验。纪念下我那些白瞎的抓狂时光。网上找到的很
1. appium介绍
appium是目前最为流行的app自动化工具。appium及appium周边工具有:
- appium服务器:appium工具的主体,用来运行我们写的自动化case代码
- appium-doctor:可用于检查本地环境中appium依赖的工具和配置是否完备
- xcuitest:Apple官方支持的iOS平台上的自动化工具
- WebDriverAgent(wda):facebook开源的支持iOS自动化的代理工具,底层通过xcuitest来实现自动化。appium的iOS自动化即使用了wda来实现
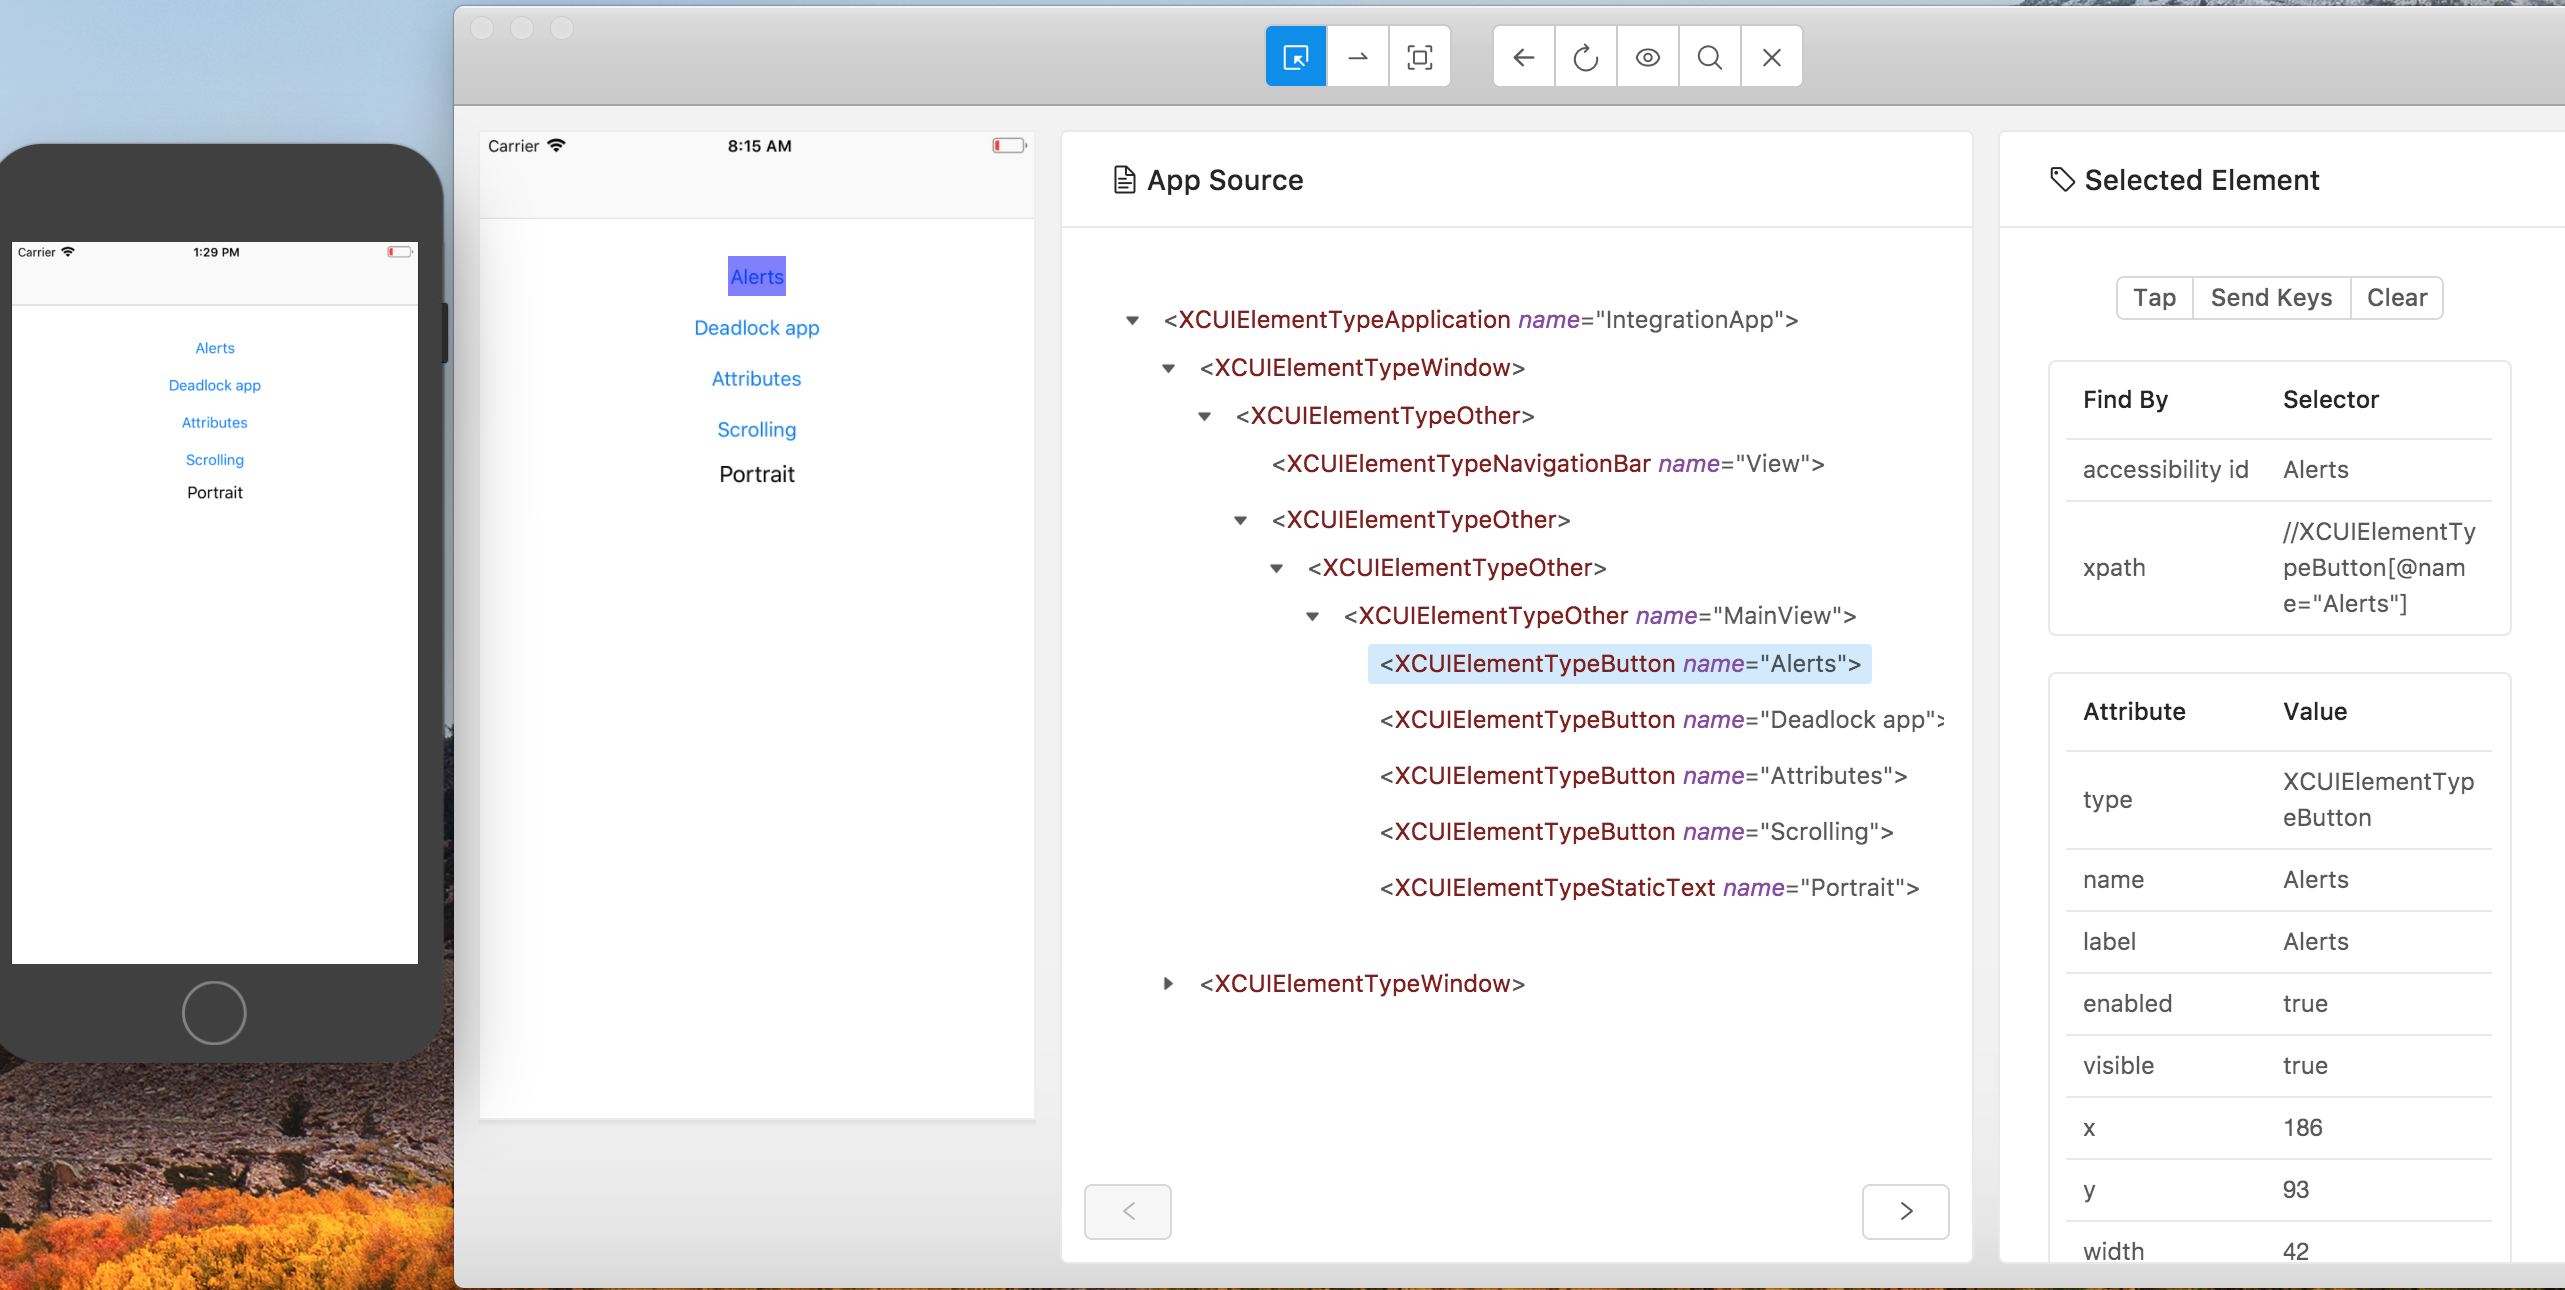
- inspector:wda启动后,可使用启动后日志中提示的url来访问该工具,通常为http://localhost:8100/inspector。此工具左边为iOS设务或模拟器的屏幕映射,中间为元素的层级结构,右边为某个元素的信息。
- appium desktop: 一个桌面工具,可用来启动appium服务器和查看真机或模拟器的页面元素,查看到的信息wda提供的inspector类似。appium可通过npm安装,也可以通过此dmg安装。可查看xpath。npm可以安装最新的beta版本的appium,dmg一般安装的是稳定版本的appium。
- macaca app-inspector:阿里开源的一个工具,可用来查看真机的页面元素。比wda的inspector多一个xpath信息。iOS自动化时,常使用xpath来定位元素。和appium desktop比,没啥额外的功能。
2. 安装appium及周边工具介绍
根据appium github上的入门指导,https://github.com/appium/appium里的Get Start,安装appium环境主要分为以下几步:
- 安装appium:可使用npm安装,也可使用appium桌面安装包安装。如果使用ios模拟器来做自动化,因为ios版本通常较新,所以推荐使用npm安装最新的beta版本的appium。否则可能会出现不能支持的情况。需要注意的事,使用npm install -g appium时,安装得是最新的稳定版本的appium。安装beta版本的appium,需要指定具体的版本号。可参看此文章 appium for Mac环境准备篇 文章中提到速度较慢的解决办法,除了FQ,还可以尝试换一个node源。
npm config set registry https://registry.npm.taobao.org推荐使用淘宝的node镜像。用国外的镜像地址,npm安装appium的时候会很慢。具体可参考 https://npm.taobao.org 。使用appium desktop安装也挺方便的,还提供一个inspector。
- appium-doctor: 安装命令 cnpm install -g appium-doctor。一开始我使用npm install -g appium-doctor安装,提示我权限不足。尝试使用sudo npm install -g appium-doctor安装,也还是提示权限不足。虽然不抱什么希望,但还是尝试使用 cnpm install appium-doctor安装。倒是没提示有错误,但是使用appium-doctor启动检查时,报找不到命令。最后发现没有安装到全局造成的调用不成功。最后使用npm install -g appium-doctor安装成功。
- 特定的driver:常见前端自动化主要有iOS 和 Android设备。做iOS app自动化,需要安装The XCUITest Drive(for iOS apps);android需要安装The UiAutomator2 Driver(for Android apps)。在安装appium的时候,会带有这些driver,不需要额外安装。这篇文章里,我们主要了解下xcuitest driver。根据appium的xcuitest driver github介绍,使用xctest需要满足以下条件:
-
- iOS真机和模拟器从iOS 9.3以后开始支持xcuitest这个自动化测试工具。
- MAC上的操作系统macOS需要是 10.11 或 10.12,理解成>=10.11就可以吧
- Xcode的版本需>=7
- Appium的版本需>=1.6
- xcuitest driver所需的支持库需要安装完备
在使用xctest之前,app平台支持的uiautomator。
- appium client:以上仅安装了appium服务器,还需要一个client将我们写的case代码发送给服务器。appium支持多种编程语言,各自使用不同的client。如java语言使用java-client;python语言使用python-client。client下载与安装是通过maven管理的。我们的case工程是一个maven工程,在pom.xml文件中,加入
<dependency>
    <groupId>io.appium</groupId>
    <artifactId>java-client</artifactId>
    <version>6.0.0-BETA4</version>
    <scope>test</scope>
</dependency>
WebDriverAgent(wda) appium下载完成后,会自带一个wda。appium主要使用wda与ios设备进行通信。不知道为什么,放在appium目录下的wda工程不能编译通过,但同样的目录放在其他地方就编译成功了。还没研究出来原因。不过这倒也不影响我们正常使用appium。
3. 运行
我们要运行一个demo case来验证本地环境。首先,我们要有一个可用的真机或模拟器。其次,我们要把被测app安装上去。第三,我们需要知道app上的元素如何定位。第四,我们写一个test case来完成一些操作,再验证某个测试点。第五,启动appium服务器。第六,运行case。
3.1 真机 VS 模拟器
iOS自动化,即可以跑在模拟器上,也可以跑在真机上。如果对ios自动化或开发不熟悉,我推荐从模拟器开始。这样门槛会低一点。
3.1.1 真机
因为跑在真机上的app需要使用证书签名,所以运行自动化的时候,需要对使用的wda使用与app相同的签名进行重签名。如何进行重签名呢?具体可以参考这篇文章《前端app自动化相关》里关于webdriveragent重签名的部分。启动wda的时候,除用命令行外,也可以点击工具栏中的Product - Test 或在/usr/local/lib/node_modules/appium/node_modules/appium-xcuitest-driver目录下运行 xcodebuild -project WebDriverAgent.xcodeproj -scheme WebDriverAgentRunner test命令。
除重签名外,真机使用的机器也需要加入到签名使用的证书下。否则也无法成功运行wda。真机上安装的包以.ipa为后缀。
如果未重签名,appium会提示Unable to launch WebDriverAgent because of xcodebuild failure: xcodebuild failed with code 65,让我们去看https://github.com/appium/appium-xcuitest-driver/blob/master/docs/real-device-config.md这里的指导。我发现如果中使用单纯的wda,按这个文档里的方式可走通。但是在appium里wda,完全按这个来,就会有各种错误…… 比如,使用./Scripts/bootstrap.sh -d 这个命令的时候,就会发现wda编译不通过。后来发现,直接使用原目录下的WebDriverAgent.xcodeproj,修改证书为个人证书,修改WebDriverAgentRunner的bundle为唯一,重新编译就能成功了。再使用xcodebuild -project WebDriverAgent.xcodeproj -scheme WebDriverAgentRunner -destination 'id=<udid>' test能就成功连接真机了。
3.1.2 模拟器
安装在模拟器上的app不需要签名,所以在模拟器上运行环境搭建会稍微简单一些。因为被测app是公司的app,所以我先使用xcode将源代码编译通过后,使其运行在某个选中的模拟器,如iPhone 8 Plus。至此,模拟器上有了我的被测app。模拟器上安装的包以.app为后缀。可以在xcode的编译结果中找到本地.app包的位置。自动化的时候需要使用。
3.2 iOS元素定位
可以使用appium desktop里带的appium inspector来查看元素信息,主要有accessibility id, xpath,name,label等。官方示例里的app(http://appium.s3.amazonaws.com/TestApp7.1.app.zip) 的元素如下图所示。常用的定位元素有accessibility id,xpath。appium不推荐使用xpath,xpath容易变动,易引起case的不稳定。
3.3 Demo case
3.3.1 Appium desired capability
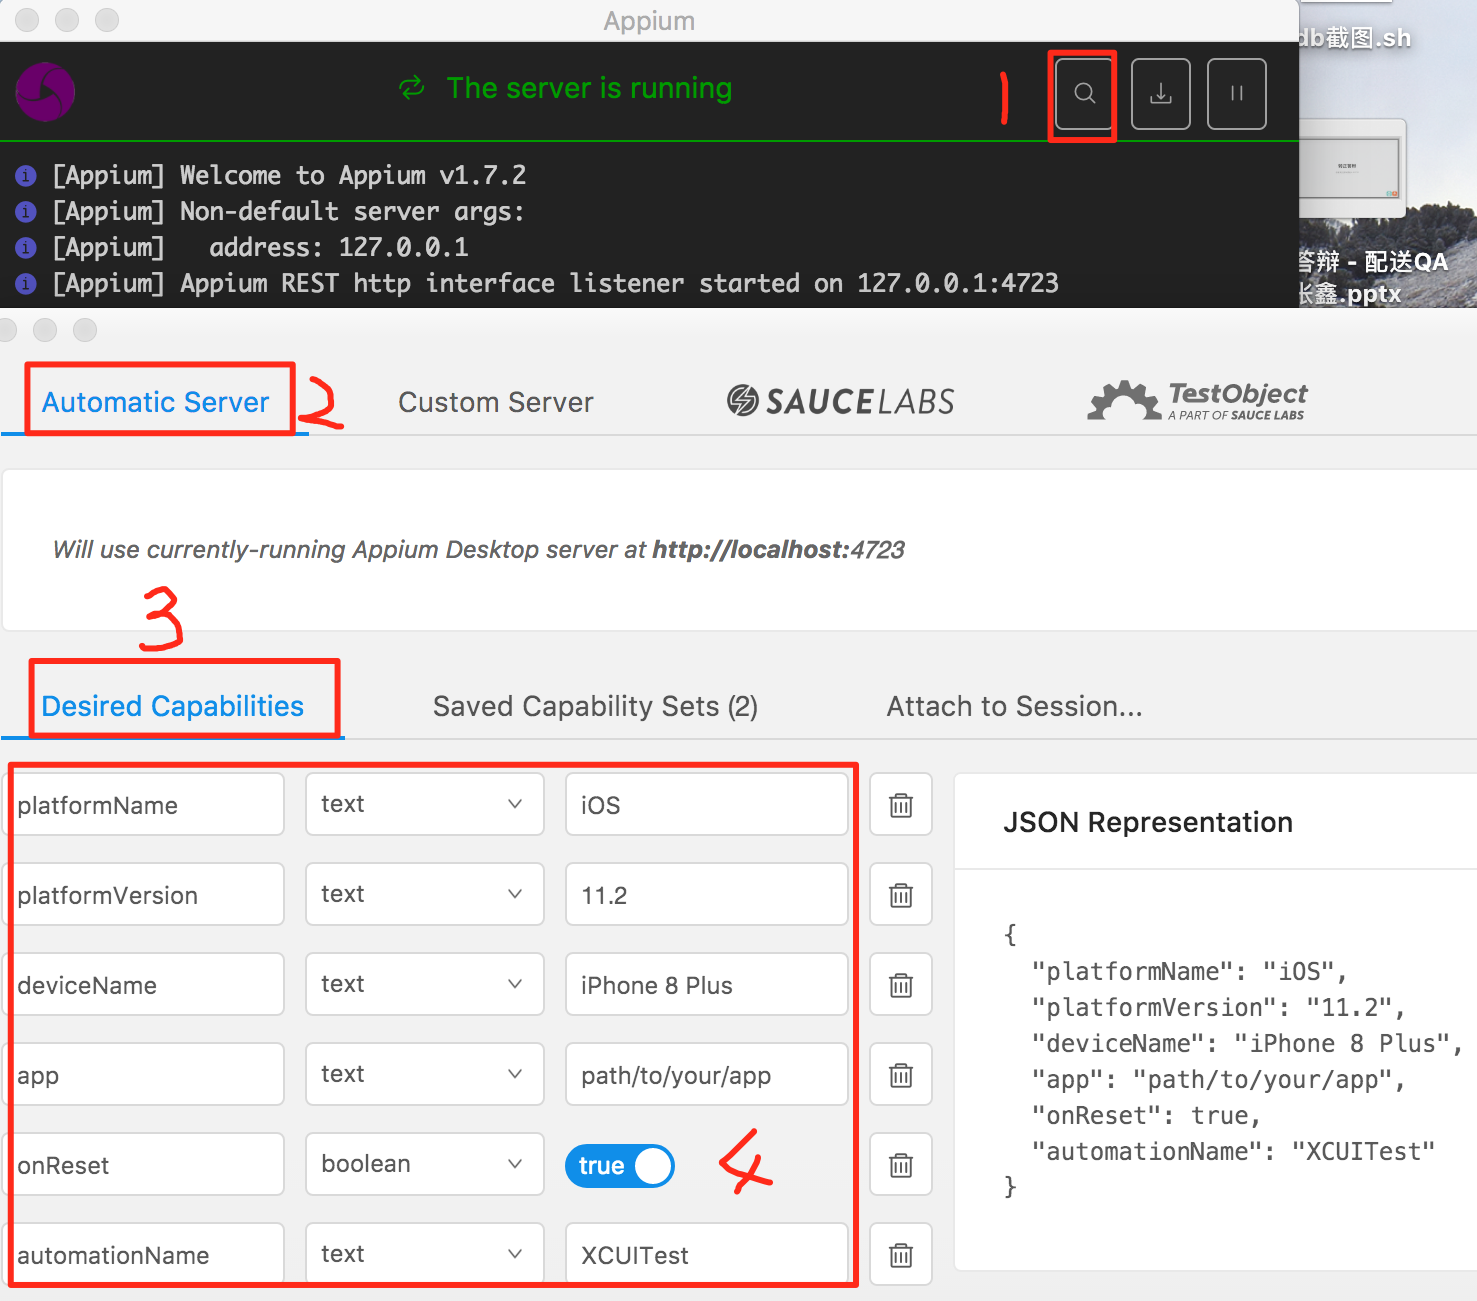
写case第一步,即是要连接上安装有被测app的模拟器或真机设备。我们需要在capability文件中指明要连接设备信息。文件内容通过如下:
|
1
2
3
4
5
6
7
|
{
"platformName"
:
"iOS"
,
"platformVersion"
:
"11.0"
,
"deviceName"
:
"iPhone 7"
,
"automationName"
:
"XCUITest"
,
"app"
:
"/path/to/my.app"
}
|
当被测app是第三方应用时,在模拟器上,app 应为绝对路径或指向app或.app.zip文件的url;无需填udid信息。在真上运行时,可填app或bundleId信息,且必须填入真机的udid信息。当被测app是apple的应用,如safari时,不填app或bundleId,而填"browserName": "Safari"。更多更全的capability内容可见 Appium Desired Capabilities.
如果使用appium desktop1.4.1 的inspector,启动appium(点击start servier。与命令行中使用appium效果相同。若先在命令行中启动appium,再通过desktop启动时,会报端口被占用的错误)后,点击右上角的这么大镜符号,即进入inspector界面。如果启动appium时使用默认配置,可选automatic server。需要编辑正确的capability文件才可连接到被测设备上。注意,iOS9.3以后的被测系统,需要加入automationName=XCUITest的配置。
连接成功后,即可看到如3.2中展示的页面元素信息。
3.3.2 java demo case
Appium API Documents给出了常用的appium api,写case必备知识呀。 我使用idea编程,输入driver.后,会自动提示所有支持的api。如果有不明白的地方,可以来查官方给出的documents。
|
1
2
3
4
5
6
7
8
9
10
11
12
13
14
15
16
17
18
19
20
21
22
23
24
25
26
27
28
29
30
31
32
33
34
35
36
37
38
39
40
41
42
43
44
45
46
47
48
|
package com.banma.crowdsource.autotest.cases;
import io.appium.java_client.MobileBy;
import io.appium.java_client.MobileElement;
import io.appium.java_client.ios.IOSDriver;
import org.openqa.selenium.WebDriver;
import org.openqa.selenium.remote.DesiredCapabilities;
import org.testng.Assert;
import org.testng.annotations.AfterClass;
import org.testng.annotations.BeforeClass;
import org.testng.annotations.Test;
import java.net.URL;
import java.util.concurrent.TimeUnit;
public
class
DemoTestCase {
WebDriver driver;
@BeforeClass
public
void
setUp() throws Exception{
DesiredCapabilities capabilities =
new
DesiredCapabilities();
capabilities.setCapability(
"deviceName"
,
"iPhone 8 Plus"
);
capabilities.setCapability(
"platformVersion"
,
"11.3"
);
capabilities.setCapability(
"platformName"
,
"iOS"
);
capabilities.setCapability(
"bundleId"
,
"com.xxx.xxx"
);
capabilities.setCapability(
"automationName"
,
"XCUITest"
);
driver =
new
IOSDriver(
new
URL(
"http://0.0.0.0:4723/wd/hub"
),
capabilities);
}
@AfterClass
public
void
tearDown(){
driver.quit();
}
@Test
public
void
testDemo1() throws Exception{
driver.manage().timeouts().implicitlyWait(10, TimeUnit.SECONDS);
//隐式等待
MobileElement fieldOne = (MobileElement)driver.findElement(By.xpath(
"//XCUIElementTypeStaticText[@name=\"哈哈哈\"]"
));
fieldOne.click();
MobileElement filedTwo = (MobileElement)driver.findElement(MobileBy.AccessibilityId(
"完成"
));
driver.manage().timeouts().implicitlyWait(10, TimeUnit.SECONDS);
//隐式等待
filedTwo.click();
filedTwo = (MobileElement)driver.findElement(MobileBy.AccessibilityId(
"登录"
));
Assert.assertTrue(filedTwo !=
null
,
"haha"
);
}
}
|
看许多例子里有driver.findElementByAccessibility这种方法,但我看ide里并没有这种提示。只有两个方法,driver.findElemnet 和 driver.findElements。前者返回一个元素,后者返回一个list。参数里,使用 By 是selenium提示的方法来定位页面元素。使用 MobileBy 使用java_client里提供的方法来定位app上的元素。case里使用的是testng框架来管理测试case。
3.4 启动appium服务器
在命令行中,输入appium即可启动。使用appium desktop,点击start server也可启动appium服务器。desktop上可自己配置连接的appium服务器。本机上,通过 npm和dmg安装的appium处于不同的目录下,通过命令行启动的是npm安装的appium;通过图标启动的是dmg安装的appium。inspector通过host port等信息,决定连接哪个服务器。
3.5 运行case
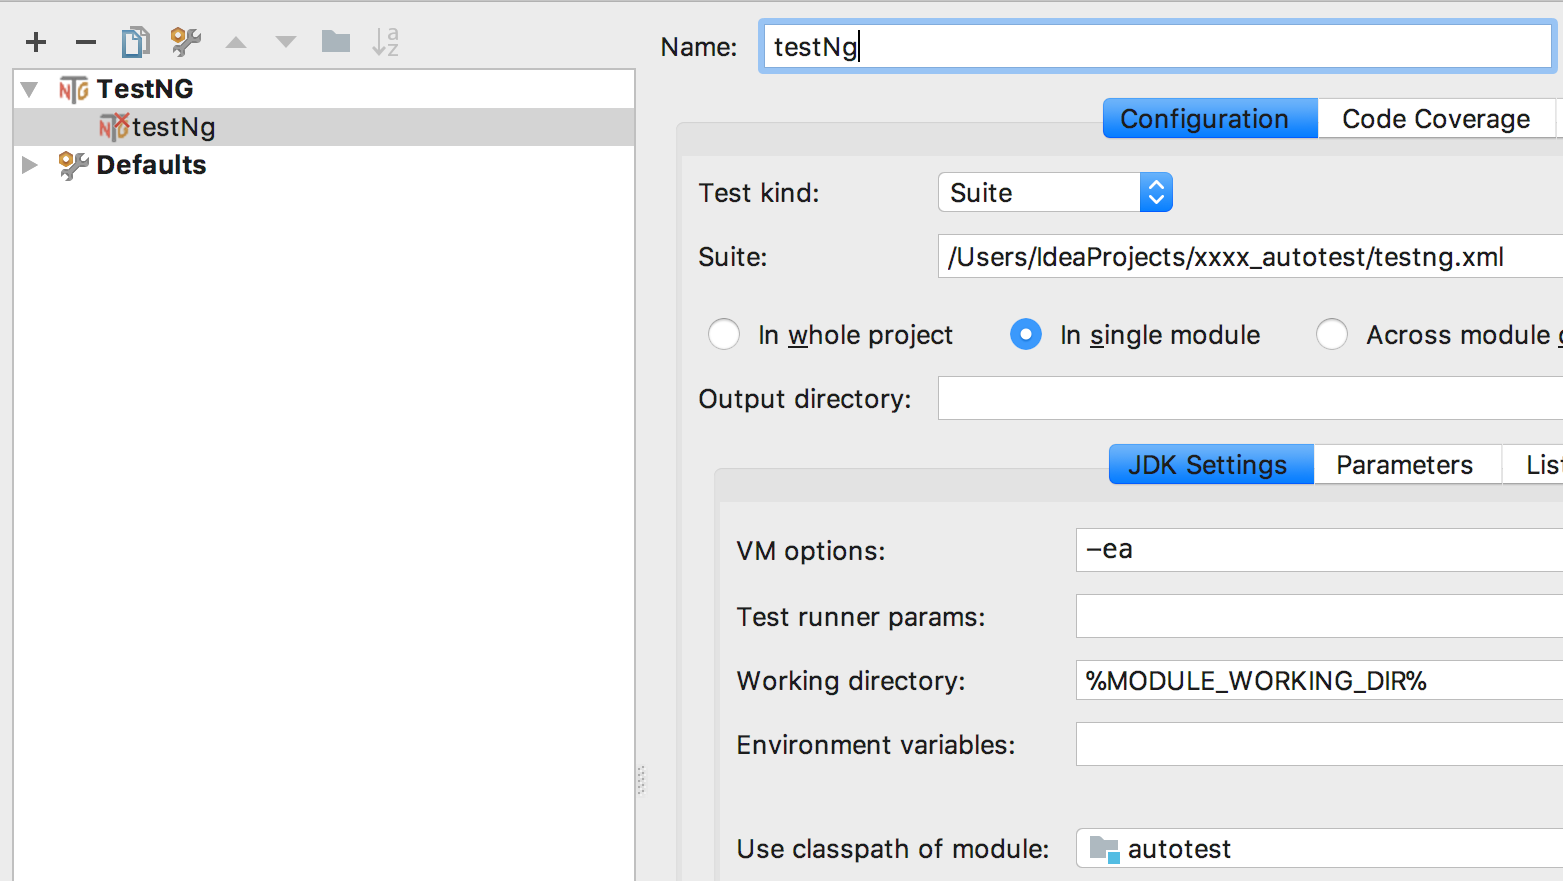
使用maven + testNg + appium来写的case。因为使用了testNg,所以运行时配置好正确的suite路径。
testng.xml内容为:

<?xml version="1.0" encoding="UTF-8"?>
<!DOCTYPE suite SYSTEM "http://testng.org/testng-1.0.dtd">
<suite name="TestSuite" parallel="false" junit="false" guice-stage="DEVELOPMENT" configfailurepolicy="skip" skipfailedinvocationcounts="false" group-by-instances="false" preserve-order="true" allow-return-values="false">
    <test name="crowdsource" preserve-order="true">
        <classes>
            <class name="xxx.autotest.cases.DemoTestCase"/>
        </classes>
    </test>
</suite
目录结构为:

pom.xml内容为:
<?xml version="1.0" encoding="UTF-8"?>
<project xmlns="http://maven.apache.org/POM/4.0.0"
             xmlns:xsi="http://www.w3.org/2001/XMLSchema-instance"
             xsi:schemaLocation="http://maven.apache.org/POM/4.0.0 http://maven.apache.org/xsd/maven-4.0.0.xsd">
    <modelVersion>4.0.0</modelVersion>

    <groupId>com.banma.crowdsource.autotest</groupId>
    <artifactId>autotest</artifactId>
    <version>1.0-SNAPSHOT</version>

    <build>
        <plugins>
            <plugin>
                <groupId>org.apache.maven.plugins</groupId>
                <artifactId>maven-compiler-plugin</artifactId>
                <configuration>
                    <encoding>UTF-8</encoding>
                    <source>1.8</source>
                    <target>1.8</target>
                </configuration>
            </plugin>

            <plugin>
                <artifactId>maven-assembly-plugin</artifactId>
                <configuration>
                    <archive>
                        <manifest>com.allen.capturewebdata.Main</manifest>
                    </archive>
                    <descriptorRefs>
                        <descriptorRef>jar-with-dependencies</descriptorRef>
                    </descriptorRefs>
                </configuration>
            </plugin>

            <plugin>
                <groupId>org.apache.maven.plugins</groupId>
                <artifactId>maven-surefire-plugin</artifactId>
                <version>2.5</version>
                <configuration>
                    <suiteXmlFiles>
                        <suiteXmlFile>testng.xml</suiteXmlFile>
                    </suiteXmlFiles>
                </configuration>
            </plugin>

            <plugin>
                <groupId>org.apache.maven.plugins</groupId>
                <artifactId>maven-jar-plugin</artifactId>
                <version>2.2</version>
                <executions>
                    <execution>
                        <goals>
                            <goal>test-jar</goal>
                        </goals>
                    </execution>
                </executions>
            </plugin>
        </plugins>
    </build>

    <dependencies>
        <dependency>
            <groupId>org.testng</groupId>
            <artifactId>testng</artifactId>
            <version>6.9.10</version>
        </dependency>

        <dependency>
            <groupId>com.sankuai.conan.appiumauto</groupId>
            <artifactId>appium-testcase</artifactId>
            <version>1.4.9</version>
        </dependency>

        <dependency>
            <groupId>io.appium</groupId>
            <artifactId>java-client</artifactId>
            <version>5.0.4</version>
            <exclusions>
                <exclusion>
                    <groupId>com.google.guava</groupId>
                    <artifactId>guava</artifactId>
                </exclusion>
            </exclusions>
        </dependency>
    </dependencies>
</project>
4. 我踩过的各种坑
4.1 使用desktop的inspector,提示内部错误:找不到wda里的某头文件
查看了确实没有该文件。于是觉得是appium里的带的wda不对。正好有新发布的appium desktop1.4.1,于是把正在使用的1.3.2换掉了。
4.2 使用desktop的inspector,提示内部错误:Could not navigate to webview!
具体错误:Encountered internal error running command: Error: Could not navigate to webview! Err: connect ECONNREFUSED ::1:27753
因为刚装好appium,想试下环境,所以使用模拟器,使用inspector看下Safari。于写capability文件内容:
|
1
2
3
4
5
6
7
8
|
{
"platformName"
:
"iOS"
,
"platformVersion"
:
"11.3"
,
"deviceName"
:
"iPhone 8 Plus"
,
"browserName"
:
"Safari"
,
"onReset"
:
true
,
"automationName"
:
"XCUITest"
}
|
google了下,发现都说ios-webkit-debug-proxy没有开启。于是,安装工具 brew install ios-webkit-debug-proxy。但还是失败。再查发现,需要把 设置->Safari->Advnced->Web inspector打开。这就搞笑了,因为我在我的模拟器上找不到此开关!后来发现,可能是ios11.3的操作系统中,把此开关去掉了。
怎么办,只有凉办…… 本来测试的也不是Safari,只能不再拿这个做研究了。
4.3 使用desktop的inspector,不断地[XCUITest] Failed to create WDA session. Retrying...
使用另外一个官方capability的例子,
{
  "platformName": "iOS",
  "platformVersion": "11.3",
  "deviceName": "iPhone 8 Plus",
  "app": "http://appium.s3.amazonaws.com/TestApp7.1.app.zip",
  "onReset": true,
  "automationName": "XCUITest"
}
发现,不断是重试连接。于是忍无可忍,我准备直接使用appium里的wda看下。进入工程:/Applications/Appium.app/Contents/Resources/app/node_modules/appium/node_modules/appium-xcuitest-driver/WebDriverAgent ,运行命令./Scripts/bootstrap.sh 通过后,使用xcode打开该工程。编译后,test运行。发现这个wda启动的server地址居然是http://ip:0。这个端口有问题呀,默认的应该是8100呀。于是搜索了下,发现https://github.com/appium/appium/issues/8888。 解决办法就是:
My feeling is that the issue is with a mismatch of WDA and the code that starts it and sends command to it. We now have to launch with a port, and I think the calling code you have does not do so but WDA expects it. So no port is there.

If, from the terminal, you run

cd /Applications/Appium.app/Contents/Resources/app/node_modules/appium
rm -rf node_modules/appium-xcuitest-driver
npm install appium-xcuitest-driver

then it should update correctly.
不但问题依旧,而且还出现了编译检查错误。报
/Applications/Appium.app/Contents/Resources/app/node_modules/appium/node_modules/appium-xcuitest-driver/WebDriverAgent/Inspector/js/tree_node.js
11:19 error Missing space before function parentheses space-before-function-paren 。google这个问题后,https://github.com/facebook/WebDriverAgent/issues/482这里发现,wda的开发人员建议直接从github上拉wda的代码,还说This is Appium issue in nesting WDA inside it. If you fetch WDA independently it will work. Please raise a ticket on Appium repo. 看来可能真是appium有问题。
于是想,我自己下载一个最新的wda,然后替换到appium里。于是从github上下载facebook wda的原码。放在桌面上,能编译通过。运行也没问题。想着替换到appium的相应位置就大功告成了,没想到自己天真了。wda移到appium相应的位置后,发现编译都无法通过...
没有办法,只能去github上appium的提问专区去搜索有没有人遇到和我一样的问题。https://github.com/appium/appium/issues 在这里,我找到一条与我类似的问题https://github.com/appium/appium/issues/10455,appium1.7.2 ios11.3,无法与Safari进行通信。解答中说,ios系统的改动较大,需要使用appium1.8.x-beta。于是,我npm install -g [email protected]。安装成功后,在4725端口启动。然后inspector连到该端口。使用capability文件:
{
  "platformName": "iOS",
  "platformVersion": "11.3",
  "deviceName": "iPhone 8 Plus",
  "browserName": "Safari",
  "onReset": true,
  "automationName": "XCUITest"
}
然后,inspector就华丽丽的成功了!感觉真是妙呀,太棒了!忙和了这么久,原来是ios新的操作系统导致的问题。稳定版本的appium为1.7.2,这个版本已经不能正常工作在ios 11.3上了。不断变化的世界里,尝试新鲜的版本还是很有好处的嘛。
4.4 inspector无法启动app
连上了Safari,当然得再试下普通的app啦。使用capability文件:
|
1
2
3
4
5
6
7
8
9
10
11
12
13
14
15
16
17
18
19
20
21
22
23
24
25
26
|
{
"platformName"
:
"iOS"
,
"platformVersion"
:
"11.3"
,
"deviceName"
:
"iPhone 8 Plus"
,
"app"
:
"/Users/sunmin/Desktop/UI_automation/xxxx.app.zip"
,
"onReset"
:
true
,
"automationName"
:
"XCUITest"
}
或
{
"platformName"
:
"iOS"
,
"platformVersion"
:
"11.3"
,
"deviceName"
:
"iPhone 8 Plus"
,
"app"
:
"http://appium.s3.amazonaws.com/TestApp7.1.app.zip"
,
"onReset"
:
true
,
"automationName"
:
"XCUITest"
}
或
{
"platformName"
:
"iOS"
,
"platformVersion"
:
"11.3"
,
"deviceName"
:
"iPhone 8 Plus"
,
"bundleId"
:
"com.xxx.xxx"
,
"onReset"
:
true
,
"automationName"
:
"XCUITest"
}
|
发现inspector都无法成功。使用本地的.app文件,提示找不到文件。但我去指定目录下,该文件确实存在。可能是使用路径上有中文的原因,使appium找不到吧。于是我尝试使用官方case里的远程app。发现可以安装上,但appium server服务器上的日志显示,发出请求后,一直处于等待状态。没办法,我尝试使用bundleId来连接,也不能成功。最后的最后,我只能用xcode编译运行被测app,将被测app安装到模拟器上。然后使用inspector连接Safari,再手动打开模拟器上的被测app,使用inspector来看被测app的页面元素。